
Heim >Web-Frontend >View.js >So verwenden Sie die Vue3-Tabellenkomponente
So verwenden Sie die Vue3-Tabellenkomponente

- 王林nach vorne
- 2023-05-12 21:40:121234Durchsuche
Grundlegende Tabelle
Bevor Sie die Tabellenkomponente entwickeln, überlegen Sie zunächst, welche Art von API Sie verwenden möchten. Da der Autor Element in der Produktionsarbeit verwendet, ähneln die Stile der vorherigen Komponenten denen von Element, dies habe ich jedoch nicht vor Verwenden Sie dieses Mal Element. Ich habe vor, es zu ändern und direkt anzuzeigen:
Wir erwarten, dass Benutzer es so verwenden:
<script setup>
const dataList = [
{
id: 1,
name: '《JavaEE企业应用实战》',
author: 'dev1ce',
price: '10.22',
desc: '书中最后讲解的项目案例,涵盖从前期设计到最终实施的整个过程,对全书知识点进行串联和巩固,使读者融会贯通,掌握Java Web开发的精髓。'
},
{
id: 2,
name: '《代码整洁之道》',
author: 'R0bert',
price: '10.22',
desc: '整洁代码并非遵循一组规则编写的。不可能因为学习一套金规玉律就成为软件大师。专业精神和手工艺来自于推动规则形成的价值。'
},
{
id: 3,
name: '《ECMAScript 6 入门教程》',
author: 'y1feng',
price: '10.22',
desc: '本书是一本开源的 JavaScript 语言教程,全面介绍 ECMAScript 6 新引入的语法特性。'
},
]
const columnsList = [
{
title: '书名',
key: 'name'
},
{
title: '作者',
key: 'author'
},
{
title: '价格',
key: 'price'
},
{
title: '简介',
key: 'desc'
}
]
</script>
<template>
<sanorin-table :columns="columnsList" :data="dataList"/>
</template>Schreiben Sie den folgenden Code entsprechend
<script setup>
import { ref, computed } from 'vue'
import { useProp, useNeumorphism } from '../mixin/neumorphism'
const props = defineProps({
...useProp,
...{
data: { // dataList
type: Array,
default: () => [],
},
columns: { // columnsList
type: Array,
default: () => [],
},
}
})
const { baseStyleObject } = useNeumorphism(props)
let styleObject = computed(() => ({
// '--font-size': `${props.size-26}px`, '--line-height': `${props.size-20}px`, '--limit-size': `${props.size-28}px`
}))
</script>
<template>
<div :>
<table >
<thead>
<tr class="neumorphism">
<!-- 表头循环 -->
<th v-for="col in columns" :key="col.key">{{col.title}}</th>
</tr>
</thead>
<tbody>
<!-- 表体循环 -->
<tr class="neumorphism" v-for="row in data" :key="row.id">
<td v-for="col in columns" :key="col.key">
<span>
{{row[col.key]}}
</span>
</td>
</tr>
</tbody>
</table>
</div>
</template>
<script>
export default {
name: 'sanorin-table',
}
</script>
<style scoped>
@import "../../style/index.css";
@import "../../style/neumorphism.css";
table {
width: 100%;
/* border-collapse: collapse; */
empty-cells: show;
border-collapse:separate;
border-spacing:0px 10px;
}
table td,
table th {
color: var(--text-color);
padding: 8px 16px 8px 16px;
text-align: left;
}
table th {
color: var(--text-back-color) !important;
font-weight: 600;
white-space: nowrap;
}
table tr{
margin-top: 20px;
}
</style>Der endgültige Effekt ist:
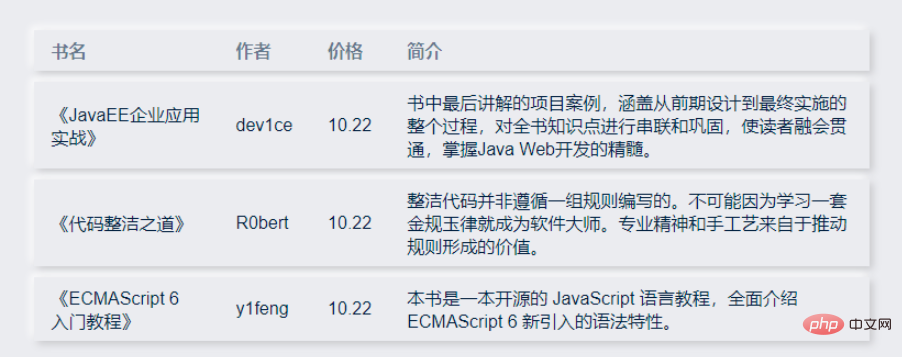
Nachdem wir dies implementiert hatten, begannen wir damit. Im Übrigen beginnen wir mit der Befestigung des Zählerkopfes.
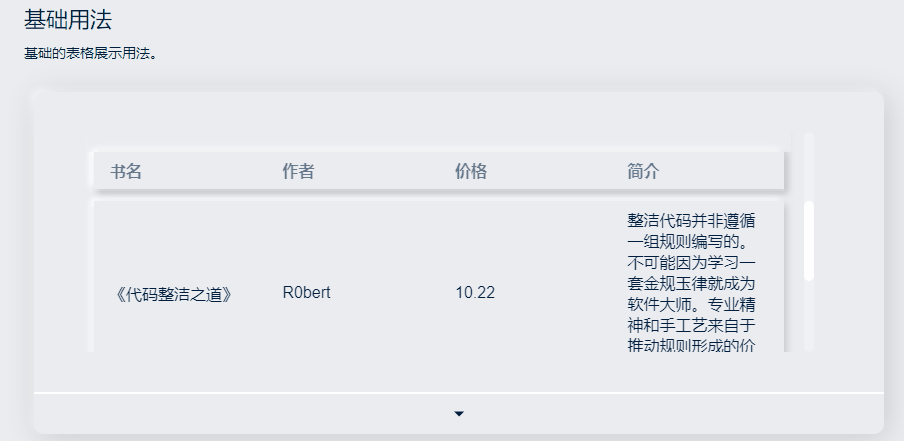
Fester Zählerkopf
Die erste Methode wird hier verwendet. Wenn sie die Anforderungen in Zukunft nicht erfüllen kann, wird auf die spätere Methode umgestellt.
Der Effekt und der Code lauten wie folgt:
<script setup>
import { ref, computed } from 'vue'
import { useProp, useNeumorphism } from '../mixin/neumorphism'
const props = defineProps({
...useProp,
...{
data: { // dataList
type: Array,
default: () => [],
},
columns: { // columnsList
type: Array,
default: () => [],
},
}
})
const { baseStyleObject } = useNeumorphism(props)
let styleObject = computed(() => ({
}))
</script>
<template>
<div class="san-table scrollbar" :>
<table>
<thead>
<tr class="neumorphism">
<!-- 表头循环 -->
<th v-for="col in columns" :key="col.key">{{col.title}}</th>
</tr>
</thead>
<tbody>
<!-- 表体循环 -->
<tr class="neumorphism" v-for="row in data" :key="row.id">
<td v-for="col in columns" :key="col.key">
<span>
{{row[col.key]}}
</span>
</td>
</tr>
</tbody>
</table>
</div>
</template>
<script>
export default {
name: 'sanorin-table',
}
</script>
<style scoped>
@import "../../style/index.css";
@import "../../style/neumorphism.css";
.san-table{
padding: 0px 20px 20px 20px;
height: 200px;
position: relative;
width: 700px;
overflow: auto;
}
table {
width: 100%;
table-layout: fixed;
empty-cells: show;
border-collapse:separate;
border-spacing:0px 10px;
}
thead {
position: sticky;
top: 10px;
}
thead:before{
position: absolute;
content: '';
width: calc(100% + var(--shadow-blur) * 2);
transform: translate(calc(var(--shadow-blur) * -1) , -10px);
height: 20px;
background-color: var(--main-color);
z-index: -1;
}
table td,
table th {
color: var(--text-color);
padding: 8px 16px 8px 16px;
text-align: left;
}
table th {
color: var(--text-back-color) !important;
font-weight: 600;
white-space: nowrap;
}
</style>Height/Fluid Height
Sie können eine Höhe für den Tisch festlegen. (Höhe)
Wenn sich die Datenmenge dynamisch ändert, können Sie eine maximale Höhe für die Tabelle festlegen. (maxHeight) Gibt die maximale Höhe für die Tabelle an, indem die Eigenschaft „max-height“ festgelegt wird. Wenn zu diesem Zeitpunkt die erforderliche Höhe der Tabelle größer als die maximale Höhe ist, wird eine Bildlaufleiste angezeigt.
Solange das height- oder maxHeight-Attribut im sanorin-table-Element definiert ist, kann eine Tabelle mit festem Header ohne zusätzlichen Code implementiert werden.
Der Code lautet wie folgt:
<script setup>
import { ref, computed, reactive } from 'vue'
import { useProp, useNeumorphism } from '../mixin/neumorphism'
const props = defineProps({
...useProp,
...{
data: { // dataList
type: Array,
default: () => [],
},
columns: { // columnsList
type: Array,
default: () => [],
},
height: {
type: Number,
},
maxHeight: {
type: Number,
}
}
})
// 高度设置
let tableHeightStyleObj = computed(() => {
let styleObj = ((e) => {
if (e.maxHeight) return { maxHeight: e.maxHeight + 'px' }
if (e.height) return { height: e.height + 'px' }
return {}
})({...props})
return styleObj
})
const { baseStyleObject } = useNeumorphism(props)
let styleObject = computed(() => ({
...tableHeightStyleObj.value
}))
</script>
<template>
<div class="san-table scrollbar" :>
<table>
<colgroup>
<col v-for="(col, index) in columns" :key="index">
</colgroup>
<thead>
<tr class="neumorphism">
<th v-for="col in columns" :key="col.key"> {{col.title}} </th>
</tr>
</thead>
<tbody>
<tr class="neumorphism" v-for="row in data" :key="row.id">
<td v-for="col in columns" :key="col.key"> {{row[col.key]}} </td>
</tr>
</tbody>
</table>
</div>
</template>
<script>
export default {
name: 'sanorin-table',
}
</script>
<style scoped>
@import "../../style/index.css";
@import "../../style/neumorphism.css";
.san-table{
padding: 0px 20px 20px 20px;
position: relative;
width: 700px;
overflow: auto;
}
table {
width: 100%;
table-layout: fixed;
empty-cells: show;
border-collapse:separate;
border-spacing:0px 10px;
}
thead {
position: sticky;
top: 10px;
}
thead:before{
position: absolute;
content: '';
width: calc(100% + var(--shadow-blur) * 2);
transform: translate(calc(var(--shadow-blur) * -1) , -10px);
height: 20px;
background-color: var(--main-color);
z-index: -1;
}
table td,
table th {
color: var(--text-color);
padding: 8px 16px 8px 16px;
text-align: left;
}
table th {
color: var(--text-back-color) !important;
font-weight: 600;
white-space: nowrap;
}
</style>Benutzerdefinierte Spaltenbreite
Fügen Sie als Nächstes eine Breitensteuerung hinzu, in der Hoffnung, dem in Spalten übergebenen Array-Objekt Breite hinzuzufügen:
const columnsList = [
  {
    title: '书名',
    key: 'name',
    width: 100,
  },
  {
    title: '作者',
    key: 'author',
    width: 100,
  },
  {
    title: '价格',
    key: 'price',
    width: 100,
  },
  {
    title: '简介',
    key: 'desc',
    minWidth: 350,
  }
]
Ich hoffe, die folgenden Effekte zu erzielen
1 . Spalte mit Breite, Breite Fest, ändert sich nicht mit der Änderung der Browserbreite. 2. Spalten, die minWidth enthalten, füllen automatisch die verbleibende Breite der Tabelle aus, wenn sie kleiner als der eingestellte Wert ist. Die Breite wird festgelegt
3. Spalten, die nicht width und minWidth enthalten, füllen automatisch die verbleibende Breite der Tabelle aus
Entsprechend unseren Anforderungen müssen wir die Breitenanzeige jeder Spalte einzeln steuern und die Breite neu berechnen und neu rendern Spalten in Echtzeit, wenn sich die Browserbreite ändert.
Definieren Sie zunächst eine Methode zur Berechnung der erforderlichen Breite jeder Spalte in der aktuellen Situation und binden Sie sie dann an das gewünschte DOM. Dann kann jedes Mal, wenn sich die Tabelle/die Browserbreite ändert, die Breite der Tabelle in Echtzeit geändert werden.
  const initColumns = () => {
    // 计算每一列在当前情况下所要的宽度
  }
  watch(() => props.columns, () => { initColumns() });
  onMounted(() => {
    nextTick(() => {
      initColumns();
      on(window, 'resize', throttle(() => initColumns(), 400));
    });
  });
  onBeforeUnmount(() => off(window, 'resize', () => initColumns()));
Alle Codes: <script setup>
import { ref, computed, watch, onMounted, onBeforeUnmount, nextTick } from 'vue'
import { on, off } from '../../utils/listener'
import { throttle } from "../../utils/debounce&throttle"
import { useProp, useNeumorphism } from '../mixin/neumorphism'
const table = ref() // 与html中ref=""对应,定位dom元素
const props = defineProps({
...useProp,
...{
data: { // dataList
type: Array,
default: () => [],
},
columns: { // columnsList
type: Array,
default: () => [],
},
height: { // height
type: Number,
},
maxHeight: { // 流体高度
type: Number,
},
minUnsetWidth: { // 未设置宽度时最小宽度
type: Number,
default: 80
}
}
})
// 高度设置
let tableHeightStyleObj = computed(() => {
let styleObj = ((e) => {
if (e.maxHeight) return { maxHeight: e.maxHeight + 'px' }
if (e.height) return { height: e.height + 'px' }
return {}
})({...props})
return styleObj
})
// 列宽设置
let col = ref([])
const { columns, minUnsetWidth } = props
const _min_column_width = minUnsetWidth // 未设置宽度时最小宽度
const initColumns = () => {
col.value = (() => {
let _total_width = table.value.offsetWidth // 表格dom元素总宽度
let _needed_minWidth = columns.reduce((t, v) => { // 需要的最小宽度
t += v.width || v.minWidth || _min_column_width
return t
}, 0)
// 需要的最小宽度比总宽度大,则取minWidth即可
if (_needed_minWidth >= _total_width) return columns.reduce((t, v) => {
let n = v.width || v.minWidth || _min_column_width
t = [...t, n]
return t
}, [])
// 需要的最小宽度比总宽度大,则要把minWidth加权,权重为(未分配的宽度 / minWidth之和)
let _unassigned_width = columns.reduce((t, v) => {
t += v.minWidth || 0
return t
}, 0)
let _assigned_width = _needed_minWidth - _unassigned_width
let _width_power = (_total_width - _assigned_width) / _unassigned_width
return columns.reduce((t, v) => {
let n = v.width || (v.minWidth ? (_width_power * v.minWidth).toFixed(2) : _min_column_width)
t = [...t, n]
return t
}, [])
})()
}
watch(() => props.columns, () => { initColumns() })
const throttleInitColumns = () => throttle(() => initColumns(), 400)
onMounted(() => {
nextTick(() => {
initColumns()
on(window, 'resize', throttleInitColumns)
})
})
onBeforeUnmount(() => off(window, 'resize', throttleInitColumns))
const { baseStyleObject } = useNeumorphism(props)
let styleObject = computed(() => ({
...tableHeightStyleObj.value
}))
</script>
<template>
<div class="san-table scrollbar" :>
<table ref="table">
<colgroup>
<col v-for="(item, index) in col" :key="index" :width="`${item}px`">
</colgroup>
<thead>
<tr class="neumorphism">
<th v-for="col in columns" :key="col.key"> {{col.title}} </th>
</tr>
</thead>
<tbody>
<tr class="neumorphism" v-for="row in data" :key="row.id">
<td v-for="col in columns" :key="col.key"> {{row[col.key]}} </td>
</tr>
</tbody>
</table>
</div>
</template>
<script>
export default {
name: 'sanorin-table',
}
</script>
<style scoped>
@import "../../style/index.css";
@import "../../style/neumorphism.css";
.san-table{
padding: 0px 20px 20px 20px;
position: relative;
overflow: auto;
}
table {
width: 100%;
table-layout: fixed;
empty-cells: show;
border-collapse:separate;
border-spacing:0px 10px;
}
thead {
position: sticky;
top: 10px;
}
thead:before{
position: absolute;
content: '';
width: calc(100% + var(--shadow-blur) * 2);
transform: translate(calc(var(--shadow-blur) * -1) , -10px);
height: 20px;
background-color: var(--main-color);
z-index: -1;
}
table td,
table th {
color: var(--text-color);
padding: 8px 16px 8px 16px;
text-align: left;
word-break:break-all;
}
table th {
color: var(--text-back-color) !important;
font-weight: 600;
white-space: nowrap;
}
</style>Die beiden darin verwendeten Js, Anti-Shake-Drosselung und Registrierungsüberwachung, werden auch hier eingefügt/* 防抖节流函数 */
let timeout = null // 创建一个标记用来存放定时器的返回值
let count = 0;
export function debounce(fn, wait = 1000, immediate = false) {
return function () {
const args = arguments;
if (immediate) {
if (count == 0) {
fn.apply(this, arguments)
count++;
} else {
if (timeout) {
clearTimeout(timeout) // 每当用户输入的时候把前一个 setTimeout clear 掉
}
timeout = setTimeout(() => {
fn.apply(this, arguments)
}, wait)
}
} else {
if (timeout) {
clearTimeout(timeout) // 每当用户输入的时候把前一个 setTimeout clear 掉
}
timeout = setTimeout(() => {
fn.apply(this, arguments)
}, wait)
}
}()
}
let canRun = true;
let count1 = 0;
export function throttle(fn, wait = 1000, immediate = true) {
return function () {
if (immediate) {
if (count1 == 0) {
fn.apply(this, arguments);
count1++;
} else {
if (canRun) {
canRun = false
setTimeout(function () {
fn.apply(this, arguments)
canRun = true
}, wait);
}
}
} else {
if (!canRun) return
canRun = false
setTimeout(function () {
fn.apply(this, arguments)
canRun = true
}, wait);
}
}()
}/**
* 绑定事件 on(element, event, handler)
*/
export const on = (element, event, handler) => {
if (document.addEventListener) {
if (element && event && handler) {
element.addEventListener(event, handler, false)
}
}
}
/**
* 解绑事件 off(element, event, handler)
*/
export const off = (element, event, handler) => {
if (document.removeEventListener) {
if (element && event) {
element.removeEventListener(event, handler, false)
}
}
}Das obige ist der detaillierte Inhalt vonSo verwenden Sie die Vue3-Tabellenkomponente. Für weitere Informationen folgen Sie bitte anderen verwandten Artikeln auf der PHP chinesischen Website!
In Verbindung stehende Artikel
Mehr sehen- Über Vue mit Validator: VeeValidate3
- Was sind die Unterschiede zwischen berechnet und Methode in Vue?
- Einführung in die Methode zum Deaktivieren der Eslint-Überprüfung im Vue-Projekt
- Einführung in verschiedene Methoden zum Definieren von Komponentenvorlagen in Vue.js
- Vier Orte zur Implementierung von AJAX in Vue-Anwendungen