
Heim >Web-Frontend >View.js >Super detailliert! Grafiken und Text erklären die kombinierte API von Vue3!
Super detailliert! Grafiken und Text erklären die kombinierte API von Vue3!

- 藏色散人nach vorne
- 2022-08-09 09:29:123197Durchsuche
Composition API
- Composition API ist ein sehr wertvolles API-Update für vue3 für uns Entwickler. Konzentrieren wir uns zunächst nicht auf die spezifische Syntax, sondern machen wir uns zunächst ein allgemeines Verständnis davon
1. Komposition vs. Optionen
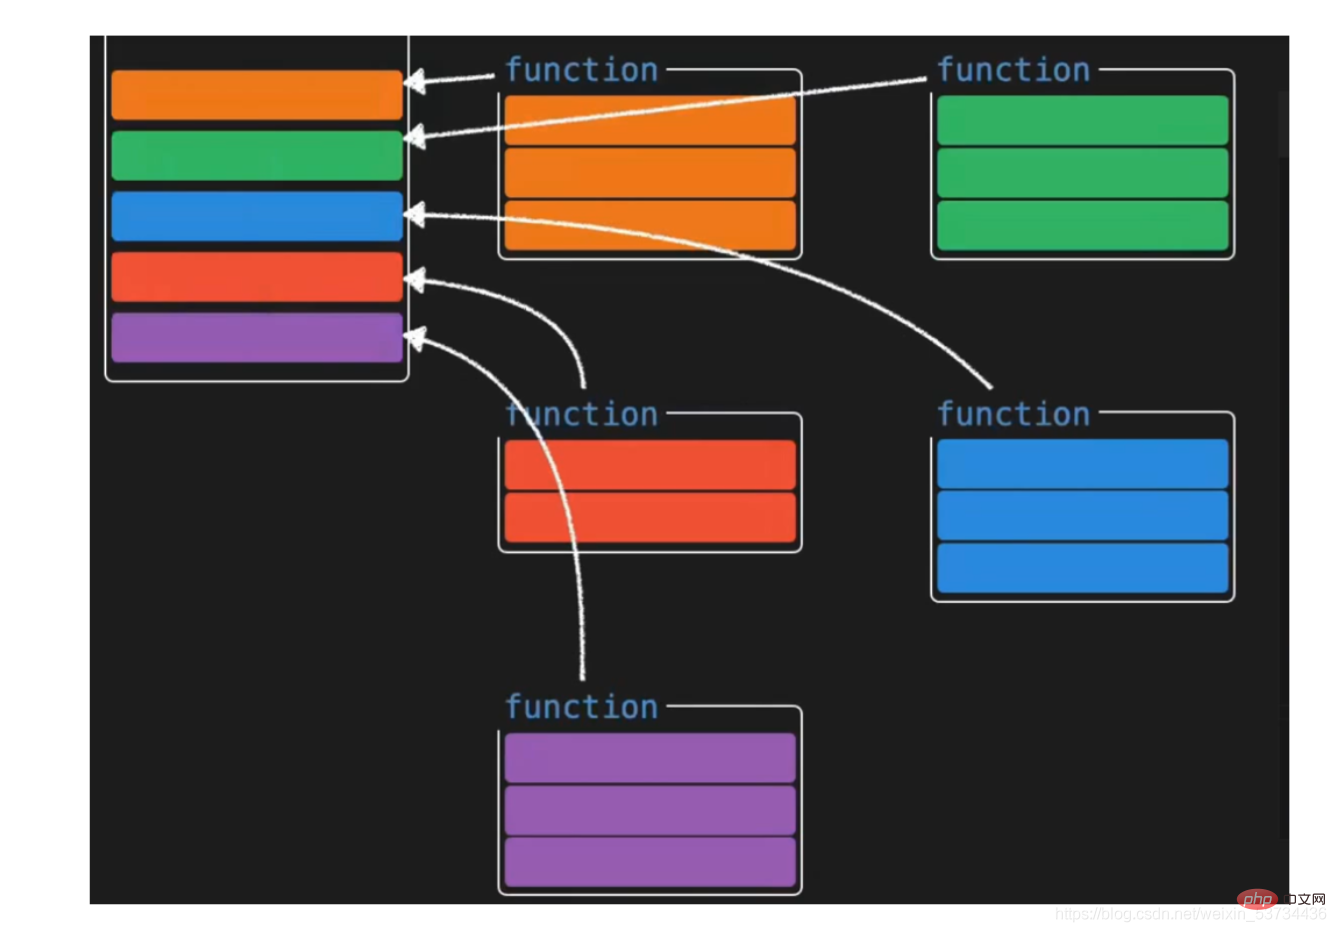
- Optionen-API Die von der Options-API entwickelte Vue-Anwendung ist leicht zu verstehen, da beispielsweise reaktionsfähige Daten in die Datenauswahl geschrieben werden Nachdem die Anwendung groß geworden ist, wird meiner Meinung nach jeder auf das Dilemma stoßen, nach dem Code zu suchen.
- Die von der Kompositions-API entwickelte Vue-Anwendung ist wie folgt gekennzeichnet. Fassen Sie sie alle für die Wartung zusammen, z. B. die Reaktionsdaten im Zusammenhang mit Funktion A, Methoden zum Betreiben von Daten usw., sodass Sie unabhängig von der Größe der Anwendung schnell alle relevanten Codes einer bestimmten Funktion lesen und finden können. Das ist einfach zu warten und selbst wenn die Funktion kompliziert einzurichten ist, das Codevolumen groß ist, können wir auch eine logische Split-Verarbeitung durchführen [Empfehlung: vue-Video-Tutorial]

Besonderer Hinweis: -
Die beiden Stile der optionalen API und der kombinierten API existieren nebeneinander und sind nicht miteinander verbunden. Szenarien, die viele logische Kombinationen erfordern, können mithilfe der Konkurrenz-API verbessert werden.
- Oben haben wir anhand der Abbildungen kurz etwas über die neue API von vue3 erfahren. Lassen Sie uns einen bestimmten kleinen Fall verwenden, um den Vergleich der Entwicklungsmodelle unter den beiden APIs besser zu verstehen. Lassen Sie uns vorübergehend die Syntaxdetails ignorieren und uns nur darauf konzentrieren das Code-Schreibformular 2.1 Verstehen Sie die Anforderungen

Zwei unabhängige Funktionen:
Steuern Sie die Anzeige und Ausblendung von p, indem Sie auf die Schaltfläche klicken.

Steuern Sie die Änderung der Schriftfarbe in p, indem Sie auf die Schaltfläche klicken 2.2 vue2.x Option Api-Version . Wenn die Anwendung groß ist und viele Funktionen hat, wird die Setup-Funktion nicht funktionieren. Wird sie groß? Wäre es nicht schwieriger zu warten? Als nächstes zerlegen wir die große Setup-Funktion
<template>
<div>
<!-- 功能一模板 -->
<button @click="show">显示</button>
<button @click="hide">隐藏</button>
<div v-if="showDiv">一个被控制显隐的div</div>
</div>
<div>
<!-- 功能二模板 -->
<button @click="changeRed">红色</button>
<button @click="changeYellow">蓝色</button>
<div :style="`color:${fontColor}`">一个被控制字体颜色的的div</div>
</div>
</template>
<script>
export default {
name: 'App',
data() {
return {
showDiv: true, // 功能一数据
fontColor: '' // 功能二数据
}
},
methods: {
// 功能一方法
show() {
this.showDiv = true
},
hide() {
this.showDiv = false
},
// 功能二方法
changeRed() {
this.fontColor = 'red'
},
changeYellow() {
this.fontColor = 'blue'
}
}
}
</script>dies kann nicht im Setup verwendet werden, dies weist auf undefiniert hin
Die Setup-Funktion wird vor dem beforeCreate-Lebenszyklus ausgeführt Hook wird ausgeführt
Importieren Sie die reaktive Funktion aus dem Vue-Framework.Code-ImplementierungRufen Sie die reaktive Funktion in der Setup-Funktion auf und übergeben Sie die Objektdaten Form eines Objekts
Funktion: ref ist eine Funktion, die einen einfachen oder komplexen Typ akzeptiert und ein reaktionsfähiges und variables Ref-Objekt zurückgibt<template> <div> <!-- 功能一模板 --> <button @click="show">显示</button> <button @click="hide">隐藏</button> <div v-if="showDivFlag">一个被控制显隐的div</div> </div> <div> <!-- 功能二模板 --> <button @click="changeRed">红色</button> <button @click="changeBlue">蓝色</button> <div :style="`color:${fontColor}`">一个被控制字体颜色的的div</div> </div> </template> <script> import { ref } from 'vue' export default { name: 'App', setup() { // 功能一 const showDivFlag = ref(true) function show() { showDivFlag.value = true } function hide() { showDivFlag.value = false } // 功能二 const fontColor = ref('') function changeRed() { fontColor.value = 'red' } function changeBlue() { fontColor.value = 'blue' } return { showDivFlag, show, hide, fontColor, changeRed, changeBlue } } } </script>4.2 Ref-Funktion
- Verwendungsschritte
- Exportieren Sie die Ref-Funktion aus dem Vue-Framework
Hinweis: Wenn Sie das Ref-Ergebnis in der Setup-Funktion verwenden, müssen Sie über .value darauf zugreifen. Wenn Sie es in der Vorlage verwenden, müssen Sie es nicht hinzufügen .valueGeben Sie in der Setup-Funktion den Rückgabewert der Ref-Funktion ein nach dem Aufruf als Geben Sie es in Form eines Objekts zurück
<script>import { ref } from 'vue'function useShow() {
const showpFlag = ref(true)
function show() {
showpFlag.value = true
}
function hide() {
showpFlag.value = false
}
return { showpFlag, show, hide }}function useColor() {
const fontColor = ref('')
function changeRed() {
fontColor.value = 'red'
}
function changeBlue() {
fontColor.value = 'blue'
}
return { fontColor, changeRed, changeBlue }}export default {
name: 'App',
setup() {
// 功能一
const { showpFlag, show, hide } = useShow()
// 功能二
const { fontColor, changeRed, changeBlue } = useColor()
return { showpFlag, show, hide, fontColor, changeRed, changeBlue }
}}</script>
reactive和ref函数都可以提供响应式数据的转换,具体什么时候需要使用哪个API社区还没有最佳实践,大家暂时可以使用自己熟练的API进行转换
推荐一种写法:只有我们明确知道要转换的对象内部的字段名称我们才使用reactive,否则就一律使用ref,从而降低在语法选择上的心智负担
4.3 toRefs 函数
- 场景: 经过reactive函数处理之后返回的对象,如果给这个对象解构或者展开,会让数据丢失响应式的能力,为了解决这个问题需要引入toRefs函数,使用 toRefs函数 可以保证该对象展开的每个属性都是响应式的
4.3.1 问题复现
还是之前的案例,如果我们想在模板中省略到state,直接书写name和age,你可能会想到,那我在return出去的时候把state中的属性解构出来不就好了
修改前
<template>
<div>{{ state.name }}</div>
<div>{{ state.age }}</div>
<button @click="state.name = 'pink'">改值</button>
</template>
<script>
import { reactive } from 'vue'
export default {
setup() {
const state = reactive({
name: 'cp',
age: 18
})
return {
state
}
}
}
</script>解构修改后
<template>
<div>{{ name }}</div>
<div>{{ age }}</div>
<button @click="name = 'pink'">改值</button>
</template>
<script>
import { reactive } from 'vue'
export default {
setup() {
const state = reactive({
name: 'cp',
age: 18
})
return {
...state
}
}
}
</script>- 点击改值按钮,发现视图已经不发生变化了,这就是我们所说的,如果解构reactive的返回值,将破坏调用响应式特性,就需要我们使用toRefs方法进行处理了
4.3.2 toRefs包裹处理
<template>
<div>{{ name }}</div>
<div>{{ age }}</div>
<button @click="name = 'pink'">改值</button>
</template>
<script>
import { reactive,toRefs } from 'vue'
export default {
setup() {
const state = reactive({
name: 'cp',
age: 18
})
return {
...toRefs(state)
}
}
}
</script>4.4 computed
- 在setup函数中使用计算属性函数
作用:根据现有响应式数据经过一定的计算得到全新的数据
使用步骤
从vue框架中导入computed 函数
在setup函数中执行computed函数,并传入一个函数,在函数中定义计算公式
把computed函数调用完的执行结果放到setup的return值对象中
<template>
{{ list }}
{{ filterList }} <button>change list</button></template><script>import { computed, ref } from 'vue'export default {
setup() {
const list = ref([1, 2, 3, 4, 5])
// 输入大于3的数字
const filterList = computed(() => {
return list.value.filter(item => item > 3)
})
// 修改list的函数
function changeList() {
list.value.push(6, 7, 8)
}
return {
list,
filterList,
changeList }
}}</script>
4.5 watch 侦听器
- 在setup函数中侦听器的使用
作用:基于响应式数据的变化执行回调逻辑,和vue2中的watch的功能完全一致
普通监听
立即执行
深度监听
使用步骤
从vue框架中导入watch函数
在setup函数中执行watch函数开启对响应式数据的监听
-
watch函数接收三个常规参数
- 第一个参数为函数,返回你要监听变化的响应式数据
- 第二个参数为响应式数据变化之后要执行的回调函数
- 第三个参数为一个对象,在里面配置是否开启立刻执行或者深度监听
4.5.1 普通监听
<template>
{{ age }} <button>change age</button></template><script>import { ref, watch } from 'vue'export default {
setup() {
const age = ref(18)
watch(() => {
// 返回你想要监听的响应式属性(ref产生的对象必须加.value)
return age.value }, () => {
// 数据变化之后的回调函数
console.log('age发生了变化')
})
return {
age }
}}</script>
4.5.2 开启立刻执行
watch的效果默认状态下,只有监听的数据发生变化才会执行回调,如果你需要在一上来的时候就立刻执行一次,需要配置一下
immediate属性
<template>
{{ age }} <button>change age</button></template><script>import { ref, watch } from 'vue'export default {
setup() {
const age = ref(18)
watch(() => {
// 返回你想要监听的响应式属性(ref产生的对象必须加.value)
return age.value }, () => {
// 数据变化之后的回调函数
console.log('age发生了变化')
},{ immediate: true})
return {
age }
}}</script>
4.5.3 开启深度监听
当我们监听的数据是一个对象的时候,默认状态下,对象内部的属性发生变化是不会引起回调函数执行的,如果想让对象下面所有属性都能得到监听,需要开启
deep配置
<template>
{{ name }}
{{ info.age }} <button>change name</button>
<button>change age</button></template><script>import { reactive, toRefs, watch } from 'vue'export default {
setup() {
const state = reactive({
name: 'cp',
info: {
age: 18
}
})
watch(() => {
return state }, () => {
// 数据变化之后的回调函数
console.log('age发生了变化')
}, {
deep: true
})
return {
...toRefs(state)
}
}}</script>
4.5.4 更好的做法
使用watch的时候,尽量详细的表明你到底要监听哪个属性,避免使用deep引起的性能问题,比如我仅仅只是想在state对象的age属性变化的时候执行回调,可以这么写
<template>
{{ name }}
{{ info.age }} <button>change name</button>
<button>change age</button></template><script>import { reactive, toRefs, watch } from 'vue'export default {
setup() {
const state = reactive({
name: 'cp',
info: {
age: 18
}
})
watch(() => {
// 详细的告知你要监听谁
return state.info.age }, () => {
// 数据变化之后的回调函数
console.log('age发生了变化')
})
return {
...toRefs(state)
}
}}</script>
5. 生命周期函数
使用步骤
先从vue中导入以on打头的生命周期钩子函数
在setup函数中调用生命周期函数并传入回调函数
生命周期钩子函数可以调用多次
<template>
<div>生命周期函数</div>
</template>
<script>
import { onMounted } from 'vue'
export default {
setup() {
// 时机成熟 回调函数自动执行
onMounted(() => {
console.log('mouted生命周期执行了')
})
onMounted(() => {
console.log('mouted生命周期函数又执行了')
})
}
}
</script>| 选项式API | 组合式API |
|---|---|
beforeCreate |
不需要(直接写到setup函数中) |
created |
不需要(直接写到setup函数中) |
beforeMount |
onBeforeMount |
mounted |
onMounted |
beforeUpdate |
onBeforeUpdate |
updated |
onUpdated |
beforeDestroyed |
onBeforeUnmount |
destroyed |
onUnmounted |
6. 父子通信
在vue3的组合式API中,父传子的基础套路完全一样,基础思想依旧为:父传子是通过prop进行传入,子传父通过调用自定义事件完成
实现步骤
setup函数提供俩个参数,第一个参数为props,第二个参数为一个对象context
props为一个对象,内部包含了父组件传递过来的所有prop数据,context对象包含了attrs,slots, emit属性,其中的emit可以触发自定义事件的执行从而完成子传父
代码落地app.vue
<template>
<son></son></template><script>import { ref } from 'vue'import Son from './components/son'export default {
components: {
Son },
setup() {
const name = ref('cp')
function getMsg(msg) {
console.log(msg)
}
return {
name,
getMsg }
}}</script>
components/son.vue
<template>
<div>
{{name}}
<button @click="setMsgToSon">set</button>
</div>
</template>
<script>
export default {
props: {
name: {
type: String
}
},
emits: ['get-msg'], // 声明当前组件触发的自定义事件
setup(props,{emit}) {
console.log(props.name)
function setMsgToSon(){
emit('get-msg','这是一条来自子组件的msg信息')
}
return {
setMsgToSon
}
}
}
</script>7. provide 和 inject
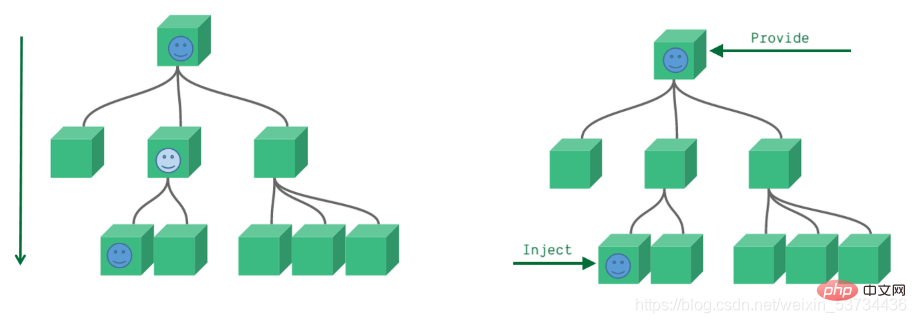
通常我们使用props进行父子之间的数据传递,但是如果组件嵌套层级较深,一层一层往下传递将会变的非常繁琐,有没有一种手段可以把这个过程简化一下呢,有的,就是我们马上要学习的provide 和 inject,它们配合起来可以方便的完成跨层传递数据
7.1 基础使用
- 在setup函数中使用provide和inject的基础用法
来个需求: 爷组件中有一份数据 传递给孙组件直接使用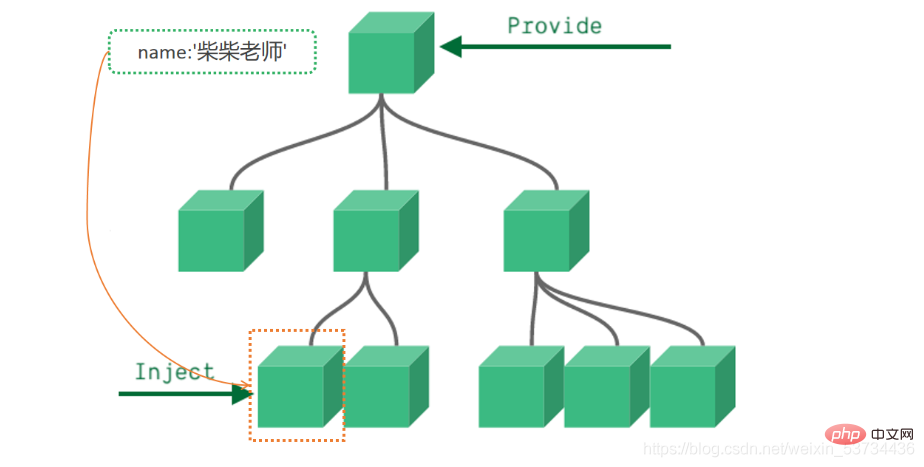
实现步骤:
顶层组件在setup方法中使用provide函数提供数据
任何底层组件在setup方法中使用inject函数获取数据
代码落地爷爷组件 - app.vue
<template>
<father></father></template><script>import Father from '@/components/Father'import { provide } from 'vue'export default {
components: {
Father },
setup() {
let name = '柴柴老师'
// 使用provide配置项注入数据 key - value
provide('name', name)
}}</script>
孙组件 - components/Son.vue
<template>
我是子组件
{{ name }}</template><script>import { inject } from 'vue'export default {
setup() {
const name = inject('name')
return {
name }
}}</script>
事实上,只要是后代组件,都可以方便的获取顶层组件提供的数据
7.2 传递响应式数据
provide默认情况下传递的数据不是响应式的,也就是如果对provide提供的数据进行修改,并不能响应式的影响到底层组件使用数据的地方,如果想要传递响应数据也非常简单,只需要将传递的数据使用ref或者reactive生成即可
- 通过provide/inject传递响应式数据
app.vue
<template>
<father></father>
<button>change name</button></template><script>import Father from '@/components/Father'import { provide, ref } from 'vue'export default {
components: {
Father },
setup() {
// 使用ref转换成响应式再传递
let name = ref('柴柴老师')
function changeName(){
name.value = 'pink'
}
provide('name', name)
return {
changeName }
}}</script>
8. 模板中 ref 的使用
在模板中使用ref,我们都很清楚,它一般有三种使用场景
ref + 普通dom标签 获取真实dom对象
ref + 组件标签 获取组件实例对象
ref + v-for 获取由dom对象(实例对象)组成的数组 (不经常使用)
- 在setup函数中使用ref获取真实dom获取组件实例的方法
实现步骤
使用ref函数传入null创建 ref对象 =>
const hRef = ref(null)模板中通过定义ref属性等于1中创建的ref对象名称建立关联 =>
<h1 ref="hRef"></h1>使用 =>
hRef.value
代码落地components/RefComponent.vue
<template>
  我是一个普通的组件</template>
app.vue
<template>
<h1>我是普通dom标签</h1>
<ref-comoonent></ref-comoonent></template><script>import { onMounted, ref } from 'vue'import RefComoonent from '@/components/RefComponent'export default {
components: {
RefComoonent },
setup() {
const h1Ref = ref(null)
const comRef = ref(null)
onMounted(() => {
console.log(h1Ref.value)
console.log(comRef.value)
})
// 必须return
return {
h1Ref,
comRef }
}}</script>
9. 来个案例吧 - Todos
核心功能
渲染列表数据 v-for
点击删除当前列表 splice + index
回车添加新项目 @keyup.enter=“addTodo” list.unshift
选择状态切换 v-model
多选和取消多选 计算属性的set和get
未完成任务数量统计 computed
<template>
<section>
<!-- 头部输入框区域 -->
<header>
<h1>todos</h1>
<input>
</header>
<section>
<!-- 全选切换input -->
<input>
<label>标记所有已经完成</label>
<ul>
<!-- 任务列表 -->
<li>
<p>
<!-- 双向绑定 flag -->
<input>
<label>{{ item.name }}</label>
<!-- 删除按钮 -->
<button></button>
</p>
</li>
</ul>
</section>
<footer>
<span> 还未完成的任务有:<strong>{{count}}</strong>项 </span>
</footer>
</section></template><script>import { computed, ref } from 'vue'export default {
setup() {
const list = ref([
{ id: 1, name: '吃饭', flag: false },
{ id: 2, name: '睡觉', flag: false },
{ id: 3, name: '打豆豆', flag: true }
])
// 删除函数
function del(index) {
// index 要删除项的下标值
// splice
list.value.splice(index, 1)
}
const curTask = ref('')
function add() {
// 添加逻辑
list.value.unshift({
id: new Date(),
name: curTask.value,
flag: false
})
curTask.value = ''
}
// 全选取消全选
// {name:"cp"} console.log(info.name) info.name = 'pink'
const isAll = computed({
// 获取isAll数据的时候会执行get函数
get() {
// 当list列表中所有项的flag属性都为true 就为true
// every
return list.value.every(item => item.flag === true)
},
set(val) {
// 拿到isAll最新值 遍历一下list 把里面的flag属性设置为最新值
list.value.forEach(item => {
item.flag = val })
}
})
// 计算未完成的任务
const count = computed(()=>{
return list.value.filter(item=>item.flag === false).length })
return {
list,
del,
curTask,
add,
isAll,
count }
}}</script><style>html,
body {
margin: 0;
padding: 0;}button {
margin: 0;
padding: 0;
border: 0;
background: none;
font-size: 100%;
vertical-align: baseline;
font-family: inherit;
font-weight: inherit;
color: inherit;
-webkit-appearance: none;
appearance: none;
-webkit-font-smoothing: antialiased;
-moz-osx-font-smoothing: grayscale;}body {
font: 14px "Helvetica Neue", Helvetica, Arial, sans-serif;
line-height: 1.4em;
background: #f5f5f5;
color: #111111;
min-width: 230px;
max-width: 550px;
margin: 0 auto;
-webkit-font-smoothing: antialiased;
-moz-osx-font-smoothing: grayscale;
font-weight: 300;}:focus {
outline: 0;}.hidden {
display: none;}.todoapp {
background: #fff;
margin: 130px 0 40px 0;
position: relative;
box-shadow: 0 2px 4px 0 rgba(0, 0, 0, 0.2), 0 25px 50px 0 rgba(0, 0, 0, 0.1);}.todoapp input::-webkit-input-placeholder {
font-style: italic;
font-weight: 300;
color: rgba(0, 0, 0, 0.4);}.todoapp input::-moz-placeholder {
font-style: italic;
font-weight: 300;
color: rgba(0, 0, 0, 0.4);}.todoapp input::input-placeholder {
font-style: italic;
font-weight: 300;
color: rgba(0, 0, 0, 0.4);}.todoapp h1 {
position: absolute;
top: -140px;
width: 100%;
font-size: 80px;
font-weight: 200;
text-align: center;
color: #b83f45;
-webkit-text-rendering: optimizeLegibility;
-moz-text-rendering: optimizeLegibility;
text-rendering: optimizeLegibility;}.new-todo,
.edit {
position: relative;
margin: 0;
width: 100%;
font-size: 24px;
font-family: inherit;
font-weight: inherit;
line-height: 1.4em;
color: inherit;
padding: 6px;
border: 1px solid #999;
box-shadow: inset 0 -1px 5px 0 rgba(0, 0, 0, 0.2);
box-sizing: border-box;
-webkit-font-smoothing: antialiased;
-moz-osx-font-smoothing: grayscale;}.new-todo {
padding: 16px 16px 16px 60px;
border: none;
background: rgba(0, 0, 0, 0.003);
box-shadow: inset 0 -2px 1px rgba(0, 0, 0, 0.03);}.main {
position: relative;
z-index: 2;
border-top: 1px solid #e6e6e6;}.toggle-all {
width: 1px;
height: 1px;
border: none; /* Mobile Safari */
opacity: 0;
position: absolute;
right: 100%;
bottom: 100%;}.toggle-all + label {
width: 60px;
height: 34px;
font-size: 0;
position: absolute;
top: -52px;
left: -13px;
-webkit-transform: rotate(90deg);
transform: rotate(90deg);}.toggle-all + label:before {
content: "❯";
font-size: 22px;
color: #e6e6e6;
padding: 10px 27px 10px 27px;}.toggle-all:checked + label:before {
color: #737373;}.todo-list {
margin: 0;
padding: 0;
list-style: none;}.todo-list li {
position: relative;
font-size: 24px;
border-bottom: 1px solid #ededed;}.todo-list li:last-child {
border-bottom: none;}.todo-list li.editing {
border-bottom: none;
padding: 0;}.todo-list li.editing .edit {
display: block;
width: calc(100% - 43px);
padding: 12px 16px;
margin: 0 0 0 43px;}.todo-list li.editing .view {
display: none;}.todo-list li .toggle {
text-align: center;
width: 40px;
/* auto, since non-WebKit browsers doesn't support input styling */
height: auto;
position: absolute;
top: 0;
bottom: 0;
margin: auto 0;
border: none; /* Mobile Safari */
-webkit-appearance: none;
appearance: none;}.todo-list li .toggle {
opacity: 0;}.todo-list li .toggle + label {
background-image: url("data:image/svg+xml;utf8,%3Csvg%20xmlns%3D%22http%3A//www.w3.org/2000/svg%22%20width%3D%2240%22%20height%3D%2240%22%20viewBox%3D%22-10%20-18%20100%20135%22%3E%3Ccircle%20cx%3D%2250%22%20cy%3D%2250%22%20r%3D%2250%22%20fill%3D%22none%22%20stroke%3D%22%23ededed%22%20stroke-width%3D%223%22/%3E%3C/svg%3E");
background-repeat: no-repeat;
background-position: center left;}.todo-list li .toggle:checked + label {
background-image: url("data:image/svg+xml;utf8,%3Csvg%20xmlns%3D%22http%3A//www.w3.org/2000/svg%22%20width%3D%2240%22%20height%3D%2240%22%20viewBox%3D%22-10%20-18%20100%20135%22%3E%3Ccircle%20cx%3D%2250%22%20cy%3D%2250%22%20r%3D%2250%22%20fill%3D%22none%22%20stroke%3D%22%23bddad5%22%20stroke-width%3D%223%22/%3E%3Cpath%20fill%3D%22%235dc2af%22%20d%3D%22M72%2025L42%2071%2027%2056l-4%204%2020%2020%2034-52z%22/%3E%3C/svg%3E");}.todo-list li label {
word-break: break-all;
padding: 15px 15px 15px 60px;
display: block;
line-height: 1.2;
transition: color 0.4s;
font-weight: 400;
color: #4d4d4d;}.todo-list li.completed label {
color: #cdcdcd;
text-decoration: line-through;}.todo-list li .destroy {
display: none;
position: absolute;
top: 0;
right: 10px;
bottom: 0;
width: 40px;
height: 40px;
margin: auto 0;
font-size: 30px;
color: #cc9a9a;
margin-bottom: 11px;
transition: color 0.2s ease-out;}.todo-list li .destroy:hover {
color: #af5b5e;}.todo-list li .destroy:after {
content: "×";}.todo-list li:hover .destroy {
display: block;}.todo-list li .edit {
display: none;}.todo-list li.editing:last-child {
margin-bottom: -1px;}.footer {
padding: 10px 15px;
height: 20px;
text-align: center;
font-size: 15px;
border-top: 1px solid #e6e6e6;}.footer:before {
content: "";
position: absolute;
right: 0;
bottom: 0;
left: 0;
height: 50px;
overflow: hidden;
box-shadow: 0 1px 1px rgba(0, 0, 0, 0.2), 0 8px 0 -3px #f6f6f6,
0 9px 1px -3px rgba(0, 0, 0, 0.2), 0 16px 0 -6px #f6f6f6,
0 17px 2px -6px rgba(0, 0, 0, 0.2);}.todo-count {
float: left;
text-align: left;}.todo-count strong {
font-weight: 300;}.filters {
margin: 0;
padding: 0;
list-style: none;
position: absolute;
right: 0;
left: 0;}.filters li {
display: inline;}.filters li a {
color: inherit;
margin: 3px;
padding: 3px 7px;
text-decoration: none;
border: 1px solid transparent;
border-radius: 3px;}.filters li a:hover {
border-color: rgba(175, 47, 47, 0.1);}.filters li a.selected {
border-color: rgba(175, 47, 47, 0.2);}.clear-completed,
html .clear-completed:active {
float: right;
position: relative;
line-height: 20px;
text-decoration: none;
cursor: pointer;}.clear-completed:hover {
text-decoration: underline;}.info {
margin: 65px auto 0;
color: #4d4d4d;
font-size: 11px;
text-shadow: 0 1px 0 rgba(255, 255, 255, 0.5);
text-align: center;}.info p {
line-height: 1;}.info a {
color: inherit;
text-decoration: none;
font-weight: 400;}.info a:hover {
text-decoration: underline;}/*
Hack to remove background from Mobile Safari.
Can't use it globally since it destroys checkboxes in Firefox
*/@media screen and (-webkit-min-device-pixel-ratio: 0) {
.toggle-all,
.todo-list li .toggle {
background: none;
}
.todo-list li .toggle {
height: 40px;
}}@media (max-width: 430px) {
.footer {
height: 50px;
}
.filters {
bottom: 10px;
}}</style>Das obige ist der detaillierte Inhalt vonSuper detailliert! Grafiken und Text erklären die kombinierte API von Vue3!. Für weitere Informationen folgen Sie bitte anderen verwandten Artikeln auf der PHP chinesischen Website!
In Verbindung stehende Artikel
Mehr sehen- Lassen Sie uns darüber sprechen, wie Vue2-Entwickler schnell mit Vue3 beginnen können
- Verstehen Sie den Vue3+Vite3-Quellcode in Sekundenschnelle, solange Sie diese 20 Bibliotheken kennen!
- Wie kann ich Anweisungen in Vue3 anpassen? Code-Erklärung
- Ausführliche Erklärung von Vue3 Suspense: Was ist das? Was können Sie tun? Wie benutzt man?
- Lassen Sie uns darüber sprechen, wie Vue3+qrcodejs QR-Codes generiert und Textbeschreibungen hinzufügt