Heim >Web-Frontend >CSS-Tutorial >Einfaches Verständnis der grundlegenden CSS-Navigationsleiste und des CSS-Dropdown-Menüs anhand von Beispielen
Einfaches Verständnis der grundlegenden CSS-Navigationsleiste und des CSS-Dropdown-Menüs anhand von Beispielen
- WBOYWBOYWBOYWBOYWBOYWBOYWBOYWBOYWBOYWBOYWBOYWBOYWBnach vorne
- 2022-08-02 17:53:022236Durchsuche
Dieser Artikel vermittelt Ihnen relevantes Wissen über css, in dem hauptsächlich verwandte Themen wie die Implementierungseigenschaften der grundlegenden CSS-Navigationsleiste und des Dropdown-Menüs vorgestellt werden. Mithilfe von CSS können Sie diese in eine gut aussehende Navigationsleiste umwandeln Werfen wir einen Blick auf das HTML-Menü. Ich hoffe, es wird für alle hilfreich sein.

(Teilen von Lernvideos: CSS-Video-Tutorial, HTML-Video-Tutorial)
Navigationsleiste
Die kompetente Verwendung der Navigationsleiste ist für jede Website sehr wichtig.
Mit CSS können Sie eine schöne Navigationsleiste anstelle eines langweiligen HTML-Menüs erstellen.
Navigationsleiste = Linkliste
Als Standard-HTML-Basis ist eine Navigationsleiste ein Muss.
In unserem Beispiel erstellen wir eine Standard-HTML-Listen-Navigationsleiste.
Eine Navigationsleiste ist im Grunde eine Liste von Links, daher ist die Verwendung der Elemente <ul></ul> und <li> sehr sinnvoll, Common HTML: <ul></ul> 和 <li> 元素非常有意义,公共HTML:
-
<li><a>主页
<li><a>新闻
<li><a>联系
<li><a>关于
现在,让我们从列表中删除边距和填充:
ul {
    list-style-type: none;
    margin: 0;
    padding: 0;}
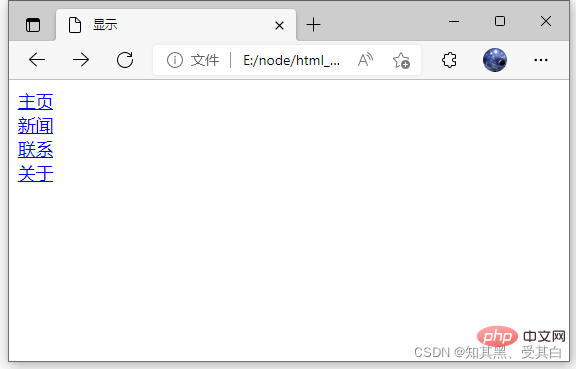
例子解析:list-style-type:none – 移除列表前小标志,一个导航栏并不需要列表标记。
移除浏览器的默认设置将边距和填充设置为0。
上面的例子中的代码是垂直和水平导航栏使用的标准代码。
nbsp;html>


    <meta>
    <title>显示</title>
    <style>
        ul {
            list-style-type: none;
            margin: 0;
            padding: 0;
        }
    </style>
-
<li><a>主页
<li><a>新闻
<li><a>联系
<li><a>关于
垂直导航栏
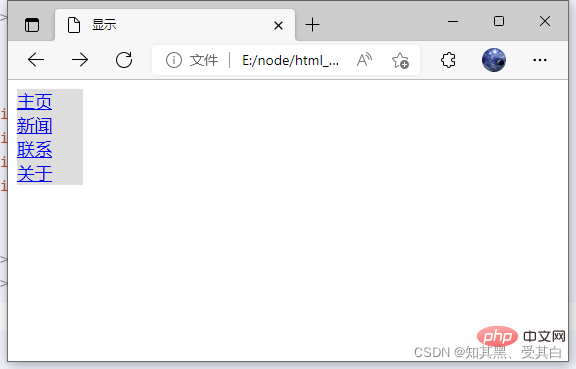
上面的代码,我们只需要 <a></a> 元素的样式,建立一个垂直的导航栏:
li a {
  display: block;
  width: 60px;
  background-color: #dddddd;}
示例说明:
display:block 显示块元素的链接,让整体变为可点击链接区域(不只是文本),它允许我们指定宽度 width:60px 。
块元素默认情况下是最大宽度。我们要指定一个60像素的宽度。
注意: 请务必指定 <a></a> 元素在垂直导航栏的的宽度。如果省略宽度,IE6可能产生意想不到的效果。
nbsp;html>


    <meta>
    <title>显示</title>
    <style>
        ul {
            list-style-type: none;
            margin: 0;
            padding: 0;
        }
        li a {
            display: block;
            width: 60px;
            background-color: #dddddd;
        }
    </style>
-
<li><a>主页
<li><a>新闻
<li><a>联系
<li><a>关于
垂直导航条实例
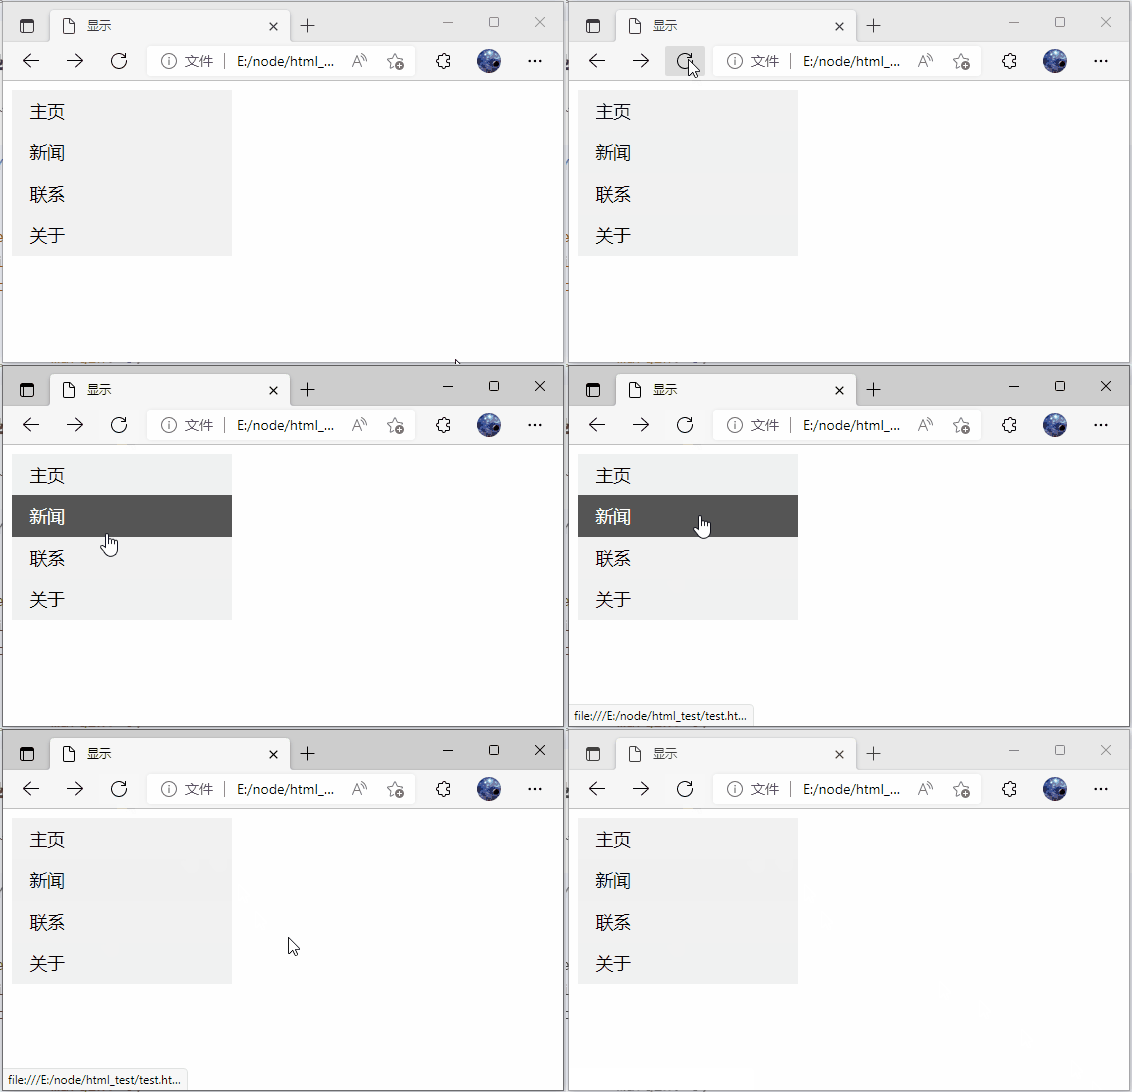
创建一个简单的垂直导航条实例,在鼠标移动到选项时,修改背景颜色:
nbsp;html>


    <meta>
    <title>显示</title>
    <style>
        ul {
            list-style-type: none;
            margin: 0;
            padding: 0;
            width: 200px;
            background-color: #f1f1f1;
        }
        li a {
            display: block;
            color: #000;
            padding: 8px 16px;
            text-decoration: none;
        }
        /* 鼠标移动到选项上修改背景颜色 */
        li a:hover {
            background-color: #555;
            color: white;
        }
    </style>
-
<li><a>主页
<li><a>新闻
<li><a>联系
<li><a>关于
激活/当前导航条实例
在点击了选项后,我们可以添加 “active” 类来标准哪个选项被选中: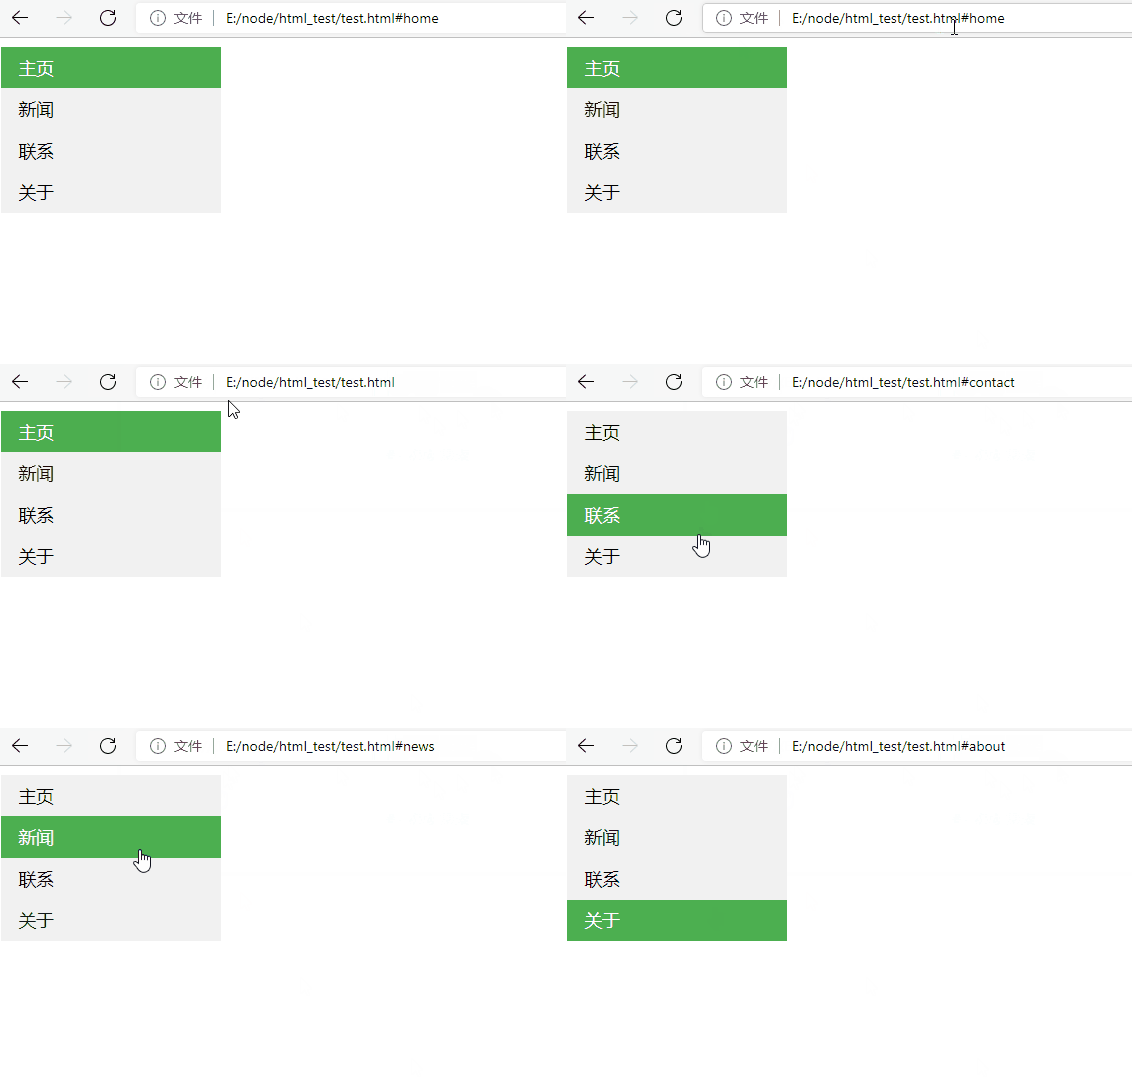
li a.active {
    background-color: #4CAF50;
    color: white;}li a:hover:not(.active) {
    background-color: #555;
    color: white;}
示例代码:
nbsp;html>


    <meta>
    <title>显示</title>
    <style>
        ul {
            list-style-type: none;
            margin: 0;
            padding: 0;
            width: 200px;
            background-color: #f1f1f1;
        }
        li a {
            display: block;
            color: #000;
            padding: 8px 16px;
            text-decoration: none;
        }
        /* 鼠标移动到选项上修改背景颜色 */
        li a:hover {
            background-color: #555;
            color: white;
        }
        li a.active {
            background-color: #4CAF50;
            color: white;
        }
        li a:hover:not(.active) {
            background-color: #555;
            color: white;
        }
    </style>
-
<li><a>主页
<li><a>新闻
<li><a>联系
<li><a>关于
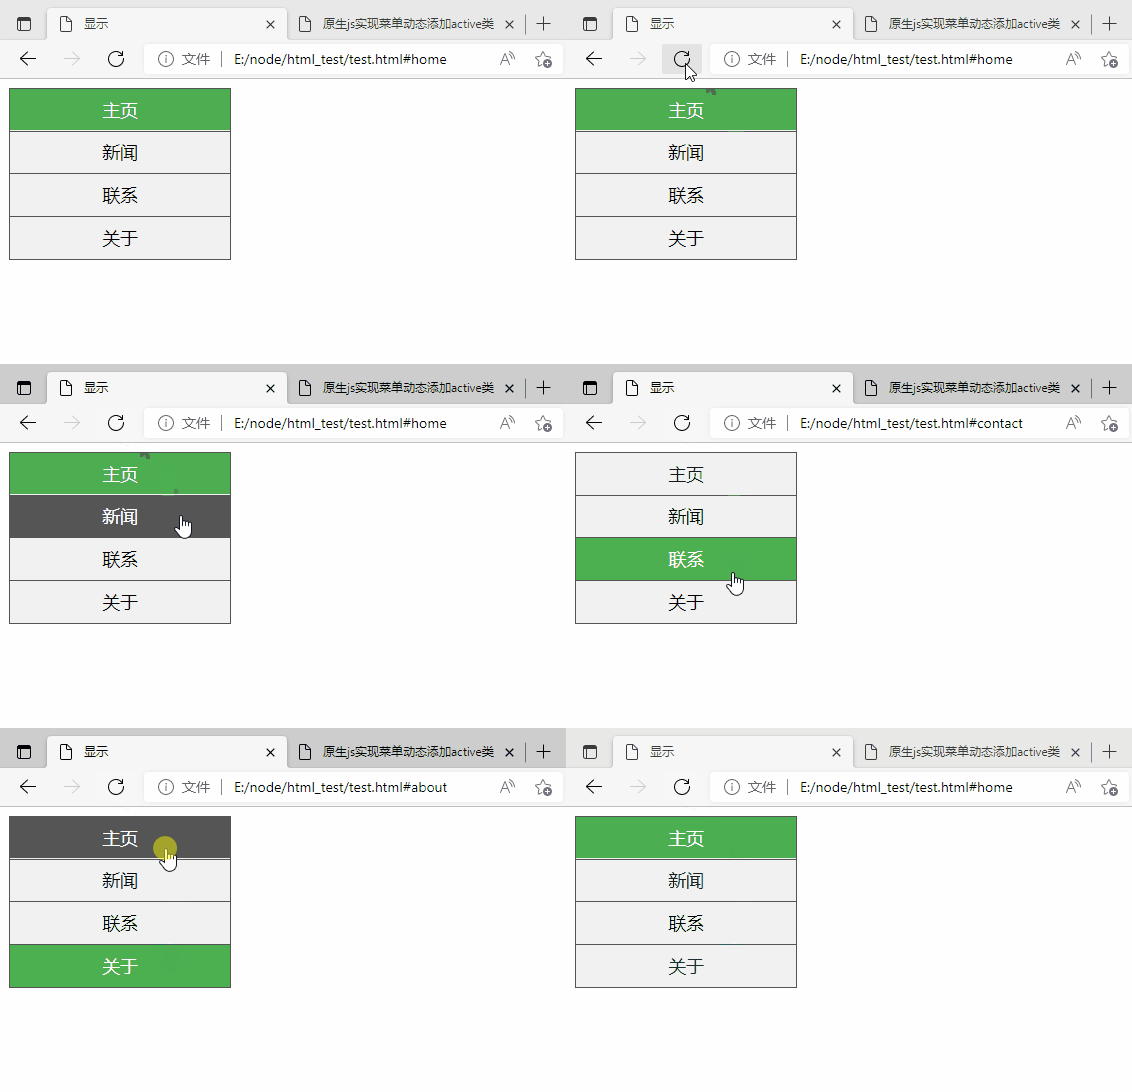
创链接并添加边框
可以在 <li> or <a> </a>
</li> 上添加 text-align:center 样式来让链接居中。
可以在 border <ul></ul> 上添加 border 属性来让导航栏有边框。
如果要在每个选项上添加边框,可以在每个 <li> 元素上添加 border-bottom :
nbsp;html>


    <meta>
    <title>显示</title>
    <style>
        ul {
            list-style-type: none;
            margin: 0;
            padding: 0;
            width: 200px;
            background-color: #f1f1f1;
            border: 1px solid #555;
        }

        li a {
            display: block;
            color: #000;
            padding: 8px 16px;
            text-decoration: none;
        }

        li {
            text-align: center;
            border-bottom: 1px solid #555;
        }

        li:last-child {
            border-bottom: none;
        }

        li a.active {
            background-color: #4CAF50;
            color: white;
        }

        li a:hover:not(.active) {
            background-color: #555;
            color: white;
        }
    </style>
-
<li><a>主页
<li><a>新闻
<li><a>联系
<li><a>关于
全屏高度的固定导航条
接下来我们创建一个左边是全屏高度的固定导航条,右边是可滚动的内容。
ul {
    list-style-type: none;
    margin: 0;
    padding: 0;
    width: 25%;
    background-color: #f1f1f1;
    height: 100%; /* 全屏高度 */
    position: fixed;
    overflow: auto; /* 如果导航栏选项多,允许滚动 */}
注意: 该实例可以在移动设备上使用。
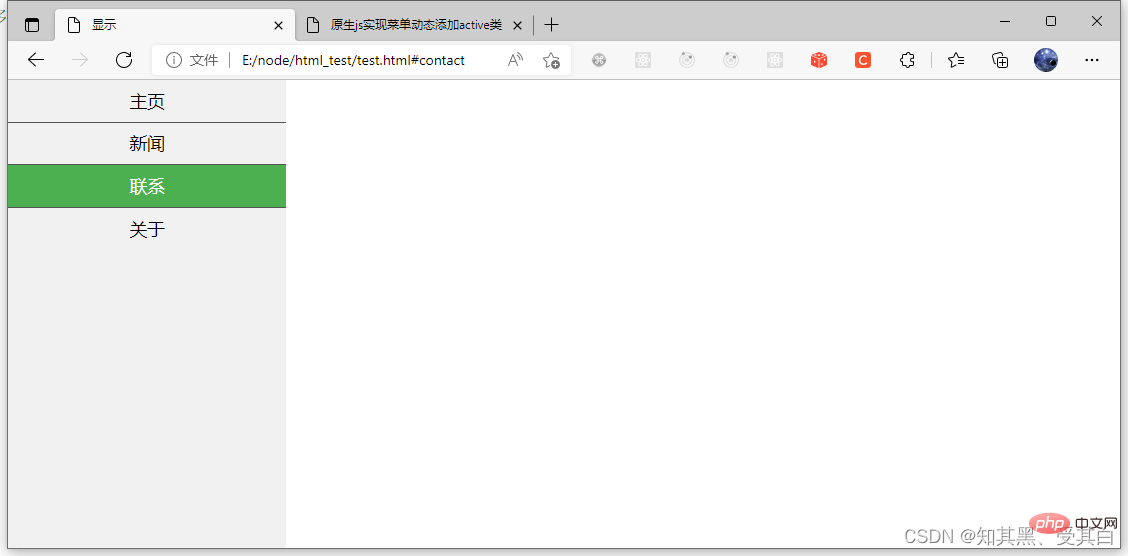
源码
nbsp;html>


    <meta>
    <title>显示</title>
    <style>
        *{
            margin: 0;
            padding: 0;
        }
        ul {
            list-style-type: none;
            margin: 0;
            padding: 0;
            width: 25%;
            background-color: #f1f1f1;
            height: 100%; /* 全屏高度 */
            position: fixed;
            overflow: auto; /* 如果导航栏选项多,允许滚动 */
        }

        li a {
            display: block;
            color: #000;
            padding: 8px 16px;
            text-decoration: none;
        }

        li {
            text-align: center;
            border-bottom: 1px solid #555;
        }

        li:last-child {
            border-bottom: none;
        }

        li a.active {
            background-color: #4CAF50;
            color: white;
        }

        li a:hover:not(.active) {
            background-color: #555;
            color: white;
        }
    </style>
-
<li><a>主页
<li><a>新闻
<li><a>联系
<li><a>关于
水平导航栏
有两种方法创建横向导航栏。使用 内联 (inline) 或 浮动 (float) 的列表项。
这两种方法都很好,但如果你想链接到具有相同的大小,你必须使用浮动的方法。
内联列表项
建立一个横向导航栏的方法之一是指定元素, 上述代码是标准的内联:
ul {
    list-style-type:none;
    margin:0;
    padding:0;}li {
    display:inline;}
实例解析:
display:inline; -默认情况下,<li> 元素是块元素。
在这里,我们删除换行符之前和之后每个列表项,以显示一行。
浮动列表项
在上面的例子中链接有不同的宽度。
对于所有的链接宽度相等,浮动 <li> 元素,并指定为 <a></a>
ul {
    list-style-type:none;
    margin:0;
    padding:0;
    overflow:hidden;}li {
    float:left;}li a {
    display: block;
    color: #000;
    padding: 8px 16px;
    text-decoration: none;}
Jetzt lassen wir den Rand und den Abstand aus der Liste entfernen: <p></p>
   float:left – 使用浮动块元素的幻灯片彼此相邻。
display:block – 显示块元素的链接,让整体变为可点击链接区域(不只是文本),它允许我们指定宽度。
   width:60px – 块元素默认情况下是最大宽度。我们要指定一个60像素的宽度。
 ul {
list-style-type: none;
margin: 0;
padding: 0;
overflow: hidden;
background-color: #333;}
li {
float: left;}
li a {
display: block;
color: white;
text-align: center;
padding: 14px 16px;
text-decoration: none;}
/*鼠标移动到选项上修改背景颜色 */li a:hover {
background-color: #111;}🎜Vertikale Navigationsleiste🎜🎜Für den obigen Code benötigen wir nur den Stil des
 <a>-Elements, um eine vertikale Navigationsleiste zu erstellen: 🎜<li style=" float:right><a>关于</a>🎜Beispielbeschreibung: 🎜🎜<code> display: block </code> zeigt den Link des Blockelements an, sodass der gesamte Linkbereich (nicht nur der Text) anklickbar ist. Dadurch können wir die Breite angeben: 60 Pixel. 🎜🎜Blockelemente haben standardmäßig die maximale Breite. Wir geben eine Breite von 60 Pixel an. 🎜🎜Hinweis: Bitte geben Sie unbedingt die Breite des <code> <a></a></code>-Elements in der vertikalen Navigationsleiste an. Wenn Sie die Breite weglassen, kann IE6 unerwartete Auswirkungen haben. 🎜🎜<img src="https://img.php.cn/upload/article/000/000/067/8048fb7f71d8a7bb45551a5ac22c1d67-1.png" alt="Bildbeschreibung hier einfügen">🎜<pre class="brush:php;toolbar:false">/* 除了最后一个选项(last-child) 其他的都添加分割线 */
li {
border-right: 1px solid #bbb;
}
li:last-child {
border-right: none;
}
-
<li><a>主页
<li><a>新闻
<li><a>联系
<li><a>关于
 🎜
🎜ul {
position: fixed;
top: 0;
width: 100%;}🎜Aktive/aktuelle Navigationsleisteninstanz🎜🎜Nachdem wir auf die Option geklickt haben, können wir die Klasse "active" zum Standard-Which hinzufügen Option ist ausgewählt: 🎜 🎜
🎜ul {
position: fixed;
bottom: 0;
width: 100%;} 🎜Beispiel Code: 🎜nbsp;html>
<meta>
<title>显示</title>
<style>
*{
margin: 0;
padding: 0;
}
ul {
list-style-type: none;
margin: 0;
padding: 0;
overflow: hidden;
background-color: #333;
}
li {
float: left;
border-right: 1px solid #bbb;
}
li a {
display: block;
color: white;
text-align: center;
padding: 14px 16px;
text-decoration: none;
}
/*鼠标移动到选项上修改背景颜色 */
li a:hover {
background-color: #111;
}
li a.active {
background-color: #4CAF50;
color: white;
}
li a:hover:not(.active) {
background-color: #555;
color: white;
}
</style>
-
<li><a>主页
<li><a>新闻
<li><a>联系
<li><a>关于
text-align:center auf <li> hinzufügen, um ihn zu erstellen der Link zentriert. 🎜🎜Sie können das Randattribut zu Rand <ul></ul> hinzufügen, damit die Navigationsleiste einen Rand hat. 🎜 Wenn Sie jeder Option einen Rahmen hinzufügen möchten, können Sie border-bottom zu jedem <li>-Element hinzufügen: 🎜🎜 🎜
🎜nbsp;html>
<meta>
<title>原生js实现菜单动态添加active类</title>
<style>
*{
margin: 0;
padding: 0;
}
ul{
margin: 0 auto;
display: flex;
justify-content: center;
align-items: center;
height: 50px;
list-style: none;
box-shadow: 0 2px 4px #eeeeee;
}
ul > li {
padding: 6px 16px;
margin: 0 5px;
border-right: 1px solid #f7f7f7;
border-bottom: 1px solid transparent;
cursor: pointer;
}
ul > li:last-child{
border-right: none;
}
li:hover, li:focus, .active {
color: #ff6615;
border-bottom: 1px solid #ff6615;
}
</style>
<li>首页
<li>产品中心
<li>新闻资讯
<li>文档下载
<li>联系我们
<script>
function removeActiveClass(node) {
node.className = '';
}
let menus = document.querySelectorAll('#nav');
menus.forEach(function (value, index) {
value.addEventListener('click', function (e) {
var target = e.target;
Array.prototype.forEach.call(document.querySelectorAll('#nav li'), removeActiveClass);
target.className = 'active';
})
});
</script>
🎜Feste Navigationsleiste mit voller Bildschirmhöhe🎜🎜Als nächstes erstellen wir eine feste Navigation mit voller Bildschirmhöhe auf der linke Leiste, mit scrollbarem Inhalt auf der rechten Seite. 🎜nbsp;html>
<meta>
<title>下拉菜单</title>
<style>
/*鼠标下拉菜单*/
.dropdown {
position: relative;
display: inline-block;
}
.dropdown-content {
display: none;
position: absolute;
background-color: #f9f9f9;
min-width: 160px;
box-shadow: 0px 8px 16px 0px rgba(0,0,0,0.2);
padding: 12px 16px;
}
.dropdown:hover .dropdown-content {
display: block;
}
</style>
<div>
<span>鼠标移动到我这看到下拉菜单!</span>
<div>
<p>CSDN博客</p>
<p>wgchen.blog.csdn.net</p>
</div>
</div>
🎜Hinweis: Dieses Beispiel kann auf mobilen Geräten verwendet werden. 🎜🎜 🎜 Quellcode 🎜
nbsp;html>
<meta>
<title>下拉菜单</title>
<style>
/* 下拉按钮样式 */
.dropbtn {
background-color: #4CAF50;
color: white;
padding: 16px;
font-size: 16px;
border: none;
cursor: pointer;
}
/* 容器 <div> - 需要定位下拉内容 */
.dropdown {
position: relative;
display: inline-block;
}
/* 下拉内容 (默认隐藏) */
.dropdown-content {
display: none;
position: absolute;
background-color: #f9f9f9;
min-width: 160px;
box-shadow: 0px 8px 16px 0px rgba(0, 0, 0, 0.2);
}
/* 下拉菜单的链接 */
.dropdown-content a {
color: black;
padding: 12px 16px;
text-decoration: none;
display: block;
}
/* 鼠标移上去后修改下拉菜单链接颜色 */
.dropdown-content a:hover {
background-color: #f1f1f1
}
/* 在鼠标移上去后显示下拉菜单 */
.dropdown:hover .dropdown-content {
display: block;
}
/* 当下拉内容显示后修改下拉按钮的背景颜色 */
.dropdown:hover .dropbtn {
background-color: #3e8e41;
}
</style>
<div>
<button>下拉菜单</button>
<div>
<a>CSDN博客 1</a>
<a>CSDN博客 2</a>
<a>CSDN博客 3</a>
</div>
</div>
🎜Level Navigationsleiste 🎜🎜Es gibt zwei Möglichkeiten, eine horizontale Navigationsleiste zu erstellen. Verwenden Sie inline oder float für Listenelemente. 🎜🎜Beide Methoden sind in Ordnung, aber wenn Sie möchten, dass Links die gleiche Größe haben, müssen Sie die Float-Methode verwenden. 🎜🎜Inline-Listenelemente🎜🎜Eine Möglichkeit, eine horizontale Navigationsleiste zu erstellen, besteht darin, das Element anzugeben. Der obige Code ist standardmäßig inline: 🎜rrreee🎜Beispielanalyse: 🎜🎜display:inline - Standard: In diesem Fall ist das <li>-Element ein Blockelement. 🎜 Hier entfernen wir die Zeilenumbrüche vor und nach jedem Listenelement, um eine einzelne Zeile anzuzeigen. 🎜🎜 Floating List Items 🎜🎜 Im obigen Beispiel haben die Links unterschiedliche Breiten. 🎜🎜Damit alle Links die gleiche Breite haben, schweben Sie das Element <li> und geben Sie die Breite des Elements <a></a> an: 🎜rrreee🎜Beispielanalyse: 🎜 rrreee🎜 Beispiel für eine horizontale Navigationsleiste🎜🎜Erstellen Sie eine horizontale Navigationsleiste und ändern Sie die Hintergrundfarbe, nachdem Sie die Maus auf die Option bewegt haben. 🎜ul {
list-style-type: none;
margin: 0;
padding: 0;
overflow: hidden;
background-color: #333;}
li {
float: left;}
li a {
display: block;
color: white;
text-align: center;
padding: 14px 16px;
text-decoration: none;}
/*鼠标移动到选项上修改背景颜色 */li a:hover {
background-color: #111;}
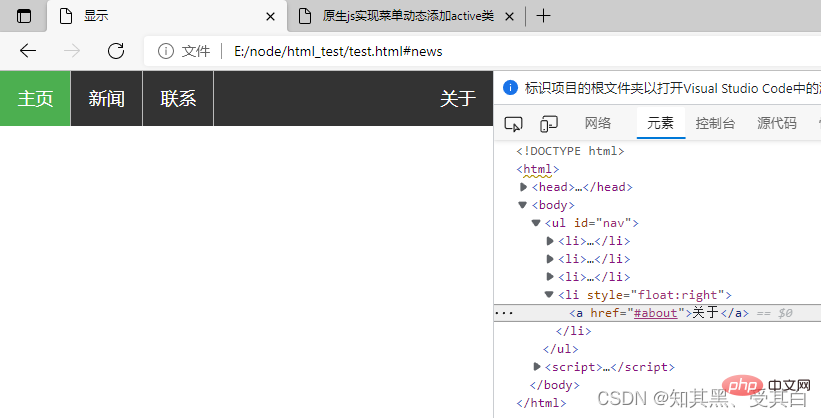
链接右对齐
将导航条最右边的选项设置右对齐 (float:right;):

<li><a>关于
添加分割线
<li> 通过 border-right 样式来添加分割线:
/* 除了最后一个选项(last-child) 其他的都添加分割线 */
li {
border-right: 1px solid #bbb;
}
li:last-child {
border-right: none;
}
<li><a>主页
<li><a>新闻
<li><a>联系
<li><a>关于
固定导航条
可以设置页面的导航条固定在头部或者底部。
固定在头部:
ul {
    position: fixed;
    top: 0;
    width: 100%;}
固定在底部:
ul {
    position: fixed;
    bottom: 0;
    width: 100%;}
注意: 该实例可以在移动设备上使用。
源码
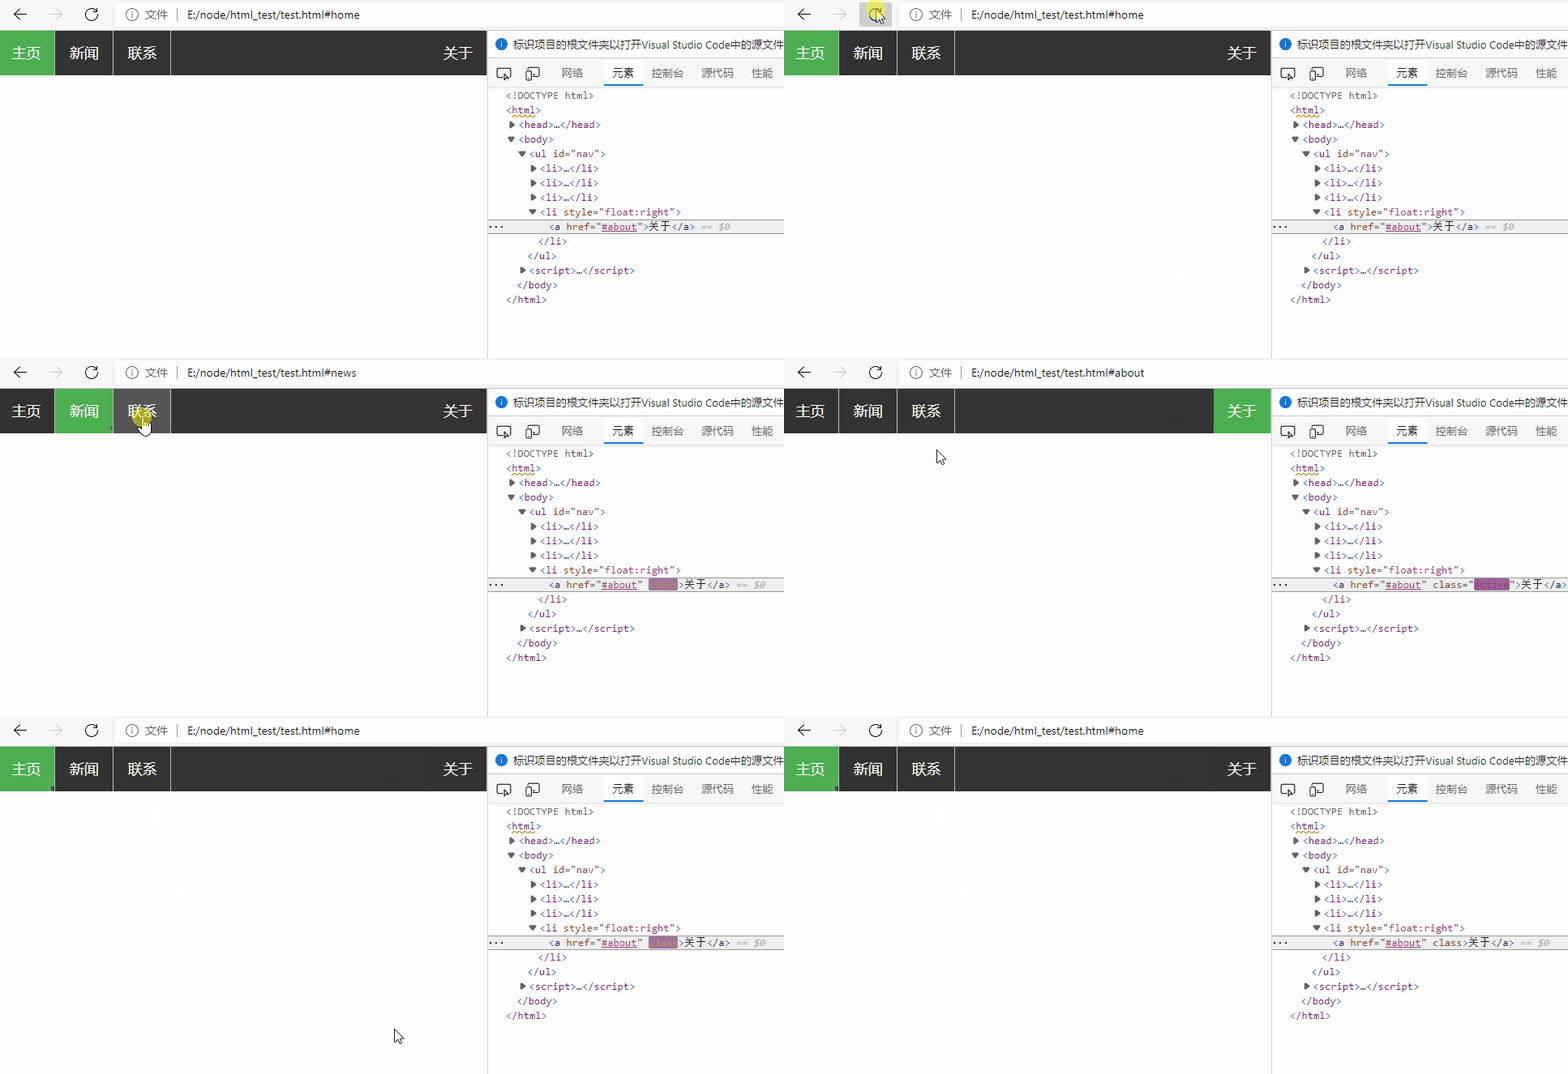
nbsp;html>


    <meta>
    <title>显示</title>
    <style>
        *{
            margin: 0;
            padding: 0;
        }
        ul {
            list-style-type: none;
            margin: 0;
            padding: 0;
            overflow: hidden;
            background-color: #333;
        }
        li {
            float: left;
            border-right: 1px solid #bbb;
        }
        li a {
            display: block;
            color: white;
            text-align: center;
            padding: 14px 16px;
            text-decoration: none;
        }
        /*鼠标移动到选项上修改背景颜色 */
        li a:hover {
            background-color: #111;
        }
        li a.active {
            background-color: #4CAF50;
            color: white;
        }
        li a:hover:not(.active) {
            background-color: #555;
            color: white;
        }
    </style>
<li><a>主页
<li><a>新闻
<li><a>联系
<li><a>关于
<script>
function removeActiveClass(node) {
node.className = '';
}
let menus = document.querySelectorAll('#nav');
menus.forEach(function (value, index) {
value.addEventListener('click', function (e) {
var target = e.target;
Array.prototype.forEach.call(document.querySelectorAll('#nav li a'), removeActiveClass);
target.className = 'active';
})
});
</script>
示例 1
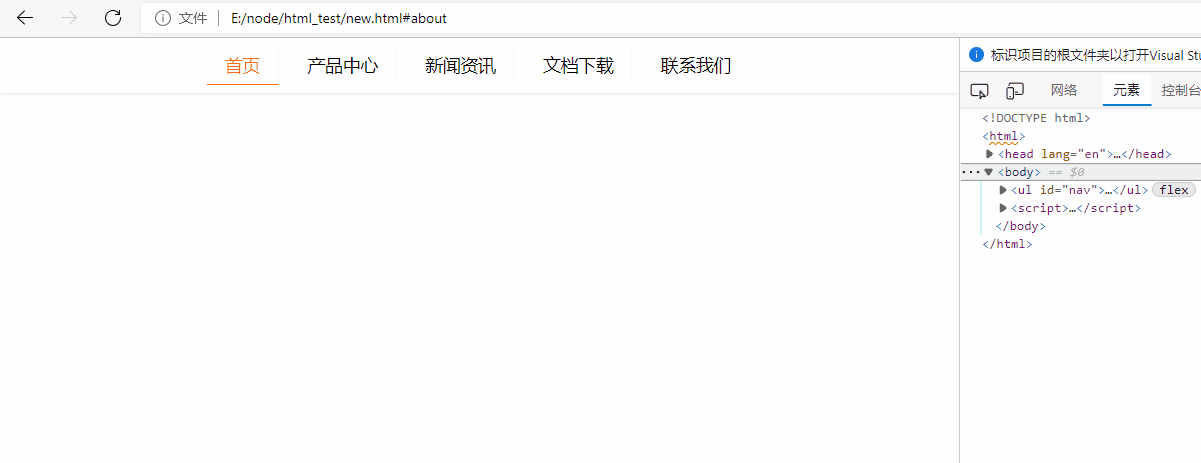
nbsp;html>
<meta>
<title>原生js实现菜单动态添加active类</title>
<style>
*{
margin: 0;
padding: 0;
}
ul{
margin: 0 auto;
display: flex;
justify-content: center;
align-items: center;
height: 50px;
list-style: none;
box-shadow: 0 2px 4px #eeeeee;
}
ul > li {
padding: 6px 16px;
margin: 0 5px;
border-right: 1px solid #f7f7f7;
border-bottom: 1px solid transparent;
cursor: pointer;
}
ul > li:last-child{
border-right: none;
}
li:hover, li:focus, .active {
color: #ff6615;
border-bottom: 1px solid #ff6615;
}
</style>
<li>首页
<li>产品中心
<li>新闻资讯
<li>文档下载
<li>联系我们
<script>
function removeActiveClass(node) {
node.className = '';
}
let menus = document.querySelectorAll('#nav');
menus.forEach(function (value, index) {
value.addEventListener('click', function (e) {
var target = e.target;
Array.prototype.forEach.call(document.querySelectorAll('#nav li'), removeActiveClass);
target.className = 'active';
})
});
</script>
CSS 下拉菜单
使用 CSS 创建一个鼠标移动上去后显示下拉菜单的效果。
基本下拉菜单
当鼠标移动到指定元素上时,会出现下拉菜单。
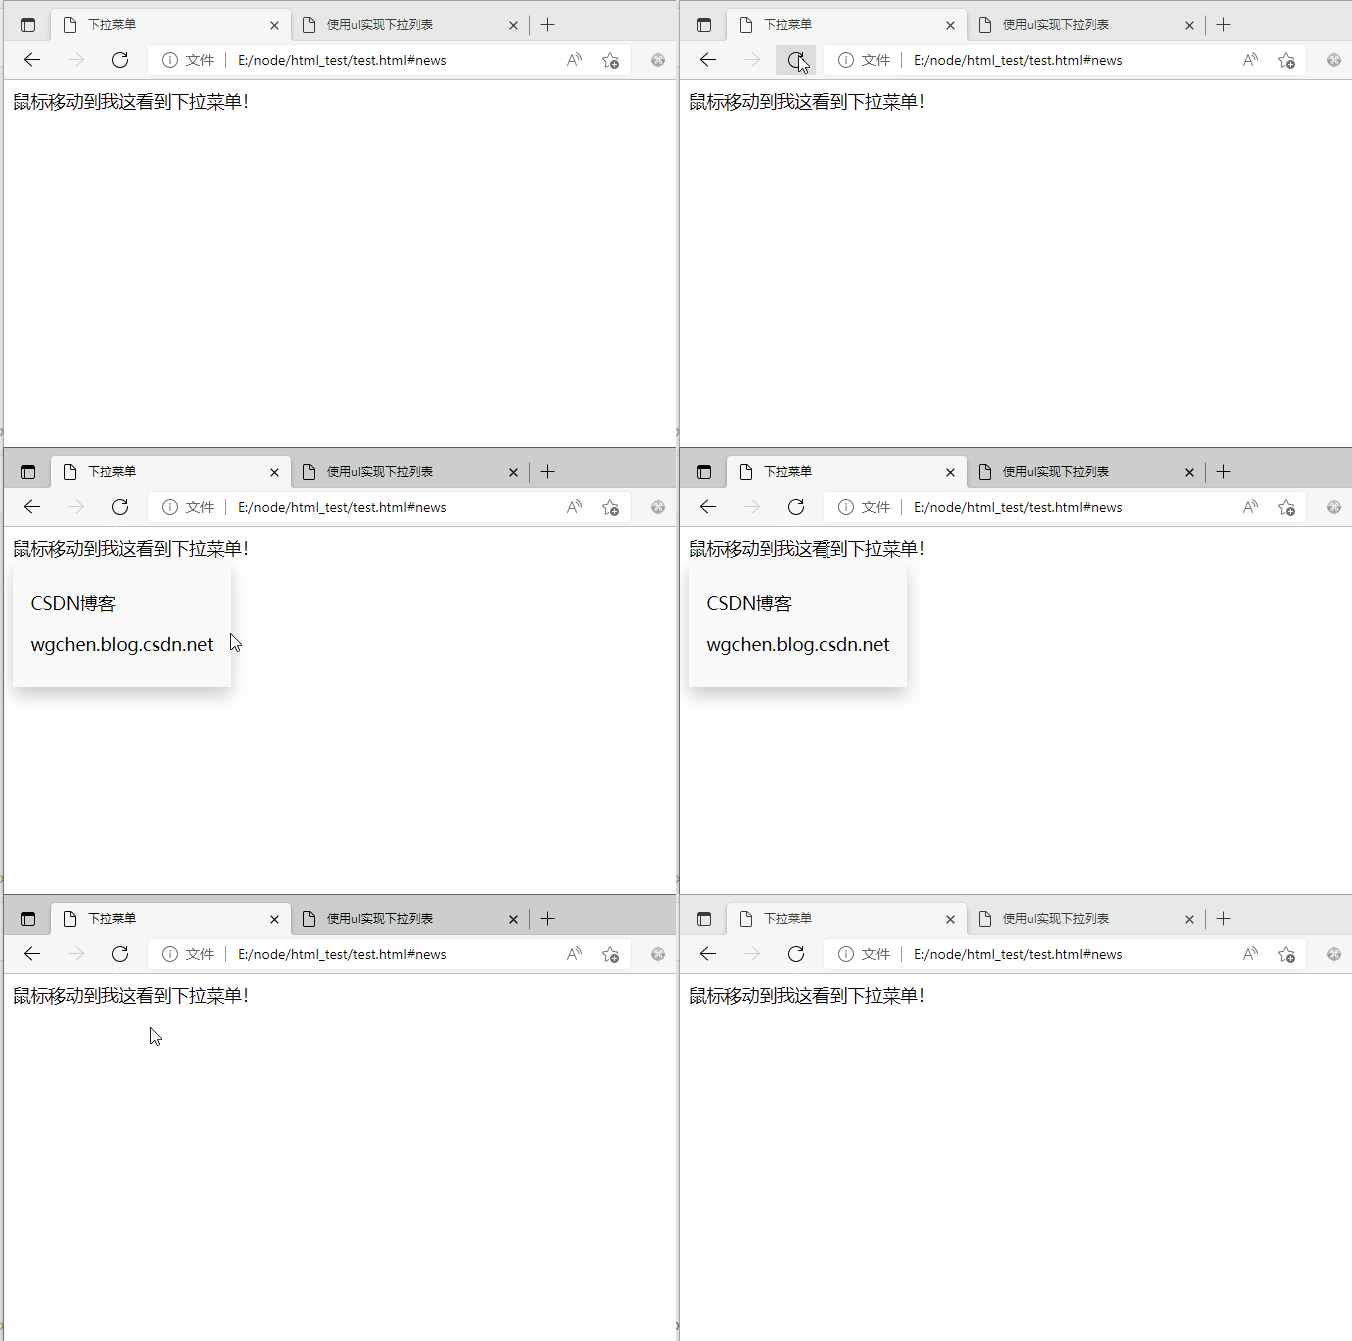
nbsp;html>
<meta>
<title>下拉菜单</title>
<style>
/*鼠标下拉菜单*/
.dropdown {
position: relative;
display: inline-block;
}
.dropdown-content {
display: none;
position: absolute;
background-color: #f9f9f9;
min-width: 160px;
box-shadow: 0px 8px 16px 0px rgba(0,0,0,0.2);
padding: 12px 16px;
}
.dropdown:hover .dropdown-content {
display: block;
}
</style>
<div>
<span>鼠标移动到我这看到下拉菜单!</span>
<div>
<p>CSDN博客</p>
<p>wgchen.blog.csdn.net</p>
</div>
</div>
实例解析
HTML 部分
我们可以使用任何的 HTML 元素来打开下拉菜单,如:<span></span> , 或 a <button></button> 元素。
使用容器元素 (如: <p></p> ) 来创建下拉菜单的内容,并放在任何你想放的位置上。
使用 <p> </p> 元素来包裹这些元素,并使用 CSS 来设置下拉内容的样式。
CSS 部分
.dropdown 类使用 position:relative:
这将设置下拉菜单的内容放置在下拉按钮 (使用 position:absolute ) 的右下角位置。
.dropdown-content 类中是实际的下拉菜单。
默认是隐藏的,在鼠标移动到指定元素后会显示。 注意 min-width 的值设置为 160px。你可以随意修改它。
注意:如果你想设置下拉内容与下拉按钮的宽度一致,可设置 width 为 100%
( overflow:auto 设置可以在小尺寸屏幕上滚动)。
我们使用 box-shadow 属性让下拉菜单看起来像一个”卡片”。
:hover 选择器用于在用户将鼠标移动到下拉按钮上时显示下拉菜单。
下拉菜单
创建下拉菜单,并允许用户选取列表中的某一项:
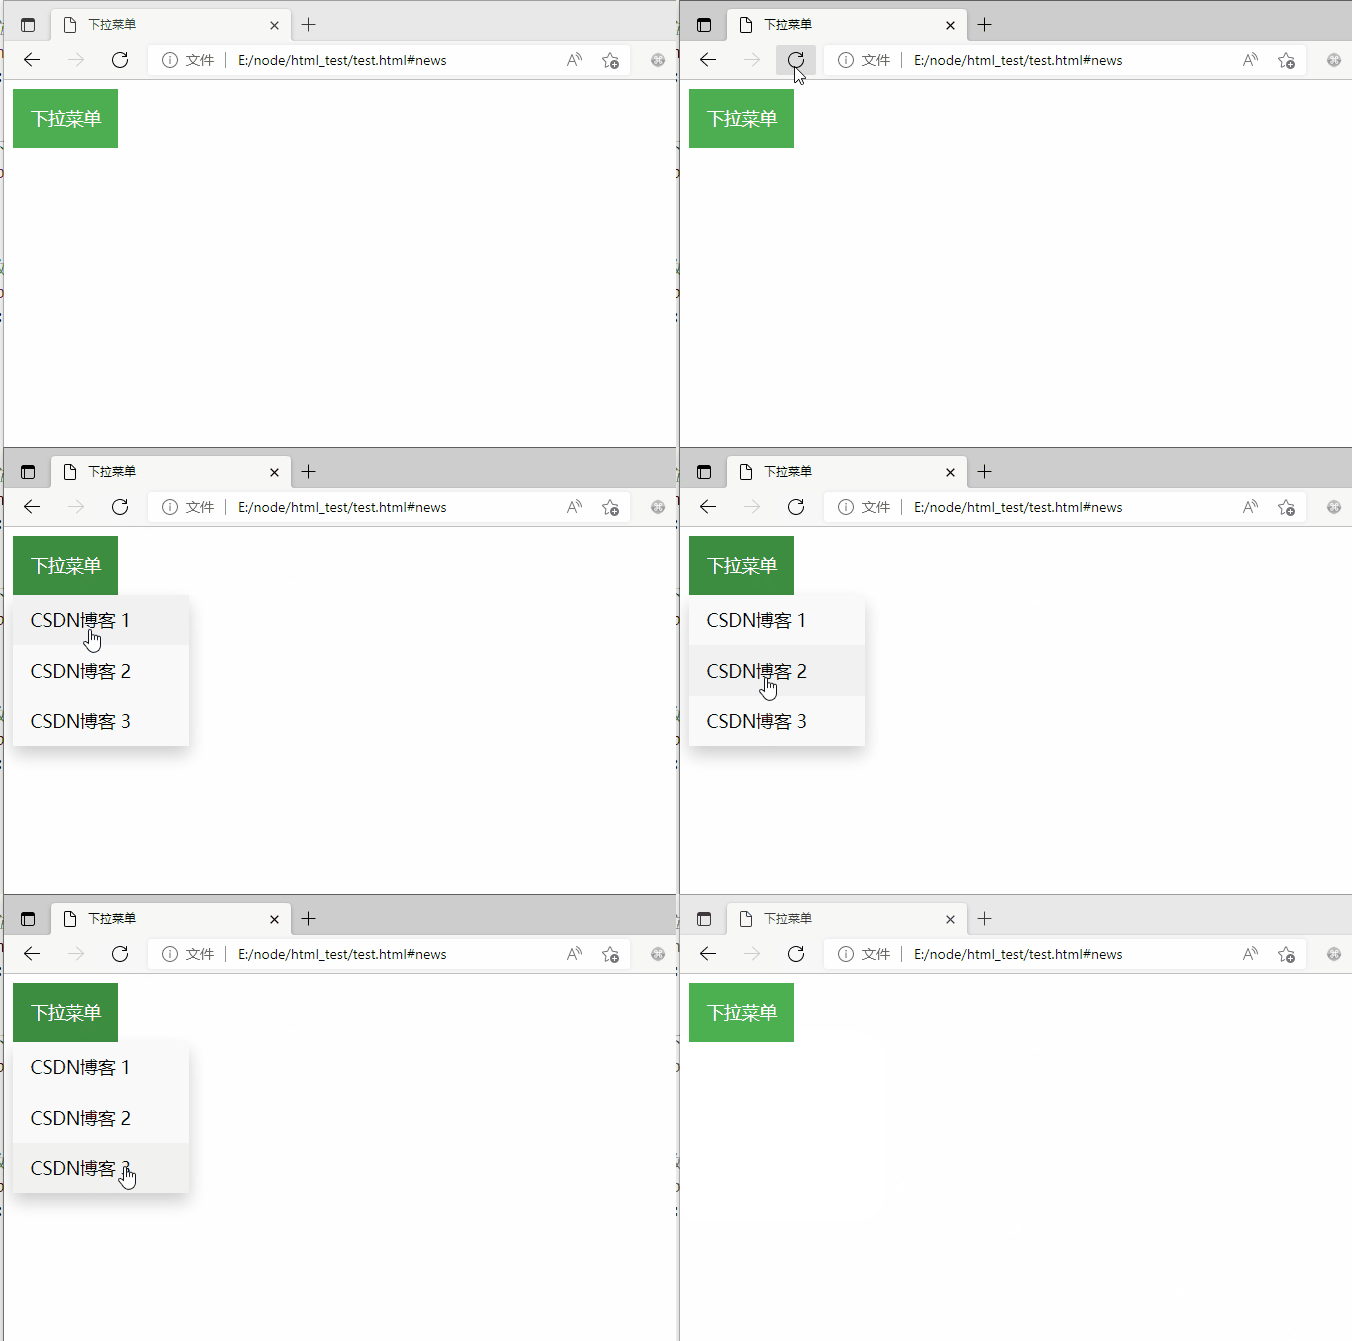
nbsp;html>
<meta>
<title>下拉菜单</title>
<style>
/* 下拉按钮样式 */
.dropbtn {
background-color: #4CAF50;
color: white;
padding: 16px;
font-size: 16px;
border: none;
cursor: pointer;
}
/* 容器 <div> - 需要定位下拉内容 */
.dropdown {
position: relative;
display: inline-block;
}
/* 下拉内容 (默认隐藏) */
.dropdown-content {
display: none;
position: absolute;
background-color: #f9f9f9;
min-width: 160px;
box-shadow: 0px 8px 16px 0px rgba(0, 0, 0, 0.2);
}
/* 下拉菜单的链接 */
.dropdown-content a {
color: black;
padding: 12px 16px;
text-decoration: none;
display: block;
}
/* 鼠标移上去后修改下拉菜单链接颜色 */
.dropdown-content a:hover {
background-color: #f1f1f1
}
/* 在鼠标移上去后显示下拉菜单 */
.dropdown:hover .dropdown-content {
display: block;
}
/* 当下拉内容显示后修改下拉按钮的背景颜色 */
.dropdown:hover .dropbtn {
background-color: #3e8e41;
}
</style>
<div>
<button>下拉菜单</button>
<div>
<a>CSDN博客 1</a>
<a>CSDN博客 2</a>
<a>CSDN博客 3</a>
</div>
</div>
Das obige ist der detaillierte Inhalt vonEinfaches Verständnis der grundlegenden CSS-Navigationsleiste und des CSS-Dropdown-Menüs anhand von Beispielen. Für weitere Informationen folgen Sie bitte anderen verwandten Artikeln auf der PHP chinesischen Website!

