Heim >Web-Frontend >CSS-Tutorial >Eine kurze Analyse der Implementierung eines linearen Gradienten (linearer Gradient) in CSS
Eine kurze Analyse der Implementierung eines linearen Gradienten (linearer Gradient) in CSS
- 青灯夜游nach vorne
- 2022-04-02 11:22:403806Durchsuche
Wie implementiert man einen linearen Farbverlauf in CSS? Der folgende Artikel stellt Ihnen die Verwendung der CSSlinearen Verlaufsfunktion linear-gradient() vor und spricht über die verschiedenen Anwendungen linearer Verläufe. Ich hoffe, dass er für alle hilfreich ist!

linear-gradient
1. Syntax
linear-gradient([[zu <richtung>|<winkel>],]? <farbstopp>, <farbstopp>[, ...]?)</farbstopp></farbstopp></winkel></richtung>linear-gradient([[to <direction>|<angle>],]? <color stop>, <color stop>[, ...]?)</color></color></angle></direction>
-webkit-linear-gradient([[<direction>|<angle>],]? <color stop>, <color stop>[, ...]?)</color></color></angle></direction>
这2种在使用方式和表现形式上都有所不同,使用direction时,前者要带to, 后者不带;使用angle时,表现不一致。【推荐学习:css视频教程】
1)默认
二者默认都是从上到下
background-image:linear-gradient(#00ffff, #ff1493, #006699);
background-image:-webkit-linear-gradient(#00ffff, #ff1493, #006699)

2)<direction>: [left|right]|[top|bottom]</direction>的使用
二者表现方向相反
background-image:linear-gradient(to left, #00ffff, #ff1493, #006699);
background-image:-webkit-linear-gradient(left, #00ffff, #ff1493, #006699);

background-image:linear-gradient(to left top, #00ffff, #ff1493, #006699);
background-image:-webkit-linear-gradient(left top, #00ffff, #ff1493, #006699);

3)<angle></angle>的使用
度数与方向的对应关系。-webkit-与之对应的方向则为450°-angle

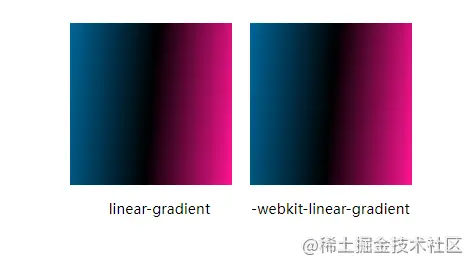
background-image:linear-gradient(275deg, #ff1493, #000000, #006699);
background-image:-webkit-linear-gradient(175deg, #ff1493, #000000, #006699);
450°-175°=275°,所以二者表现一致,如下图:

4)<color stop> = <color></color></color>的使用
stop可使用百分比,也可以使用具体值,表示这种颜色在此位置达到饱和
background-image:linear-gradient(to right, #ff1493 10%, #000000 40%, #006699 60%);
background-image:-webkit-linear-gradient(to right, #ff1493 10%, #000000 40%, #006699 60%);

从上图可以看出颜色变化过程:
0% --> 10%: #ff1493一直处于饱和
10% --> 40%: #ff1493渐变为#000000, 在40%处,#000000达到饱和
40% --> 60%: #000000渐变为#006699, 在60%处,#006699达到饱和
60% --> 100%: #006699一直处于饱和
利用这一特性,可以绘制出条纹
  background-image:linear-gradient(to right, #ff1493 33%, #000000 33%, #000000 66%, #006699 66%);
  background-image:-webkit-linear-gradient(to right, #ff1493 33%, #000000 33%, #000000 66%, #006699 66%);

注:stop还可以同时设置2个值, 如linear-gradient(to right, #ff1493 0% 33%, #000000 33% 66%, #006699 66% 100%);-webkit-linear-gradient(to right, #ff1493 33%, #000000 33% 66%, #006699 66% 100%);,效果与上图一致。
若后者的值小于前者,以前者为准,如下20px小于60px,实际按60px显示,效果如下图:
background-image:linear-gradient(right, #ff1493 60px, #000000 20px);
background-image:-webkit-linear-gradient(right, #ff1493 60px, #000000 20px);

扩展1:渐变中心
默认是2种颜色的中心,但是我们可以设置其渐变中心
/* 3种颜色平分,渐变中心为1/3和2/3处 */
background-image:linear-gradient(to right, #ff1493, #000000, #006699);
/* 渐变中心在10%和20%处 */
background-image:linear-gradient(to right, #ff1493, 10%, #000000, 20%, #006699);
注:-webkit-linear-gradient-webkit-linear-gradient([[<richtung>|<winkel>],]? <farbstopp>, <color stop>[, ...]?)</color></farbstopp></winkel></richtung>
Diese beiden unterscheiden sich in Verwendung und Ausdruck. Bei Verwendung von direction erfordert ersteres to, während letzteres nicht der Fall ist; bei Verwendung von angle ist die Leistung inkonsistent. [Empfohlenes Lernen:  CSS-Video-Tutorial
1) Standardmäßig
Beide Standardeinstellungen erfolgen von oben nach untenbackground-image:repeating-linear-gradient(0deg, #ff1493, #000000 10px, #006699 20px); background-image:-webkit-repeating-linear-gradient(0deg, #ff1493, #000000 10px, #006699 20px)


2)<richtung>: [links|rechts]|[oben|unten] Die Verwendung von </richtung>Die beiden Leistungsrichtungen sind entgegengesetzt
background-image:
    linear-gradient(45deg, rgba(255, 0, 76, 0.7), rgba(0, 0, 255, 0) 80%),
    linear-gradient(135deg, rgba(106, 0, 128, 1), rgba(0, 128, 0, 0) 80%),
    linear-gradient(225deg, rgba(0, 255, 255, 1), rgba(0, 255, 255, 0) 80%),
    linear-gradient(315deg, rgba(255, 192, 203, 0.7), rgba(255, 192, 203, 0) 80%);
background-image:
    repeating-linear-gradient(0deg, rgba(0, 255, 255, 0.3) 0px 5px, transparent 5px 10px),
    repeating-linear-gradient(90deg, rgba(0, 255, 255, 0.3) 0px 5px, transparent 5px 10px);

background-image:
    repeating-linear-gradient(45deg, rgba(0, 255, 255, 0.3) 0px 5px, transparent 5px 10px),
    repeating-linear-gradient(135deg, rgba(0, 255, 255, 0.3) 0px 5px, transparent 5px 10px);
<angle></angle>
Die Entsprechung zwischen Grad und Richtung-Relation. <code>-webkit-Die entsprechende Richtung ist 450°-Winkel
<div id="wrap"></div>
<style>
 #wrap {
    width: 180px;
    height: 40px;
    border: 5px solid transparent;
    border-image: linear-gradient(45deg, aqua, pink, purple) 1;
}

</style>
450°-175°=275°, also verhalten sich die beiden gleich, wie gezeigt unten:


<color stop> = <color></color></color>🎜🎜🎜stop kann Prozentsätze oder bestimmte Werte verwenden, die darauf hinweisen Die Farbe ist an dieser Position gesättigt🎜<div id="wrap"></div>
<style>
#wrap {
width: 180px;
height: 40px;
border: 5px solid transparent;
border-image: linear-gradient(45deg, aqua, pink, purple) 1;
clip-path: inset(0 round 5px);
}
</style>🎜 🎜🎜Sie können den Farbänderungsprozess im Bild oben sehen: 🎜🎜
0% --> 10%: #ff1493war in Sättigung🎜🎜10 % --> 40 %: #ff1493 wird zu #000000 ausgeblendet, bei 40 % , #000000 erreicht Sättigung🎜🎜40 % --> 60 %: #000000 Gradient zu #006699 , bei 60 %, #006699 erreicht Sättigung🎜🎜60 % --> 100 %: #006699Immer vorhanden gesättigt🎜🎜Mit dieser Funktion können Sie Streifen zeichnen🎜<div id="wrap">
<div id="content"></div>
</div>
<style>
#wrap {
width: 180px;
height: 40px;
border-radius: 20px;
background: #FFF;
position: relative;
}
#wrap::before {
content: '';
position: absolute;
left: -5px;
right: -5px;
top: -5px;
bottom: -5px;
background-image: linear-gradient(45deg, aqua, pink, purple);
border-radius: 25px;
z-index: -1
}
/*或者*/
#wrap {
width: 180px;
height: 40px;
border-radius: 20px;
background: #FFF;
position: relative;
border: 5px solid transparent;
background-origin: border-box;
background-image: linear-gradient(#FFF, #FFF), linear-gradient(45deg, aqua, pink, purple);
background-clip: padding-box, border-box;
}
/*或者*/
#wrap {
width: 180px;
height: 50px;
border: 5px solid transparent;
border-radius: 25px;
background-image: linear-gradient(45deg, aqua, pink, purple);
background-origin: border-box;
}
#content {
width: 100%;
height: 100%;
border-radius: 20px;
background: #FFF;
}
</style>🎜 🎜🎜Hinweis:
 stop kann auch zwei Werte gleichzeitig festlegen, z. B. linear- Farbverlauf (nach rechts, #ff1493 0 % 33 %, #000000 33 % 66 %, #006699 66 % 100 %);-webkit-linear-gradient (nach rechts, #ff1493 33 %, #000000 33 % 66 %, # 006699 66 % 100 %);, der Effekt stimmt mit dem Bild oben überein. 🎜🎜🎜Wenn der letztere Wert kleiner als der erstere ist, hat der erstere Vorrang. Wenn 20px kleiner als 60px ist, wird der tatsächliche Wert als 60px angezeigt . Der Effekt ist wie folgt: 🎜<div id="wrap"> Darker CMJ</div>
<style>
#wrap {
font-size: 40px;
line-height: 40px;
font-weight: bold;
background-clip: text;
-webkit-background-clip: text;
// color: transparent;
-webkit-text-fill-color: transparent;
background-image: linear-gradient(45deg, aqua, pink, purple);
}
</style>🎜 🎜 🎜🎜Erweiterung 1: Verlaufsmitte 🎜🎜🎜Die Standardeinstellung ist die Mitte von 2 Farben, aber wir können die Verlaufsmitte festlegen 🎜rrreee🎜Hinweis:
 -webkit -linear-gradient unterstützt diese Verwendung nicht 🎜🎜🎜🎜🎜🎜🎜Erweiterung 2: Repeating-linear-gradient🎜🎜🎜Wir können das Attribut verwenden, um wiederholte Farbblöcke zu zeichnen🎜rrreee🎜🎜🎜🎜🎜🎜2 . Gängige Stile 🎜🎜🎜🎜🎜 (1) Mehrfarbiger Sternenhimmel🎜🎜rrreee🎜Stellen Sie mehrere Werte gleichzeitig ein, damit die gesamte Hintergrundfarbe schöner aussieht🎜🎜🎜🎜🎜🎜 (2) Karomuster🎜 🎜rrreee🎜Verwenden Sie Farbe und transparente Farbe, um abwechselnd zu rendern🎜🎜🎜🎜(3)边框渐变
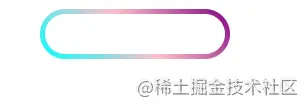
<div id="wrap"></div>
<style>
#wrap {
width: 180px;
height: 40px;
border: 5px solid transparent;
border-image: linear-gradient(45deg, aqua, pink, purple) 1;
}
</style>内部背景透明,但是不支持设置border-radius

<div id="wrap"></div>
<style>
 #wrap {
    width: 180px;
    height: 40px;
    border: 5px solid transparent;
    border-image: linear-gradient(45deg, aqua, pink, purple) 1;
    clip-path: inset(0 round 5px);
}

</style>注:可以使用clip-path裁剪出圆角, 但是这种方式不适用于角度较大的圆角

<div id="wrap">
<div id="content"></div>
</div>
<style>
#wrap {
width: 180px;
height: 40px;
border-radius: 20px;
background: #FFF;
position: relative;
}
#wrap::before {
content: '';
position: absolute;
left: -5px;
right: -5px;
top: -5px;
bottom: -5px;
background-image: linear-gradient(45deg, aqua, pink, purple);
border-radius: 25px;
z-index: -1
}
/*或者*/
#wrap {
width: 180px;
height: 40px;
border-radius: 20px;
background: #FFF;
position: relative;
border: 5px solid transparent;
background-origin: border-box;
background-image: linear-gradient(#FFF, #FFF), linear-gradient(45deg, aqua, pink, purple);
background-clip: padding-box, border-box;
}
/*或者*/
#wrap {
width: 180px;
height: 50px;
border: 5px solid transparent;
border-radius: 25px;
background-image: linear-gradient(45deg, aqua, pink, purple);
background-origin: border-box;
}
#content {
width: 100%;
height: 100%;
border-radius: 20px;
background: #FFF;
}
</style>这几种方式都能做到圆角渐变边框,但是无法做到内部背景透明

(4)文字渐变
<div id="wrap"> Darker CMJ</div>
<style>
#wrap {
    font-size: 40px;
    line-height: 40px;
    font-weight: bold;
    background-clip: text;
    -webkit-background-clip: text;
    // color: transparent;
    -webkit-text-fill-color: transparent;
    background-image: linear-gradient(45deg, aqua, pink, purple);
}
</style>background-clip规定背景的绘制区域,我们设置其值为text,就是在文字区域绘制,然后将文字color或者-webkit-text-fill-color设置为透明色,渐变区域就能显示出来了
好了,over,第一次写文章,希望能坚持下去=.=
(学习视频分享:web前端)
Das obige ist der detaillierte Inhalt vonEine kurze Analyse der Implementierung eines linearen Gradienten (linearer Gradient) in CSS. Für weitere Informationen folgen Sie bitte anderen verwandten Artikeln auf der PHP chinesischen Website!
In Verbindung stehende Artikel
Mehr sehen- Wie optimiert man die CSS-Leistung? Teilen von Optimierungstipps
- Magisches CSS zum automatischen Vervollständigen von Zeichenfolgen!
- Lassen Sie uns darüber sprechen, wie Sie mithilfe von CSS-Filtern konkave und glatte abgerundete Ecken erzielen.
- So erstellen Sie in CSS3 einen 360-Grad-Rotationseffekt beim Bewegen der Maus
- Teilen Sie 10 Ladeeffekte, die mit reinem CSS implementiert wurden
- Lassen Sie uns darüber sprechen, wie Sie mit CSS Milchglaseffekte erzielen können (Untersuchung von Kompatibilitätslösungen).


%20in%20CSS)