Heim >Web-Frontend >js-Tutorial >Designbeispiel für eine Designschaltfläche bei der Entwicklung mobiler jQuery-Seiten
Designbeispiel für eine Designschaltfläche bei der Entwicklung mobiler jQuery-Seiten
- 青灯夜游nach vorne
- 2018-10-08 16:45:321746Durchsuche
In diesem Artikel werden hauptsächlich Designbeispiele für die Entwicklung mobiler jQuery-Seiten vorgestellt. jQuery ist heute die beliebteste JavaScript-Entwicklungsbibliothek.
Die Hälfte nach dem weißen Symbol Der schwarze Kreis stellt sicher, dass das Bild auf jeder Hintergrundfarbe deutlich angezeigt werden kann, und sorgt außerdem dafür, dass es gut im Jquery Mobile-Designsystem funktioniert. Im Folgenden finden Sie einige Beispiele für Symbolschaltflächen unter verschiedenen Themenstilen
Symbolschaltfläche unter „A“ Thema data-theme="a"
<p data-role="content">
 <p data-role="controlgroup" data-type="horizontal">
 <a href="index.html" data-role="button" data-icon="bars" data-iconpos="notext" data-theme="a" data-inline="true">My button</a>
 <a href="index.html" data-role="button" data-icon="edit" data-iconpos="notext" data-theme="a" data-inline="true">My button</a>
 <a href="index.html" data-role="button" data-icon="arrow-l" data-iconpos="notext" data-theme="a" data-inline="true">My button</a>
 <a href="index.html" data-role="button" data-icon="arrow-r" data-iconpos="notext" data-theme="a" data-inline="true">My button</a>
 <a href="index.html" data-role="button" data-icon="arrow-u" data-iconpos="notext" data-theme="a" data-inline="true">My button</a>
 <a href="index.html" data-role="button" data-icon="arrow-d" data-iconpos="notext" data-theme="a" data-inline="true">My button</a>
 <a href="index.html" data-role="button" data-icon="delete" data-iconpos="notext" data-theme="a" data-inline="true">My button</a>
 <a href="index.html" data-role="button" data-icon="plus" data-iconpos="notext" data-theme="a" data-inline="true">My button</a>
 <a href="index.html" data-role="button" data-icon="minus" data-iconpos="notext" data-theme="a" data-inline="true">My button</a>
 <a href="index.html" data-role="button" data-icon="check" data-iconpos="notext" data-theme="a" data-inline="true">My button</a>
 </p>
 <p data-role="controlgroup" data-type="horizontal">
 <a href="index.html" data-role="button" data-icon="gear" data-iconpos="notext" data-theme="a" data-inline="true">My button</a>
 <a href="index.html" data-role="button" data-icon="refresh" data-iconpos="notext" data-theme="a" data-inline="true">My button</a>
 <a href="index.html" data-role="button" data-icon="forward" data-iconpos="notext" data-theme="a" data-inline="true">My button</a>
 <a href="index.html" data-role="button" data-icon="back" data-iconpos="notext" data-theme="a" data-inline="true">My button</a>
 <a href="index.html" data-role="button" data-icon="grid" data-iconpos="notext" data-theme="a" data-inline="true">My button</a>
 <a href="index.html" data-role="button" data-icon="star" data-iconpos="notext" data-theme="a" data-inline="true">My button</a>
 <a href="index.html" data-role="button" data-icon="alert" data-iconpos="notext" data-theme="a" data-inline="true">My button</a>
 <a href="index.html" data-role="button" data-icon="info" data-iconpos="notext" data-theme="a" data-inline="true">My button</a>
 <a href="index.html" data-role="button" data-icon="home" data-iconpos="notext" data-theme="a" data-inline="true">My button</a>
 <a href="index.html" data-role="button" data-icon="search" data-iconpos="notext" data-theme="a" data-inline="true">My button</a>
 </p>
</p>

" B „Symbolschaltfläche unter dem Thema data-theme="b"

"C"Symbolschaltfläche unter dem Thema data-theme="c"

Designierte Schaltflächen
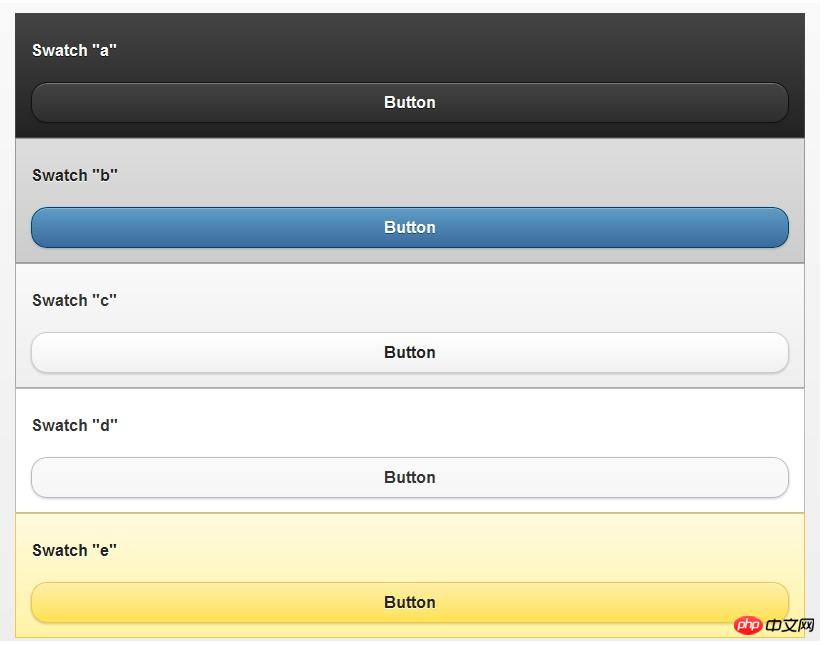
Query Mobile verfügt über ein umfangreiches Designsystem, das Ihnen die volle Kontrolle über die Gestaltung Ihrer Schaltflächen gibt. Wenn ein Link zu einem Container hinzugefügt wird, wird ihm automatisch ein Buchstabe zugewiesen, der wie ein Chamäleon mit der visuellen Integrationsschaltfläche der übergeordneten Leiste oder des Inhaltsfelds in das Themenbeispiel des übergeordneten Containers übereinstimmt. So wird einer Schaltfläche, die mit Inhalten mit dem Thema „a“ (Schwarz im Standarddesign) platziert wird, automatisch das Design der Schaltfläche „a“ (Anthrazit im Standarddesign) zugewiesen. a ist schwarz, b ist grau mit blau, c ist grau mit grau, d ist weiß mit weiß und e ist gelb mit gelb. Dies ist ein Beispiel für das Standarddesign einer Schaltfläche. Alle Schaltflächen haben das gleiche HTML-Markup:
<p data-role="content">
 <p class="ui-body ui-body-a"><h4>Swatch "a"</h4><a href="index.html" data-role="button">Button</a></p>
 <p class="ui-body ui-body-b"><h4>Swatch "b"</h4><a href="index.html" data-role="button">Button</a></p>
 <p class="ui-body ui-body-c"><h4>Swatch "c"</h4><a href="index.html" data-role="button">Button</a></p>
 <p class="ui-body ui-body-d"><h4>Swatch "d"</h4><a href="index.html" data-role="button">Button</a></p>
 <p class="ui-body ui-body-e"><h4>Swatch "e"</h4><a href="index.html" data-role="button">Button</a></p>
</p>

Datenthema im Systemstil zuweisen
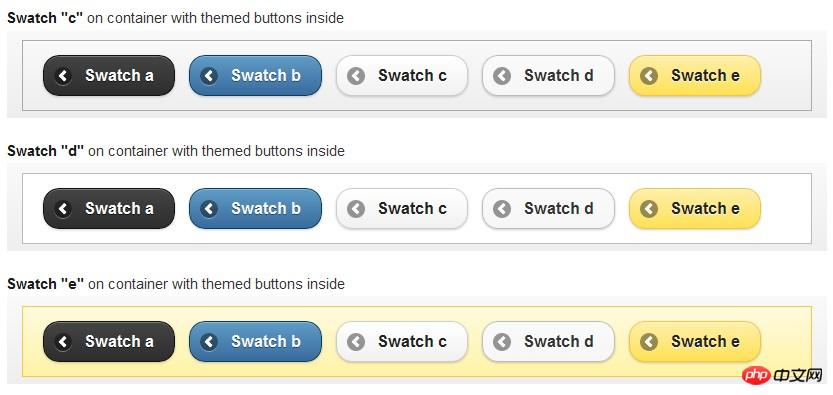
Datenthema zur Schaltfläche hinzufügen = Mit dem Attribut „Buchstabe“ können Sie der Schaltfläche manuell Stile hinzufügen, sodass die Schaltfläche nicht mit dem Stil des übergeordneten Containers übereinstimmen muss
<p data-role="content">
 <a href="index.html" data-role="button" data-theme="a" data-icon="arrow-l" data-inline="true">Swatch a</a>
 <a href="index.html" data-role="button" data-theme="b" data-icon="arrow-l" data-inline="true">Swatch b</a>
 <a href="index.html" data-role="button" data-theme="c" data-icon="arrow-l" data-inline="true">Swatch c</a>
 <a href="index.html" data-role="button" data-theme="d" data-icon="arrow-l" data-inline="true">Swatch d</a>
 <a href="index.html" data-role="button" data-theme="e" data-icon="arrow-l" data-inline="true">Swatch e</a>
</p>

Themenänderungen ui-body
verfügt standardmäßig über fünf Stilsätze: ui-body-a, ui-body-b, ui-body-c, ui-body-d, ui-body-e
<p class="ui-body ui-body-a">
 <a href="index.html" data-role="button" data-theme="a" data-icon="arrow-l" data-inline="true">Swatch a</a>
 <a href="index.html" data-role="button" data-theme="b" data-icon="arrow-l" data-inline="true">Swatch b</a>
 <a href="index.html" data-role="button" data-theme="c" data-icon="arrow-l" data-inline="true">Swatch c</a>
 <a href="index.html" data-role="button" data-theme="d" data-icon="arrow-l" data-inline="true">Swatch d</a>
 <a href="index.html" data-role="button" data-theme="e" data-icon="arrow-l" data-inline="true">Swatch e</a>
</p>

<p class="ui-body ui-body-b">
 <a href="index.html" data-role="button" data-theme="a" data-icon="arrow-l" data-inline="true">Swatch a</a>
 <a href="index.html" data-role="button" data-theme="b" data-icon="arrow-l" data-inline="true">Swatch b</a>
 <a href="index.html" data-role="button" data-theme="c" data-icon="arrow-l" data-inline="true">Swatch c</a>
 <a href="index.html" data-role="button" data-theme="d" data-icon="arrow-l" data-inline="true">Swatch d</a>
 <a href="index.html" data-role="button" data-theme="e" data-icon="arrow-l" data-inline="true">Swatch e</a>
</p>


Das obige ist der detaillierte Inhalt vonDesignbeispiel für eine Designschaltfläche bei der Entwicklung mobiler jQuery-Seiten. Für weitere Informationen folgen Sie bitte anderen verwandten Artikeln auf der PHP chinesischen Website!
In Verbindung stehende Artikel
Mehr sehen- Eine eingehende Analyse der Bootstrap-Listengruppenkomponente
- Detaillierte Erläuterung des JavaScript-Funktions-Curryings
- Vollständiges Beispiel für die Generierung von JS-Passwörtern und die Erkennung der Stärke (mit Download des Demo-Quellcodes)
- Angularjs integriert WeChat UI (weui)
- Wie man mit JavaScript schnell zwischen traditionellem Chinesisch und vereinfachtem Chinesisch wechselt und wie Websites den Wechsel zwischen vereinfachtem und traditionellem Chinesisch unterstützen – Javascript-Kenntnisse

