Heim >Web-Frontend >HTML-Tutorial >HTML5-Imitation der WeChat-Chat-Schnittstelle für Mobiltelefone
HTML5-Imitation der WeChat-Chat-Schnittstelle für Mobiltelefone
- 不言Original
- 2018-05-08 15:31:094930Durchsuche
In diesem Artikel wird hauptsächlich der Schlüsselcode der HTML5-Imitation des mobilen WeChat-Chat-Interfaces vorgestellt, der einen gewissen Referenzwert hat.
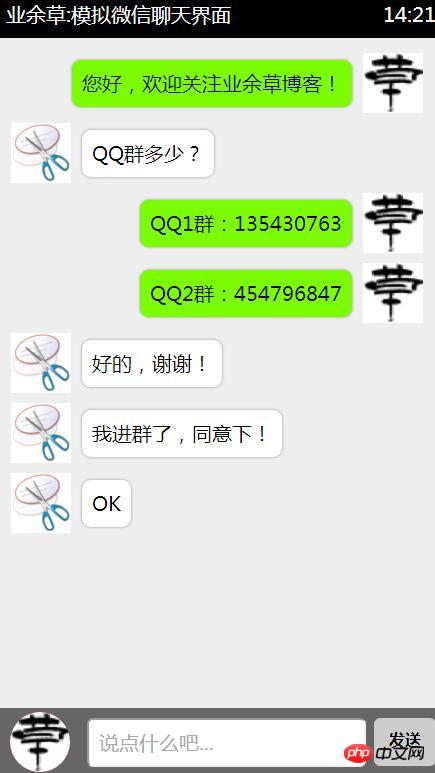
Was ich Ihnen vorstelle, ist der HTML5-Imitation-Mobiltelefon-WeChat-Chat Schnittstelle ist der Screenshot-Effekt wie folgt:

Der Quellcode lautet wie folgt:
XML/HTML-Code Inhalt in die Zwischenablage kopieren
<!DOCTYPE html> <html> <head> <meta charset="UTF-8"> <title>HTML5模拟微信聊天界面</title> <style> /**重置标签默认样式*/ * { margin: 0; padding: 0; list-style: none; font-family: '微软雅黑' } #container { width: 450px; height: 780px; background: #eee; margin: 80px auto 0; position: relative; box-shadow: 20px 20px 55px #777; } .header { background: #000; height: 40px; color: #fff; line-height: 34px; font-size: 20px; padding: 0 10px; } .footer { width: 430px; height: 50px; background: #666; position: absolute; bottom: 0; padding: 10px; } .footer input { width: 275px; height: 45px; outline: none; font-size: 20px; text-indent: 10px; position: absolute; border-radius: 6px; right: 80px; } .footer span { display: inline-block; width: 62px; height: 48px; background: #ccc; font-weight: 900; line-height: 45px; cursor: pointer; text-align: center; position: absolute; right: 10px; border-radius: 6px; } .footer span:hover { color: #fff; background: #999; } #user_face_icon { display: inline-block; background: red; width: 60px; height: 60px; border-radius: 30px; position: absolute; bottom: 6px; left: 14px; cursor: pointer; overflow: hidden; } img { width: 60px; height: 60px; } .content { font-size: 20px; width: 435px; height: 662px; overflow: auto; padding: 5px; } .content li { margin-top: 10px; padding-left: 10px; width: 412px; display: block; clear: both; overflow: hidden; } .content li img { float: left; } .content li span{ background: #7cfc00; padding: 10px; border-radius: 10px; float: left; margin: 6px 10px 0 10px; max-width: 310px; border: 1px solid #ccc; box-shadow: 0 0 3px #ccc; } .content li img.imgleft { float: left; } .content li img.imgright { float: right; } .content li span.spanleft { float: left; background: #fff; } .content li span.spanright { float: right; background: #7cfc00; } </style> <script> window.onload = function(){ var arrIcon = ['http://www.xttblog.com/icons/favicon.ico','http://www.xttblog.com/wp-content/uploads/2016/03/123.png']; var num = 0; //控制头像改变 var iNow = -1; //用来累加改变左右浮动 var icon = document.getElementById('user_face_icon').getElementsByTagName('img'); var btn = document.getElementById('btn'); var text = document.getElementById('text'); var content = document.getElementsByTagName('ul')[0]; var img = content.getElementsByTagName('img'); var span = content.getElementsByTagName('span'); icon[0].onclick = function(){ if(num==0){ this.src = arrIcon[1]; num = 1; }else if(num==1){ this.src = arrIcon[0]; num = 0; } } btn.onclick = function(){ if(text.value ==''){ alert('不能发送空消息'); }else { content.innerHTML += '<li><img src="'+arrIcon[num]+'"><span>'+text.value+'</span></li>'; iNow++; if(num==0){ img[iNow].className += 'imgright'; span[iNow].className += 'spanright'; }else { img[iNow].className += 'imgleft'; span[iNow].className += 'spanleft'; } text.value = ''; // 内容过多时,将滚动条放置到最底端 contentcontent.scrollTop=content.scrollHeight; } } } </script> </head> <body> <p id="container"> <p class="header"> <span style="float: left;">业余草:模拟微信聊天界面</span> <span style="float: right;">14:21</span> </p> <ul class="content"> <!-- 欢迎加入qq群:454796847、135430763 --> </ul> <p class="footer"> <p id="user_face_icon"> <img src="http://www.xttblog.com/icons/favicon.ico" alt=""> </p> <input id="text" type="text" placeholder="说点什么吧..."> <span id="btn">发送</span> </p> </p> </body> </html>
Das Obige ist der gesamte Inhalt dieses Artikels. Es ist nicht spannend, ich hoffe, es wird für das Studium aller hilfreich sein.
Verwandte Empfehlungen:
HTML5 implementiert die Funktion zum Teilen mit WeChat-Freunden, QQ-Freunden, QQ-Space-Weibo-QR-Code
Das obige ist der detaillierte Inhalt vonHTML5-Imitation der WeChat-Chat-Schnittstelle für Mobiltelefone. Für weitere Informationen folgen Sie bitte anderen verwandten Artikeln auf der PHP chinesischen Website!

