Heim >Web-Frontend >js-Tutorial >So verwenden Sie AjaxFileUpload zum Hochladen mehrerer Dateien
So verwenden Sie AjaxFileUpload zum Hochladen mehrerer Dateien
- php中世界最好的语言Original
- 2018-03-31 09:29:193837Durchsuche
这次给大家带来怎么用AjaxFileUpload实现多文件上传,用AjaxFileUpload实现多文件上传的注意事项有哪些,下面就是实战案例,一起来看一下。
本文重点给大家介绍AjaxFileUpload+Struts2实现多文件上传功能,具体实现代码大家参考下本文。
单文件和多文件的实现区别主要修改两点,
一是插件ajaxfileupload.js里接收file文件ID的方式
二是后台action是数组形式接收
1、ajaxFileUpload文件下载地址http://www.phpletter.com/Demo/AjaxFileUpload-Demo/
2、引入jquery-1.8.0.min.js、ajaxFileUpload.js文件
3、文件上传页面核心代码
<body>
<form action="" enctype="multipart/form-data">
<h2>
多文件上传
</h2>
<input type="file" id="file1" name="file" />
</br>
<input type="file" id="file2" name="file" />
</br>
<input type="file" id="file3" name="file" />
</br>
<span>
<table id="down">
</table>
</span>
</br>
<input type="button" onclick="fileUpload();" value="上传">
</form>
</body>
<script type="text/javascript">
function fileUpload() {
var files = ['file1','file2','file3']; //将上传三个文件 ID 分别为file2,file2,file3
$.ajaxFileUpload( {
url : 'fileUploadAction', //用于文件上传的服务器端请求地址
secureuri : false, //一般设置为false
fileElementId : files, //文件上传的id属性 <input type="file" id="file" name="file" />
dataType : 'json', //返回值类型 一般设置为json
success : function(data, status) {
var fileNames = data.fileFileName; //返回的文件名
var filePaths = data.filePath; //返回的文件地址
for(var i=0;i<data.fileFileName.length;i++){
//将上传后的文件 添加到页面中 以进行下载
$("#down").after("<tr><td height='25'>"+fileNames[i]+
"</td><td><a href='downloadFile?downloadFilePath="+filePaths[i]+"'>下载</a></td></tr>")
}
}
})
}
</script>
以上fileElementId属性接收的files参数为['file1','file2','file3']
由于是多文件,所以我们需要修改ajaxfileupload.js 找到以下代码
var oldElement = jQuery('#' + fileElementId);
var newElement = jQuery(oldElement).clone();
jQuery(oldElement).attr('id', fileId);
jQuery(oldElement).before(newElement);
jQuery(oldElement).appendTo(form);
修改为:
for(var i in fileElementId){
  var oldElement = jQuery('#' + fileElementId[i]);
  var newElement = jQuery(oldElement).clone();
  jQuery(oldElement).attr('id', fileId);
  jQuery(oldElement).before(newElement);
  jQuery(oldElement).appendTo(form);
}
4、文件上传Action
public class FileAction {
  private File[] file;       //文件
  private String[] fileFileName;  //文件名
  private String[] filePath;    //文件路径
  private String downloadFilePath; //文件下载路径
  private InputStream inputStream;
  /**
   * 文件上传
   * @return
   */
  public String fileUpload() {
    String path = ServletActionContext.getServletContext().getRealPath("/upload");
    File file = new File(path); // 判断文件夹是否存在,如果不存在则创建文件夹
    if (!file.exists()) {
      file.mkdir();
    }
    try {
      if (this.file != null) {
        File f[] = this.getFile();
        filePath = new String[f.length];
        for (int i = 0; i < f.length; i++) {
          String fileName = java.util.UUID.randomUUID().toString(); // 采用时间+UUID的方式随即命名
          String name = fileName + fileFileName[i].substring(fileFileName[i].lastIndexOf(".")); //保存在硬盘中的文件名
          FileInputStream inputStream = new FileInputStream(f[i]);
          FileOutputStream outputStream = new FileOutputStream(path+ "\\" + name);
          byte[] buf = new byte[1024];
          int length = 0;
          while ((length = inputStream.read(buf)) != -1) {
            outputStream.write(buf, 0, length);
          }
          inputStream.close();
          outputStream.flush();
          //文件保存的完整路径
          // 如:D:\tomcat6\webapps\struts_ajaxfileupload\\upload\a0be14a1-f99e-4239-b54c-b37c3083134a.png
          filePath[i] = path + "\\" + name;
        }
      }
    } catch (Exception e) {
      e.printStackTrace();
    }
    return "success";
  }
  /**
   * 文件下载
   * @return
   */
  public String downloadFile() {
    String path = downloadFilePath;
    HttpServletResponse response = ServletActionContext.getResponse();
    try {
      // path是指欲下载的文件的路径。
      File file = new File(path);
      // 取得文件名。
      String filename = file.getName();
      // 以流的形式下载文件。
      InputStream fis = new BufferedInputStream(new FileInputStream(path));
      byte[] buffer = new byte[fis.available()];
      fis.read(buffer);
      fis.close();
      // 清空response
      response.reset();
      // 设置response的Header
      String filenameString = new String(filename.getBytes("gbk"),"iso-8859-1");
      response.addHeader("Content-Disposition", "attachment;filename="+ filenameString);
      response.addHeader("Content-Length", "" + file.length());
      OutputStream toClient = new BufferedOutputStream(response.getOutputStream());
      response.setContentType("application/octet-stream");
      toClient.write(buffer);
      toClient.flush();
      toClient.close();
    } catch (IOException ex) {
      ex.printStackTrace();
    }
    return null;
  }
  /**
   * 省略set get方法
   */
}
5、struts配置
<!DOCTYPE struts PUBLIC
  "-//Apache Software Foundation//DTD Struts Configuration 2.0//EN"
  "http://struts.apache.org/dtds/struts-2.0.dtd">
<struts>
  <package name="ajax_code" extends="json-default">
    <!-- 文件上传 -->
    <action name="fileUploadAction" class="com.itmyhome.FileAction" method="fileUpload">
      <result type="json" name="success">
        <param name="contentType">text/html</param>
      </result>
    </action>
  </package>
  <package name="jsp_code" extends="struts-default">
    <!-- 文件下载 -->
    <action name="downloadFile" class="com.itmyhome.FileAction" method="downloadFile">
      <result type="stream">
         <param name="contentType">application/octet-stream</param>
         <param name="inputName">inputStream</param>
         <param name="contentDisposition">attachment;filename=${fileName}</param>
         <param name="bufferSize">4096</param>
      </result>
    </action>
  </package>
</struts>
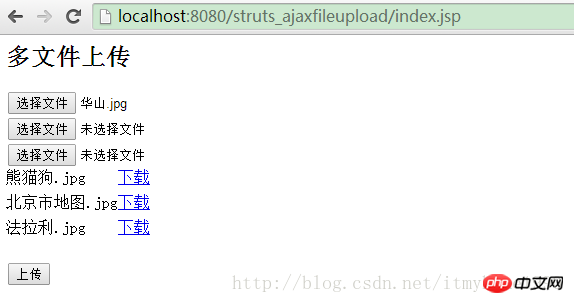
浏览器中输入:http://localhost:8080/struts_ajaxfileupload/index.jsp 即可进行文件上传
如图:

相信看了本文案例你已经掌握了方法,更多精彩请关注php中文网其它相关文章!
推荐阅读:
Das obige ist der detaillierte Inhalt vonSo verwenden Sie AjaxFileUpload zum Hochladen mehrerer Dateien. Für weitere Informationen folgen Sie bitte anderen verwandten Artikeln auf der PHP chinesischen Website!
In Verbindung stehende Artikel
Mehr sehen- Eine eingehende Analyse der Bootstrap-Listengruppenkomponente
- Detaillierte Erläuterung des JavaScript-Funktions-Curryings
- Vollständiges Beispiel für die Generierung von JS-Passwörtern und die Erkennung der Stärke (mit Download des Demo-Quellcodes)
- Angularjs integriert WeChat UI (weui)
- Wie man mit JavaScript schnell zwischen traditionellem Chinesisch und vereinfachtem Chinesisch wechselt und wie Websites den Wechsel zwischen vereinfachtem und traditionellem Chinesisch unterstützen – Javascript-Kenntnisse

