Heim >WeChat-Applet >Mini-Programmentwicklung >Einführung in die WeChat Mini-Programmvorlage
Einführung in die WeChat Mini-Programmvorlage
- 巴扎黑Original
- 2018-05-15 10:19:593395Durchsuche
微信小程序 template模板详解及实例
首先看一些官方的一些介绍。
模板:模板功能是通过对template 标签的属性 name=”” 去创建不同模板,通过is=”name的值”来使用。


通过上面两张图,大概能看出,使用模板可以为大量类似的布局带来便利。下面看一下我自己的一个Demo.
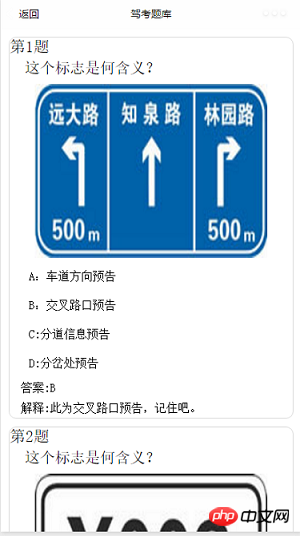
先放出效果图(数据来自聚合数据)


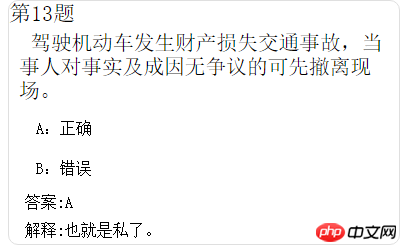
可以看到,除了选项个数的差别之外,其他布局是相同的。
下面的每一道题的模板。
<template name="carItem">
 <view class="timu">
  <view class="title">第pw_item.id题</view>
  <view class='question'>pw_item.question</view>
  <view class="img" wx:if="pw_item.url!=''"><image src="pw_item.url" /></view>
  <view class='select'>A:pw_item.item1</view>
  <view class='select'>B:pw_item.item2</view>
  <view class='select' wx:if="pw_item.item3!=''">C:pw_item.item3</view>
  <view class='select' wx:if="pw_item.item4!=''">D:pw_item.item4</view>
  <view class='content'>答案:pw_item.answer</view>
  <view class='content'>解释:pw_item.explains</view>
 </view>
</template>
在我们上面的代码中,除了使用template标签定义模板外,还是用了条件渲染。例如当题目为判断题的时候。CD选项是没有数据的,所以就不能显示出来,我们可以通过if语句判断是否为空来决定显示与否。
下面放出代码。
CarUtils.js
/**
 * 网络请求
 */
function request(url, subject, model, testType, success, fail) {
  if (typeof success != 'function' || typeof fail != 'function') {
    return
  }
  wx.request({
    url: url,
    data: {
      key: "5f0c9315c43385f5baaa3f49b79caa8f",
      subject: subject,
      model: model,
      testType: testType,


    },
    success: function (res) {
      if (res.data.error_code == 0) {
        console.log("获取数据成功"),
          success(res.data)
      } else {
        wx.showModal({
          title: '提示',
          content: 'res.data.reason'+'请重新选择',
          success: function (res) {
            if (res.confirm) {
              console.log('用户点击确定')
            }
          }
        })
        console.log("失败原因" + res.data.reason)
        fail(res.data.reason)
      }
    },
    fail: function () {
      fail('网络出现问题')
    },
  })
}
function getanswer(url,success,fail){
   if( typeof success != 'function' || typeof fail != 'function' ) {
  return
 }
   wx.request({
    url:url,
    data: {
      key:"0794b823b484d6e1b4186d150834ae1b",
    },
    success: function(res){
     if( res.data.error_code == 0 ) {
        console.log("获取数据成功"),
        success( res.data )
      } else {
        console.log("失败原因"+res.data.reason)
        fail( res.data.reason )
      }
    },
    fail: function() {
      fail( '网络出现问题' )
    },
   })
}
module.exports = {
  request: request,
  getanswer:getanswer
}
template.wxml
<template name="carItem">
 <view class="timu">
  <view class="title">第pw_item.id题</view>
  <view class='question'>pw_item.question</view>
  <view class="img" wx:if="pw_item.url!=''"><image src="pw_item.url" /></view>
  <view class='select'>A:pw_item.item1</view>
  <view class='select'>B:pw_item.item2</view>
  <view class='select' wx:if="pw_item.item3!=''">C:pw_item.item3</view>
  <view class='select' wx:if="pw_item.item4!=''">D:pw_item.item4</view>
  <view class='content'>答案:pw_item.answer</view>
  <view class='content'>解释:pw_item.explains</view>
 </view>
</template>
选择界面 drivercar.js
Page({
 data:{
  subject: [
   {name: '1', value: '科目一',checked: 'true'},
   {name: '4', value: '科目四'},


  ],
  model: [
   {name: 'c1', value: 'c1',checked: 'true'},
   {name: 'c2', value: 'c2'},
   {name: 'a1', value: 'a1'},
   {name: 'a2', value: 'a2'},
   {name: 'b1', value: 'b1'},
   {name: 'b2', value: 'b2'},


  ],
  testType: [
   {name: 'rand', value: '随机(100条)',checked: 'true'},
   {name: 'order', value: '全部(全部)'},
  ],


 },
 onLoad:function(options){
 var that = this;
  that.setData({
   subject1:"1",
   model1:"c1",
   testType1:"rand"
  })
 },
 confirm(){
  var that=this;
   wx.navigateTo({
   url: 'detail/detail?subject='+that.data.subject1+'&model='+that.data.model1+'&testType='+that.data.testType1,
  });
 },
  confirm1(){
  var that=this;
   wx.navigateTo({
   url: 'detail_1/detail_1?subject='+that.data.subject1+'&model='+that.data.model1+'&testType='+that.data.testType1,
  });
 },
 //科目类型
 subjectChange(e){
  var that = this;
  console.log('科目类型:'+e.detail.value);
  that.setData({
   subject1:e.detail.value,


  })
 } ,
  //驾照类型
  modelChange(e){
  var that = this;
  console.log('驾照类型:'+e.detail.value);
  that.setData({
   model1:e.detail.value,
  })
 } ,
 //测试类型
  testTypeChange(e){
   var that = this;
  console.log('测试类型:'+e.detail.value);
  that.setData({
   testType1:e.detail.value,
  })
 } ,


})
选择界面drivercar.wxml
<view class="container">
<!--radio-->
 <view class="radio">
 <text>请选择考试类型:</text>
  <radio-group class="radio-group" bindchange="subjectChange">
    <label class="radio" wx:for="pw_subject" wx:key="subject">
      <radio value="pw_item.name" checked="pw_item.checked"/>pw_item.value
   </label>
  </radio-group>
 </view>
 <view class="radio">
 <text>请选择驾照类型:</text>
  <radio-group class="radio-group" bindchange="modelChange" >
     <label class="radio" wx:for="pw_model" wx:key="model">
        <radio value="pw_item.name" checked="pw_item.checked"/>pw_item.value
     </label>
   </radio-group>
 </view>
 <view class="radio">
 <text>请选择模式:</text>
  <radio-group class="radio-group" bindchange="testTypeChange" >
     <label class="radio" wx:for="pw_testType" wx:key="testType">
        <radio value="pw_item.name" checked="pw_item.checked"/>pw_item.value
     </label>
   </radio-group>
 </view>
  <!--button-->
  <text class="nav" bindtap="confirm">确定选择</text>
</view>
选择界面drivercar.wxss
.radio{ margin: 20rpx;}
.radio text{margin: 20rpx;}
.nav {
   border: 1px solid #DFDFDF;
  border-radius: 10px;
  text-align: center;
  width: 50%;
  float: left;
  height: 60rpx;
  line-height: 60rpx;
  margin-bottom:30rpx;
  margin-top: 30rpx;
  margin-left:25%;
  margin-right:25%;


}
题目界面detail.js
var util = require('../../../../Utils/CarUtils.js')
var url = 'http://api2.juheapi.com/jztk/query'
var answerurl = "http://api2.juheapi.com/jztk/answers"
Page({
  data: {
    loadingHide: false,
    ResList: {
      "error_code": 0,
      "reason": "success",
      "result": {
        1: "A",
        2: "B",
        3: "C",
        4: "D",
        7: "AB",
        8: "AC",
        9: "AD",
        10: "BC",
        11: "BD",
        12: "CD",
        13: "ABC",
        14: "ABD",
        15: "ACD",
        16: "BCD",
        17: "ABCD"
      }
    },
  },
  onLoad: function (options) {


    var that = this
    var z=1;
    var mTimuLIs={}
    util.request(url, options.subject, options.model, options.testType, function (dataJson) {
      console.log(options.model + "model");
      console.log(options.testType + "testType");
      console.log(options.subject + "subject");
      console.log("请求成功00");


      mTimuLIs=dataJson["result"];
      console.log(mTimuLIs.length);
      for (var i = 0; i < mTimuLIs.length; i++) {


        //console.log(that.data.ResList.result[1]);
        var y= parseInt(mTimuLIs
题目界面 detail.wxml
<import src="../../../../common/templet.wxml"/>
<scroll-view scroll-y="true" class="page-body" >
   <template is="carItem" data="pw_item" wx:for="pw_mTimuLIs" wx:key="TimuList"/>
</scroll-view>
<loading hidden="pw_loadingHide">
  加载中...
</loading>
全局样式 app.wxss
.container {
 height:100%;
 flex: 1;
 display: flex;
 flex-direction: column;
 box-sizing: border-box;
 background-size: 100%;
}
.item-view{
  padding: 10px;
  display: flex;
  flex-direction: column;
  border-top: 1px solid #DEDEDE;
  border-left: 1px solid #DEDEDE;
  box-shadow: 2px 2px 2px #C7C7C7;
  margin: 10px;
  border-radius: 5px;
}


.item-view .content{color: black;}
.item-view .date{ color: grey;margin-top: 10px;}
.item-view image{width: 100%;height: 400rpx;margin-top: 10rpx;}
.loading-view{display: flex;flex-direction: row; justify-content: center;align-items: center;padding: 10px;}
.timu{border: 1px solid #DFDFDF;margin: 20rpx;border-radius: 10px;}
.timu .title{font-size: 40rpx; }
.timu .question{text-indent: 20rpx;margin-left: 10rpx; padding: 10rpx;}
.timu .img{width: 100%;display:flex;flex-direction: column;align-items: center;margin: 0 auto;padding-top: 10rpx;padding-bottom: 10rpx;}
.timu .content{font-size: 30rpx;padding: 10rpx;margin-left: 20rpx }
.timu .select{font-size: 30rpx;margin-left: 30rpx;margin-right: 30rpx; padding: 20rpx; }
Das obige ist der detaillierte Inhalt vonEinführung in die WeChat Mini-Programmvorlage. Für weitere Informationen folgen Sie bitte anderen verwandten Artikeln auf der PHP chinesischen Website!
Stellungnahme:
Der Inhalt dieses Artikels wird freiwillig von Internetnutzern beigesteuert und das Urheberrecht liegt beim ursprünglichen Autor. Diese Website übernimmt keine entsprechende rechtliche Verantwortung. Wenn Sie Inhalte finden, bei denen der Verdacht eines Plagiats oder einer Rechtsverletzung besteht, wenden Sie sich bitte an admin@php.cn
Vorheriger Artikel:Beispielanalyse des 60-s-Countdowns zum Erhalten des Bestätigungscodes im WeChat-MiniprogrammNächster Artikel:Beispielanalyse des 60-s-Countdowns zum Erhalten des Bestätigungscodes im WeChat-Miniprogramm
In Verbindung stehende Artikel
Mehr sehen- WeChat Mini-Programm Einfache DEMO-Layout-, Logik- und Stilübungen
- Ausführliche Erklärung und Beispiele des WeChat-Applets wx.request (Schnittstellenaufrufmethode)
- WeChat Mini-Programm – Detaillierte Erläuterung der WeChat-Anmeldung, WeChat-Zahlung und Vorlagennachrichten
- Einfache Beispielanwendung für das WeChat-Applet (Anwendungskonto) und ausführliche Erläuterung des Beispiels
- Detaillierte Erklärung des WeChat-Applets für die Schleife

