Heim >WeChat-Applet >Mini-Programmentwicklung >Beispiel für die Entwicklung eines WeChat-Applets (Anwendungskonto) für eine praktische Buchhaltungssoftware
Beispiel für die Entwicklung eines WeChat-Applets (Anwendungskonto) für eine praktische Buchhaltungssoftware
- 高洛峰Original
- 2017-03-26 13:41:304160Durchsuche
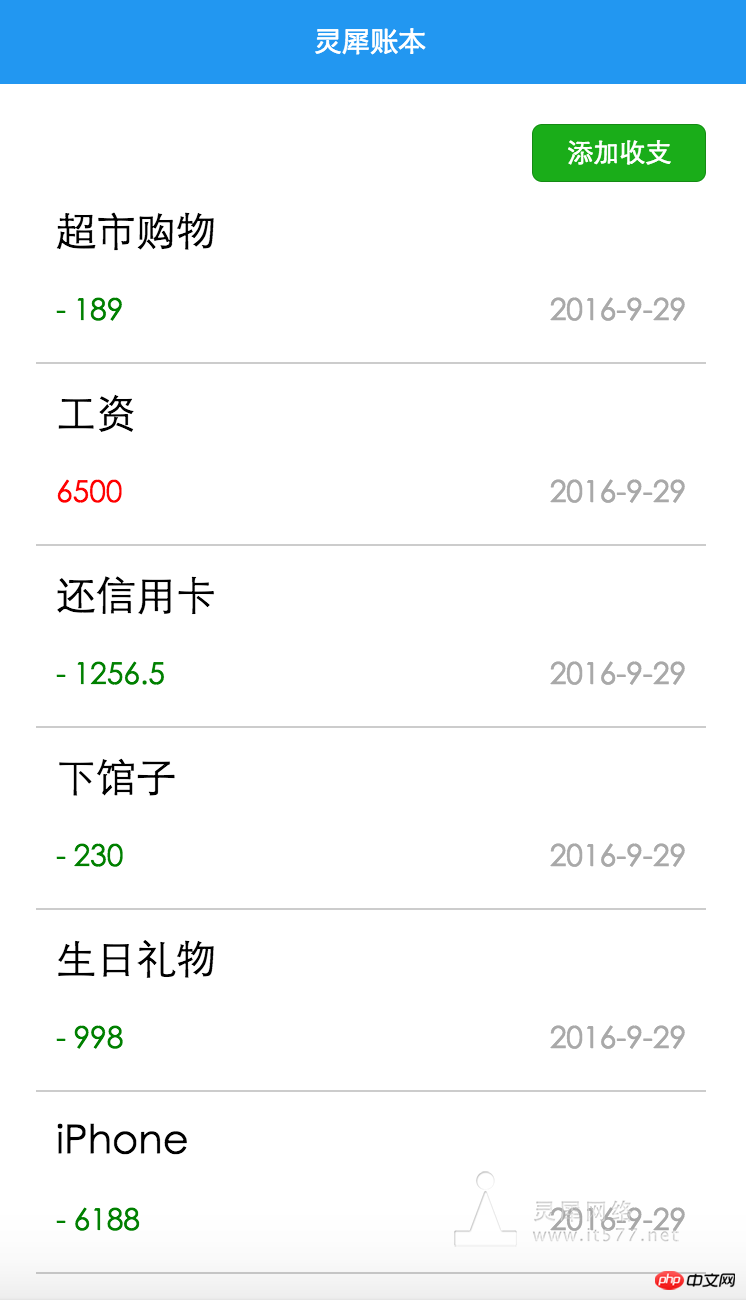
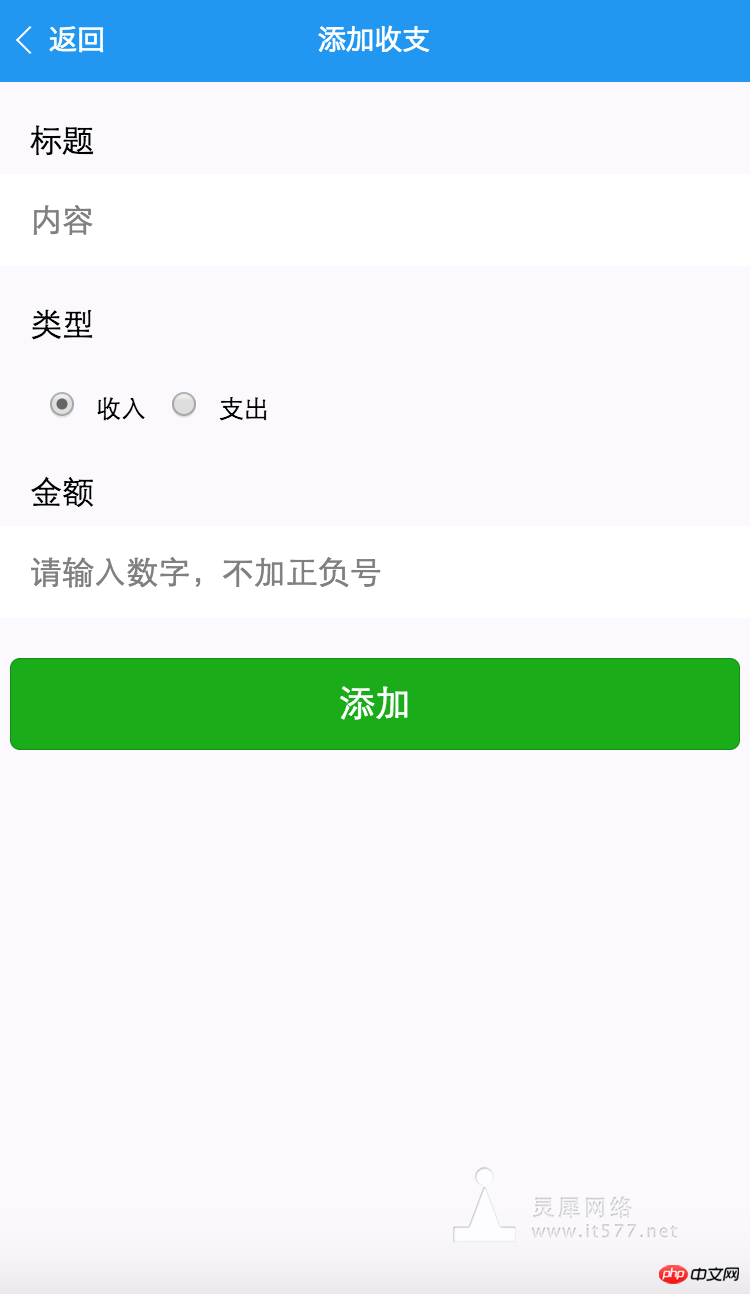
Die offizielle Entwicklung hat v0.10.101100 aktualisiert. Das Modusattribut von Picker unterstützt bereits Datum und Uhrzeit (der Hintergrundbildfehler wurde ebenfalls behoben ), also aktualisieren Sie diese Instanz.
Ziel: Um die integrierte Datumskomponente zu implementieren
Fügen Sie, wie in den Schritten
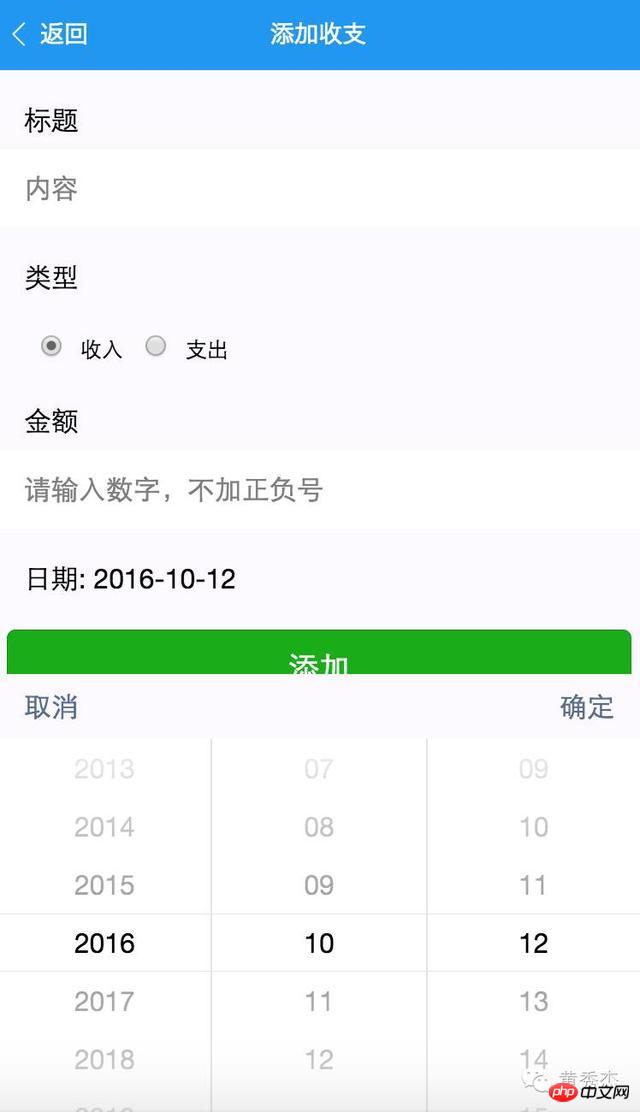
gezeigt, eine Auswahlkomponente zur item.wxml hinzu Datei wie folgt:
    <view>
        <picker>
            <view>
              日期: {{date}}
            </view>
        </picker>
    </view>
Wie im Bild gezeigt
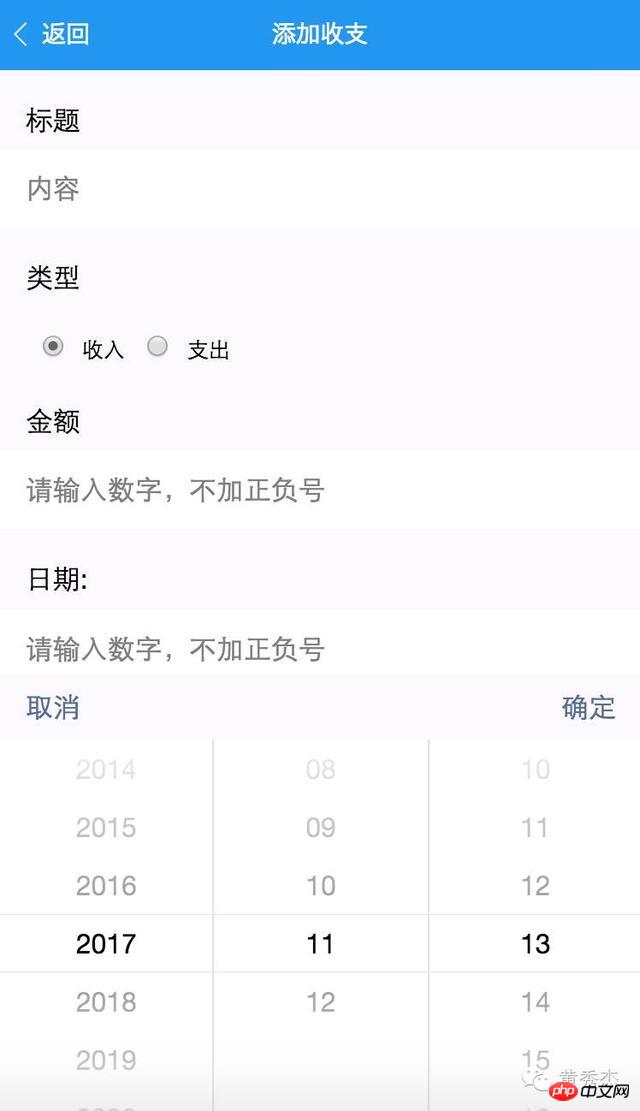
Wie auf dem Bild zu sehen ist:
1. Nach dem Datum sollte standardmäßig ein Leerzeichen angezeigt werden.
2. Auch wenn Sie auf OK klicken, wird es nicht in der Komponente angezeigt.
Wir müssen also ein Datenwertdatum in der Datei item.js deklarieren, das an {{date}} in wxml gebunden werden soll
und dann das Zeichenfolgenformat in onLoad The initialisieren Datumswert von 🎜>An diesem Punkt müssen wir noch einen logischen Fehler beheben, das heißt, das Enddatum der Komponente sollte den aktuellen Tag nicht überschreiten. Die Methode ist auch sehr einfach. Sie müssen nur das Datumsattribut ändern des Pickers in der WXML-Datei vom 01.09.2017 bis { {Datum}} kann
//    获取当前日期
    var date = new Date();
//    格式化日期为"YYYY-mm-dd"
    var dateStr = date.getFullYear() + "-" + (date.getMonth() + 1) + "-" + date.getDate();
//    存回data,以渲染到页面
    this.setData({
        date: dateStr
    })
sein. Beschweren wir uns, der offizielle Picker hat immer noch Fehler, er hört nicht auf Start und Ende Alles in allem können Sie immer noch ein beliebiges Datum auswählen und es vorerst ignorieren. Der Code ist also so geschrieben. Wenn die Entwicklungstools repariert sind, ist alles in Ordnung. Schließlich befindet es sich noch in der internen Testphase, also verwenden Sie es einfach.
Behandeln Sie als Nächstes das Datumskomponente-Klick-Bestätigungsereignis bindDateChange
Kehren Sie zur Datei item.js zurück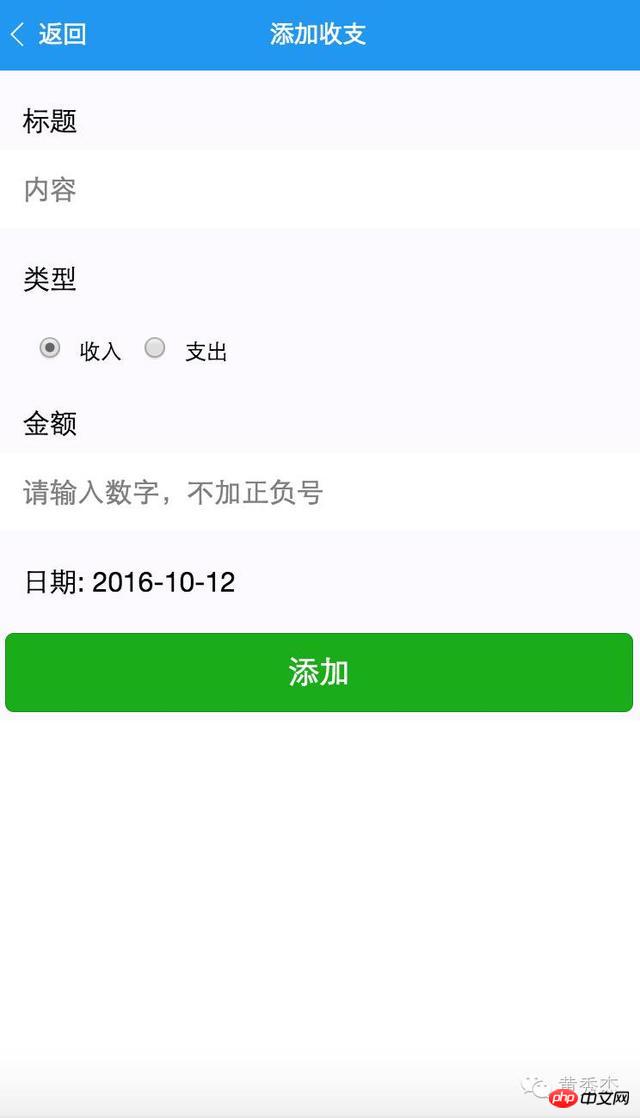
声明一个bindDateChange方法,添加如下代码以写回data中的date值
//  点击日期组件确定事件
  bindDateChange: function(e) {
    this.setData({
        date: e.detail.value
    })
  }
至此,已经实现集成日期picker组件。剩下的就是将它同之前的标题、类型、金额字段那样存在json再本地setStorage存储即可,这里不作赘述,具体可以参考本人公众号之前发的文章《微信小程序(应用号)实战课程之记账应用开发》。
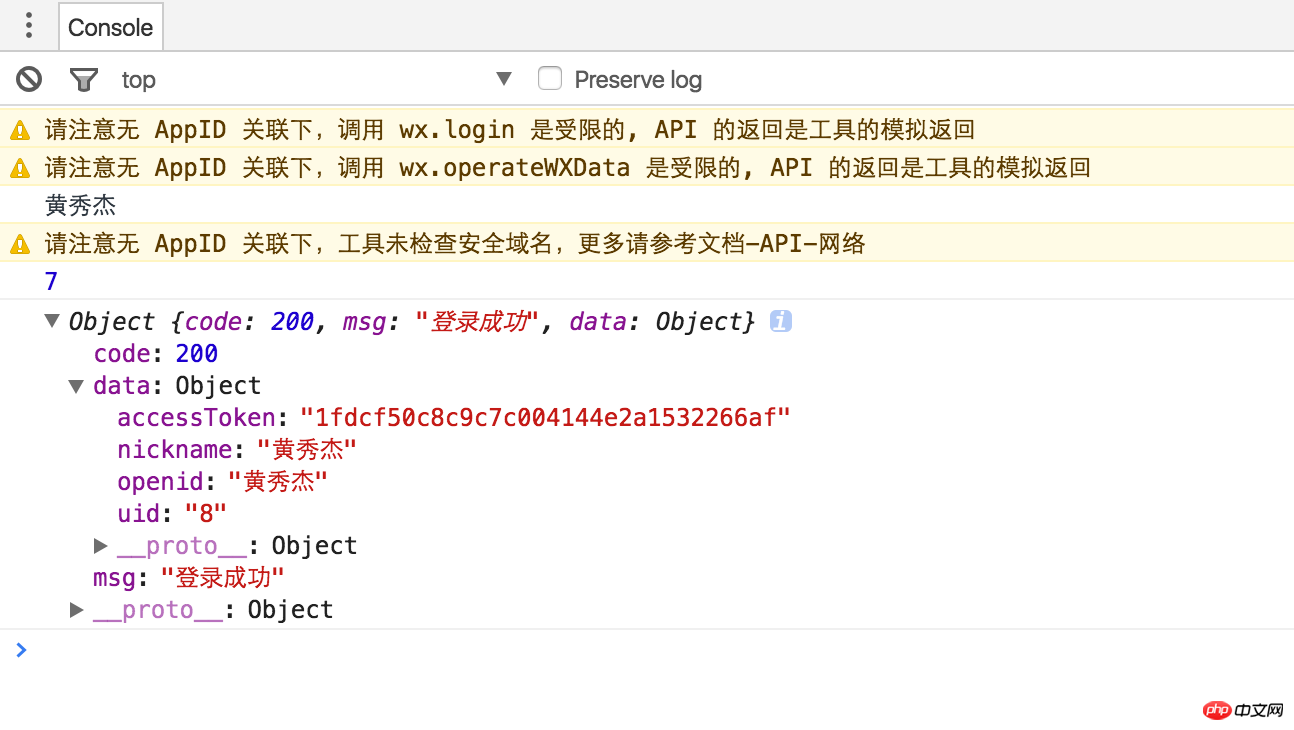
步骤
1.小程序端通过微信第三方登录,取出nickname向服务端请求登录,成功后本地并缓存uid,accessToken
接口出处:https://mp.weixin.qq.com/debug/wxadoc/dev/api/api-login.html
App({
  onLaunch: function() {
    wx.login({
      success: function(res) {
        if (res.code) {
          //发起网络请求
          wx.request({
            url: 'https://test.com/onLogin',
            data: {
              code: res.code
            }
          })
        } else {
          console.log('获取用户登录态失败!' + res.errMsg)
        }
      }
    });
  }
})
缓存用户的基本信息
index.js
  onLoad: function(){
        var that = this
        //调用应用实例的方法获取全局数据
        app.getUserInfo(function(userInfo){
          //请求登录
            console.log(userInfo.nickName);
            app.httpService(
                    'user/login',
                    {
                        openid: userInfo.nickName
                    },
                    function(response){
                        //成功回调
                        console.log(response);
//                      本地缓存uid以及accessToken
                        var userinfo = wx.getStorageSync('userinfo') || {};
                        userinfo['uid'] = response.data.uid;
                        userinfo['accessToken'] = response.data.accessToken;
                        console.log(userinfo);
                        wx.setStorageSync('userinfo', userinfo);
                    }
            );
        })
  }
app.js
定义一个通用的网络访问函数:
  httpService:function(uri, param, cb) {
//    分别对应相应路径,参数,回调
      wx.request({
            url: 'http://financeapi.applinzi.com/index.php/' + uri,
            data: param,
            header: {
                'Content-Type': 'application/json'
            },
            success: function(res) {
                cb(res.data)
            },
            fail: function() {
                console.log('接口错误');
            }
        })
  },
这里method默认为get,如果设置为其他,比如post,那么服务端怎么也取不到值,于是改动了服务端的取值方式,由$POST改为$GET。
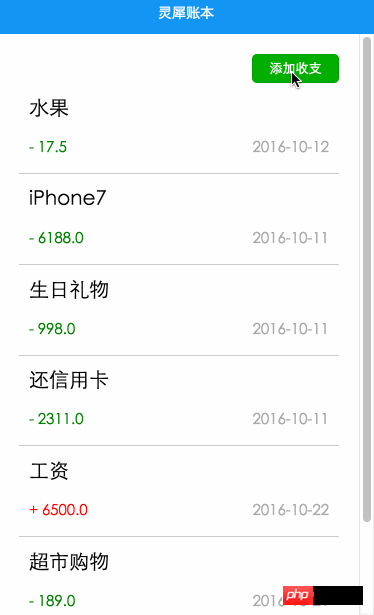
在Storage面板中,检查到数据已成功存入

[2016-10-25]
由单机版升级为网络版
1.缓存accessToken,以后作为令牌使用,uid不必缓存,由服务端完成映射,user/login接口
先来回顾一下app.js封装的httpService的代码实现:
  httpService:function(uri, param, cb) {
//    分别对应相应路径,参数,回调
      wx.request({
            url: 'http://financeapi.applinzi.com/index.php/' + uri,
            data: param,
            header: {
                'Content-Type': 'application/json'
            },
            success: function(res) {
                cb(res.data)
            },
            fail: function() {
                console.log('接口错误');
            }
        })
  }
调用的是wx.request接口,返回res.data即为我们服务器返回的数据,结构与wx.request返回的类似,这里多一层结构,不可混淆。
response.code,response.msg,response.data是我自己服务端定义的结构
res.statusCode,res.errMsg,res.data是微信给我们定义的结构
而我们的response又是包在res.data中的,所以正常不加封装的情况下,要取得我们自己服务端返回的目标数据应该是写成,res.data.data.accessToken;好在已经作了封装,不会那么迷惑人了,今后调用者只认response.data就可以拿到自己想要的数据了。
明白了上述关系与作了封装后,我们调用起来就方便了,index.js中onShow写上如下代码
app.httpService(
                    'user/login',
                    {
                        openid: userInfo.nickName
                    },
                    function(response){
                        //成功回调,本地缓存accessToken
              var accessToken = response.data.accessToken;
                        wx.setStorageSync('accessToken', accessToken);
                    }
            );
app.js onLaunch调用如下代码,在程序启动就登录与缓存accessToken。
之所以不在index.js中调用登录,是因为app launch生命周期较前者更前,accessToken保证要加载item/all之前生成并缓存到本地
  onLaunch: function () {
    //调用应用实例的方法获取全局数据
    var that = this
    //调用登录接口
    wx.login({
      success: function () {
        wx.getUserInfo({
          success: function (res) {
            //请求登录
            that.httpService(
                'user/login',
                {
                  openid: res.userInfo.nickName
                },
                function(response){
                  //成功回调,本地缓存accessToken
                  var accessToken = wx.getStorageSync('logs') || '';
                  accessToken = response.data.accessToken;
                  wx.setStorageSync('accessToken', accessToken);
                }
            );
          }
        })
      }
    })
  },
2.请求网络,对接获取的账目列表,item/all接口
使用onShow而不使用onLoad,是因为每次添加返回后首页需要自刷新
response是服务器返回的数据
而response.data中包含了自己的账目列表信息
{
  "code": 200,
  "msg": "加载成功",
  "data": [
    {
      "id": "21",
      "title": "工资",
      "cate": "+",
      "account": "6500.0",
      "date": "2016-10-22",
      "uid": "8"
    },
    {
      "id": "20",
      "title": "超市购物",
      "cate": "-",
      "account": "189.0",
      "date": "2016-10-21",
      "uid": "8"
    },
    {
      "id": "12",
      "title": "抢红包",
      "cate": "+",
      "account": "20.5",
      "date": "2016-10-30",
      "uid": "8"
    }
  ]
}
读取代码:
  onShow: function () {
    var that = this
    // 获取首页列表,本地storage中取出accessToken作为参数,不必带上uid;
    // 成功回调后,设置为data,渲染wxml
    app.httpService(
                    'item/all',
                    {'accessToken': wx.getStorageSync('accessToken')},
                    function(response){
                        that.setData({
                          'items':response.data
                        });
                    }
    );
  }
布局代码:
<block>
    <view>
      <view>
        <text>{{item.title}}</text>
        <view>
          <text>{{item.cate}} {{item.account}}</text>
          <text>{{item.cate}} {{item.account}}</text>
          <text>{{item.date}}</text>
        </view>
      </view>
    </view>
  </block>
2.请求网络,对接账目,item/add接口
拿到表单组件上的各值,title,record,cate,date,而accessToken我们就在httpService方法统一注入。
  httpService:function(uri, param, cb) {
    // 如果令牌已经存在,那么提交令牌到服务端
    if (wx.getStorageSync('accessToken')) {
      param.accessToken = wx.getStorageSync('accessToken');
    }
    ...
提交到网络
    // 本条数据打包成json
    var record = {
      title: this.data.title,
      cate: this.data.cate,
      account: this.data.account,
      date: this.data.date
    }
    // accessToken放在record传入也可以,但为了更多的复用,我将它放在httpService时统一注入
    // 访问网络
    var app = getApp();
    app.httpService(
      'item/add',
      record,
      function(response) {
        // 提示框
        that.setData({
          modalHidden: false
        });
      }
    );
3.首页传id值,编辑页面访问网络并显示数据
1.从首页列表传item对象的id号到item页面
<view></view>
2.绑定data-id到点击单元格事件itemTap
var id = parseInt(e.currentTarget.dataset.id);
3.使用navigate传值
    wx.navigateTo({
      url: '../item/item?id='+id
    })
4.item页面接收id值,并作判断有无id号
  onLoad: function (options) {
    this.setData({
      id:options.id,
    })
  }
5.读取网络返回的数据与渲染到页面
    var that = this;
    if (options.id) {
      // 访问网络
      var app = getApp();
      app.httpService(
          'item/view',
          {id: options.id},
          function(response){
            that.setData({
              id: response.data.id,
              title: response.data.title,
              cate: response.data.cate,
              account: response.data.account,
              date: response.data.date
            });
          }
        );
    }
6.并将button按钮绑定为update方法
    <button>编辑</button>
    <button>添加</button>
7.修改账目提交到网络,item/update
客户端update方法
update: function(){
    var that = this;
    // 本条数据打包成json
    var record = {
      title: this.data.title,
      cate: this.data.cate,
      account: this.data.account,
      date: this.data.date,
      id: this.data.id
    }
    // accessToken放在record传入也可以,但为了更多的复用,我将它放在httpService时统一注入
    // 访问网络
    var app = getApp();
    app.httpService(
      'item/update',
      record,
      function(response) {
        // 提示框
        that.setData({
          modalHidden: false
        });
      }
    );
  },
8.删除账目,item/del接口
方法实现
  delete: function () {
      var that = this;
      // 访问网络,删除账目
      var app = getApp();
      app.httpService(
          'item/del',
          {id: that.data.id},
          function(response){
            // 提示框
            that.setData({
              modalTitle: '删除成功',
              modalHidden: false
            });
          }
        );
  },
布局页面
先判断是否有id值,有则在编辑按钮正文出现删除按钮
<button>删除</button>
Das obige ist der detaillierte Inhalt vonBeispiel für die Entwicklung eines WeChat-Applets (Anwendungskonto) für eine praktische Buchhaltungssoftware. Für weitere Informationen folgen Sie bitte anderen verwandten Artikeln auf der PHP chinesischen Website!
In Verbindung stehende Artikel
Mehr sehen- WeChat Mini-Programm Einfache DEMO-Layout-, Logik- und Stilübungen
- Ausführliche Erklärung und Beispiele des WeChat-Applets wx.request (Schnittstellenaufrufmethode)
- WeChat Mini-Programm – Detaillierte Erläuterung der WeChat-Anmeldung, WeChat-Zahlung und Vorlagennachrichten
- Einfache Beispielanwendung für das WeChat-Applet (Anwendungskonto) und ausführliche Erläuterung des Beispiels
- Detaillierte Erklärung des WeChat-Applets für die Schleife

