HTML-Tabellen verfügen über eine Reihe von Zeilen und Spalten, in die wir Daten einfügen, anordnen und anzeigen können. Diese Daten werden dann auf der Webseite in tabellarischer Form angezeigt. Mithilfe dieser Tabellen können wir Daten auf geordnete Weise darstellen, z. B. eine Artikelliste anzeigen, tabellarische Daten wie Verkaufsberichte anzeigen, Layouts für Webseitenabschnitte erstellen usw.
In diesem Artikel erfahren Sie, wie Sie die folgenden Arten von HTML-Tabellen erstellen:
Einfacher Tisch
Tabelle mit Rändern und Polsterung
Tisch mit Styling
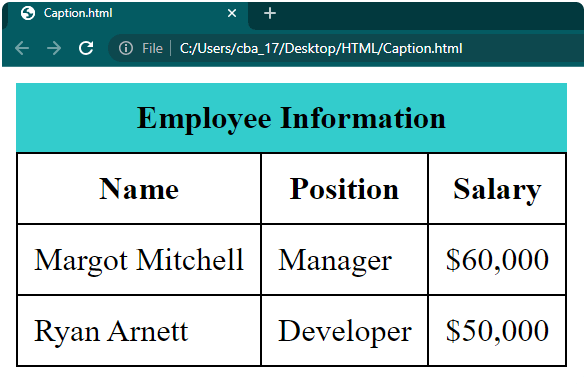
Tabelle mit Bildunterschriften
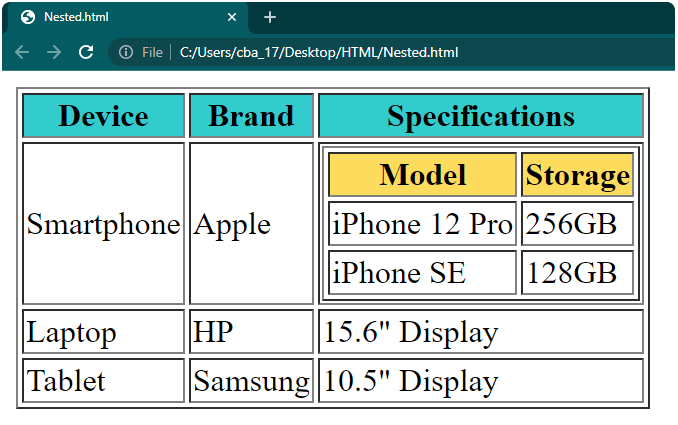
Tabelle mit verschachtelten Tabellen
Tabelle mit Spalten- und Zeilenbereich
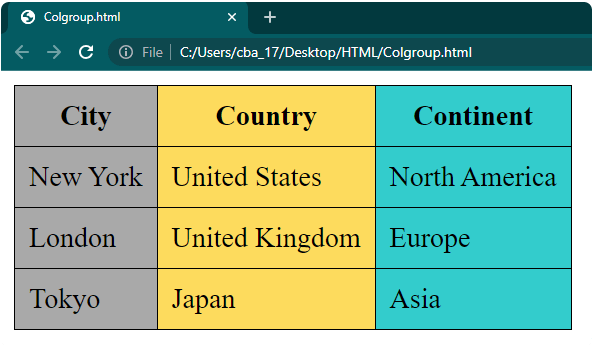
Tabelle mit Kolgruppe
Grundlagen zum Erstellen einer Tabelle in HTML
Texteditor oder HTML-Editor: Öffnen Sie einen Texteditor oder HTML-Editor wie Notepad++, Sublime Text oder Visual Studio Code, um Ihren HTML-Code zu schreiben und zu speichern. Wir haben Notepad++ als Standardeditor verwendet, Sie können jedoch jeden beliebigen Editor verwenden.
HTML-Datei: Erstellen Sie eine neue Datei in Notepad++. Nennen wir es „table.html“ oder einen anderen Namen, den Sie bevorzugen, aber denken Sie daran, den Dateinamen mit „.html“ zu beenden. In diese Datei schreiben Sie Ihren Code für Ihre Webseite. Wenn Sie Hilfe beim Erstellen dieser Datei benötigen, können Sie sich unser Tutorial „Webseite in HTML entwerfen“ ansehen
HTML-Code: Wir haben in diesem Artikel alle wesentlichen Codes zum Erstellen verschiedener Tabellentypen bereitgestellt. Kopieren Sie einfach den Code und fügen Sie ihn in Ihre „table.html“-Datei ein.
Webbrowser: Nachdem Sie Ihren HTML-Code in die Datei „table.html“ geschrieben haben, müssen Sie Ihre Webseite anzeigen und testen. Sie können einen Webbrowser wie Google Chrome, Mozilla Firefox oder Microsoft Edge verwenden. Wir haben Google Chrome verwendet, um Webseiten für alle Beispiele in diesem Artikel anzuzeigen, aber Sie können jeden beliebigen Browser wählen.
In HTML verwendete Tags
Bevor Sie eine Tabelle in HTML erstellen, ist es wichtig, die Tags zu verstehen, die zum Erstellen und Strukturieren verwendet werden. Hier sind die Schlüssel-Tags, die zum Erstellen von HTML-Tabellen verwendet werden:
Tag
Description
Defines a table and its content.
Defines a title or caption for a table.
Groups the header content in a table.
Groups the body content in a table.
Groups the footer content in a table.
Defines a table row.
Defines a table header cell.
Defines a table data/cell.
Specifies a set of one or more columns in a table for the purpose of formatting.
Defines the attributes for a group of columns in a table.
Tag
Beschreibung
Definiert eine Tabelle und ihren Inhalt.
Definiert einen Titel oder eine Beschriftung für eine Tabelle.
Gruppiert den Header-Inhalt in einer Tabelle.
Gruppiert den Hauptinhalt in einer Tabelle.
Gruppiert den Fußzeileninhalt in einer Tabelle.
Definiert eine Tabellenzeile.
Definiert eine Tabellenkopfzelle.
Definiert Tabellendaten/Zelle.
Gibt einen Satz von einer oder mehreren Spalten in einer Tabelle zum Zwecke der Formatierung an.
Definiert die Attribute für eine Gruppe von Spalten in einer Tabelle.
Examples of Tables in HTML
Example 1: Simple Table
Let’s create a basic HTML table that showcases product information. We will include two columns labeled “Product” and “Price.” The table will contain a single row displaying data for the product “Apple” with a price of $20.
To create a simple HTML table:
Open an HTML file in a text or HTML editor.
Add the
element to define the table.
Use the
element to create table rows.
The
element defines table headers (column labels).
Use the
element to create table cells (data).
Insert the desired data within the table cells.
Save the file with the .html extension, and then open it in a web browser to view the table.
Let’s see how to add borders to an HTML table. This is a way to visually separate the different sections of the table and make it easier to read and understand.
Example 2: Table with Borders and Padding
In this example, we will add a table element and set the border and cellpadding attribute. We will use the border attribute and set the width of the table’s border to 1 pixel. For the cellpadding attribute, we will use 5 pixels of padding for the content inside each cell.
If you want to improve the appearance of your table, you can use CSS (Cascading Style Sheets) to add various styles and formatting.
One way to enhance the table is by giving different cells a background color. To do this, you can simply add the style attribute with the background-color property inside the opening
tag. For instance, you can use style=”background-color: #33cccc;” to set the background color to a nice shade of teal.
Using an HTML table with a caption is a great way to present information on a webpage in a tidy and organized manner. It’s like giving your table a title or a brief description to help people grasp its content easily. To include a caption, all you have to do is use the
In HTML, when we talk about a nested table, it means we have a table placed inside another table. So, basically, some cells in the outer table contain a whole new table structure within them. If you want to include a nested table, you just need to insert another table inside any cell of your main table. To understand better, here is an example:
In HTML, the “colspan” and “rowspan” give you the power to merge or split cells horizontally (colspan) and vertically (rowspan) to create more advanced table structures.
If you want to merge cells horizontally, simply use “colspan” followed by the number of cells you want to merge. And if you want to merge cells vertically, you can use “rowspan” along with the number of cells you want to merge.
To use the colspan and rowspan attributes, you can add them directly within the
Das obige ist der detaillierte Inhalt vonErstellen Sie Tabellen in HTML. Für weitere Informationen folgen Sie bitte anderen verwandten Artikeln auf der PHP chinesischen Website!
Der Inhalt dieses Artikels wird freiwillig von Internetnutzern beigesteuert und das Urheberrecht liegt beim ursprünglichen Autor. Diese Website übernimmt keine entsprechende rechtliche Verantwortung. Wenn Sie Inhalte finden, bei denen der Verdacht eines Plagiats oder einer Rechtsverletzung besteht, wenden Sie sich bitte an admin@php.cn