Heim >Backend-Entwicklung >Golang >Authentifizierung mit Golang und AWS Cognito
Authentifizierung mit Golang und AWS Cognito
- WBOYOriginal
- 2024-08-19 06:32:11473Durchsuche
Was heißt Cognito?
Die Authentifizierung einer Anwendung ist etwas sehr Wichtiges im System, aber auch sehr sensibel. Es müssen verschiedene Implementierungen, Sicherheit und Validierung berücksichtigt werden.
Ich habe beschlossen, einen Beitrag über Cognito zu verfassen, ein sehr schönes Tool von AWS, das Ihnen bei der Authentifizierung und Validierung des Benutzers für Web- und mobile Anwendungen helfen kann, die viele Menschen nicht kennen.
Cognito ist eine AWS-Plattform, die für die Erstellung und Validierung von Benutzerzugriffsdaten sowie für die Registrierung von Benutzern und die Speicherung ihrer Informationen sowie für die Generierung von OAuth-Tokens verantwortlich ist. Cognito kann auch die gesamte Benutzervalidierung bereitstellen.
Wir können einige Benutzerdaten erstellen, wie zum Beispiel: E-Mail, Name, Telefon, Geburtsdatum, Spitzname, Geschlecht, Website und viele andere, wir können auch benutzerdefinierte Felder platzieren.
Cognito ermöglicht uns weiterhin die Zusammenarbeit mit „verbundenen Anbietern“, sogenannten Social Logins, wie Google, Facebook und GitHub. Wir werden diesen Beitrag nicht behandeln, aber es ist möglich, dies mit Cognito zu tun.
Was werden wir tun?
Wir werden einige Endpunkte erstellen, um zu zeigen, wie Cognito funktioniert. Wir werden einen Benutzer erstellen, die E-Mail-Adresse bestätigen, uns anmelden, mit dem von Cognito bereitgestellten Token nach einem Benutzer suchen und Informationen aktualisieren.
Einrichten des Projekts
Wir werden etwas sehr Einfaches tun, wir werden uns nicht um den Projektvater kümmern, wir wollen uns nur mit der Nutzung von Wissen befassen.
Um die Endpunkte zu erstellen, werden wir Gin verwenden.
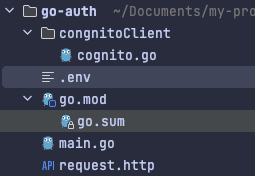
Lassen Sie uns die folgenden Dateien erstellen:
Der Einstiegspunkt unserer Anwendung main.go im Stammverzeichnis des Projekts
.env Zum Speichern kognitiver Anmeldeinformationen
Eine Paste namens cognitoClient und in einer Datei namens cognito.go
Es gibt eine Datei namens request.http, um Ihre Anfragen zu vervollständigen.
Die Struktur wird wie folgt sein:
Cognito auf AWS einrichten
Bevor wir mit dem Code beginnen, konfigurieren wir das Cognito in AWS, um auf das Panel zuzugreifen und nach Cognito zu suchen. Nachdem wir unseren Pool erstellt haben, wählen wir die Option Benutzerverzeichnisse zu Ihrer App hinzufügen.
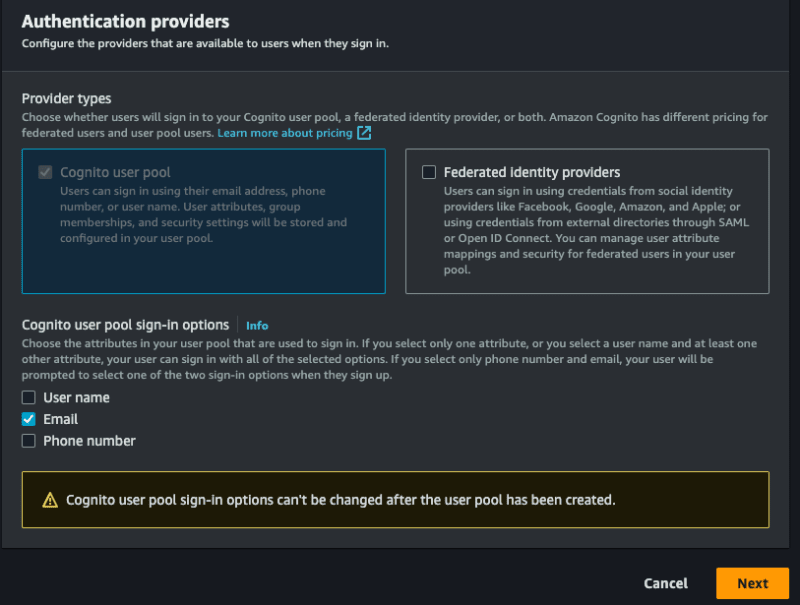
Wählen Sie für Anbietertypen die Option Cognito-Benutzerpool aus. Sie können die Anmeldung per E-Mail, Benutzername und Telefon zulassen. Sie können sich nur für E-Mail entscheiden. Wählen Sie aus, was Sie möchten Wählen Sie lieber Assim zur ersten Stufe aus:
Ich muss noch ein paar Dinge konfigurieren, los geht's!
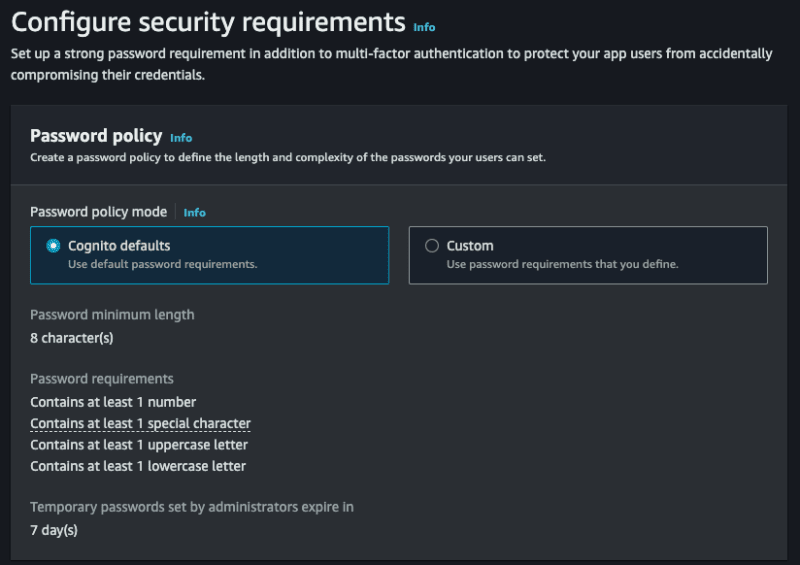
- Im Passwortrichtlinienmodus können Sie eine bestimmte Richtlinie auswählen. Deixieren Sie die Cognito-Standardeinstellungen.
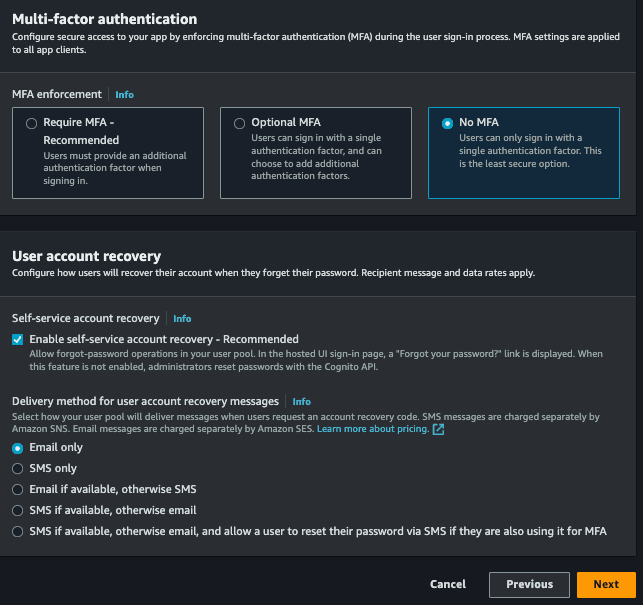
- Multi-Faktor-Authentifizierung ermöglicht unserem Login eine Zwei-Faktor-Authentifizierung, verzichten wir darauf, aber Sie können sie bei Bedarf implementieren, Sie können sich für Keine MFA entscheiden.
- Schließlich oder Benutzerkontowiederherstellung können Sie Möglichkeiten zur Wiederherstellung Ihres Kontos auswählen. Sie können einfach E-Mail auswählen.
Nächster Schritt:
- Self-Service-Anmeldung, wir erlauben dies jeder Person, ausgewählt lassen.
- Cognito-unterstützte Überprüfung und Bestätigung, erlauben Sie Cognito, für die Bestätigung der Identität des Benutzers verantwortlich zu sein, überprüfen Sie diese und wählen Sie außerdem die Option E-Mail-Nachricht senden, E-Mail-Adresse überprüfen.
- Attributänderungen überprüfen, aktivieren Sie diese Option, damit die Aktualisierung der E-Mail-Adresse des Benutzers erneut validiert werden muss.
- Erforderliche Attribute, wählen Sie die Felder aus, die Sie zum Erstellen eines neuen Benutzers obligatorisch machen möchten, Sie wählen die Optionen, die E-Mail-Adresse (und den Namen) aus und der Name wird auch von Ihrem Vater benötigt.
- Benutzerdefinierte Attribute, es ist optional, aber Sie können benutzerdefinierte Felder hinzufügen. Sie erstellen beispielsweise ein Feld namens „custom_id“, das eine beliebige UUID sein kann.
Diese Phase ist auch aufgetreten:
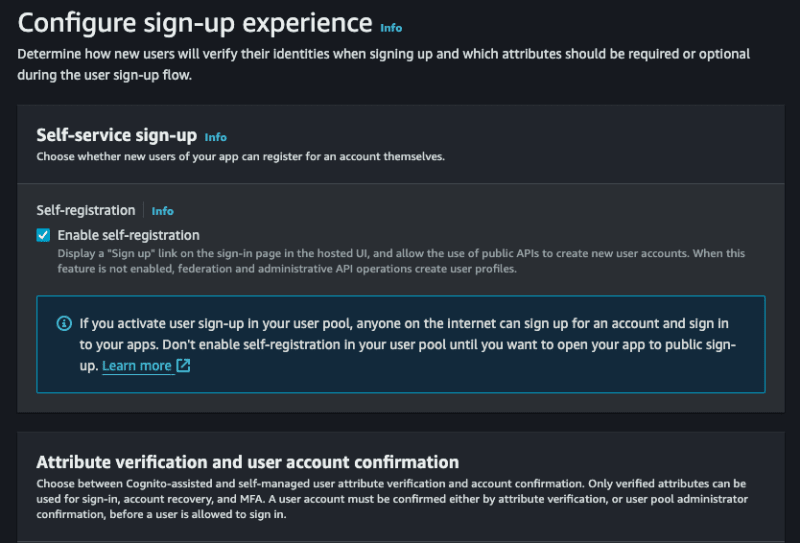
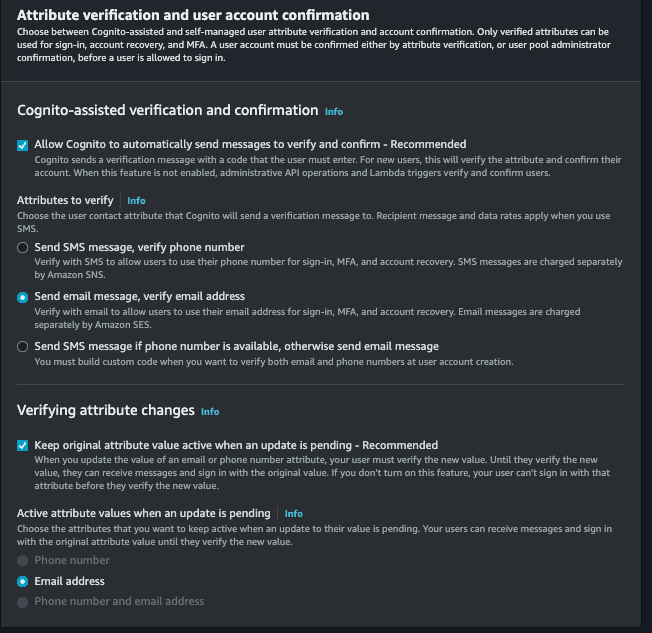
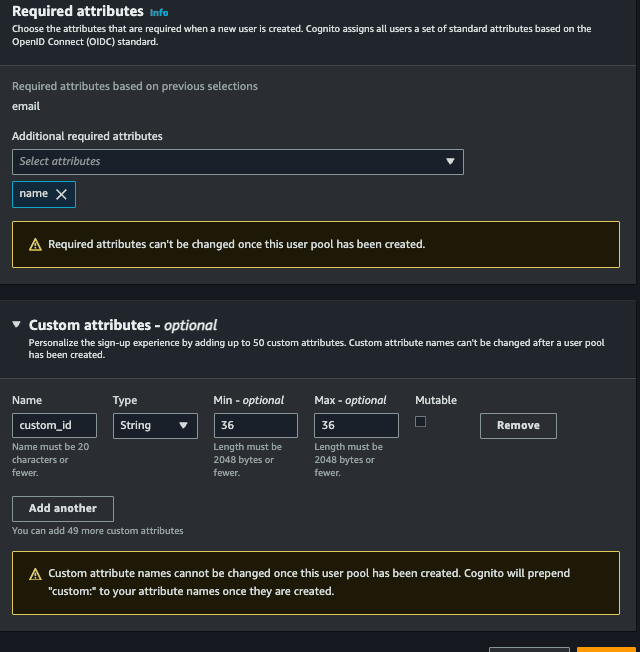
Als nächstes wählen Sie die Option E-Mail mit Cognito senden, sodass wir nichts konfigurieren müssen, um die E-Mails auszulösen.
Geben Sie im nächsten Schritt unter Name des Benutzerpools den gewünschten Namen in Name des App-Clients ein, geben Sie außerdem den gewünschten Namen ein und fahren Sie fort.
In der letzten Phase müssen wir nichts ändern, wir müssen nur den Benutzerpool fertigstellen und erstellen.
Mit allem, Zugriff oder Cognito > Benutzerpools: Wählen Sie den Pool aus, den Sie gerade erstellt haben. In diesem Teil werden alle Benutzer Ihrer Anwendung aufgelistet. Es ist unter anderem möglich, das Token des Benutzers zu widerrufen, zu deaktivieren und zu überprüfen.
Wir werden die ID des Pools angeben, um das Go-SDK für AWS verwenden zu können, für den Zugriff auf den erstellten Pool App-Integration > App-Kundenliste und sehen Sie sich unsere Kunden-ID an:

Lassen Sie uns diese ID in unserer .env-Datei speichern:
COGNITO_CLIENT_ID=client_id
Denken Sie daran, dass Sie immer noch über die AWS-Anmeldeinformationen verfügen müssen, die sich normalerweise im Verzeichnis /Users/your-user/.aws befinden. Wenn Sie sie noch nicht konfiguriert haben, sehen Sie hier, wie das geht.
Cognito implementieren
Lassen Sie uns den Cognito-Teil in eine andere Datei aufteilen.
Registrieren des Benutzers
Innerhalb der cognito.go-Datei initialisieren wir unser Cognito und erstellen unsere Schnittstelle:
  package congnitoClient

  import (
    "github.com/aws/aws-sdk-go/aws"
    "github.com/aws/aws-sdk-go/aws/session"
    cognito "github.com/aws/aws-sdk-go/service/cognitoidentityprovider"
    "github.com/google/uuid"
  )

  type User struct {
    Name     string `json:"name" binding:"required"`
    Email    string `json:"email" binding:"required,email"`
    Password string `json:"password" binding:"required"`
  }

  type CognitoInterface interface {
    SignUp(user *User) error
  }

  type cognitoClient struct {
    cognitoClient *cognito.CognitoIdentityProvider
    appClientID   string
  }

  func NewCognitoClient(appClientId string) CognitoInterface {
    config := &aws.Config{Region: aws.String("us-east-1")}
    sess, err := session.NewSession(config)
    if err != nil {
      panic(err)
    }
    client := cognito.New(sess)

    return &cognitoClient{
      cognitoClient: client,
      appClientID:   appClientId,
    }
  }

  func (c *cognitoClient) SignUp(user *User) error {
    return nil
  }
Zuerst erstellen wir eine Struktur namens „Benutzer“. Diese Struktur enthält die Benutzerfelder, die wir in Cognito speichern müssen.
Dann erstellen wir eine Schnittstelle namens CognitoInterface, wir werden die Methoden haben, die wir verwenden werden, zuerst werden wir nur SignUp haben, das einen Zeiger auf die Benutzerstruktur erhält.
Dann haben wir eine weitere Struktur namens cognitoClient, die unsere Instanz für NewCognitoClient enthält, die unser Konstruktor sein wird.
Wie bereits erwähnt, wird NewCognitoClient wie unser Konstruktor sein. Hier erstellen wir die Sitzung mit AWS und geben diese Verbindung zurück. Diese Verbindung könnte eine globale Variable sein. In unserem Fall werden wir dies nicht tun. Es liegt an Ihnen, zu prüfen, welcher Ansatz für Ihren Anwendungsfall der beste ist.
Jetzt implementieren wir SignUp:
  func (c *cognitoClient) SignUp(user *User) error {
    userCognito := &cognito.SignUpInput{
      ClientId: aws.String(c.appClientID),
      Username: aws.String(user.Email),
      Password: aws.String(user.Password),
      UserAttributes: []*cognito.AttributeType{
        {
          Name:  aws.String("name"),
          Value: aws.String(user.Name),
        },
        {
          Name:  aws.String("email"),
          Value: aws.String(user.Email),
        },
        {
          Name:  aws.String("custom:custom_id"),
          Value: aws.String(uuid.NewString()),
        },
      },
    }
    _, err := c.cognitoClient.SignUp(userCognito)
    if err != nil {
      return err
    }
    return nil
  }
Wir werden den AttributeType von Cognito verwenden, um die Parameter zusammenzustellen, die wir an die Anmeldung des AWS SDK senden. Beachten Sie, dass die „custom_id“, die unser benutzerdefiniertes Feld ist, zuvor „custom“ platziert werden muss, da sie sonst nicht akzeptiert wird , wir haben gerade eine UUID mit dem Google-Paket erstellt. Dieses Feld dient nur dazu, zu zeigen, wie benutzerdefinierte Attribute verwendet werden.
Das ClientId-Feld bezieht sich auf die COGNITO_CLIENT_ID unserer Umgebung, wir werden sie beim Start von main.go weitergeben.
Das ist es, was wir brauchen, um den Benutzer zu retten, einfach nicht wahr?
Vergessen Sie nicht, das Projekt zu beginnen mit:
go mod init <your project name>
Und installieren Sie die erforderlichen Pakete:
go mod tidy
Bestätigen des Kontos
Lassen Sie uns eine weitere Funktion erstellen, um das Konto des Benutzers per E-Mail zu überprüfen. Um das Konto zu verifizieren, muss der Benutzer den per E-Mail gesendeten Code eingeben. Erstellen wir eine neue Struktur und fügen wir der Schnittstelle die neue Methode „ConfirmAccount“ hinzu:
  type UserConfirmation struct {
    Email string `json:"email" binding:"required,email"`
    Code  string `json:"code" binding:"required"`
  }
  type CognitoInterface interface {
    SignUp(user *User) error
    ConfirmAccount(user *UserConfirmation) error
  }
Jetzt lasst uns Folgendes umsetzen:
  func (c *cognitoClient) ConfirmAccount(user *UserConfirmation) error {
    confirmationInput := &cognito.ConfirmSignUpInput{
      Username:         aws.String(user.Email),
      ConfirmationCode: aws.String(user.Code),
      ClientId:         aws.String(c.appClientID),
    }
    _, err := c.cognitoClient.ConfirmSignUp(confirmationInput)
    if err != nil {
      return err
    }
    return nil
  }
Es ist ganz einfach: Wir verwenden den ConfirmSignUpInput aus dem Cognito-Paket, um die Parameter zusammenzustellen, wobei wir bedenken, dass der Benutzername die E-Mail-Adresse des Benutzers ist. Abschließend rufen wir „ConfirmSignUp“ auf und übergeben den „confirmationInput“.
Denken Sie daran, dass wir nur den Fehler zurückgegeben haben. Sie können die Art der Fehlermeldungen verbessern und überprüfen.
Login
Dies sollte die Funktionalität sein, die am häufigsten genutzt wird. Erstellen wir eine Methode namens SignIn und eine Struktur:
  type UserLogin struct {
    Email    string `json:"email" binding:"required,email"`
    Password string `json:"password" binding:"required"`
  }
  type CognitoInterface interface {
    SignUp(user *User) error
    ConfirmAccount(user *UserConfirmation) error
    SignIn(user *UserLogin) (string, error)
  }
Unser SignIn erhält ein UserLogin.
Lassen Sie uns Folgendes umsetzen:
  func (c *cognitoClient) SignIn(user *UserLogin) (string, error) {
    authInput := &cognito.InitiateAuthInput{
      AuthFlow: aws.String("USER_PASSWORD_AUTH"),
      AuthParameters: aws.StringMap(map[string]string{
        "USERNAME": user.Email,
        "PASSWORD": user.Password,
      }),
      ClientId: aws.String(c.appClientID),
    }
    result, err := c.cognitoClient.InitiateAuth(authInput)
    if err != nil {
      return "", err
    }
    return *result.AuthenticationResult.AccessToken, nil
  }
Wir verwenden die InitiateAuth-Funktion aus dem aws cognito-Paket. Wir müssen den Benutzernamen (E-Mail-Adresse des Benutzers), das Passwort und den AuthFlow übergeben. Dieses Feld bezieht sich auf die Art des Zugriffs, den wir zulassen, in unserem Fall USER_PASSWORD_AUTH.
Wenn Sie eine Fehlermeldung wie diese erhalten:
Sie haben allen Proxys vertraut, das ist NICHT sicher. Wir empfehlen Ihnen, einen Wert festzulegen
Es ist notwendig, den ALLOW_USER_PASSWORD_AUTH-Flow zu aktivieren, um den Zugriff auf Cognito im AWS-Panel zu konfigurieren, gehen Sie zu:
Benutzerpools > Wählen Sie Ihren Pool > App-Integration > App-Client-Liste > Wählen Sie einen Client aus, dieser Bildschirm wird geöffnet:
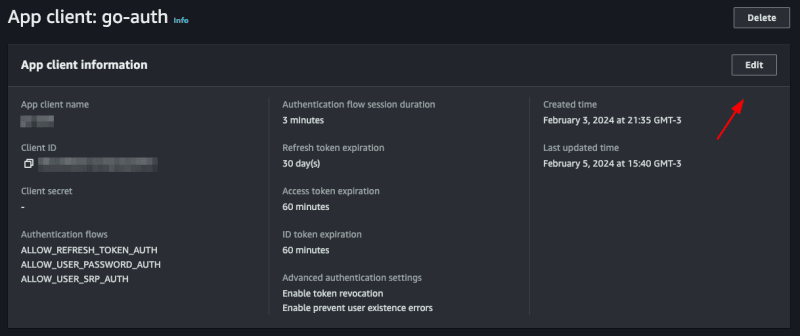
Click on edit and in Authentication flows select the option ALLOW_USER_PASSWORD_AUTH then save, with this you can now log in with the user's password and email.
Listando um usuário
Para mostrar como utilizar o token jwt fornecido pelo cognito vamos criar um endpoint que mostra os dados do usuário salvos no cognito apenas com o token.
Let's create another function called GetUserByToken that will receive a token and return a struct of type GetUserOutput that we will get from the cognito package.
  type CognitoInterface interface {
    SignUp(user *User) error
    ConfirmAccount(user *UserConfirmation) error
    SignIn(user *UserLogin) (string, error)
    GetUserByToken(token string) (*cognito.GetUserOutput, error)
  }
If you click on GetUserOutput you will see what is inside this struct
  type GetUserOutput struct {
    _ struct{} `type:"structure"`
    MFAOptions []*MFAOptionType `type:"list"`
    PreferredMfaSetting *string `type:"string"`
    UserAttributes []*AttributeType `type:"list" required:"true"`
    UserMFASettingList []*string `type:"list"`
    Username *string `min:"1" type:"string" required:"true" sensitive:"true"`
  }
inside the _ struct{} there are custom attributes that we created for our user, in our case the custom_id.
Let's implement:
  func (c *cognitoClient) GetUserByToken(token string) (*cognito.GetUserOutput, error) {
    input := &cognito.GetUserInput{
      AccessToken: aws.String(token),
    }
    result, err := c.cognitoClient.GetUser(input)
    if err != nil {
      return nil, err
    }
    return result, nil
  }
We use GetUser from the cognito package, it only needs an AccessToken which is the token provided by cognito itself.
Updating password
Finally, we will update the user's password. To do this, we will need the email address and the new password. We already have the UserLogin struct with the fields we need. We will reuse it. If you wish, create a new one just for this function. Let's create the UpdatePassword function:
  type CognitoInterface interface {
    SignUp(user *User) error
    ConfirmAccount(user *UserConfirmation) error
    SignIn(user *UserLogin) (string, error)
    GetUserByToken(token string) (*cognito.GetUserOutput, error)
    UpdatePassword(user *UserLogin) error
  }
Let's implement:
  func (c *cognitoClient) UpdatePassword(user *UserLogin) error {
    input := &cognito.AdminSetUserPasswordInput{
      UserPoolId: aws.String(os.Getenv("COGNITO_USER_POOL_ID")),
      Username:   aws.String(user.Email),
      Password:   aws.String(user.Password),
      Permanent:  aws.Bool(true),
    }
    _, err := c.cognitoClient.AdminSetUserPassword(input)
    if err != nil {
      return err
    }
    return nil
  }
We will use the AdminSetUserPassword function from the cognito package, we need to pass the user's email and the new password, in addition we have to pass the UserPoolId, we will put the COGNITO_USER_POOL_ID in the .env file, to search in aws just access your pool and copy the User pool ID

We will also pass Permanent, informing that it is a permanent password, you could pass false, so Cognito would create a temporary password for the user, this will depend on the strategy you will use in your application.
Creating the main
Let's create our main.go, this will be the file where we will start cognito and create our routes.
  func main() {
    err := godotenv.Load()
    if err != nil {
      panic(err)
    }
    cognitoClient := congnitoClient.NewCognitoClient(os.Getenv("COGNITO_CLIENT_ID"))
    r := gin.Default()

    fmt.Println("Server is running on port 8080")
    err = r.Run(":8080")
    if err != nil {
      panic(err)
    }
  }
First we will load our envs with the godotenv package, then we start our cognito client, passing the COGNITO_CLIENT_ID, which we got earlier, then we start gin and create a server, that's enough.
Creating the endpoints
Creating a user
Let's create a function inside the main.go file itself, let's call it CreateUser:
  func CreateUser(c *gin.Context, cognito congnitoClient.CognitoInterface) error {
    var user congnitoClient.User
    if err := c.ShouldBindJSON(&user); err != nil {
      return errors.New("invalid json")
    }
    err := cognito.SignUp(&user)
    if err != nil {
      return errors.New("could not create use")
    }
    return nil
  }
Something simple, we just convert what we receive in the body to our struct using gin's ShouldBindJSON, then we call the SignUp that we created in cognito.go.
Now let's create the endpoint inside the main.go function:
  r.POST("user", func(context *gin.Context) {
        err := CreateUser(context, cognitoClient)
        if err != nil {
            context.JSON(http.StatusBadRequest, gin.H{"error": err.Error()})
            return
        }
        context.JSON(http.StatusCreated, gin.H{"message": "user created"})
    })
We call the function we just created CreateUser, if there is an error we throw a StatusBadRequest, if it is successful a StatusCreated, let's test.
Let's do a go mod tidy downloading all the packages, then we'll run the application with go run main.go
Now we can create a call in the request.http file and execute:
POST http://localhost:8080/user HTTP/1.1
content-type: application/json

{
  "Name": "John Doe",
  "email": "wivobi1159@bitofee.com",
  "password": "Pass@1234"
}
If everything is correct we will receive the message:
{
  "message": "user created"
}
Now entering the Cognito panel on AWS, and accessing the pool then the users, we will have our user there:

Confirming a user
Note that the user we created above is not confirmed, let's confirm it!
Create a function called ConfirmAccount in the main.go file:
  func ConfirmAccount(c *gin.Context, cognito congnitoClient.CognitoInterface) error {
    var user congnitoClient.UserConfirmation
    if err := c.ShouldBindJSON(&user); err != nil {
      return errors.New("invalid json")
    }
    err := cognito.ConfirmAccount(&user)
    if err != nil {
      return errors.New("could not confirm user")
    }
    return nil
  }
Same concept we used before, let's convert the body to the UserConfirmation struct and pass it to ConfirmAccount in cognito.go.
Let's create the endpoint:
  r.POST("user/confirmation", func(context *gin.Context) {
        err := ConfirmAccount(context, cognitoClient)
        if err != nil {
            context.JSON(http.StatusBadRequest, gin.H{"error": err.Error()})
            return
        }
        context.JSON(http.StatusCreated, gin.H{"message": "user confirmed"})
    })
It's also simple, we just handle the error and return a message, let's create our call and test it:
POST http://localhost:8080/user/confirmation HTTP/1.1
content-type: application/json

{
  "email": "wivobi1159@bitofee.com",
  "code": "363284"
}
We will receive the message:
{
  "message": "user confirmed"
}
Now accessing Cognito again on the AWS panel, notice that the user is confirmed, remembering that you need to enter a valid email, you can use a temporary email to play around, but it needs to be valid, as Cognito will send the confirmation code and it needs to be a valid code to confirm successfully.

Login
Now let's create our token, to do this in the main.go file create a function called SignIn, this function will return an error and a token.
  func SignIn(c *gin.Context, cognito congnitoClient.CognitoInterface) (string, error) {
    var user congnitoClient.UserLogin
    if err := c.ShouldBindJSON(&user); err != nil {
      return "", errors.New("invalid json")
    }
    token, err := cognito.SignIn(&user)
    if err != nil {
      return "", errors.New("could not sign in")
    }
    return token, nil
  }
Same pattern as the other functions, we convert the body to the UserLogin struct and pass it to SignIn of cognito.go.
Let's create the endpoint:
  r.POST("user/login", func(context *gin.Context) {
        token, err := SignIn(context, cognitoClient)
        if err != nil {
            context.JSON(http.StatusBadRequest, gin.H{"error": err.Error()})
            return
        }
        context.JSON(http.StatusCreated, gin.H{"token": token})
    })
Now we return a token to the user, let's create the call and test:
POST http://localhost:8080/user/login HTTP/1.1
content-type: application/json

{
  "email": "wivobi1159@bitofee.com",
  "password": "Pass@1234"
}
When making the call we will receive our jwt token:
{
  "token": "token_here"
}
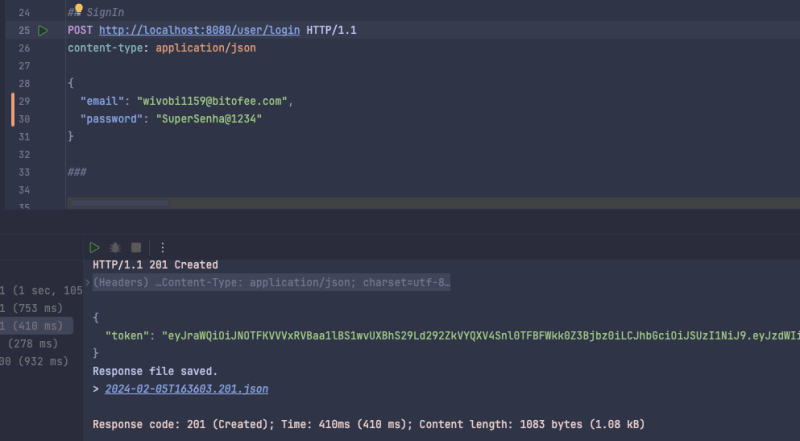
If we get the jwt token we can see what's inside, using the website jwt.io.
Listing a user
Now we will list the user data saved in cognito using only the token, to do this create a function called GetUserByToken in main.go and we will need a struct to represent the response that we will return to the user, we will create it in main as well:
  type UserResponse struct {
    ID            string `json:"id"`
    Name          string `json:"name"`
    Email         string `json:"email"`
    CustomID      string `json:"custom_id"`
    EmailVerified bool   `json:"email_verified"`
  }

  func main() {}
Now the function:
  func GetUserByToken(c *gin.Context, cognito congnitoClient.CognitoInterface) (*UserResponse, error) {
    token := strings.TrimPrefix(c.GetHeader("Authorization"), "Bearer ")
    if token == "" {
      return nil, errors.New("token not found")
    }
    cognitoUser, err := cognito.GetUserByToken(token)
    if err != nil {
      return nil, errors.New("could not get user")
    }
    user := &UserResponse{}
    for _, attribute := range cognitoUser.UserAttributes {
      switch *attribute.Name {
      case "sub":
        user.ID = *attribute.Value
      case "name":
        user.Name = *attribute.Value
      case "email":
        user.Email = *attribute.Value
      case "custom:custom_id":
        user.CustomID = *attribute.Value
      case "email_verified":
        emailVerified, err := strconv.ParseBool(*attribute.Value)
        if err == nil {
          user.EmailVerified = emailVerified
        }
      }
    }
    return user, nil
  }
This will be the biggest function, we need to map what we receive from Cognito to our UserResponse struct, we do this with a for and a switch, of course we could improve it, but for the sake of example we will keep it like this. Also to map custom attributes we need to put custom before, like custom:custom_id.
We also check if the user passed the token in the header, if not we return an error.
Let's create the endpoint:
  r.GET("user", func(context *gin.Context) {
        user, err := GetUserByToken(context, cognitoClient)
        if err != nil {
            if err.Error() == "token not found" {
                context.JSON(http.StatusUnauthorized, gin.H{"error": "token not found"})
                return
            }
            context.JSON(http.StatusBadRequest, gin.H{"error": err.Error()})
            return
        }
        context.JSON(http.StatusOK, gin.H{"user": user})
    })
We perform the same validation as the other endpoints, but now we check the error type and if it is of the token not found type we return a StatusUnauthorized.
Let's test:
GET http://localhost:8080/user HTTP/1.1
content-type: application/json
Authorization: Bearer token_jwt
Let's receive the user:
{
  "user": {
    "id": "50601dc9-7234-419a-8427-2a4bda92d33f",
    "name": "John Doe",
    "email": "wivobi1159@bitofee.com",
    "custom_id": "cb748d09-40de-457a-af23-ed9483d69f8d",
    "email_verified": true
  }
}
Updating password
Finally, let's create the UpdatePassword function that will update the user's password:
  func UpdatePassword(c *gin.Context, cognito congnitoClient.CognitoInterface) error {
    token := strings.TrimPrefix(c.GetHeader("Authorization"), "Bearer ")
    if token == "" {
      return errors.New("token not found")
    }
    var user congnitoClient.UserLogin
    if err := c.ShouldBindJSON(&user); err != nil {
      return errors.New("invalid json")
    }
    err := cognito.UpdatePassword(&user)
    if err != nil {
      return errors.New("could not update password")
    }
    return nil
  }
We also make it mandatory to inform the token in the header, the rest of the function is what we have already done previously.
Let's create the last endpoint:
  r.PATCH("user/password", func(context *gin.Context) {
        err := UpdatePassword(context, cognitoClient)
        if err != nil {
            if err.Error() == "token not found" {
                context.JSON(http.StatusUnauthorized, gin.H{"error": "token not found"})
                return
            }
            context.JSON(http.StatusBadRequest, gin.H{"error": err.Error()})
            return
        }
        context.JSON(http.StatusOK, gin.H{"message": "password updated"})
    })
Let's make the call:
PATCH http://localhost:8080/user/password HTTP/1.1
content-type: application/json
Authorization: Bearer token_jwt

{
  "email": "wivobi1159@bitofee.com",
  "password": "NovaSenha2@2222"
}
Now when you update your password and try to log in you will receive an error, and if you use the new password, everything will work.
Final considerations
In this post we talk a little about Cognito, one of the many AWS services that many people don't know about but that helps a lot in the evolution of your system.
Cognito's practicality goes beyond what I've discussed. Making a basic login is simple, but Cognito stands out for already providing you with an account verification system "ready", a login option with social networks (which can be quite annoying to implement without Coginito), two-factor authentication, among others, and it also has AWS security to protect user data.
Cognito has more functionality, it's worth seeing all of them in the documentation.
Repository link
Project repository
See the post on my blog here
Subscribe and receive notification of new posts, participate
Das obige ist der detaillierte Inhalt vonAuthentifizierung mit Golang und AWS Cognito. Für weitere Informationen folgen Sie bitte anderen verwandten Artikeln auf der PHP chinesischen Website!

