第12章 jQuery中的基本操作(二)
时间:2018年10月10号 天气:晴
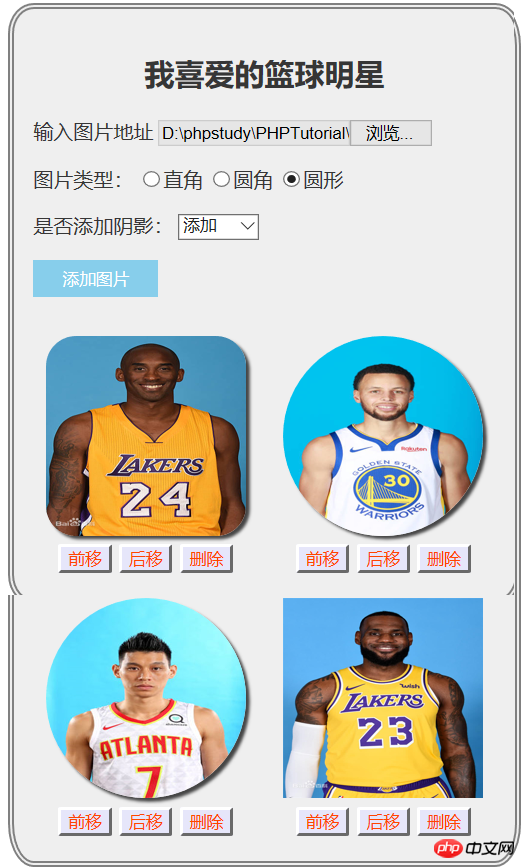
1.实战: 武林高手在线相册
实例
<!DOCTYPE html>
<html lang="en">
<head>
    <meta charset="UTF-8">
    <title>实战演练:篮球明星照片在线管理</title>
    <link rel="icon" type="image/x-icon" href="images/logo.jpg">
</head>
<style>
    .wrap{
        width: 400px;
        height: auto;
        background-color: #efefef;
        color: #363636;
        border: 5px double gray;
        border-radius: 5%;
        margin: auto;
    }
    .wrap .header{
        padding: 15px;
    }
    .add{
        background-color: skyblue;
        color: white;
        border: none;
        width: 100px;
        height: 30px;
      }
    .add:hover{
        cursor: pointer;
        font-size: 1.1rem;
        background-color: coral;
    }
     .main{
         overflow: hidden;
     }
    .main ul{
        list-style-type: none;
        margin: 0;
        padding: 0;
    }
    .main ul li {
        display: block;
        width: 170px;
        height: 200px;
        float: left;
        margin-left: 20px;
        margin-bottom: 10px;
        text-align: center;
    }
    .main ul li button{
        background-color: lavender;
        color: orangered;
        margin: 3px;
        border-radius: 5%;
    }
    .main ul li button:hover{
        font-size: 1.01rem;
        background-color: lightcoral;
        color: white;
        cursor:pointer;
    }

</style>
<body>
<div class="wrap">
    <div class="header">
        <h2 align="center">我喜爱的篮球明星</h2>
        <p>
            <label for="img_url">输入图片地址</label>
            <input type="file" id="img_url" name="img_url" placeholder="图片地址">
        </p>
        <p>
            图片类型:
            <input type="radio" id="rect" name="border" value="0" ><label for="rect">直角</label>
            <input type="radio" id="radius" name="border" value="15%"><label for="radius">圆角</label>
            <input type="radio" id="circle" name="border" value="50%"><label for="rect">圆形</label>
        </p>
        <p>
            是否添加阴影:
            <select name="shadow" id="">
                <option value="0">不添加</option>
                <option value="1">添加</option>
                <option value="1" selected>默认</option>
            </select>
        </p>
        <p><button class="add">添加图片</button></p>
    </div>
    <div class="main">
        <ul>
            <!--<li>
                <button>前</button>
                <button>后</button>
                <button>删</button>
            </li>-->
        </ul>
    </div>
</div>
<script src="lib/jQuery.js"></script>
<script>
    <!--三步走 -->
    $(function () {
  $('button.add').on('click',function () {
//      1、获取图片的相关信息
      //判断是否选取了图片
      let img_url = $('#img_url').val();
      if (img_url.length === 0){
          alert('请选择一张图片');
          $('#img_url').focus();
          return false;
      }
      //获取图片的样式类型
      let img_type = $(':radio:checked').val();
      //添加阴影与否
      let shadow = 'none';
      if ($(':selected').val()==='1'){
          shadow = '3px 3px 3px #444';
      }
//    2、创建图片并添加到页面中
      //改成file文件上传
      console.log(img_url);
      console.log(img_url.split('\\')[2])
      console.log('http://www.js.io/0918/images'+img_url.split('\\')[2]);
      img_url = 'http://www.js.io/0918/images/'+img_url.split('\\')[2];
      let img = $('<img>')
          .prop('src',img_url)
          .width(160)
          .height(160)
          .css({
              'border-radius':img_type,
              'box-shadow':shadow
          });
      let before = $('<button></button>').text('前移');
      let after = $('<button></button>').text('后移');
      let remove = $('<button></button>').text('删除');

      //船舰容器包裹所有内容
      let contaier = $('<li>');
      //将图片和按钮添加到li中
      contaier.append(img,before,after,remove);
      //将li添加到ul中
      contaier.appendTo('ul');

      //给三个按钮添加功能
      //前移
     before.click(function () {
        let current = $(this).parent();
        let prv = current.prev();
        prv.before(current);
     });
     //后移
      after.click(function () {
          let current =$(this).parent();
          let next = current.next();
          next.after(current);
      });
      //删除
      remove.click(function () {
          if (confirm('确定删除吗?')){
              $(this).parent().remove();
          }
          return false;
      });
  });
  });
</script>
</body>
</html>
运行实例 »
点击 "运行实例" 按钮查看在线实例

总结:
首先:自己比较懒惰最近,课程没按时上,作业也没做。
其次:感觉这部分学的比较吃力,看的录播比较慢。
最后:这段时间状态已经调整好了,应该会疯狂的补交拉下的作业。

