1、本节课主要学习了表单制作、元素的单位、样式继承、样式冲突以及一些常用的CSS选择器。
具体总结内容可以见下面。
2、表单的制作
表单
<!DOCTYPE html>
<html lang="en">
<head>
	<meta charset="UTF-8">
	<title>表单</title>
</head>
<body>
	<form action="demo.php" method="get">
		<!-- 文本框 -->
		姓名:<input type="text" name="name" value="" placeholder="不少于8个字节"><br>
		<!-- 密码框 -->
		密码:<input type="password" name="password" value=""><br>
		<!-- 单选框 -->
		性别:<input type="radio" name="sex" value="male" >	男<input type="radio" name="sex" value="female" >女
		<input type="radio" name="sex" value="secret" checked>保密
		<br>
		<!-- 复选框 -->
		爱好:<input type="checkbox" name="hobby[]" value="study" checked>学习
		<input type="checkbox" name="hobby[]" value="reading" checked>读书
		<input type="checkbox" name="hobby[]" value="cook">做饭
		<input type="checkbox" name="hobby[]" value="wash">洗衣服
		<br>
		<!-- 下拉列表 -->
		级别:
		<select name="level" id="">
			<option value="0" selected="">比丘</option>
			<option value="1">罗汉</option>
			<option value="1">菩萨</option>
			<option value="3">佛</option>

		</select>
		<br>
		头像:<input type="file" name="photo" accept="image/*"><br>
		<!-- 文本域 -->
		<textarea name="comment" cols="30" rows="10" value="aaa">请留言</textarea>

		<!-- 隐藏域 -->
		<input type="hidden" name="user_id" value="
		10"><br>

		<!-- 按钮 -->
		<input type="submit" name="submit" value="提交">
		<input type="reset" name="reset" value="重填">

		<button type="button">登录</button>


	</form>
</body>
</html>
运行实例 »
点击 "运行实例" 按钮查看在线实例
3、 用表格布局来实现用户注册表单
我们还要学习几个新标签<label><fieldset><legend>
实例
<!DOCTYPE html>
<html lang="en">
<head>
    <meta charset="UTF-8">
    <title>用表格布局来实现用户注册表单</title>
</head>
<body>
<!-- 这个案例中,我们还要学习几个新标签,<label><fieldset><legend> -->

<form action="" method="post">
    <table border="0" cellspacing="0" cellpadding="8" align="center" width="400" bgcolor="powderblue">
        <caption><h2>用户注册</h2></caption>
        <tr><td colspan="2"><hr></td></tr>  <!-- 此行代码就是画一条分隔线没有其它用处 -->
        <tr align="center">
            <td align="right" width="60"><label for="name">邮箱:</label></td>
            <td align="left" width="300"><input type="text" id="name" name="name" value="" placeholder="example@mail.com" size="30" width="200"></td>
        </tr>

        <tr align="center">
            <td align="right"><label for="password">密码:</label></td>
            <td align="left"><input type="text" id="password" name="name" value="" placeholder="占位符" size="30"></td>
        </tr>

        <tr align="center">  <!-- 如何设置label标签,点击时会导致第一个控件被选中 -->
            <td align="right">性别:</td> <!-- 不需要进入焦点 -->
            <td align="left">
                <input type="radio"  name="sex" value="male">男
                <input type="radio"  name="sex" value="female">女
                <input type="radio"  name="sex" value="secret" checked="">保密
            </td>
        </tr>

        <tr align="center">
            <td align="right">兴趣:</td>   <!-- 不需要进入焦点 -->
            <td align="left">
                <input type="checkbox" name="happy[]" value="html">HTML
                <input type="checkbox" name="happy[]" value="css">CSS
                <input type="checkbox" name="happy[]" value="javascript">JavaScript
                <input type="checkbox" name="happy[]" value="php" checked="">PHP
            </td>
        </tr>


        <tr align="center">
            <td align="right"><label for="photo">头像:</label></td>
            <td align="left">
                <img src="../images/13.png" height="30">
                <input type="file" id="photo" name="photo" accept="image/*">
            </td>
        </tr>

        <tr align="center">
            <td valign="middle" align="right"><label>简介:</label></td>
            <td align="left"><textarea name="comment" id="comment" rows="5" cols="40" placeholder="感谢php中文网"></textarea></td>
        </tr>

        <tr>
            <td colspan="2" align="center">
                <hr>
                <input type="submit" name="submit" value="提交">

                <input type="reset" name="reset" value="重填">
            </td>
        </tr>

    </table>
</form>
</body>
</html>
运行实例 »
点击 "运行实例" 按钮查看在线实例
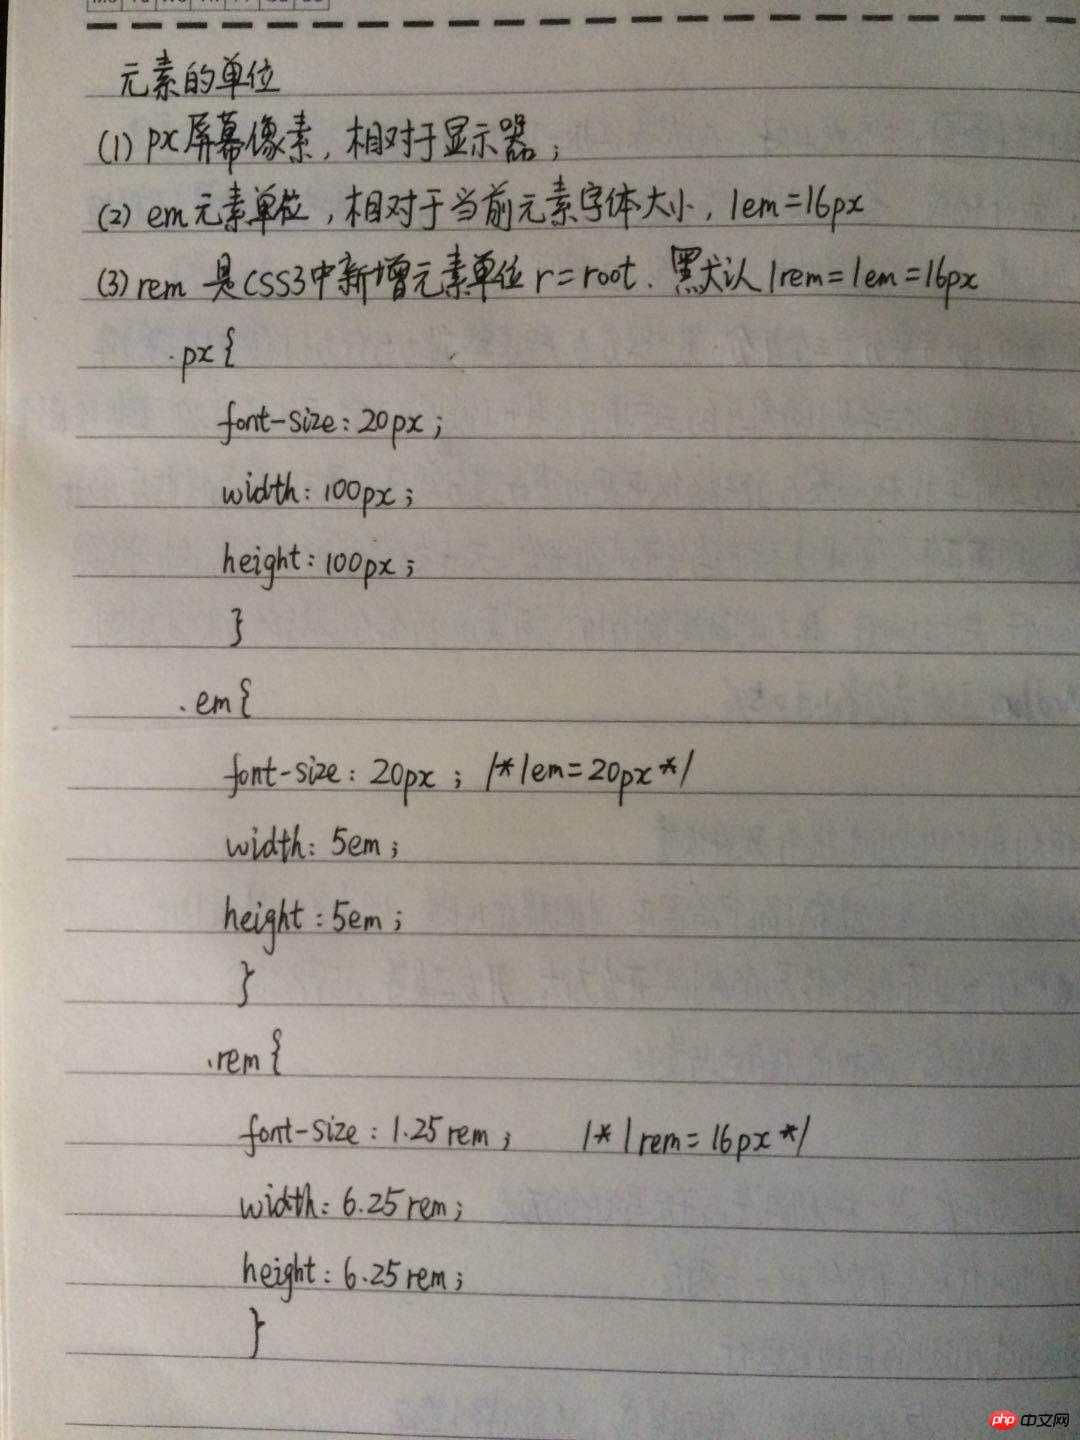
4、元素的单位
(1)px 屏幕像素,相对于显示器;
(2)em 元素单位,相对于当前元素字体大小,1em=16px
(3)rem css3中,根元素单位r=root,1rem=1em=16px
实例
<!DOCTYPE html>
<html lang="en">
<head>
	<meta charset="UTF-8">
	<title>元素的单位</title>
</head>
<body>
	<h3>元素的单位:px,em,rem</h3>
	<div class="px">px</div>
	<div class="em">em</div>
	<div class="rem">rem</div>

    <style>
        html{
           /*浏览器默认字体大小16px*/
           font-size: 16px;

        }
    	.px{
           font-size: 20px;
           width: 100px;
           height:100px;
           background-color: lightgreen;
           text-align: center;
           line-height: 100px;
    	}

        /*em 元素单位,相对于当前元素字体大小,1em=16px,默认16px*/
    	.em{
           font-size: 20px;/*1em=20px*/
           width: 5em;
           height:5em;
           background-color: lightblue;
           text-align: center;
           line-height: 100px;

    	}

    	/*rem css3中,根元素单位r=root,1rem=1em=16px*/
        .rem{
        	font-size: 1.25rem;
            width: 6.25rem;
            height: 6.25rem;
            background-color: lightcoral;
            text-align: center;
            line-height: 6.25rem;
        }
    </style>

</body>
</html>
运行实例 »
点击 "运行实例" 按钮查看在线实例
5、样式继承
(1)在文档树中DOM,字体,大小,颜色,列表样式,表格可以继承
(2)边框,内外边距都不可以,与元素无关的不可以继承
实例
<!DOCTYPE html>
<html lang="en">
<head>
 <meta charset="UTF-8">
 <title>样式继承</title>
</head>
<style>
 /*在文档树中DOM,字体,大小,颜色,列表样式,表格可以继承*/
    /*边框,内外边距都不可以,与元素无关的*/
</style>
<body>
 <nav>
 <ul>
 <li class="item1"><a href="">导航01</a></li>
 <li class="item2"><a href="">导航02</a></li>
 <li class="item3"><a href="">导航03</a></li>
 <li class="item4"><a href="">导航04</a></li>
 </ul>
 </nav>
</body>
</html>
运行实例 »
点击 "运行实例" 按钮查看在线实例
6、样式冲突的处理
(1)优先级:与样式声明的位置相关
内联:以style属性方式声明在元素的起始标签内
内部:以style标签声明在html文件内部,对当前文档有效
外部:将样式放置在一个外部文件内
优先级:内联,内部,外部
(2)顺序相关,后面覆盖前面的
(3)重要性相关:!important-->
实例
<!DOCTYPE html>
<html lang="en">
<head>
 <meta charset="UTF-8">
 <title>样式冲突的处理</title>
</head>
<body>
 <!-- 1、优先级:与样式声明的位置相关
  内联:以style属性方式声明在元素的起始标签内
  内部:以style标签声明在html文件内部,对当前文档有效
 外部:将样式放置在一个外部文件内
  优先级:内联,内部,外部
  2、顺序相关,后面覆盖前面的
 3、重要性相关:!important-->

<style>
 h2{
 color: cyan!important;
 color: blue;
 }
</style>
 <h2 style="color: green">《CSS权威指南》</h2>

</body>
</html>
运行实例 »
点击 "运行实例" 按钮查看在线实例
7、常用选择器
(1)CSS基本语法
样式规则:由选择器+样式声明组成:h2{color:red}
(2)一个元素由哪些部分组成:
<标签 属性+值(可能多个)></标签>
<h2 id="id">
(3)常用选择的方式
和元素的特征相关,和上下文相关。
实例
<!DOCTYPE html>
<html lang="en">
<head>
 <meta charset="UTF-8">
 <title>常用选择器</title>
    <style>
     ul{
     /*padding: 0;*/
     margin: 0;
     width: 500px;
     border: 1px dashed #666;
     padding: 10px 5px;
     }
     /*子块撑开父块*/
        ul:after{
         content: "";
         display: block;
         clear: both;
        }

        ul li{
         list-style: none;
         float:left;
         width:40px;
         height: 40px;
         line-height: 40px;
         text-align: center;
         border-radius: 50%;
         box-shadow: 2px 2px 2px #888;
         background-color: skyblue;
         margin:5px;
        }
        /*id选择器*/
        #item1{
         background-color: coral
        }

        /*class*/
        .class2{
         background-color: gold;
        }

        /*属性选择器:属性名*/
        ul li[class]{
         background-color: blueviolet;
        }
        /*属性选择器:属性值*/
        ul li[class="class3"]{
         background-color: grey;
        }

        /*属性选择器:以属性值开头的*/
        ul li[class^="thanks"]{
         background-color: brown;
        }

        /*属性选择器:以属性值开头的*/
        ul li[class$="dad"]{
         background-color: red;
        }

        /*属性选择器:以属性值开头的*/
        ul li[class*="dda"]{
         background-color: blue;
        }
        /*后代选择器,层级选择器*/
        body ul li{

        }
    </style>
</head>
<body>
 <ul>
 <li id="item1">1</li>
 <li class="class2">2</li>
 <li class="class3">3</li>
 <li class="thanks mum">4</li>
 <li class="mum dad">5</li>
 <li class="budda dad">6</li>
 <li>7</li>
 <li>8</li>
 <li>9</li>
 <li>10</li>
 </ul>
</body>
</html>
运行实例 »
点击 "运行实例" 按钮查看在线实例
8、手写作业
元素的三种单位
 9、课程总结:
(1)表单的创建涉及到以下标签:
input,form,select,br,label,fieldset,legend等
(2)元素的单位三种:
px 屏幕像素,相对于显示器;
em 元素单位,相对于当前元素字体大小,1em=16px
rem css3中,根元素单位r=root,1rem=1em=16px
(3)常用的CSS选择器
a.id选择器*/
b.class
c.属性名
d属性值
e.以属性值开头的
f.以属性值开头的
h.属性选择器
g.层级选择器
/*id选择器*/
#item1{
background-color: coral
}
/*class*/
.class2{
background-color: gold;
}
/*属性选择器:属性名*/
ul li[class]{
background-color: blueviolet;
}
/*属性选择器:属性值*/
ul li[class="class3"]{
background-color: grey;
}
/*属性选择器:以属性值开头的*/
ul li[class^="thanks"]{
background-color: brown;
}
/*属性选择器:以属性值开头的*/
ul li[class$="dad"]{
background-color: red;
}
/*属性选择器:以属性值开头的*/
ul li[class*="dda"]{
background-color: blue;
}
/*后代选择器,层级选择器*/
body ul li{
}

