1准备centos安装环境
1.1 关闭selinux
# vim /etc/sysconfig/selinux
将文件中SELINUX=enforcing改为disabled,保存退出然后执行”setenforce 0″不用重启地关闭selinux。
    :wq
    #  setenforce 0
1.2关闭防火墙,或者开放防火墙端口(两者二选一)
关闭防火墙
# systemctl stop firewalld.service
开启端口(80、 21 、3306、3306[udp])开启方式:
# firewall-cmd --zone=public --add-port=80/tcp --permanent
向防火墙添加ftp服务
# firewall-cmd --permanent --zone=public --add-service=ftp
重启防火墙
# systemctl restart firewalld.service
查看防火墙状态
# systemctl status firewalld.service
Active: active (running) since 一 2018-05-21 16:23:58 CST; 12s ago
若结果包含此字样,则服务正在运行,反之没有运行
查看80[tcp]端口是否开启
# firewall-cmd --query-port=80/tcp
*若端口开启则结果为 ‘yes’,反之为‘no’
2安装软件
2.1 vsftp 安装
安装vsftp
# yum -y install vsftpd
设置ftp开机启动
# systemctl enable vsftpd
启动vsftp服务
# systemctl restart vsftpd
添加ftp用户
# useradd -g root -d /home/data -s /sbin/nologin ftpuser
*/home/data 就是用户以后可以登录和控制的目录,此目录可自定义,此目录最好与后面nginx配置目录统一
*-s /sbin/nologin 限制用户无法登录系统,ftpuser 为你的用户名
# passwd ftpuser (设置用户密码)
设置权限
    #  chown -R ftpuser:root /home/data
    #  setsebool -P ftpd_full_access on
修改vsftp配置文件,禁止匿名用户登录,并限制用户只能浏览并操作用户自己的目录
# vim /etc/vsftpd/vsftpd.conf
* ①、将 anonymous_enable=YES 改为: anonymous_enable=NO
②、去掉
#chroot_local_user=YES
#chroot_list_enable=YES
#chroot_list_file=/etc/vsftpd/chroot_list 这三行前面的“#”
③、在文件末尾添加 allow_writeable_chroot=YES ,然后‘:wq’保存退出
创建/etc/vsftpd/chroot_list 文件,若此文件不存在ftp 用户端将无法正常登录
    #  vim /etc/vsftpd/chroot_list
    :wq
    #  ll /etc/vsftpd/                            *查看文件是否被创建,若未创建,则重新创建
重启vsftpd
# systemctl restart vsftpd
现在已经可以使用其他电脑的ftp 用户端进行连接了,并且用户只能访问自己的文件夹。
2.2安装MYSQL
下载mysql的repo源
# curl -O http://repo.mysql.com/mysql-community-release-el7-5.noarch.rpm
安装 mysql-community-release-el7-5.noarch.rpm 包
# rpm -ivh mysql-community-release-el7-5.noarch.rpm
安装MYSQL
# yum install -y mysql-server
更改MYSQL用户权限:
# chown -R root:root /var/lib/mysql
启动MYSQL
# systemctl restart mysql.service
登录,并修改密码
    #  mysql -u root
    mysql> use mysql
    mysql> update user set password=password('123456') where user='root';      *更改root用户的密码
如果你希望mysql可以对外开放连接的话(navicat),执行下面两句话。若不需要,则略过
    mysql> CREATE USER 'admin'@'%' IDENTIFIED BY 'some_pass';        *创建一个新的账户admin,密码是some_pass
    mysql> GRANT ALL  ON *.* TO 'admin'@'%';                          *授予数据库操作权限

    mysql> flush privileges;                                          *更新表数据
    mysql> exit                                                      *之后登录mysql语句为 mysql -u root-p
2.3安装php
rpm 安装 Php7 相应的 yum源
    #  rpm -Uvh https://dl.fedoraproject.org/pub/epel/epel-release-latest-7.noarch.rpm

    #  rpm -Uvh https://mirror.webtatic.com/yum/el7/webtatic-release.rpm
安装 php7.0
# yum install -y php70w
安装php扩展
    #  yum install -y  php70w-mysql.x86_64   php70w-gd.x86_64   php70w-ldap.x86_64  php70w-mbstring.x86_64
        php70w-mcrypt.x86_64
安装 PHP FPM
# yum install -y php70w-fpm
2.4 nginx 安装
下载对应当前系统版本的nginx包
# curl -O http://nginx.org/packages/centos/7/noarch/RPMS/nginx-release-centos-7-0.el7.ngx.noarch.rpm
建立 nginx 的 yum仓库 (默认yum是没有 nginx的)
# rpm -ivh nginx-release-centos-7-0.el7.ngx.noarch.rpm
下载并安装nginx
# yum install -y nginx
nginx 启动
# systemctl start nginx
nginx 设置开机启动
# systemctl enable nginx
3 修改配置文件
3.1 修改php-fpm配置文件
# vim /etc/php-fpm.d/www.conf *修改(就在前面几行)
user =nginx
group=nginx
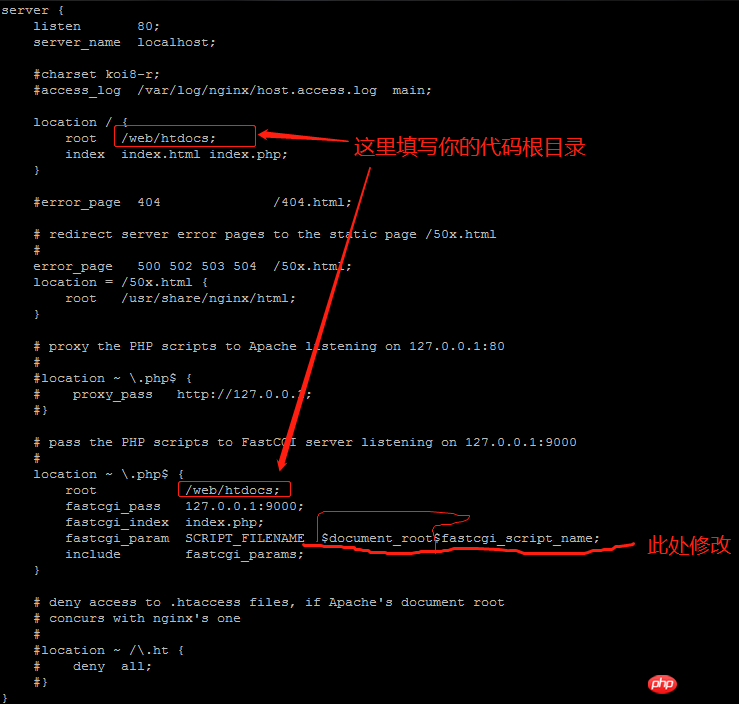
3.2修改nginx配置文件
# vim /etc/nginx/conf.d/default.conf
配置php解析,如下图(图中的配置已经是我修改过得了,修改目录后要记得开启相关目录的权限 chmod a+x /home):

4.放入测试文件(此处文件放入你nginx配置文件中填写的文件夹)
    #  cd 你的目录
    #  echo'hello word'>index.php
5.完成测试
启动php-fpm
# systemctl start php-fpm
重启nginx
# systemctl restart nginx
打开你的本地浏览器在地址栏输入你centos的IP地址,看到 hello word就大功告成
*若显示nginx 404 ,请检查你的代码目录是否开启权限

