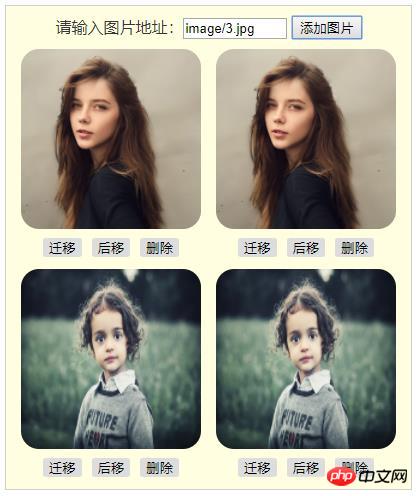
Jquery超简单相册管理
先看看效果:

HTML 部分 源码
<!doctype html>
<html>
<head>
<meta charset="utf-8">
<title>Jquery 相册管理</title>
<link href="css/style.css" type="text/css" rel="stylesheet">
<script src="js/jquery.js" type="text/javascript"></script>
<script src="js/photo.js" type="text/javascript"></script>
</head>

<body>
<div class="wrap">
    <div class="box1">
    请输入图片地址:<input type="text" id="img" value="image/1.jpg" />
    <button id="btnAdd">添加图片</button>
    </div>
    <div class="main">
        <ul></ul>
    </div>
</div>
</body>
</html>
运行实例 »
点击 "运行实例" 按钮查看在线实例
CSS部分 源码
@charset "utf-8";
.wrap{
	width:405px;
	height:auto;
	margin:0px auto;
	background-color: lightyellow;
	border: 1px solid #cecece;
	color: #363636;
}
.box1{
	padding:10px;
	text-align:center;
}
input{
	width:100px;


}
button{ cursor:pointer;}

.main{
	overflow:hidden;
}
.main ul{
	margin:0;
	padding:0;
}
.main ul li{
	list-style:none;
	float:left;
	margin-left:15px;
	width:180px;
	height:220px;
	text-align:center;

}
.main ul li button{
	margin:5px;
	border:none;
	border-radius:10%;
}
.main ul li button:hover{cursor:pointer;}
运行实例 »
点击 "运行实例" 按钮查看在线实例
JS部分 源码
// JScript Document
$(document).ready(function(e) {
    $('#btnAdd').on('click',function(){
		var img_url=$('#img').val()
		if(img_url.length==0){
			alert('请选择图片')
			$('#img').focus()
			return false
		}

		var img = $('<img>')
			.prop('src',img_url)
			.width(180)
			.height(180)
			.css({'border':'border: 1px solid #cecece;','border-radius':'10%'})

		var before=$('<button>').text('迁移')
		var after=$('<button>').text('后移')
		var remove=$('<button>').text('删除')
		//console.log(img)

		//添加
		var li=$('<li>').append(img,before,after,remove)
		li.appendTo('ul')//appendTo()方法是将所选元素插入到被选元素的结尾,如果放入到开头部分用prependTo()方法
		//console.log(img_url)

		//prev()和next() 都只返回一个单位元素

		//前移
		before.click(function(){
			//prev() 方法返回被选元素的前一个同级元素。
			//before() 方法在被选元素之前插入指定内容。
			$(this).parent().prev().before($(this).parent())
		});
		//后移
		after.click(function(){
			//next() 方法返回被选元素的后一个同级元素。
			//after() 在被选元素后插入内容
			$(this).parent().next().after($(this).parent())
		});

		//删除
		remove.click(function(){
			$(this).parent().remove()
		});

	})
});
