一、浮动(float)
浮动属性 float 是指定一个元素沿其所在的容器的左侧或者右侧放置。浮动的出现想解决的问题就是文字和图片的并排显示,不过一旦使用了浮动属性,该元素就会脱离网页正常流动(文档流)。
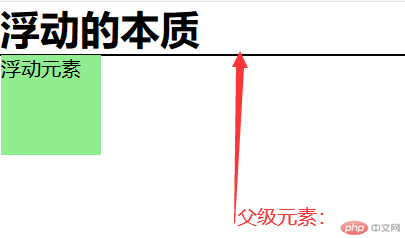
浮动的缺点:任何一个元素使用浮动属性之后都会脱离文档流,然后在父级元素计算高度的时候,就会忽略内部的浮动元素,造成父级元素高度塌陷。
示例:
<!DOCTYPE html><html><head><meta charset="UTF-8" /><title>浮动的示例</title></head><body><h1>浮动的本质</h1><div class="box"><div class="child">浮动元素</div></div></body></html>
* {padding: 0;margin: 0;box-sizing: border-box;}.box {/* padding: 1em; */border: 1px solid #000;background-color: lightcyan;}.child {width: 5em;height: 5em;background-color: lightgreen;float: left;}
显示效果如下:

这样就可以看到,浮动后的元素是脱离了文档流的,直接造成了父级元素 box 的高度塌陷,这样的情况,我们可以有三种方法:
添加一个附加元素,让它消除浮动影响(不建议使用)
使用伪元素 “:after” 来消除浮动影响
使用创建 BFC 容器的方法消除浮动影响
- 添加附加元素
这个就很简单了,就是在浮动元素同级下添加一个空的 div 元素,用来消除浮动影响。
<body><h1>浮动的本质</h1><div class="box"><div class="child">浮动元素</div><div calss="clear"></div></div></body>
.clear {clear: both;}
- 使用伪元素
.box:after {content: "";/* 使这个区域变成以一个块级元素 */display: block;clear: both;}
- 创建 BFC 容器
创建 BFC 的方式:任何一个元素添加上以下任何一个属性后就是一个 BFC 容器
- float:left / right,不能是 none;
- overflow: hidden / auto / scroll, 不能是 visible;
- display: flex / inline-flex;
- display: grid / inline-grid;
- display: inline-block / table-cell;
- position: absolute / fiexed。
使用 overflow:hidden;将父元素转为 BFC 容器,使它的布局不受到内部浮动元素的影响
.box {overflow: hidden;}
二、定位(position)
定位属性:position
定位类型:
静态定位(position:static;):文档流定位;默认定位,元素的显示位置与它源码的位置一致
相对定位(position:relative;):相对于该元素在文档流中的原始位置进行定位(偏移)。
绝对定位(position:absolute;):相对于它的祖先中离它最近的 “定位元素” 的位置发生偏移(定位元素:只要这个元素中有 position: relative;或者 position:absolute;就称为定位元素,仅限这两种)。如果祖先元素中不存在定位元素,那它就参考根元素(html)进行定位,而且只有定位元素才有资格充当绝对定位元素的定位祖先元素(定位参考元素)。
固定定位(position:fixed;):它是绝对定位的一个特例,它始终相对于 html 定位。固定定位应用场景:在线客服,广告位等。
定位实战
- 模态框实现
特点:点击“登录”按钮弹出登录框,同时登录框居于屏幕中央,背景半透明,点击“关闭”按钮时,登录框隐藏,页面恢复原来亮度。
<!DOCTYPE html><html><head><meta charset="UTF-8" /><title>模态框</title><link rel="stylesheet" href="style/demo6.css" /></head><body><!-- 页眉 --><header><h2>我的博客</h2><button>登录</button></header><!-- 模态框 --><div class="modal"><!-- 蒙板:用来盖住后面的内容,使它半透明 --><div class="modal-coverback"></div><!-- 主体 --><div class="modal-body"><button class="close">关闭</button><form action="" method="POST"><table><caption>用户登录</caption><tr><td><label for="username">用户名:</label></td><td><input type="text" name="username" id="username" required /></td></tr><tr><td><label for="psd">密码:</label></td><td><input type="password" name="psd" id="psd" required /></td></tr><tr><td></td><td><button>登录</button></td></tr></table></form></div></div></body></html><script src="js/demo6.js"></script>
demo6.css 代码如下:
* {margin: 0;padding: 0;box-sizing: border-box;}/* 页眉样式 */header {background-color: #ccc;padding: 0.5em 2em;overflow: hidden;font-style: italic;color: #123456;}header h2 {float: left;}header button {float: right;width: 5em;height: 2.5em;}header button:hover {cursor: pointer;opacity: 0.8;}/* 模态框样式 *//* 蒙版 *//* 使用固定定位 */.modal .modal-coverback {background-color: rgb(0, 0, 0, 0.5);position: fixed;top: 0;left: 0;right: 0;bottom: 0;}/* 主体 */.modal .modal-body {padding: 1em;min-width: 20em;min-height: 10em;border: 1px solid #000;background: linear-gradient(to right, lightcyan, #fff);/* 固定定位 */position: fixed;/* top: 0;left: 0;right: 0;bottom: 0; *//* margin: auto; *//* 实现屏幕居中 */top: 50%;left: 50%;/* 向后平移以自身为基准的50% */transform: translate(-50%, -50%);}.modal form table {width: 80%;}.modal form table caption {font-weight: bold;margin-bottom: 1em;}.modal form table td {padding: 0.5em 0;margin-bottom: 2em;}.modal form table td:first-of-type {width: 5em;}.modal form table td input {width: auto;height: auto;}.modal form table button {width: 7.5em;height: 2.5em;}.modal form table button:hover {opacity: 0.8;cursor: pointer;}.modal-body {position: relative;}.modal .close {position: absolute;width: 4em;height: 2em;top: 1em;right: 1em;}.modal .close:hover {cursor: pointer;background-color: lightcyan;color: #000;box-shadow: 0 0 2px #eee;}/* 页面初始化时,模态框应该隐藏 */.modal {display: none;}
demo6.js 代码:
const btn = document.querySelector("header button");const modal = document.querySelector(".modal");const close = document.querySelector(".close");btn.addEventListener("click", setModal, false);close.addEventListener("click", setModal, false);function setModal(ev) {ev.preventDefault();let status = window.getComputedStyle(modal, null).getPropertyValue("display");modal.style.display = status === "none" ? "block" : "none";}
显示效果如下:
点击前效果:

点击后效果:

- 使用定位制作一个五环
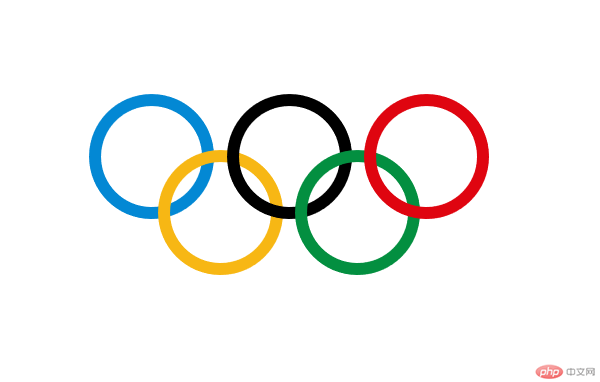
五环样式要求如下:
为了显示效果,将五环置于屏幕中央
示例代码如下:
<!DOCTYPE html><html lang="en"><head><meta charset="UTF-8" /><title>使用绝对定位实现五环效果</title><link rel="stylesheet" href="style/five-ring.css" /></head><body><div class="body"><div class="circle1"></div><div class="circle2"></div><div class="circle3"></div><div class="circle4"></div><div class="circle5"></div></div></body></html>
five-ring.css 代码
* {padding: 0;margin: 0;box-sizing: border-box;}html {font-size: 10px;}.body {width: 35em;height: 20em;/* border: 1px solid #000;background-color: lightcyan; */}.body {position: relative;/* overflow: hidden; */position: fixed;top: 50%;left: 50%;transform: translate(-50%, -50%);}.circle1,.circle2,.circle3,.circle4,.circle5 {position: absolute;width: 10em;height: 10em;border: 10px solid #0388d4;border-radius: 50%;}.circle1 {top: 0;left: 0;z-index: 1;}.circle2 {top: 0;left: 11em;border-color: #000;z-index: 3;}.circle3 {top: 0;left: 22em;border-color: #df0510;z-index: 5;}.circle4 {top: 4.5em;left: 5.5em;border-color: #f7b714;z-index: 2;}.circle5 {top: 4.5em;left: 16.5em;border-color: #038f40;z-index: 4;}
显示效果如下:


