1. 盒模型的大小与位置的设置与计算
1.1 盒模型的基础知识
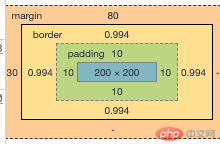
下图是我所做的一个基本的盒模型;
下图是该盒模型的构造;

以上可以知道,外边距margin-top为80px,margin-left为30px,内边框padding为10px。
盒子大小为200px*200px。
下列为该盒模型的代码;
<!-- @format --><!DOCTYPE html><html lang="en"><head><meta charset="UTF-8" /><meta name="viewport" content="width=device-width, initial-scale=1.0" /><title>Document</title><style>.box {width: 200px;height: 200px;background-color: lightcoral;/* 边框 */border: 1px solid #000;/* 内边框 */padding: 10px;background-clip: content-box;/* 外边距 */margin-top: 30px;margin-left: 30px;}.box:first-of-type {margin-top: 80px;}</style></head><body><div class="box">盒子</div><div class="box">盒子</div></body></html>
1.2 盒子大小计算方式

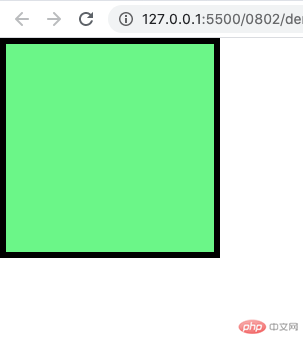
上图的代码如示;
<!-- @format --><!DOCTYPE html><html lang="en"><head><meta charset="UTF-8" /><meta name="viewport" content="width=device-width, initial-scale=1.0" /><title>用户自定义盒子大小计算方式</title><style>/* 推荐在html,body加入box-sizing: border-box; */* {margin: 0;padding: 0;box-sizing: border-box;}.box {width: 200px;height: 200px;background-color: lightgreen;border: 5px solid #000;/* 210px = 200(width)+ 5(border-right) + 5(border-right) */padding: 10px;/* 230 = 200(width)+ 5(border-right) + 5(border-right) + 10(padding-right) + 10(padding-left) *//* margin只影响到盒子的排列位置,不影响大小 *//* margin: 10px; *//* 默认盒子计算公式:内容区 + 内边距 + 边框 */box-sizing: border-box;}</style></head><body><div class="box"></div></body></html>
可以通过margin元素来设置盒子的位置。
默认盒子计算公式为内容区 + 内边距 + 边框。
1.3 盒子的位置设置

如上图所示,将一个“点我就有好心情”的盒子的位置固定在窗口的右下方。
实现该功能,需要用到 position定位元素以及right和bottom元素。
利用这3个元素,可将盒子随意固定在自己想要的位置上。
下面为该代码。
<!-- @format --><!DOCTYPE html><html lang="en"><head><meta charset="UTF-8" /><meta name="viewport" content="width=device-width, initial-scale=1.0" /><title>盒子的位置设置-固定定位</title><style>* {margin: 0;padding: 0;}.good {background-color: coral;color: white;border-radius: 10px;font-weight: 500;padding: 5px;width: 300px;text-align: center;/* 固定定位 */position: fixed;right: 10px;bottom: 10px;}</style></head><body><h2 class="good">点我就有好心情<button type="button" onclick="this.parentNode.style.display='none'">关闭</button></h2></body></html>
2. box-sizing属性的实际作用
简单一句话来说,使用box-sizing属性可以解决盒子(div等)宽高被内边距撑开的问题。
有时我们会给页面的元素(比如div)设置个固定的高度或宽度。但如果给这个div又设置了内边距或者边框的话,那么这个div就会被撑大。也就是其实际的尺寸变成了:设置的宽高尺寸+内边距+边框。
这样就有可能对我们的布局造成影响,如果不想让内边距和边框影响到我们设置的固定尺寸,可以借助 box-sizing 这个css属性来实现。
| 值 | 描述 |
|---|---|
| content-box | 宽度和高度分别应用到元素的内容框。在宽度和高度之外绘制元素的内边距和边框。 |
| border-box | 为元素设定的宽度和高度决定了元素的边框盒。就是说,为元素指定的任何内边距和边框都将在已设定的宽度和高度内进行绘制。通过从已设定的宽度和高度分别减去边框和内边距才能得到内容的宽度和高度。 |
| inherit | 规定应从父元素继承 box-sizing 属性的值。 |

上图的代码如示;
<!-- @format --><!DOCTYPE html><html lang="en"><head><meta charset="UTF-8" /><meta name="viewport" content="width=device-width, initial-scale=1.0" /><title>用户自定义盒子大小计算方式</title><style>/* 推荐在html,body加入box-sizing: border-box; */* {margin: 0;padding: 0;box-sizing: border-box;}.box {width: 200px;height: 200px;background-color: lightgreen;border: 5px solid #000;padding: 10px;/* 默认值 */box-sizing: content-box;/* 此时,盒子的大小是包括了外边距与边框,但是总大小始终等于盒子大小,此时内容区大小会被压缩 */box-sizing: border-box;}</style></head><body><div class="box"></div></body></html>
可通过运用box-sizing元素来定义盒子内容区是否包括内边距或边框 。
box-sizing: content-box;为默认值,
当box-sizing的值为border-box时,盒子的大小是包括了外边距与边框,但是总大小始终等于盒子大小,当设置外边距与边框时候,内容区大小会被压缩。
3. 绝对定位、相对定位的区别与应用
3.1 绝对定位
绝对定位即脱离文档流的定位,相对于祖元素 偏移。定位参照物为自己的父级,但是自己的父级必须拥有position属性,且父级position属性必须为absolute,relative,fixed中的一个,static不行。假若自己的父级没有设置position属性,会一直向上寻找有position属性且不为static的的祖先元素,直到body元素。
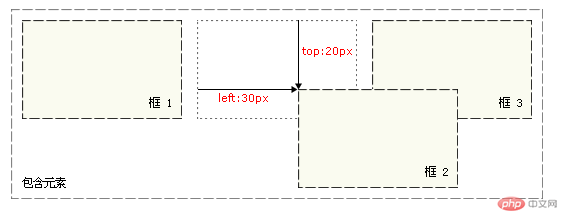
从下个图中可以看出,它的父级祖元素为body,相对于祖元素进行了偏移。
部分代码如下:
.box2{position:absolute;left: 30px;top: 20px;}
3.2 相对定位
元素框会相对于原本位置偏移,从下个图中可以看出,元素仍保留其未定位前的形状,但是它原本所占有的空间仍然保留。

部分代码如下:
.box2{position: relative;left: 30px;top: 20px;}
3.3 绝对定位、相对定位的区别
总结来说, 绝对定位是相对于祖元素进行了偏移,不占有空间。而相对定位是相对于原本位置进行偏移,且保留原本所占有的空间。
4. 绝对定位、固定定位的区别与应用
4.1 固定定位
固定定位是相对于浏览器窗口进行定位的,无论怎样移动你的滑动条,它都会固定在相对于浏览器窗口的固定位置,另外要注意,它的兄弟元素将会在位置排布上忽视它的存在。这个时候用的top,bottom,left,right也是相对于浏览器窗口而言的。
说明:固定定位也是绝对定位的一种,拥有绝对定位的大部分特点;但是他是相对于浏览器窗口的位置进行定位.比如漂浮的客服,回到顶部.这类的按钮都是使用的固定定位.
下图为一个固定定位的应用,是相对于浏览器窗口。
下面为该代码。
<!-- @format --><!DOCTYPE html><html lang="en"><head><meta charset="UTF-8" /><meta name="viewport" content="width=device-width, initial-scale=1.0" /><title>固定定位</title><style>* {margin: 0;padding: 0;}.good {background-color: coral;color: white;border-radius: 10px;font-weight: 500;padding: 5px;width: 300px;text-align: center;/* 固定定位 */position: fixed;right: 10px;bottom: 10px;}</style></head><body><h2 class="good">点我就有好心情<button type="button" onclick="this.parentNode.style.display='none'">关闭</button></h2></body></html>
4.2 固定定位和绝对定位的区别
偏移基准的不同,固定定位是相对于浏览器窗口,而绝对定位是相对于父级元素。
5. 使用绝对定位实现垂直居中
使用绝对定位来实现块的垂直居中,如下图所示:
图中的紫色块在绿色块中水平垂直居中。
代码如下:
<!-- @format --><!DOCTYPE html><html lang="en"><head><meta charset="UTF-8" /><meta name="viewport" content="width=device-width, initial-scale=1.0" /><title>margin:auto</title><style>* {margin: 0;padding: 0;box-sizing: border-box;}.container {width: 300px;height: 300px;background-color: lightgreen;/* 转为定位元素,定位父级 */position: relative;}.container > .item {width: 100px;height: 100px;background-color: violet;/* 水平局中 */text-align: center;/* 垂直居中(使用position) */position: absolute;/* 定位起点 */top: 0;left: 0;/* 定位终点 */right: 0;bottom: 0;margin: auto;}</style></head><body><div class="container"><div class="item">Rinki.me</div></div></body></html>
6. 使用绝对定位实现二列布局
使用绝对定位实现一个PC端的带有导航和页脚的左右分布的二列布局。
如下图所示:
代码如下:
<!-- @format --><!DOCTYPE html><html lang="en"><head><meta charset="UTF-8"><meta name="viewport" content="width=device-width, initial-scale=1.0"><title>绝对定位写一个两列布局</title><link rel="stylesheet" href="demo7.css"></head><body><!-- 页眉 --><div class="header"><div class="content"><ui><li><a href="">导航栏</a></li></ui></div></div><!-- 主体 --><div class="container"><div class="left">左侧内容区</div><!-- <div class="main">内容区</div> --><div class="right">右侧内容区</div></div><!-- 页脚 --><div class="footer"><div class="content"><p>Rinki.me 版权所有|©;</p></div></div></body></html>
下面为css代码:
/** @format */* {margin: 0;padding: 0;box-sizing: border-box;}a {text-decoration: none;color: #666;}li {list-style: none;}/* 页脚页眉 */.header,.footer {height: 40px;line-height: 40px;background-color: lightblue;text-align: center;}.content {width: 1000px;margin: auto;}/* 主体定位布局 */.container {width: 300px;background-color: lightgrey;margin: 10px auto;/* 转为定位元素,作为子元素left定位的父级 */position: relative;min-height: 300px;}/* 左侧内容区布局 */.container .left {width: 150px;background-color: lightsteelblue;min-height: 300px;position: absolute;/* 默认值 *//* top: 0; */left: 0;}/* 右侧内容区布局 */.container .right {width: 150px;background-color: lightskyblue;min-height: 300px;position: absolute;/* 默认值 *//* top: 0; */right: 0;}
7. 使用浮动实现三列布局
效果图如下:
下面为代码:
<!-- @format --><!DOCTYPE html><html lang="en"><head><meta charset="UTF-8"><meta name="viewport" content="width=device-width, initial-scale=1.0"><title>使用浮动实现三列布局</title><link rel="stylesheet" href="demo8.css"></head><body><!-- 页眉 --><div class="header"><div class="content"><ui><li><a href="">首页</a></li><li><a href="">秒杀</a</li><li><a href="">客服</a</li></ui></div></div><!-- 主体 --><div class="container"><div class="left">左侧</div><div class="main">内容区</div><div class="right">右侧</div></div><!-- 页脚 --><div class="footer"><div class="content"><p>Rinki.me 版权所有|©;</p></div></div></body></html>
下面为css代码:
/** @format */* {margin: 0;padding: 0;/* box-sizing: border-box; */}a {text-decoration: none;color: #666;}li {list-style: none;}/* 页脚页眉 */.header,.footer {height: 40px;background-color: lightblue;}.content {width: 1000px;margin: auto;}.content:first-of-type li {float: left;padding: 0 15px;/* 行内文本的垂直居中,只需要设置它的行高等于父级高度即可 */line-height: 40px;}.footer {text-align: center;line-height: 40px;}/* 主体使用浮动定位 */.container {width: 1000px;/* min-height: 600px; */background-color: tomato;margin: 10px auto;border: 5px solid #f00;overflow: hidden;}.container > .left,.container > .right {width: 200px;min-height: 600px;background-color: violet;}.container > .left {float: left;}.container > .right {float: right;}.container > .main {width: 600px;min-height: 600px;background-color: lightsalmon;float: left;}
8. 圣杯布局的思想以及实现(三列布局)
首先来说说实现圣杯布局的步骤。
1.内容区必须全部渲染,DOM结构中将主体内容写到前面去。
2.中间主体内容必须要自适应,占据整个容器的全部空间。
3.主体内容区,左侧,右侧,全部浮动。
4.通过给左右两侧添加margin负值,让他们回到正确的位置上
5.通过给主体内容区添加padding属性,将左右区块挤出来
6.再给左右两侧通过相对定位,将他们放在正确的位置上
下图是通过以上步骤实现的三列的圣杯布局:
代码为:
<!-- @format --><!DOCTYPE html><html lang="en"><head><meta charset="UTF-8" /><meta name="viewport" content="width=device-width, initial-scale=1.0" /><title>圣杯布局:经典的三列PC端布局方式</title><link rel="stylesheet" href="demo9.css" /></head><body><!-- 页眉与页脚省略 --><!-- 主体区优先显示,并且自适应,所以默认100% --><div class="container"><!-- 圣杯要求内容区优先显示 --><div class="main">内容区</div><div class="left">左侧</div><div class="right">右侧</div></div></body></html>
CSS代码为:
/** @format */.container {border: 5px dashed;}.container > * {min-height: 400px;}.container > .left,.container > .right {width: 200px;background-color: cyan;}/* 内容区:默认宽度100%,自适应 */.container > .main {width: 100%;background-color: yellow;}.container > * {/* 为什么左侧右侧,没有贴到上面的内容区,因为内容区的宽度是100% */float: left;}.container {/* 使父级容器包括浮动的子元素 */overflow: hidden;}/* 将左侧放在内容区的左侧 */.container > .left {margin-left: -100%;}/* 将右侧放在内容区的右侧 */.container > .right {margin-left: -200px;}.container {/* 使用padding将左右两侧的空间挤出来 */padding: 0 200px;}.container > .left {position: relative;right: 200px;}.container > .right {position: relative;left: 200px;}

