1. 类加载的三种方式
示例将在frame这个目录下进行,先创建子目录app,在创建app的子目录controller,在controller里面新建文件Controller.php,在frame根目录下创建index1.php

Controller.php如下:
<?phpnamespace app\controller;class Controller{public static function hello(){return '方法名是: '.__METHOD__;}}
1.1 方式一:require
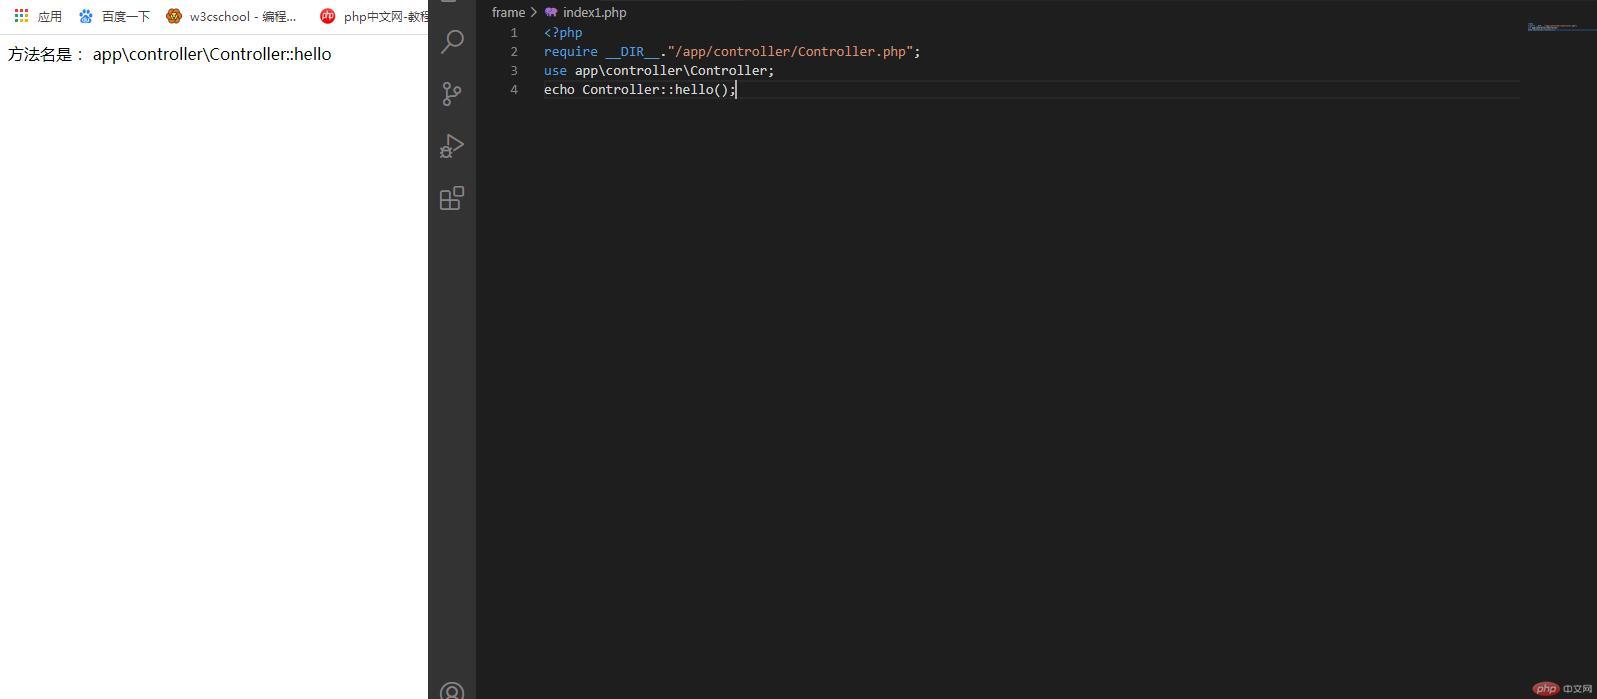
index1.php如下:
<?phprequire __DIR__."/app/controller/Controller.php";use app\controller\Controller;echo Controller::hello();

1.2 方式二:注册自动加载器
index2.php如下:
<?phpspl_autoload_register(function ($class) {$path = str_replace("\\",DIRECTORY_SEPARATOR,$class);$classFile = __DIR__.DIRECTORY_SEPARATOR.$path.".php";require $classFile;});use app\controller\Controller;echo Controller::hello();

1.3 方式三:使用composer的autoload
先生成
composer.json,内容为空,就一对花括号{}执行终端命名
composer install,成功以后会自动生成vendor目录,目录下有个autoload.php在入口文件中引入
autoload.php修改
composer.json的属性
{"autoload": {"files": ["app/controller/Controller.php"]}}
终端执行命名
composer dumpautoloadindex3.php如下:
<?phprequire __DIR__."/vendor/autoload.php";use app\controller\Controller;echo Controller::hello();

2. autoload 字段的意义
2.1 files 字段:加载任意位置的类文件
接上面的示例,在frame目录下,再创建子目录lib,新建文件Test1.php,如下:
<?phpnamespace test;class Test1{public static function show (){return '方法名是: '.__METHOD__;}}
- 修改
composer.json,如下:
{"autoload": {"files": ["app/controller/Controller.php","lib/Test1.php"]}}
执行终端命名
composer dumpautoloadindex4.php如下:
<?phprequire __DIR__."/vendor/autoload.php";use app\controller\Controller;use test\Test1;echo Controller::hello(),'<br>';echo Test1::show();

- 小结:想要使用某个类,直接在
files字段中加入相应的类文件路径即可,修改后记得执行终端命名
2.2 classmap 字段:类映射,实现类的批量注册
接上面示例,如果同目录下有很多的类,每次都去手动引入类文件比较麻烦,而使用classmap ,可以将类文件映射到路径上,同目录下的类文件只需要引入一次即可
示例:在上面示例的lib目录下,再新建文件Test2.php,如下:
<?phpnamespace test;class Test2{public static function show (){return '方法名是: '.__METHOD__;}}
如果按照files字段,需要在composer.json中再去增加lib/Test2.php,显然这样有点麻烦了,而使用classmap 呢,如下:
{"autoload": {"classmap": ["app/controller","lib"]}}
终端执行命名
composer dumpautoloadindex4.php,如下:
<?phprequire __DIR__."/vendor/autoload.php";use app\controller\Controller;use test\Test1;use test\Test2;echo Controller::hello(),'<br>';echo Test1::show(),'<br>';echo Test2::show(),'<br>';

2.3 psr-4字段:将类命名空间与路径绑定
在开发中,类文件一般会满足两个条件:
类的命名空间和当前类文件的路径一致
类名与类文件名一致
这种命名规范可以叫做psr-4规范,而满足这种规范的,一般都会使用psr-4字段来实现映射
- 修改
composer.json,如下:
{"autoload": {"psr-4": {"app\\controller\\": "app/controller","test\\": "lib"}}}

3. 自定义框架
本次示例,新建frame2这个根目录,所有文件将存放在这个目录下,使用MVC架构,Model和View使用第三方包,业务逻辑写在Controller中
下载模型包:catfan/medoo,终端输入命令
composer require catfan/medoo下载视图包:league/plates,终端输入命令
composer require league/plates创建自己的框架核心代码,继承第三方包,放入frame2/core目录下
Model.php :
<?phpnamespace core;// 模型类// 继承第三方包catfan\medoouse Medoo\Medoo;class Model extends Medoo{// 连接数据库public function __construct(){$options=['database_type' => 'mysql','database_name' => 'first','server' => 'php.edu','username' => 'root','password' => 'root'];parent::__construct($options);}}
View.php :
<?phpnamespace core;use League\Plates\Engine;class View extends Engine{private $templates;public function __construct($path){$this->templates = parent::__construct($path);}}
- 创建自己的应用,分别放于app/models、app/views、app/controllers目录下
app/models中StudentModel.php :
<?phpnamespace app\models;use core\Model;class StudentModel extends Model{public function __construct(){parent::__construct();}}
app/controllers中StudentController.php :
<?phpnamespace controllers;class StudentController{// 依赖注入private $model = null;private $view = null;public function __construct($model,$view){$this->model = $model;$this->view = $view;}// 用来测试的public function test(){echo '111';}// 查询public function select(){// 获取数据$users = $this->model->select("student", ["username","age","tel"], [ "id[>=]" => 1200,"LIMIT"=>10]);// return $users;// 渲染模板(同时进行模板赋值)return $this->view->render('student/list', ['users'=> $users]);}}
app/views/student中list.php:
<!DOCTYPE html><html lang="en"><head><meta charset="UTF-8" /><meta name="viewport" content="width=device-width, initial-scale=1.0" /><title>Document</title><style>table {width: 500px;border: 1px solid black;border-collapse: collapse;text-align: center;margin: auto;}th,td {border: 1px solid black;padding: 8px;}</style></head><body><table><caption><h2>用户管理</h2></caption><thead><tr><th>用户名</th><th>年龄</th><th>电话</th><th>操作</th></tr></thead><tbody><?php foreach ($users as $user): ?><tr><td><?=$this->e($user['username'])?></td><td><?=$this->e($user['age'])?></td><td><?=$this->e($user['tel'])?></td><td><button>编辑</button><button>删除</button></td></tr><?php endforeach ?></tbody></table></body></html>
- 命名空间与路径绑定,实现类映射
composer.json:
{"require": {"catfan/medoo": "^1.7","league/plates": "^3.3"},"autoload": {"psr-4": {"app\\models\\": "app/models","core\\": "core","controllers\\": "app/controllers","views\\": "app/views"}}}
- 入口文件
index.php:
<?php// composer 加载器// 创建入口文件,实现类加载require __DIR__."/vendor/autoload.php";use app\models\StudentModel;use core\View;use controllers\StudentController;// 测试模型$model = new StudentModel();// var_dump($model);// 测试视图$view = new View('app/views');// var_dump($view);// 测试控制器$controller = new StudentController($model,$view);// var_dump($controller);// $controller->test();print_r($controller->select());
- 运行入口文件后效果:


