主要内容:
1-建立一个css文件,通过class的方式将有可能用到的所有flex设置都放到里面。这样就不用再为每个类去写flex设置了。
2-header、聚焦图等里面有很多好玩的地方,当然也是要动心思的地方,见下面吧。
1、flex的通用设置文件
例如下面这种,而且在class取名方面就想好。这样的话,后面要用的时候直接取就好了。
这种情况类似于将flex所有的设置通过.class变成了属性的选项。只要在搭建的时候给对应的元素赋予对应的.class名称,那么这个元素就具有了对应的flex特征。是一种很巧妙的方法。
* {margin: 0;padding: 0;box-sizing: border-box;}html,body {width: 100%;height: 100%;overflow: hidden;overflow-y: auto;}{transition: all 200ms ease;}@font-face {font-family: icon;src: url("../fonts/icon.ttf") format("truetype"),url("../fonts/icon.eot") format("embedded-opentype"),url("../fonts/icon.woff") format("woff"),url("../fonts/icon.svg") format("svg");}a {color: #444;text-decoration: none;}li,dd {list-style: none;}button,img {border: none;outline: none;}.contrain {width: 1200px;margin: 0 auto;}.flexDis {display: -webkit-flex;display: -moz-flex;display: -o-flex;display: -ms-flexbox;display: flex;}.applyFlex {flex-grow: 1;}.flexShrinkStatic {flex-shrink: 0;}.flexShrinkAuto {flex-shrink: 1;}.flexDirV {flex-direction: column;}.flexDirH {flex-direction: row;}.flexWrap {flex-wrap: wrap;}.flexNoWrap {flex-wrap: nowrap;}.flexContentS {justify-content: flex-start;}.flexContentC {justify-content: center;}.flexContentE {justify-content: flex-end;}.flexContentV {justify-content: space-evenly;}.flexContentA {justify-content: space-around;}.flexContentB {justify-content: space-between;}.flexAlignS {align-items: flex-start;}.flexAlignC {align-items: center;}.flexAlignE {align-items: flex-end;}.flexAlignB {align-items: baseline;}.flexAlignT {align-items: stretch;}
2、header的解析

<header id="mainHeader" class="flexDis"> <!--这个地方直接设置flexdis就实现了flex效果--><div>LOGO</div><ul><li><a href="#">导航1</a></li><li><a href="#">导航2</a></li><li><a href="#">导航3</a></li><li><a href="#">导航4</a></li></ul><div class="searchInfo"><input type="text" placeholder="请输入关键字" value="" /><ahref="#"></a></div><p><a href="#">登录</a><a href="#">注册</a></p></header>
- 每块用相对独立的块区分开。
- 菜单直接用ul li。
- 搜索用一个input+a。
- 登录、注销用一个p中间加两个a。
css部分:
#mainHeader {background: white;padding: 1.5em;box-shadow: 0 0.2em 0.4em rgba(0, 0, 0, 0.2);}#mainHeader ul {padding: 0 1em;}#mainHeader ul li {display: inline-block;/*这个是让li水平显示*/padding: 0 0.8em;}#mainHeader ul li a {color: #38e;}#mainHeader ul li a:hover {color: black;}#mainHeader .searchInfo {padding: 0 1em;}#mainHeader .searchInfo a {vertical-align: middle;background: #38e;/*这个地方是一个搜索icon一样的,设置了背景色。具体内容则是由下面的伪元素来占据*/padding: 0.3em 0.6em;color: white;}#mainHeader .searchInfo a::after {content: "\f001";/*添加伪元素*/font-family: icon;}#mainHeader .searchInfo input {border: solid 1px silver;padding: 0.5em;outline: none;vertical-align: middle;border-radius: 0.3em 0 0 0.3em;}#mainHeader > p {margin-left: auto;}/*p"登录、注销"通过margin-left自动放大来实现向最右侧的靠齐*/#mainHeader > p a {color: #38e;margin: 0 0.6em;}
3、焦点图部分focus area的解析

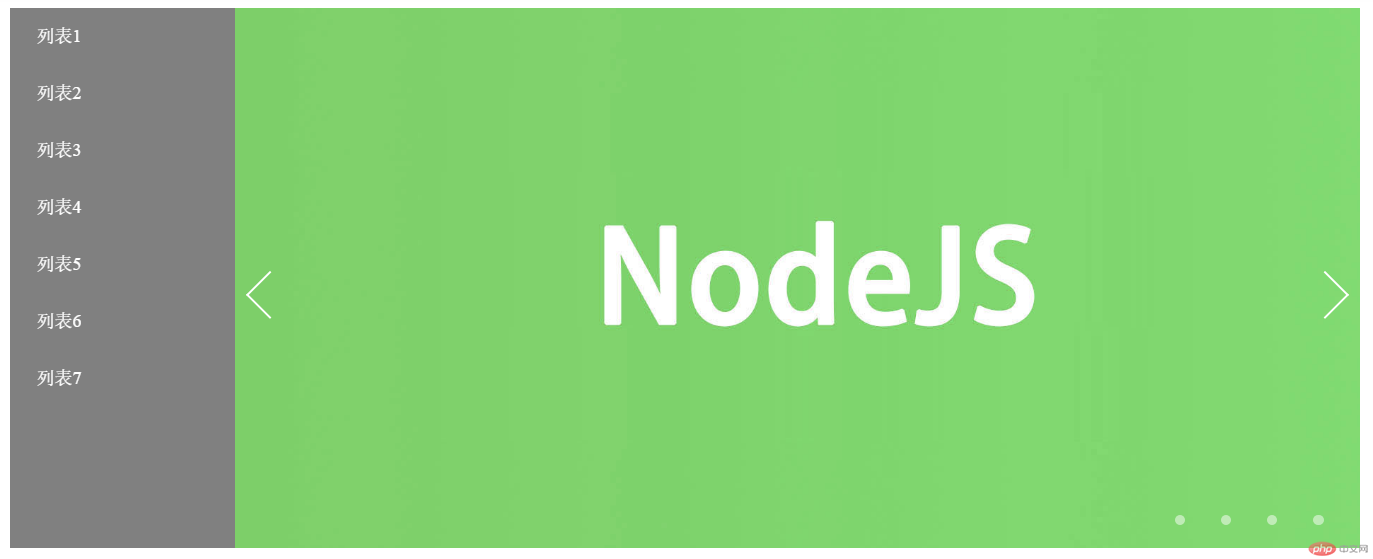
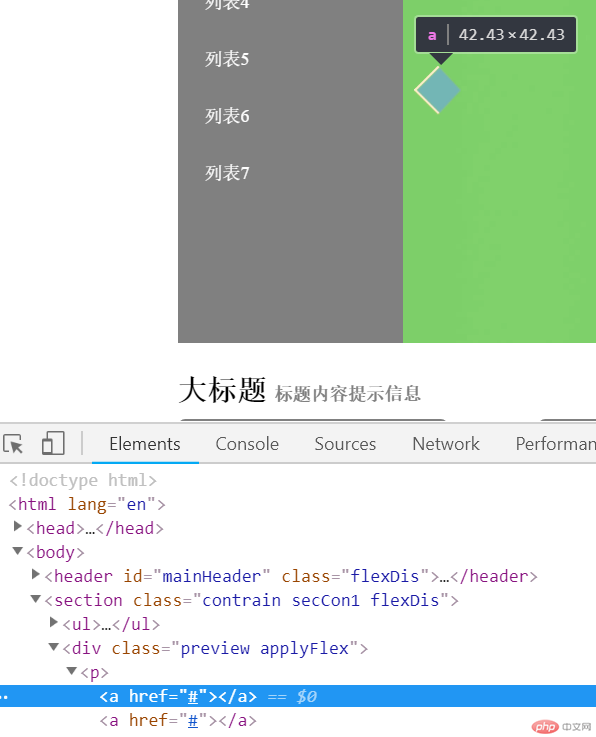
<section class="contrain secCon1 flexDis"><ul><li><a href="#">列表1</a></li><li><a href="#">列表2</a></li><li><a href="#">列表3</a></li><li><a href="#">列表4</a></li><li><a href="#">列表5</a></li><li><a href="#">列表6</a></li><li><a href="#">列表7</a></li></ul><div class="preview applyFlex"><p><a href="#"></a><a href="#"></a></p><!--这里用两个box旋转(后面会看到)来形成向左、向右的两个箭头——旋转并只加两个变的border。见下图--><div class="applyFlex"><img src="./images/1.jpg" alt="" /><img src="./images/2.jpg" alt="" /><img src="./images/3.jpg" alt="" /><img src="./images/4.jpg" alt="" /></div><div class="controler"><span></span><span></span><span></span><span></span>/*通过span实现右下角的小点*/</div></div></section>

css部分:
.secCon1 {height: 480px;margin: 1em auto;}/* ① 左侧的几个列表部分*/.secCon1 ul {width: 200px;background: gray;}.secCon1 ul li {background: gray;}.secCon1 ul li a {display: block;/*上面这个还挺关键的,没有的话就无法让a像块(block)一样地去操作*/color: white;padding: 1em 1.5em;}.secCon1 ul li a:hover {background: rgba(255, 255, 255, 0.2);}.secCon1 .preview {position: relative;height: 100%;}/* ② 下面为焦点图部分*/.secCon1 .preview .applyFlex {position: relative;height: 100%;}.secCon1 .preview img {position: absolute;display: block; /*重点*/left: 0;top: 0;width: 100%;height: 100%;object-fit: cover; /*重点*/}/* ③ 两个箭头的地方*/.secCon1 .preview p {position: absolute;width: 100%;top: 50%;left: 0;z-index: 1;/*这个还不知道是干什么的*/}.secCon1 .preview p a {position: absolute;width: 30px;height: 30px;}.secCon1 .preview p a:first-of-type {border: solid 2px white;border-style: solid none none solid;transform: rotate(-45deg); /*旋转*/left: 1em;}.secCon1 .preview p a:last-of-type {border: solid 2px white;border-style: none solid solid none;transform: rotate(-45deg);right: 1em;}/* ④ 下面四个小控制点*/.secCon1 .controler {position: absolute;right: 1em;bottom: 1em;}.secCon1 .controler span {display: inline-block;/*重点*/width: 9px;height: 9px;background: white;border-radius: 1em;margin: 0 1em;cursor: pointer;opacity: 0.5;/*透明度*/}.secCon1 .controler span:hover {opacity: 1;}
主体内容、footer部分也有值得学习的点,以后再复习代码吸收。
4、某度假景点网站照猫画虎
臭了点,主要是为了练习。
代码如下:
html部分:
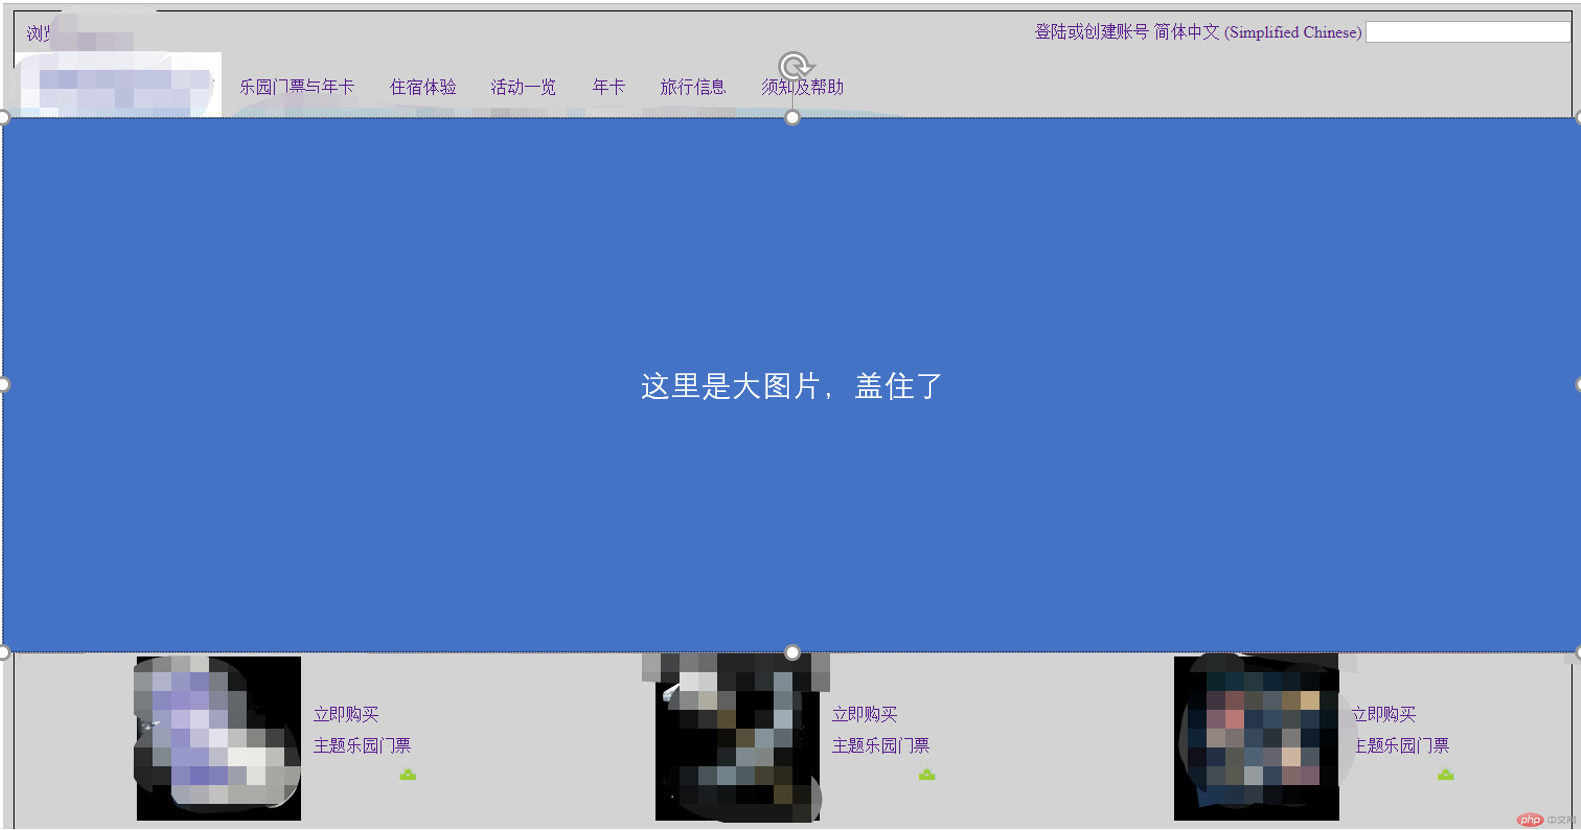
<!DOCTYPE html><html lang="en"><head><meta charset="UTF-8"><meta name="viewport" content="width=device-width, initial-scale=1.0"><link rel="stylesheet" href="css/header.css"><link rel="stylesheet" href="myicon/iconfont.css"><title>Document</title></head><body><section class = "h1"><a class = "h1-itms" href="">浏览Disney.cn</a><div><a class = "h1-itms" href="">登陆或创建账号</a><a class = "h1-itms" href="">简体中文 (Simplified Chinese)</a><input class = "h1-itms" type="text"></div></section><section class = "h2"><a href="" class="h2-itms"><img src="img/logo.png" alt=""></a><a href="" class="h2-itms">乐园门票与年卡</a><a href="" class="h2-itms">住宿体验</a><a href="" class="h2-itms">活动一览</a><a href="" class="h2-itms">年卡</a><a href="" class="h2-itms">旅行信息</a><a href="" class="h2-itms">须知及帮助</a></section><section class = "slide"><img src="img/slide1.png" alt="" class="slide-img"><img src="" alt="" class="slide-img"></section><section class = "focus"><div class="focus-itms"><a href="" class="focus-eles"><img src="img/prom1.png" alt=""></a><div><a href="" class="focus-eles">立即购买</a><a href="" class="focus-eles">主题乐园门票</a><span class="iconfont icon-taiyang-shuishang"></span></div></div><div class="focus-itms"><a href="" class="focus-eles"><img src="img/prom2.png" alt=""></a><div><a href="" class="focus-eles">立即购买</a><a href="" class="focus-eles">主题乐园门票</a><span class="iconfont icon-taiyang-shuishang"></span></div></div><div class="focus-itms"><a href="" class="focus-eles"><img src="img/prom3.png" alt=""></a><div><a href="" class="focus-eles">立即购买</a><a href="" class="focus-eles">主题乐园门票</a><span class="iconfont icon-taiyang-shuishang"></span></div></div></section><section class = "links1"></section><section class = "links2"></section><section class = "links3"></section><section class = "footer"></section></body></html>
css部分:
* {margin: 0;padding: 0;box-sizing: border-box;}:root {font-size: 14px;background-color: #d3d3d3;}a {text-decoration: none;}body {width: 85vw;min-height: 100vh;border: 1px solid black;margin: 5px auto;}.h1 {height: 35px;line-height: 35px;display: flex;justify-content: space-between;}.h1 > .h1-itms {margin: 2px 10px;}.h2 {height: 60px;line-height: 60px;display: flex;}.h2 > .h2-itms:not(:first-of-type ) {margin: 0 15px;}.h2 > .h2-itms:first-of-type > img {height: 60px;}.slide {display: flex;flex: row nowrap;justify-content: center;height: 450px;}.slide > img {width: 200vw;}.focus {display: flex;flex: row nowrap;justify-content: space-around;height: 150px;}.focus > .focus-itms {display: flex;align-items: center;}.focus > .focus-itms > .focus-eles > img {height: 140px;}.focus > .focus-itms > div {display: flex;flex-flow: column nowrap;}.focus-eles {margin: 5px 5px;}.iconfont {font-size: larger;color: yellowgreen;text-align: right;}

