
ajax 的基础用法/使用 ajax 实现登陆功能小实战
1. ajax 发送请求的基本步骤
1.1. ajax 发送 GET 请求
ajax 发送 GET 请求的基本步骤
- 创建 ajax 对象
- 监听请求(监听当前请求状态的变化: 当当前请求的状态=4 时, 则请求成功, 状态码为 200 时, 表示请求被正常处理).
其他请求状态:
- 0 : (未初始化)还没有调用 send()方法
- 1 : (载入)已调用 send()方法,正在发送请求
- 2 : (载入完成)send()方法执行完成,
- 3 : (交互)正在解析响应内容
- 4 : (完成)响应内容解析完成,可以在客户端调用了
服务器处理请求返回的状态码很多, 但暂时只需记住 200 为成功, 其他状态码为不成功即可.
- 初始化请求参数, 调用格式:
调用格式: xhr.open(当前请求类型, 当前请求脚本地址, 是否异步);
- 初始化请求参数, 调用格式:
- 发送请求, 最好给发送请求的方法传入一个
null值, 以防止古老的浏览器报错.
- 发送请求, 最好给发送请求的方法传入一个
<!DOCTYPE html><html lang="en"><head><meta charset="UTF-8"><meta name="viewport" content="width=device-width, initial-scale=1.0"><title>ajax中的GET请求操作</title></head><body><h1>helo</h1><script>// 1. 创建ajax对象var xhr = new XMLHttpRequest;// 2. 监听请求(监听当前请求状态的变化: 当当前请求的状态=4时, 则请求成功, 状态码为200时, 表示请求被正常处理)xhr.onreadystatechange = function() {if(xhr.readyState === 4 && xhr.status === 200) {// 从服务器返回的相应数据, 是个字符串.console.log(xhr.responseText);}};// 3. 初始化请求参数/* 调用格式: xhr.open(当前请求类型, 当前请求脚本地址, 是否异步);*/xhr.open('GET', 'test1.php', true);// 4. 发送请求/* 入参null是防止古老的浏览器报错, 仅此而已, 不传也没关系 */xhr.send(null);</script></body></html>
1.2. ajax 发送 POST 请求
步骤跟 GET 类似
1.2.1. ajax 发送内容为表单数据的 POST 请求
前面 3 步跟发送 GET 相同.
设置请求头, 指定请求内容以表单类型数据进行发送:
xhr.setRequestHeader('content-type', 'application/x-www-form-urlencoded')再执行请求发送, 在发送请求的
send方法中传入转成 JSON 字符串的表单数据.
<!DOCTYPE html><html lang="en"><head><meta charset="UTF-8"><meta name="viewport" content="width=device-width, initial-scale=1.0"><title>ajax中的POST请求操作(发送表单数据)</title></head><body><h1>hello</h1><script>// 1. 创建ajax对象var xhr = new XMLHttpRequest;// 2. 监听请求(监听当前请求状态的变化: 当当前请求的状态=4时, 则请求成功, 状态码为200时, 表示请求被正常处理)xhr.onreadystatechange = function() {if(xhr.readyState === 4 && xhr.status === 200) {// 从服务器返回的相应数据, 是个字符串.console.log(xhr.responseText);}};// 3. 初始化请求参数/* 调用格式: xhr.open(当前请求类型, 当前请求脚本地址, 是否异步);*/xhr.open('POST', 'test2.php', true);// 4. 设置请求头, 指定请求内容以表单类型数据进行发送xhr.setRequestHeader('content-type', 'application/x-www-form-urlencoded')// 假设只是要插入的表单数据对象var user = {username: "zhangsan",password: "123456",};// 把js表单对象转换为json字符串来发送var dataStr = JSON.stringify(user);// 4. 发送请求xhr.send(dataStr);</script></body></html>
1.2.2 ajax 发送内容为 JSON 字符串数据的 POST 请求
操作与发送表单数据的 POST 请求基本相同, 唯一区别在设置请求头时, 把值设置为application/json;charset=utf-8即可. 即: xhr.setRequestHeader('content-type', 'application/json;charset=utf-8')
1.2.3 ajax 发送内容为 FormData 封装的数据的 POST 请求
操作与发送表单数据的 POST 请求基本相同, 区别在于发送 FormData 封装的数据的请求, 不需要设置请求头.
FormData不需要序列化, 可直接传入send方法发送FormData的相关操作:- 创建
FormData对象:var formData = new FormData(表单对象[可选]); 向
FormData对象中添加数据:FormData.append(key, value);从
FormData对象中删除数据:FormData.delete(key);获取
FormData对象中某个 key 的值:FormData.get(key);
- 创建
<script>// 新建FormData对象var formData = new FormData();// 如果使用FormData对象封装表单数据, 则在新建FormData对象时把表单对象作为参数传入var formData1 = new FormData(document.forms[0]);// 向FormData对象中添加数据: FormData.append(key, value)formData.append("username", "admin");formData.append("password", "admin123456");// 从FormData对象中删除数据: FormData.delete(key);formData.delete("username");// 获取FormData对象中某个key的值: FormData.get(key);formData.get("password");</script>
2. 使用 ajax 实现登陆功能小实战
实现思路
登录页面做重复登录验证, 即验证
session中是否存有键名=user的键值对, 若有, 则提示”不能重复登录”, 然后跳转到主页.前后端都做录入项的空值判断, 前端判断是为了过滤出缺少录入值的请求, 减轻服务器的压力. 而后端判断是为了用户使用工具模拟发送登录请求, 绕过前端验证.
使用ajax发送异步登录请求, 验证成功, 则跳转到主页; 反之提示异常.
后端需验证
session中是否以保存有用户信息, 若没有, 提示用户先登录, 并跳转到登录页.后端验证登录信息, 成功, 则把用户信息保存到
session中; 失败, 则返回异常信息数组(转换为json字符串).注销操作, 删除
session中的用户信息, 返回登录页.
实现代码
登录页login.php
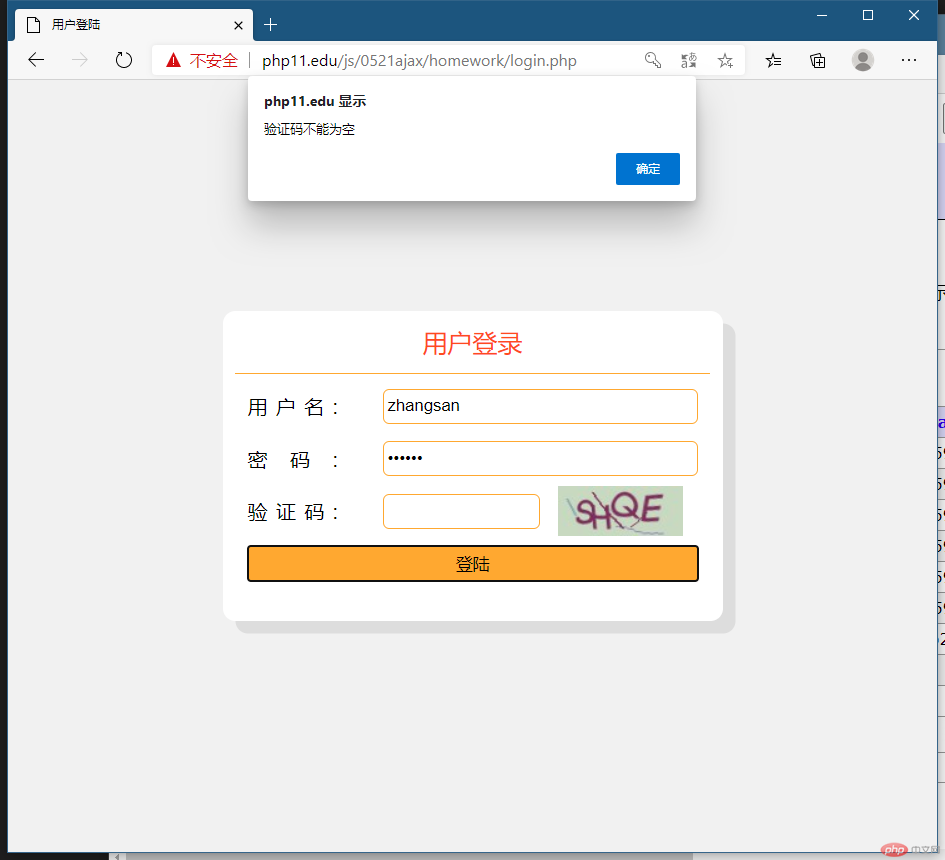
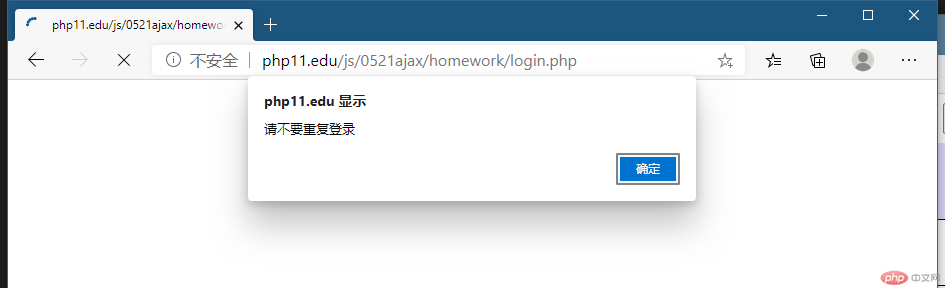
<?phpsession_start();if(isset($_SESSION['user']) || !empty($_SESSION['user'])) {echo ('<script>alert("请不要重复登录");window.location.href="/js/0521ajax/homework/home.php";</script>');}?><!DOCTYPE html><html lang="en"><head><meta charset="UTF-8" /><meta name="viewport" content="width=device-width, initial-scale=1.0" /><title>用户登陆</title><style>@import 'style.css';</style></head><body><section><div class="login-title"><span>用户登录</span></div><form action="" onsubmit="return false;"><div class="login-content"><div class="item-box"><label for="username">用户名:</label><input type="text" name="username" maxlength="50" value=""/></div><div class="item-box"><label for="password">密码:</label><input type="password" name="password" maxlength="50" value=""/></div><div class="item-box"><label for="captcha_code">验证码:</label><div class="captcha"><input type="text" name="captcha_code" maxlength="4"/><img src="javascript:void(0);" alt="" onclick="getCaptcha()" /></div></div><div class="item-box"><button onclick="doLogin()">登陆</button></div></div></form></section></body><script>// 登录执行函数function doLogin() {// 获取所有input元素var inputs = document.querySelectorAll('input');// 判空操作for(var index = 0; index < inputs.length; index ++) {var input = inputs[index];var inputValue = input.value;// 空字符串也不算if(inputValue === undefined || inputValue.trim() == '' ) {if(input.name == 'captcha_code') {alert('验证码不能为空');return false;} else {alert(input.previousElementSibling.innerText + '不能为空');return false;}}}// 使用ajax发送异步登录请求xhr = new XMLHttpRequest();xhr.onreadystatechange = function () {if (xhr.readyState === 4 && xhr.status === 200) {// document.write(xhr.responseText);var res = JSON.parse(xhr.responseText);// 约定status值为1时表示登录成功if(res.status != undefined && res.status == 1) {alert(res.message);window.location.href = '/js/0521ajax/homework/home.php';} else {// 登陆失败alert(res.message);// 刷新验证码getCaptcha();// 登陆失败的输入项获得焦点document.getElementsByName(res.data)[0].focus();}}};// 3. 初始化请求参数/* 调用格式: xhr.open(当前请求类型, 当前请求脚本地址, 是否异步);*/xhr.open("POST", "doLogin.php", true);// 4. 设置请求头, 指定请求内容以表单类型数据进行发送// xhr.setRequestHeader("content-type", "application/x-www-form-urlencoded");var user = document.querySelector("form");// var dataStr = JSON.stringify(user);var fd = new FormData(user);fd.set('password', fd.get('password').trim());xhr.send(fd);}// 验证码获取函数function getCaptcha() {// 发送异步GET请求获取xhr = new XMLHttpRequest();xhr.onreadystatechange = function () {if (xhr.readyState === 4 && xhr.status === 200) {// 从服务器返回的相应数据, 是个字符串.// console.log(xhr.responseText);// return xhr.responseText;document.getElementsByTagName("img").item(0).src = xhr.responseText;}};xhr.open("GET", "createCaptcha.php", true);xhr.send(null);};// 进入页面时获取一次验证码getCaptcha();</script></html>
获取验证码脚本文件createCaptcha.php
<?phprequire 'vendor/autoload.php';use Gregwar\Captcha\CaptchaBuilder;//生成验证码图片的Builder对象,配置相应属性(4位验证码)$builder = new CaptchaBuilder(4);//可以设置图片宽高及字体$builder->build($width = 100, $height = 40, $font = null);//获取验证码的内容$phrase = $builder->getPhrase();session_start();//把内容存入session$_SESSION['captcha'] = $phrase;// 返回验证码到客户端echo $builder->inline();
登录处理脚本文件doLogin.php
<?php// $arr = print_r($_POST, true);$res = ['status' => 1,'message' => '登陆成功',];// 各输入项判空// 用户名if (empty($_POST['username']) || trim($_POST['username']) == '') {$res = ['status' => 0,'message' => '用户名不能为空','data' => 'username',];echo json_encode($res);exit;}// 密码if (empty($_POST['password']) || trim($_POST['password']) == '') {$res = ['status' => 0,'message' => '密码不能为空','data' => 'password',];echo json_encode($res);exit;}// 验证码if (empty($_POST['captcha_code']) || trim($_POST['captcha_code']) == '') {$res = ['status' => 0,'message' => '验证码不能为空','data' => 'captcha_code',];echo json_encode($res);exit;}// 开启sessionsession_start();$captchaCode = trim($_POST['captcha_code']);// 判断验证码是否输入正确// 忽略大小写if (strtoupper($captchaCode) != strtoupper($_SESSION['captcha'])) {$res = ['status' => 0,'message' => '验证码不正确','data' => 'captcha_code',];echo json_encode($res);exit;}// 创建PDO对象, 查询用户信息$pdo = new PDO('mysql:host=localhost;dbname=phpedu;charset=utf8;port=3306', 'root', 'root');$sql = 'SELECT `id`, `username`, `password`, `realname` from `user` WHERE `username` = ?';$username = trim($_POST['username']);$stmt = $pdo->prepare($sql);$stmt->execute([$username]);// var_dump($stmt->debugDumpParams());$userInfo = $stmt->fetch(PDO::FETCH_ASSOC);// 查到了, 比较加密后的密码if ($userInfo) {// 密码比对成功if (md5(trim($_POST['password']) == $userInfo['password'])) {// 保存到session中的用户信息去掉密码unset($userInfo['password']);// 用户信息保存到session中$_SESSION['user'] = $userInfo;// 返回登陆成功的信息数组(json字符串)echo json_encode($res);exit;} else {// 比对不成功, 返回错误信息数组$res = ['status' => 0,'message' => '密码错误','data' => 'username',];echo json_encode($res);exit;}}// 没查到用户数据, 则用户名无效.$res = ['status' => 0,'message' => '无效的用户名','data' => 'username',];echo json_encode($res);
主页页面文件home.php
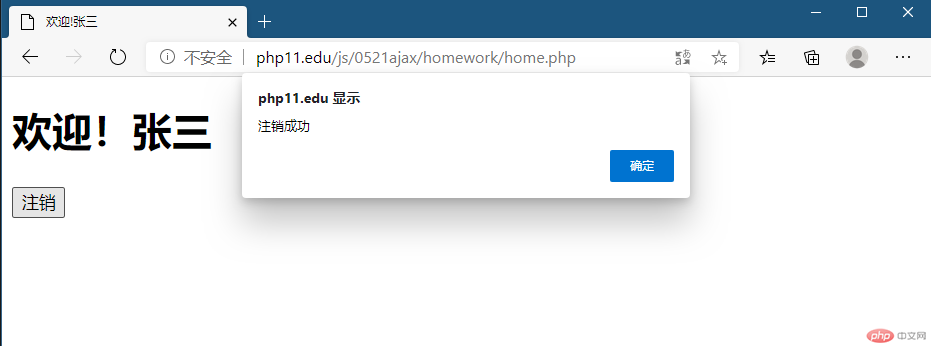
<?phpsession_start();if(!isset($_SESSION['user']) && empty($_SESSION['user'])) {echo ('<script>alert("请先登录!");window.location.href="/js/0521ajax/homework/login.php";</script>');}$user = $_SESSION['user'];?><!DOCTYPE html><html lang="en"><head><meta charset="UTF-8"><meta name="viewport" content="width=device-width, initial-scale=1.0"><title>欢迎!<?php echo($user['realname']); ?></title></head><body><h1>欢迎!<?php echo($user['realname']); ?></h1><h6><button onclick="logout(event)">注销</button></h6></body><script>function logout(event) {// 发送异步请求, 执行注销操作var xhr = new XMLHttpRequest();xhr.onreadystatechange = function() {if (xhr.readyState === 4 && xhr.status === 200) {var res = JSON.parse(xhr.responseText);// 注销成功if(res.status != undefined && res.status == "1") {alert(res.message);window.location = 'login.php';} else {注销失败alert('注销失败');}}}xhr.open('GET', 'doLogout.php', true);xhr.send(null);}</script></html>
注销登录脚本文件doLogout.php
<?phpsession_start();// 把用户信息从session中移除unset($_SESSION['user']);echo json_encode(['status' => "1",'message' => '注销成功']);
运行效果

学习心得
ajax提交请求的基本用法比较过程化, 记住步骤即可. ajax提交请求可以实现页面局部数据刷新, 提升交互体验, 可以让从后端获取数据的操作零散化,让一些不是很重要的数据获取出错时,不至于让整个页面无法浏览.ajax提交请求,是实现前后端分离的基础.