html元素集合转换为数组对象
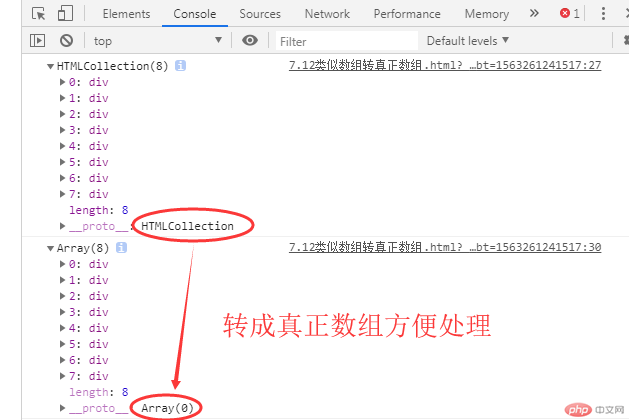
我们进行DOM操作时候经常会拿到类似数组的HTML集合 如下图
var arrDIV=document.getElementsByTagName("div");
通过上面代码获取页面上的元素就是类似数组 HTMLcollection 他是一个html集合 像数组但并不是。
//Array.prototype.slice.call(类似数组变量);通过此方法将类似数组转真正数组
arrDIV=Array.prototype.slice.call(arrDIV);
console.log(arrDIV); 现在输出的就是一个真正的数组了。 可以使用数组的方法处理数据了。
实例
<!DOCTYPE html>
<html>
	<head>
		<meta charset="UTF-8">
		<title>7.12类似数组转真正数组</title>
	</head>
	<body>
		<!--(div{我是一个div$}+p{我是p但不是屁$})*8-->
		<div>我是一个div1</div>
		<p>我是p但不是屁1</p>
		<div>我是一个div2</div>
		<p>我是p但不是屁2</p>
		<div>我是一个div3</div>
		<p>我是p但不是屁3</p>
		<div>我是一个div4</div>
		<p>我是p但不是屁4</p>
		<div>我是一个div5</div>
		<p>我是p但不是屁5</p>
		<div>我是一个div6</div>
		<p>我是p但不是屁6</p>
		<div>我是一个div7</div>
		<p>我是p但不是屁7</p>
		<div>我是一个div8</div>
		<p>我是p但不是屁8</p>
		<script type="text/javascript">
			var arrDIV=document.getElementsByTagName("div");
			console.log(arrDIV);
			//Array.prototype.slice.call(类似数组变量);通过此方法将类似数组转真正数组
			arrDIV=Array.prototype.slice.call(arrDIV);
			console.log(arrDIV);

			var arrP=document.getElementsByTagName("p");
			console.log(arrP);
			arrP=Array.prototype.slice.call(arrP,0);
			console.log(arrP);

			//数组.forEach(回调函直接写数名或匿名函数) 函数中有3个参数第一个必须其他2个可选:item被遍历到的当前元素、索引数字,当前数组自身
			arrP.forEach(wahaha);
			function wahaha(item666,index000,ar){
				item666.setAttribute("style","color:red;font-size:33px;")
				console.log("我是第"+index000+"个"+item666.nodeName+"元素! "+item666.firstChild.nodeValue+"~ \n我还有一个团队是"+arTostr(ar) );

			};
			function arTostr (x) {
				//创建一个arr空数组来临时保存 被加工处理后的新数组
				var arr=[];
				x.forEach(function(item222){
					var con=item222.firstChild.nodeValue;
					//给arr空数组追加 当前遍历到的元素进去
					arr.push(con);
				});
				//将数组转换成字符串 并使用分隔符换行和三角 后作为函数返回参数。
				return arr.join(" \n△ ")
			};


		</script>
	</body>
</html>
运行实例 »
点击 "运行实例" 按钮查看在线实例
================================分割线
定时器的种类和使用场景
js有2种定时器:
setTimeout() 方法用于在指定的毫秒数后调用函数或计算表达式(只执行一次)。
提示: 1000 毫秒= 1 秒。
提示: 如果你只想重复执行可以使用 setInterval() 方法。
提示: 使用 clearTimeout() 方法来阻止函数的执行。
来看小案例~

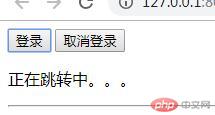
登录按钮被点击后 会提示正在登录 定时器会再3秒后执行跳转到一个新网址
如果中途不想跳转可以点取消登录 清除定时器的执行。
----------------------------------------------分割线
setInterval() 方法可按照指定的周期(以毫秒计)来调用函数或计算表达式。
setInterval() 方法会不停地调用函数,直到 clearInterval() 被调用或窗口被关闭。由 setInterval() 返回的 ID 值可用作 clearInterval() 方法的参数。
提示: 1000 毫秒= 1 秒。
提示: 如果你只想执行一次可以使用 setTimeout() 方法。
来看小案例~

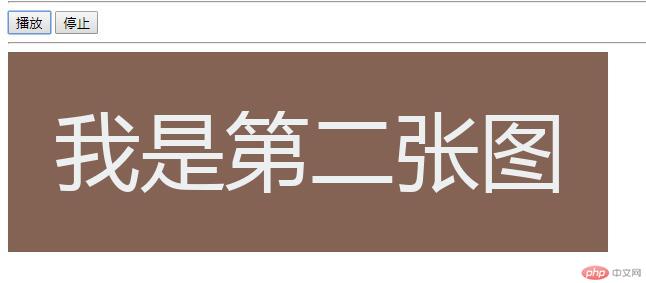
这是一个建议的轮播图案例。有多张图片不停地要换。所以会一直重复执行。所以使用clearInterval()比较合适
来吧我们看一下2个定时器的具体代码。
实例
<!DOCTYPE html>
<html>
	<head>
		<meta charset="UTF-8">
		<title>定时器与时间模拟器</title>
	</head>
	<body>
		<button>登录</button>
		<button>取消登录</button>
		<p></p>
		<hr />
		<button>播放</button>
		<button>停止</button>
		<hr />
		<img src="" alt="" />

		<script type="text/javascript">
			//一、setTimeout(function(){...},num)
			//先拿到登录按钮和提示框元素
			var btn1=document.getElementsByTagName("button").item(0);
			var btn2=document.getElementsByTagName("button").item(1);
			var tips=document.getElementsByTagName("p").item(0);

			//定时器 初始化
			var timer=null;
			//为了解决重复点击 执行多个登录动作得判断状态
			var timer_is_on=0;

			//给登录按钮添加点击事件 执行login函数 冒泡事件
			btn1.addEventListener('click',login,false);
			//登录函数
			function login () {
				if(timer_is_on==0){
					timer_is_on=1;
					tips.innerHTML="正在跳转中。。。";
					timer=setTimeout(tourl,2000);
					console.log('login里面的状态'+timer_is_on);
					console.log('这是timer的第'+timer+'次');
				};

			};
			function tourl(){
			    //跳转到一个新网页
				location.assign("http://www.websss.cn")
			}

			//给取消按钮绑定点击事件 执行timeStop函数
			btn2.addEventListener('click',timerStop,false);
			function timerStop(){
				//清除定时器timer
				clearTimeout(timer);
				//修改状态码 可以再次执行登录
				timer_is_on=0;
				tips.innerHTML="";
			}

		</script>
		<script type="text/javascript">
			//二、setInterval(function(){...},num)
			arr=['http://iph.href.lu/600x200?bg=524856'
			,'http://iph.href.lu/600x200?text=%E6%88%91%E6%98%AF%E7%AC%AC%E4%BA%8C%E5%BC%A0%E5%9B%BE&bg=846254'
			,'http://iph.href.lu/600x200?text=333%E6%88%91%E6%98%AF%E8%80%81%E4%B8%89&bg=858745']
			//先拿到登录按钮和提示框元素
			var btn3=document.getElementsByTagName("button").item(2);
			var btn4=document.getElementsByTagName("button").item(3);
			var timer_is_play=0;
			var img=document.images.item(0);
			img.src=arr[0];

			btn3.addEventListener('click',play,false);
			function play(){
				if(timer_is_play==0){
					timer_is_play=1;
					timer=setInterval(function() {
					var index=Math.ceil(Math.random()*3-1);
					img.src=arr[index]
					},1000)
				}


			};

			btn4.addEventListener('click',function(){
				clearInterval(timer);
				timer_is_play=0;
			});

			//事件模拟器:让机器模拟鼠标去点击。
			//先生成一个事件
			var event=new Event('click');
			//派分事件
			btn3.dispatchEvent(event);
		</script>
	</body>
</html>
运行实例 »
点击 "运行实例" 按钮查看在线实例
上面小案例中的模拟轮播图 因为没有上一页、下一页、也没有小圆点类的状态显示所以看起来不像哈。 (需要点击一下播放才能让大家觉得是有点像轮播图)
所以我们可以使用事件模拟器来完成~
事件模拟器:让机器模拟鼠标去点击。
//先生成一个事件
var event=new Event('click');
//派分事件
btn3.dispatchEvent(event);
简单的2行代码。就让我的模拟轮播图 动了起来 看起来就是轮播图了哈
模拟轮播图就是模拟其实并不是哈 模拟的效果而已(随机显示一张图 不停地换src属性)~
=============================================================分割线
轮播图

下来我们还是来一个真正的幻灯片案例。
首先我们看一下需求和实现步骤原理分析~
我们首先创建一个合理的html dom结构很重要哦。
我们创建一个容器div.banner 然后创建子元素 div.imgList + div.btnlist + span.prev + span.next
我们图片数量一般是动态的。所以对应的状态小圆点应该根据图片来动态生成。生成小圆点时候先遍历图片列表判断是不是第一个小圆点 需要让激活状态class有active 因为图片和小圆点要一一对应 所以我们可以使用自定义属性data-index = "2"来方便判断对应关系。 (因为小圆点是动态创建所以 先创建元素span 然后再设置属性data-index = "2"再插入到小圆点容器 div.btnlist 中 )
dom全部完成后 我们就可以让点击小圆点 让图片动起来了。我们通过遍历按钮添加点击事件,通过判断2组元素的自定义属性来判断来设置相匹配的元素添加激活active。因为还有上一页下一页所以都要用到小圆点的状态设置 所以我们把这个功能写成一个公共函数来调用传一个形参进去 这个形参就是data-index的关联值。
下一页上一页相对就简单啦。因为我们只要通过遍历判断哪个图片是active激活状态 我们移除将当前元素激活 再将下一个兄弟元素设置激活 同时吧index传给小圆点设置函数来改变小圆点就ok啦。(但是需要做一个判断 看下一个兄弟元素是否存在 如果不从来说明是最后一张图片了 要imgArr[0] 给第一张添加激活了哦。2个按钮类似操作在不赘述)
通过定时器给图片切换添加了渐出、渐显~看演示。
实例
<!DOCTYPE html>
<html>
	<head>
		<meta charset="UTF-8">
		<title>7.12焦点图(幻灯片)-大灰狼</title>
		<style type="text/css">
			*{margin: 0;padding: 0;}
			.banner{width: 800px;height: 230px; margin: 0 auto;position: relative;}
			.banner .imgList{}
			.banner .imgList a{display: none;}
			.banner .imgList .imgJT{animation: imgJT 0.5s infinite;}
			.banner .imgList .imgJX{animation: imgJX 0.5s infinite;}
			.banner .imgList .active{display: block;}
			.banner .btnlist{text-align: center;position: relative;bottom: 30px;}
			.banner .btnlist .btnS{display: inline-block; width: 12px;height: 12px; margin:0 3px;border-radius:50%; background:rgba(255,255,255,0.3)}
			.banner .btnlist .btnS:hover{border:3px solid #FFFFFF;box-sizing:border-box;}
			.banner .btnlist .active{background:#FFFFFF;}
			.banner .skip{display: inline-block;padding: 5px; margin-top: -22px;
			background: rgba(255,255,255,0);position: absolute;top: 50%;
			font-size: 33px;color: rgba(255,255,255,0.1);}
			.banner:hover .skip{color: rgba(255,255,255,0.7);background: rgba(255,255,255,0.6);}
			.banner .prev{border-radius:0 50% 50% 0;}
			.banner .next{right: 0;border-radius:50% 0 0 50%;}
			/*大灰狼写个动画*/
			@keyframes imgJT{
				from{opacity: 1;}
				to{opacity: 0;}
			}
			@keyframes imgJX{
				from{opacity: 0;}
				to{opacity: 1;}
			}

		</style>
	</head>
	<body>
		<div class="banner">
			<div class="imgList">
				<a href="#url01" data-index = "0" class="imgA active"><img src="http://iph.href.lu/800x230?text=%E7%AC%AC%E4%B8%80%E5%BC%A0%20800*230&bg=325647" alt="" /></a>
				<a href="#url02" data-index = "1" class="imgA"><img src="http://iph.href.lu/800x230?text=%E7%AC%AC%E4%BA%8C%E5%BC%A0%20800*230&bg=658914" alt="" /></a>
				<a href="#url03" data-index = "2" class="imgA"><img src="http://iph.href.lu/800x230?text=%E7%AC%AC%E4%B8%89%E5%BC%A0%20800*230&bg=856371" alt="" /></a>
				<a href="#url04" data-index = "3" class="imgA"><img src="http://iph.href.lu/800x230?text=%E7%AC%AC%E5%9B%9B%E5%BC%A0%20800*230&bg=396519" alt="" /></a>
				<a href="#url05" data-index = "4" class="imgA"><img src="http://iph.href.lu/800x230?text=%E7%AC%AC%E4%BA%94%E5%BC%A0%20800*230&bg=995216" alt="" /></a>
				<a href="#url06" data-index = "5" class="imgA"><img src="http://iph.href.lu/800x230?text=%E7%AC%AC%E5%85%AD%E5%BC%A0%20800*230&bg=187399" alt="" /></a>
			</div>
			<div class="btnlist">
				<!--<span data-index = "1" class="btnS active"></span>
				<span data-index = "2" class="btnS"></span>
				<span data-index = "3" class="btnS"></span>-->
			</div>
			<!-- 下面是前/后按钮代码 -->
			<span class="skip prev"><</span>
         	<span class="skip next">></span>
		</div>

		<script type="text/javascript">
			//-----------------首先根据图片数量生成小圆点
			//获取页面图片容器a的数量
			var imgList=document.querySelectorAll(".imgList a");
//			console.log(imgList)
			//将a节点列表转数组 方便处理
			var imgArr=Array.prototype.slice.call(imgList);
//			console.log(imgArr)
			//获取小圆点的父节点
			var btns=document.getElementsByClassName("btnlist")[0];
//			console.log(btns)
			//遍历图片 来插入小圆点
			imgArr.forEach(function(imga,index){
				//创建一个span元素
				var span=document.createElement('span');
				//判断是不是第一个span
				if(index==0){
					span.classList.add('btnS','active');
					span.dataset.index=index;
				}
				//给span设置class属性
				span.classList.add('btnS');
				//给span设置自定义属性index
				span.dataset.index=index;
				//将span插入
				btns.appendChild(span);
			});
			//-----------------------为小圆点添加点击事件 让图片切换
			//获取所有小圆点html集合
			var btnSpan=document.getElementsByClassName('btnS');
			//把html集合转数组
//			console.log(btnSpan)
			var spanArr=Array.prototype.slice.call(btnSpan);
//			console.log(spanArr)
			//遍历按钮添加点击事件
			spanArr.forEach(function(span,index){
				span.addEventListener('click',setImgActive,false);
			});
			//设置图像切换
			function setImgActive(ev){
				//ev.target 当前被点击的对象,就是小圆点
				imgArr.forEach(function(Aimg){
					// 根据小圆点的data-index值与图片data-index对应关系来确定需要切换的图片
					if(Aimg.dataset.index==ev.target.dataset.index){
						// 去掉原来所有图片上的激活样式  补增渐退效果
						imgArr.forEach(function(Aimg){
							//为了渐退先看谁是激活的
							if(Aimg.classList.contains('active')){
								//给激活的添加渐退css让去显示减退效果
								Aimg.firstElementChild.classList.add('imgJT');
								//渐退效果需要时间所以定时器来延迟切换
								setTimeout(function(){
									Aimg.firstElementChild.classList.remove('imgJT');
									Aimg.classList.remove('active');
								},500);
							};

						});
						//添加定时器为了渐退效果延迟执行下个图片的激活和延迟设置小圆点
						setTimeout(function(){
							// 设置当前图片为显示激活状态
							Aimg.classList.add('active');
							Aimg.firstElementChild.classList.add('imgJX');
							// 设置小圆点的当前激活与高亮状态 把当前激活图片的索引传过去
							setBtnSpanActive(Aimg.dataset.index);
						},500);
						//渐显效果显示完成后移除 防止重复显示
						setTimeout(function(){Aimg.firstElementChild.classList.remove('imgJX');},500);
					};
				});
			}

			//公共函数 小圆点高亮设置
			function setBtnSpanActive(imgIndex){
				//先清除原来所有小圆点
				spanArr.forEach(function(span) {
					span.classList.remove('active')
				});
				//设置与 图片索引相匹配的小圆点高亮
				spanArr.forEach(function(span){
					if(imgIndex==span.dataset.index){
						span.classList.add('active');
					};
				});
			};
			//--------------------左右翻页按钮
			//获取2个切换按钮元素
			var skip=document.getElementsByClassName('skip');

			//给2个切换按钮添加事件
			skip.item(0).addEventListener('click',qiehuan,false);
			skip.item(1).addEventListener('click',qiehuan,false);

			//定义切换函数
			function qiehuan(ev){
				//获取当前正在显示的图片
				var currentImg=null;
				imgArr.forEach(function(Aimg){
					if(Aimg.classList.contains('active')){
						currentImg=Aimg;
					};
				});
				//判断是点了上一个按钮
				if (ev.target.classList.contains('prev')) {
					currentImg.classList.remove('active');
					currentImg=currentImg.previousElementSibling;
					if(currentImg!=null && currentImg.nodeName==='A'){
						// 高亮前一个兄弟节点图片
                		currentImg.classList.add('active');
					}else{
						// 如果前一个兄弟节点不存在,则显示最后一个,以此来循环显示
                		// 高亮最后一个兄弟节点图片
                		currentImg=imgArr[imgArr.length-1];
                		currentImg.classList.add('active')
					};
				};
				//判断是不是点了下一个按钮
				if(ev.target.classList.contains('next')){
					//给元激活图先设置渐退
					currentImg.firstElementChild.classList.add('imgJT');
					setTimeout(function(){
						currentImg.classList.remove('active');
						currentImg.firstElementChild.classList.remove('imgJT');
						currentImg=currentImg.nextElementSibling;

						if(currentImg!=null && currentImg.nodeName==='A'){
						currentImg.firstElementChild.classList.add('imgJX');
						currentImg.classList.add('active');

						setTimeout(function(){currentImg.firstElementChild.classList.remove('imgJX');},500)
						}else{

						currentImg=imgArr[0];
						currentImg.classList.add('active');
						currentImg.firstElementChild.classList.add('imgJX');
						setTimeout(function(){currentImg.firstElementChild.classList.remove('imgJX');},500)};
						//设置相应小圆点变亮
						setBtnSpanActive(currentImg.dataset.index);
					},500)


				};


			};


			//---------------------通过定时器让焦点图自动切换
			//先拿到焦点图容器.banner
			var banner=document.getElementsByClassName('banner').item(0);
			var timer=null;

			banner.addEventListener('mouseout',startPlay,false);
			banner.addEventListener('mouseover',stopPlay,false);
			//当鼠标离开焦点图区域 执行此函数
			function startPlay(){
				//创建一个事件
				var clickEvent=new Event('click');
				//创建一个循环定时器
				timer = setInterval(function(){
					//将自定义的点击事件分配给按钮,让来自动点击
					skip.item(1).dispatchEvent(clickEvent);
				},3000);
			};
			//清除定时器 停止播放
			function stopPlay () {
				clearInterval(timer);

			};
			//打开页面就自动切换
			startPlay();
		</script>
	</body>
</html>
运行实例 »
点击 "运行实例" 按钮查看在线实例
浏览器在线运行效果比较真实。
http://www.xdidc.com/test0714/7.12%E7%84%A6%E7%82%B9%E5%9B%BE(%E5%B9%BB%E7%81%AF%E7%89%87).html

