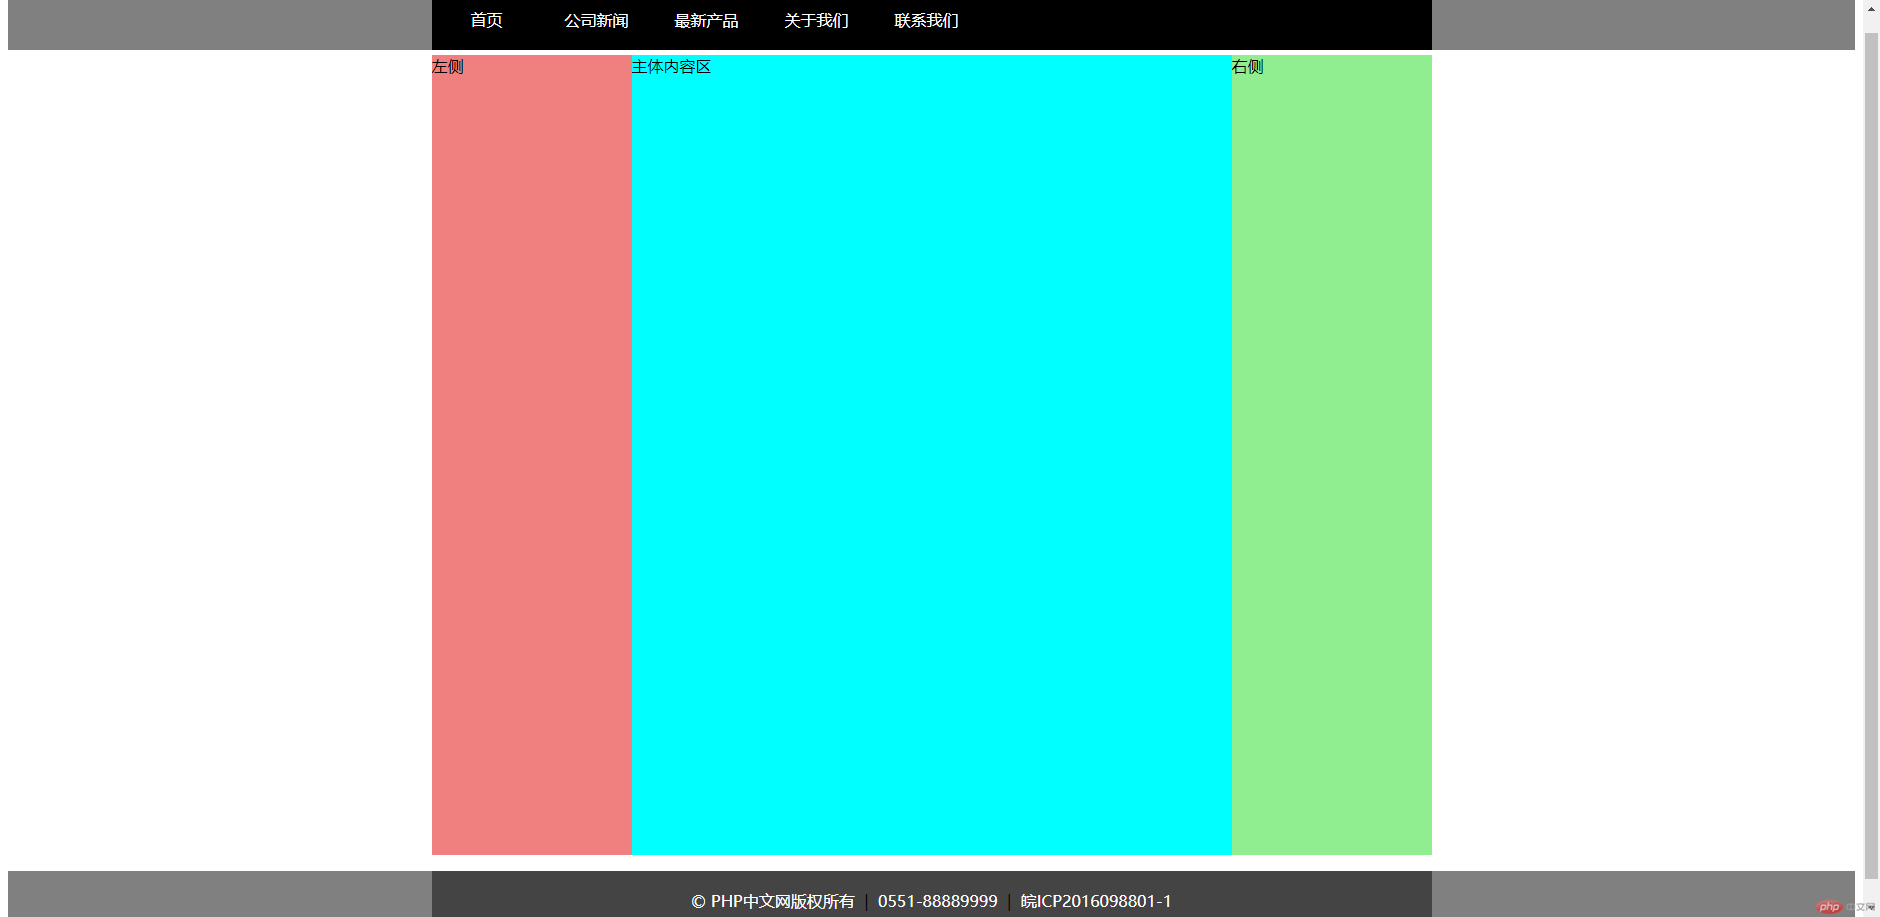
三列布局:
实例
<!DOCTYPE html>
<html lang="en">
<head>
    <meta charset="UTF-8">
    <title>布局案例:通用头部与底部布局技巧</title>
    <style>
.header{
    background-color: grey;
}
.footer{
    background-color: grey;
}
/*头部和底部共同样式*/
.header .content{
/*居中显示*/
    width:1000px;
    height:60px;
    background-color: black;
   margin:0 auto;

}

.footer .content{
    /*居中显示*/
    width:1000px;
    height:60px;
    background-color: #444;
    margin:0 auto;

}
.footer .content p{
    /*单行文本的水平居中*/
    text-align:center;
    line-height:60px;
}

.footer .content p a{
    color:white;
    /*#fff/#eee*/
    text-decoration: none;

}
.header .content .nav {
    /*导航*/
    margin-top:0;
    margin-bottom: 0;
    padding-left:0;
    /*margin:0;*/
    /*padding:0;*/
}

.header .content .nav .item{
    list-style:none;
    /*去掉无序列表前的小圆点*/
}

.header .content .nav .item a{
    /*设置li下a标签,a标签及span标签浮动后可以设置宽高*/
    /* 一定要将浮动设置到链接标签<a>上面,否则无法实现导航区的点击与高亮 */
    float:left;
    /* 设置最小宽度与最小高宽,以适应导航文本的变化 */
    min-width: 80px;
    min-height: 60px;
    /*设置单行文本的高度与区块a链接的高度一致*/
    /*设置单行文本垂直居中*/
    line-height:60px;
    color:white;
    text-decoration: none;
    /*去下划线*/
    padding:0 15px;
    /* 让导航文本在每一个小区块中居中显示 */
    text-align:center;
}

/*鼠标移上去后的效果,在元素上添加一些行为,伪类:修饰某一类样式的类*/
.header .content .nav .item a:hover{
    /* 当鼠标移入到导航链接上时改变背景色与文本前景色,实现当前导航高亮功能 */
    background-color:red;
    /* 将导航文本设置为系统根字体大小的1.1倍,rem为当前根字体的大小 */
    font-size: 1.1rem;
}
.container{
    width:1000px;
    min-height:800px;
    margin:5px auto;
    background-color:lightgrey;
}

</style>
</head>
<body>
<!--头部-->
<div class="header">
    <!--头部内容区-->
    <div class="content">
        <ul class="nav">
    <!--导航用无序列表 li.item*5+[tab]快速生成 -->
        <li class="item"><a href="">首页</a></li>
        <li class="item"><a href="">公司新闻</a></li>
        <li class="item"><a href="">最新产品</a></li>
         <li class="item"><a href="">关于我们</a></li>
        <li class="item"><a href="">联系我们</a></li>
        </ul>
    </div>
    <!-- 中间主体用一个区块模拟代替 -->
    <div class="container"></div>


    <!-- 底部 -->
    <div class="footer">


     <!--底部内容区-->
        <div class="content">
        <p>
            <a href="">© PHP中文网版权所有</a>  |
            <a href="">0551-65358899</a>  |
            <a href="">皖ICP备18***333-1</a>
         </p>
        </div>

    </div>
</div>
</body>
</html>
运行实例 »
点击 "运行实例" 按钮查看在线实例
双飞翼布局图

通用布局☞☞☞双飞翼布局思路:
在三列布局基础上:
头部样式:头部内容区,头部内容区导航,头部导航链接样式,鼠标移入文字变化
主体样式:使用双飞翼布局实现主体部分。
第一步: 主体容器设置总宽度,并水平居中 ;(此处清浮动)
第二步: 左,右二侧固定宽度,中间区块自适应:
1. 中间区块宽度设置在它的容器wrap中;
2. 设置左,右区块的宽度和高度(因为无内容,设置最小高度)及参考色块;
第三步:将中间,左,右区块全部左浮动,因中间区块宽度100%,所以左右会被挤压到下面
第四步: 将left和right拉回到他们正确的位置上,通过设置区块的负外边距的方式,实现向反方向移动区块
第五步: 将中间的内容区块 main 显示出来
.main {
padding-left: 200px;
padding-right: 200px;
/*padding: 0 200px;*/
}
或
.main{
margin:0 200px;
}
双飞翼实现代码:
实例
<!DOCTYPE html>
<html lang="en">
<head>
    <meta charset="UTF-8">
    <title>通用布局-双飞翼</title>
    <style>
    .header{
    background-color: grey;
}
.footer{
    background-color: grey;
}
/*头部和底部共同样式*/
.header .content{
    /*居中显示*/
    width:1000px;
    height:60px;
    background-color: black;
    margin:0 auto;

}

.footer .content{
    /*居中显示*/
    width:1000px;
    height:60px;
    background-color: #444;
    margin:0 auto;

}
.footer .content p{
    /*单行文本的水平居中*/
    text-align:center;
    line-height:60px;
}

.footer .content p a{
    color:white;
    /*#fff/#eee*/
    text-decoration: none;

}
.header .content .nav {
    /*导航*/
    margin-top:0;
    margin-bottom: 0;
    padding-left:0;
    /*margin:0;*/
    /*padding:0;*/
}

.header .content .nav .item{
    list-style:none;
    /*去掉无序列表前的小圆点*/
}

.header .content .nav .item a{
    /*设置li下a标签,a标签及span标签浮动后可以设置宽高*/
    /* 一定要将浮动设置到链接标签<a>上面,否则无法实现导航区的点击与高亮 */
    float:left;
    /* 设置最小宽度与最小高宽,以适应导航文本的变化 */
    min-width: 80px;
    min-height: 60px;
    /*设置单行文本的高度与区块a链接的高度一致*/
    /*设置单行文本垂直居中*/
    line-height:60px;
    color:white;
    text-decoration: none;
    /*去下划线*/
    padding:0 15px;
    /* 让导航文本在每一个小区块中居中显示 */
    text-align:center;
}

/*鼠标移上去后的效果,在元素上添加一些行为,伪类:修饰某一类样式的类*/
.header .content .nav .item a:hover{
    /* 当鼠标移入到导航链接上时改变背景色与文本前景色,实现当前导航高亮功能 */
    background-color:red;
    /* 将导航文本设置为系统根字体大小的1.1倍,rem为当前根字体的大小 */
    font-size: 1.1rem;
}
.container{
    width:1000px;
    /*min-height:800px;*/
    margin:5px auto;
    background-color:lightgrey;
    overflow:hidden;
    /*包住浮动的子元素*/
}
/*将主体部分使用双飞翼实现三列布局*/
.wrap{
    width:inherit;
    min-height:800px;
    background-color: cyan;
}
.left{
    width:200px;
    min-height:800px;
    background-color:lightcoral;
}
.right{
    width:200px;
    min-height:800px;
    background-color:lightgreen;
}

/*全部进行左浮动*/
.wrap,.right,.left{
    float:left;
}
.left{
    margin-left:-100%;
    /*margin-left:-1000px;*/
    /*首选相对距离*/
}
.right{
    margin-left:-200px;
}
.main{
    margin:0 200px;
}
</style>
</head>
<body>
<!-- 头部 -->
<div class="header">
    <div class="content">
        <ul class="nav">
            <li class="item"><a href="">首页</a></li>
            <li class="item"><a href="">公司新闻</a></li>
            <li class="item"><a href="">最新产品</a></li>
            <li class="item"><a href="">关于我们</a></li>
            <li class="item"><a href="">联系我们</a></li>
        </ul>
    </div>
</div>

<!-- 中间主体 -->
<div class="container">
    <!-- 思路:必须先创建中间主体区块,确保它优先被渲染出来, 现创建左右二列 -->
    <!--页面解析由左至右,由上之下,重要的部分放在前面-->

    <!-- 创建双飞翼使用的DOM结构 -->

    <!-- 1. 中间内容区块 -->
    <!-- 中间内容区需要创建一个父级容器进行包裹 -->
    <div class="wrap">
        <!-- 最终要展示的内容必须写在main区块中 -->
        <div class="main">主体内容区</div>
    </div>

    <!-- 2. 左侧边栏区块 -->
    <div class="left">左侧</div>

    <!-- 3. 右侧边栏区块 -->
    <div class="right">右侧</div>

</div>

<!-- 底部 -->
<div class="footer">
    <div class="content">
        <p>
            <a href="">© PHP中文网版权所有</a> |
            <a href="">0551-88889999</a> |
            <a href="">皖ICP2016098801-1</a>
        </p>

    </div>
</div>
</body>
运行实例 »点击 "运行实例" 按钮查看在线实例
布局样式之“双飞翼”与“圣杯”区别:
双飞翼:float+margin
1.思路:必须先创建中间主体区块,确保它优先被渲染出来, 现创建左右二列 ;页面解析由左至右,由上之下,重要的部分放在前面。
2.中间内容区需要创建一个父级容器进行包裹。
<div class="wrap">
<!-- 最终要展示的内容必须写在main区块中 -->
<div class="main">主体内容区</div>
</div>
<!-- 最终要展示的内容必须写在main区块中 -->
<div class="main">主体内容区</div>
</div>
第二步: 左,右二侧固定宽度,中间区块自适应
1. 中间区块宽度设置在它的容器wrap中
.wrap {
继承父级区块container宽度 width:1000px;
width: inherit;
高度也继承主体区块
min-height: 800px;
参考背景色
background-color: cyan;
}
1. 中间区块宽度设置在它的容器wrap中
.wrap {
继承父级区块container宽度 width:1000px;
width: inherit;
高度也继承主体区块
min-height: 800px;
参考背景色
background-color: cyan;
}
圣杯:float+padding
1.同样必须先创建中间主体区块,确保它优先被渲染出来
2.与双飞翼相比, DOM结构更简洁, 不需要为main创建父级容器
中间内容main区块中
<div class="main">主体内容区</div>
2.与双飞翼相比, DOM结构更简洁, 不需要为main创建父级容器
中间内容main区块中
<div class="main">主体内容区</div>
第二步: 左,右二侧固定宽度,中间区块继承父级container宽度
.main {
width: inherit;
min-height: 800px;
background-color: lightcyan;
}
.main {
width: inherit;
min-height: 800px;
background-color: lightcyan;
}

