CSS基本选择器:
1、标签选择器
ul {border: 1px dashed red;} 选择所有<ul>标签
2、层级选择器
ul li {list-style-type:none;} 选择<ul>下面所有<li>标签
3、id选择器
#bg-blue {/* 注意: id也可以给多个元素添加样式,但不要这样做 */background-color: lightblue;} 选择所有id="bg-blue "的元素
4、类选择器
.bg-green {background-color: lightgreen;} 选择所有class="bg-green"的元素
5、属性选择器
li[id="bg-blue"] {border: 2px solid red;} 选择id="bg-blue"的所有<li>标签
6、群组选择器
#bg-blue, .bg-green {border: 2px solid blue;} 选择所有id="bg-blue"和class="bg-green"的元素
7、相邻选择器
#bg-blue + * {background-color: yellow;} 选择id="bg-blue"的下一个同级元素
8、兄弟选择器
#bg-blue ~ * {background-color: yellow; } 选择id="bg-blue"后面的所有同级兄弟元素
接下来是伪类选择器
1、子元素选择器
ul :first-child {background-color: coral; }指定只有当<ul>元素是其父级的第一个子级的样式。
ul :last-child {background-color: coral; }指定只有当<ul>元素是其父级的最后一个子级的样式。
ul :nth-child(6) {background-color: coral; }指定只有当<ul>元素是其父级的第六个子级的样式。
ul :nth-last-child(3) {background-color: coral; }指定只有当<ul>元素是其父级的倒数第三个子级的样式。
2、类型选择器
ul li:first-of-type {background-color: darkorchid; }选择每个<li>元素是其父级<ul>的第一个<li>元素
ul li:last-of-type {background-color: darkorchid; }选择每个<li>元素是其父级<ul>的最后一个<li>元素
ul li:nth-of-type(6) {background-color: darkorchid; }选择每个<li>元素是其父级<ul>的第六个<li>元素
我们发现, 伪类中的子元素选择器与类型选择器的功能几乎是一样的,那我们应该用哪个呢?
这两类伪类选择器关注点不同, 子元素选择器的重点是 "child" 关键字上,关注的是子元素位置
而类型选择器关注点在 "type" 关键字上,重点是元素的类型
3、表单控件
form :enabled {background-color: wheat;}选择每一个已启用的表单
form :checked + * {color: red;}将单选按钮中的文本前景色设置为红色,使用了伪类和相邻选择器
form :invalid {color: red;}当在控件中输入无效值文本自动变成红色
form :focus {background-color: lightgreen;}设置控件获取到焦点时的样式
button:hover {width: 56px;height: 28px;background-color: black;color: white;}设置鼠标悬停时的样式
掌握以上的选择器, 对于常规的开发项目已经够用了, 更多选择器,大家可参考开发手册
接下来我们通过一些页面布局案例加深印象
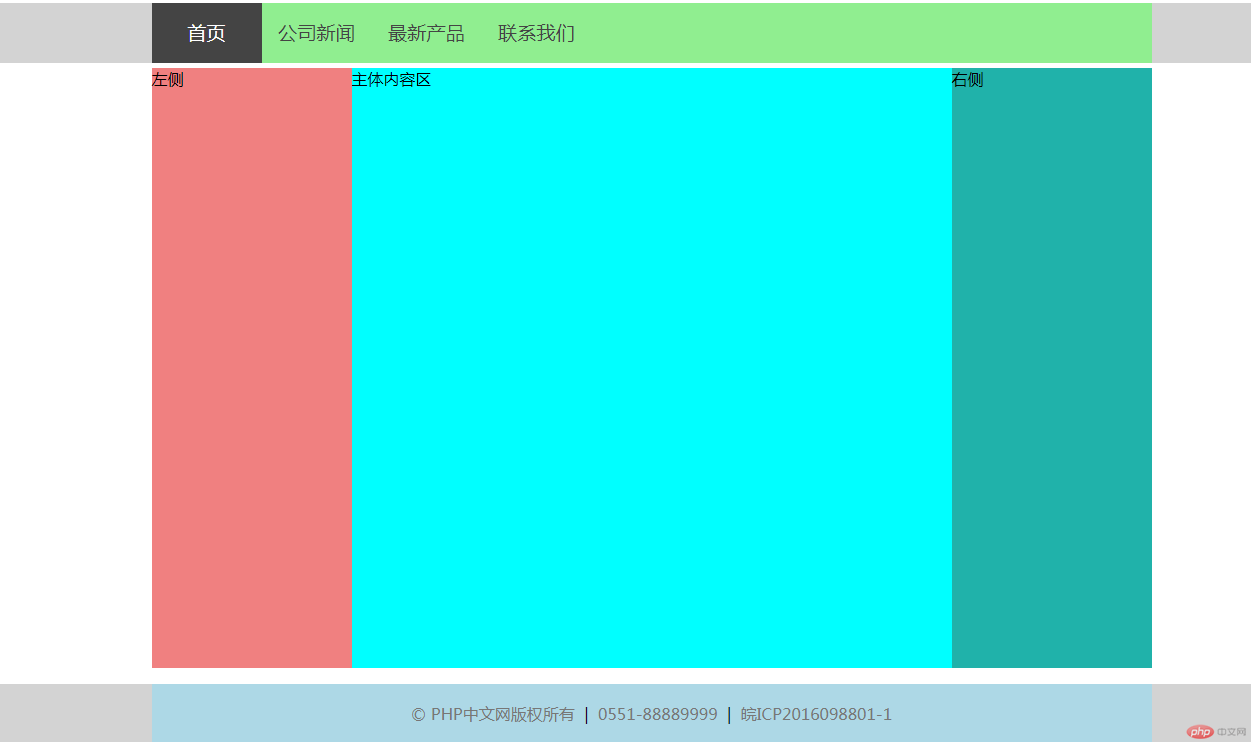
通用布局之[双飞翼](Flying Swing Layout)

效果图
实例
<!DOCTYPE html>
<html lang="en">
        <head>
        <meta charset="UTF-8">
        <title>通用布局之[双飞翼](Flying Swing Layout)</title>
        <style>
.header {
	/* 通常宽度默认为100% */
	width: 100%;
	/* 参考色块,上线时应该删除或替换 */
	background-color: lightgray;
}
.header .content {
	/* 头部内容区,应该居中显示,所有要有宽度 */
	width: 1000px;
	height: 60px;
	/* 参考色块 */
	background-color: lightgreen;
	/* 上下外边距为0,左右自动居中 */
	margin: 0 auto;
	/* margin: 0 auto的等价语句,注意上右下左的顺序 */
	margin-top: 0;
	margin-right: auto;
	margin-bottom: 0;
	margin-left: auto;/* 因为上下相等,左右也相等,所以可以简写为: margin: 0 auto; */

}
.header .content .nav {
	/* 清空导航UL元素的默认样式 */
	margin: 0;
	padding: 0;
}
.header .content .nav .item {
	list-style-type: none;
}
.header .content .nav .item a {
	/* 一定要将浮动设置到链接标签<a>上面,否则无法实现导航区的点击与高亮 */
	float: left;
	/* 设置最小宽度与最小高宽,以适应导航文本的变化 */
	min-width: 80px;
	min-height: 60px;
	/* 设置行高与头部区块等高,使导航文本可以垂直居中显示 */
	line-height: 60px;
	color: #444;
	/* 将导航文本设置为系统根字体大小的1.2倍 */
	font-size: 1.2rem;
	/* 设置民航文本的左右内边距,使导航文本不要挨的太紧 */
	padding: 0 15px;
	/* 去掉链接标签默认的下划线 */
	text-decoration: none;
	/* 让导航文本在每一个小区块中居中显示 */
	text-align: center;
}
.header .content .nav .item a:hover {
	/* 当鼠标移入到导航链接上时改变背景色与文本前景色,实现当前导航高亮功能 */
	background-color: #444;
	color: white;
}
/* 使用双飞翼布局实现主体部分 */

        /* 第一步: 主体容器设置总宽度,并水平居中 */
.container {
	width: 1000px;
	min-height: 600px;
	margin: 5px auto;
	background-color: lightgray;   /* 参考色块 */
}
/* 第二步: 左,右二侧固定宽度,中间区块自适应*/
        /* 中间区块宽度设置在它的容器wrap中 */
.wrap {
	width: inherit;  /* 继承父级区块container宽度 */
	min-height: inherit;
	background-color: cyan;
}
/* 设置左,右区块的宽度和高度(因为无内容,所以设置了最小高度),并设置参考色块 */
.left {
	width: 200px;
	min-height: 600px;
	background-color: lightcoral;
}
.right {
	width: 200px;
	min-height: 600px;
	background-color: lightseagreen
}
/* 第三步:将中间,左,右区块全部左浮动 */
        /* 因中间区块宽度100%,所以左右会被挤压到下面 */
.wrap, .left, .right {
	float: left;
}
/* 第四步: 将left和right拉回到他们正确的位置上 */
        /* 通过设置区块的负外边距的方式,实现向反方向移动区块 */
.left {
	margin-left: -100%;   /* -100%等价于-1000px,将左区块拉回到中间的起点处*/
}
.right {
	margin-left: -200px; /* -200px就正好将右区块上移到中间区块右侧显示 */
}
/* 现在还有最后一个问题,中间内容区块main没有显示出来 */

        /* 第五步: 将中间的内容区块 main 显示出来 */
.main {
	padding-left: 200px;
	padding-right: 200px;
}
/* 底部与头部的基本样式类似 */
.footer {
	width: 100%;
	background-color: lightgray;
}
.footer .content {
	width: 1000px;
	height: 60px;
	background-color: lightblue;
	margin: 0 auto;
}
.footer .content p {
	text-align: center;
	line-height: 60px;
}
.footer .content a {
	text-decoration: none;
	color: #777;
}
/* 鼠标移入时显示下划线并加深字体前景色 */
.footer .content a:hover {
	text-decoration: underline;
	color: #444;
}
</style>
        </head>
        <body>
<!-- 头部 -->
<div class="header">
          <div class="content">
    <ul class="nav">
              <li class="item"><a href="">首页</a></li>
              <li class="item"><a href="">公司新闻</a></li>
              <li class="item"><a href="">最新产品</a></li>
              <li class="item"><a href="">联系我们</a></li>
            </ul>
  </div>
        </div>

<!-- 中间主体 -->
<div class="container">
          <!-- 创建双飞翼使用的DOM结构 -->

          <!-- 必须先创建中间主体区块,确保它优先被渲染出来 -->
          <!-- 中间内容区需要创建一个父级容器进行包裹 -->
          <div class="wrap">
    <!-- 最终要展示的内容必须写在main区块中 -->
    <div class="main">主体内容区</div>
  </div>

          <!-- 创建左侧边栏区块 -->
          <div class="left">左侧</div>

          <!-- 创建右侧边栏区块 -->
          <div class="right">右侧</div>
        </div>

<!-- 底部 -->
<div class="footer">
          <div class="content">
    <p> <a href="">© PHP中文网版权所有</a>  |  <a href="">0551-88889999</a>  |  <a href="">皖ICP2016098801-1</a> </p>
  </div>
        </div>
</body>
</html>
运行实例 »
点击 "运行实例" 按钮查看在线实例
代码解释:
听说双飞翼布局是玉伯大大提出来的,始于淘宝UED
如果把三栏布局比作一只大鸟,可以把main看成是鸟的身体,left和right则是鸟的翅膀。这个布局的实现思路是,先把最重要的身体部分放好,然后再将翅膀移动到适当的地方.
左翅left有200px,右翅right..200px.. 身体main自适应未知
1.html代码中,main要放最前边
2.将main left right都float:left
3.将main占满 width:100%
4.此时main占满了,所以要把left拉到最左边,使用margin-left:-100% 同理 right使用margin-left:-200px
5.main内容被覆盖了吧,再设置padding padding-left: 200px;padding-right: 200px;
6.main正确展示
案例二、绝对定位实现窗口遮罩功能
实例
<!DOCTYPE html>
<html lang="en">
<head>
<meta charset="UTF-8">
<style>
body {
	margin: 0;
	background-color:#666;
	background-size: cover;
}
/* 设置遮罩 */
.shade {
	/* 遮罩绝对定位,并自动伸展到整个窗口 */
	position: absolute;
	left: 0;
	top: 0;
	width: 100%;
	height: 100%;
	/* 将背景设置为纯黑,并通过透明度使背影内容透出来 */
	background-color: black;
	opacity: 0.7;
}
/* 设置登录窗口 */
.login {
	background-color: white;
	/* 登录窗口不随窗口大小变化,说明它不是文档流中,是绝对定位 */
	position: absolute;
	/* 使登录窗中页面的正中间位置开始显示,注意是显示的起点在正中间 */
	left: 50%;
	top: 50%;
	/* 再把每个方向向相反方式拉,设置负外边距就可以 */
    /* 注意,margin的负值是登录块的大小的一半 */
	margin-left: -190px;
	margin-top: -230px;
}
.login{
	width: 380px;
	height: 460px;
	background-color:#FF0;
}
</style>
<title>绝对定位之遮罩(shade)</title>
</head>
<body>
<div class="shade"></div>
<div class="login"></div>
</body>
</html>
运行实例 »
点击 "运行实例" 按钮查看在线实例
案例三、固定定位制作广告位
实例
<!DOCTYPE html>
<html lang="en">
	<head>
	<meta charset="UTF-8">
	<title>固定定位小案例(position:fixed)</title>
	<style>
body {
	background-color: lightgray;
	height: 2000px;
}
.ads {
	width: 350px;
	height: 250px;
	background-color: lightblue;
	position: fixed;
	right: 0;
	bottom: 0;
}
.ads button {
	float: right;
	margin-right: 20px;
}
</style>
	</head>
	<body>
<h1>固定定位小案例:实现广告位</h1>
<div class="ads">
      <button onclick="this.parentNode.style.display = 'none'">关闭</button>
      <h2>php中文网第四期线上班</h2>
      <h1>招生进行中...</h1>
    </div>
</body>
</html>
运行实例 »
点击 "运行实例" 按钮查看在线实例

