如何使用 AppML
本章节将通过以下4个简单的步骤演示如何创建<AppML>的应用程序。
下一章将介绍如何下载<AppML>,并开始在你自己的电脑上开发Web应用程序。
1.创建模型(Model)
使用以下内容创建文件
<datasource>
<database>
<connection>Demo</connection>
<sql>SELECT CustomerName,ContactName,City,Country FROM Customers</sql>
<orderby>CustomerName</orderby>
</database>
</datasource>
<filters>
<query>
<field>CustomerName</field>
</query>
</filters>
</appml>
在子目录中Models(我们建议)将该文件保存为 Customers.xml。
模型解析
<appml> 标签定义了模型。
<datasource>标签定义模型的数据源。
<database>标签定义数据库。
<connection>标签定义数据库的链接。
<sql>标签定义数据查询
<orderby>标签定义默认排序。
<query>标签定义合法的查询过滤器。
2. 创建 WEB 页面
在第一个 <AppML> app中,创建一个 HTML页面:
实例
<!DOCTYPE html>
<html>
<body>

<h1>My First Web Application</h1>

<table>
<tr>
  <th>Customer</th>
  <th>City</th>
  <th>Country</th>
</tr>
<tr>
  <td>Alfreds Futterkiste</td>
  <td>Berlin</td>
  <td>Germany</td>
</tr>
</table>

</body>
</html>
运行实例 »
点击 "运行实例" 按钮查看在线实例
3. 添加样式
在你的web页面中添加层叠样式在执行e <AppML> app:
实例
<!DOCTYPE html>
<html>

<head>
<link rel="stylesheet" href="appml.css">
</head>

<body>
<h1>My First Web Application</h1>

<table class="appmltable">
<tr>
  <th>Customer</th>
  <th>City</th>
  <th>Country</th>
</tr>
<tr>
  <td>Alfreds Futterkiste</td>
  <td>Berlin</td>
  <td>Germany</td>
</tr>
</table>

</body>
</html>
运行实例 »
点击 "运行实例" 按钮查看在线实例
4. 添加脚本, 然后执行应用
在你的web页面中添加脚本来运行 <AppML> app:
实例
<!DOCTYPE html>
<html>

<head>
<link rel="stylesheet" href="appml.css">
</head>

<body>
<h1>My First Web Application</h1>

<div id="Place01">

<table id="Template01" class="appmltable">
<tr>
  <th>Customer</th>
  <th>City</th>
  <th>Country</th>
</tr>
<trid="appml_row">
  <td>#CustomerName#</td>
  <td>#City#</td>
  <td>#Country#</td>
</tr>
</table>
</div>

<script src="appml.js"></script>
<script>
app=new AppML("appml.htmlx","Models/Customers.xml");
app.run("Place01","Template01");
</script>

</body>
</html>
运行实例 »
点击 "运行实例" 按钮查看在线实例
实例解析
<AppML> 库中含有大量的函数。这些函数可以再你的web页面中调用。
<script src="appml.js"> 加载了 <AppML> 库。
JavaScript 语句: app=new AppML("appml.htmlx","Models/Customers.xml"); 创建 AppML 应用对象, 然后执行web服务端脚本 "appml.htmlx" 来加载 "Customers.xml"文件的数据。
JavaScript 语句 app.run("Place01","Template01"); 将数据插入到 id="Place01" 的HTML元素中, 使用 id="Template01" 属性元素作为模板。
属性 id="appml_row" 定义了每条数据插入到HTML元素中。
# 标记中的数据会使用模型的数据替换。
以上所有,你可以想象到更快的原型吗?
它是如何工作的?
当web页面加载时, 你可以再页面中加载 <AppML> 控制器。
使用 <AppML> 控制器, 你可以再页面创建 <AppML> 对象。
当你在页面中运行 <AppML> 对象, 它会请求服务端数据控制器。
<AppML> 对象从服务器接收数据 (使用数据模型)。
<AppML> 对象 (或者你的代码) 在页面中显示数据。
(可选) web用户可以改变数据。
(可选) <AppML> 可以在服务器后台发送数据。
(可选) 服务器控制器可以在服务端存储数据。
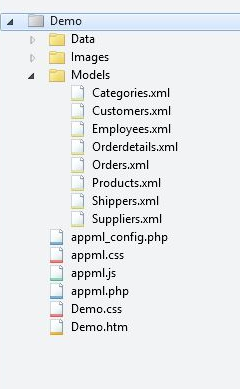
典型的 Web 文件和文件夹:
|
数据文件夹: Data 图片文件夹: Images 模型文件夹: Models 应用: Demo.htm 样式: Demo.css
<AppML> 配置文件: appml_config.php (或者 .htmlx) <AppML> 样式文件: appml.css <AppML> 浏览器控制器: appml.js <AppML> 服务器控制器: appml.php (or .htmlx) |
没有限制
可以将 <AppML> 对象放在 HTML 页面。 <AppML> 不影响页面的其他部分。
<AppML> 在方案页面不存在时默认为标准的显示页面。 这是完美的快速原型。
但是 <AppML> 主要功能不是用于页面的显示。 <AppML> 主要是读取 应用程序数据. 它带来的数据可以通过自由的使用 HTML, CSS, 和 JavaScript 来设计它们的显示效果。你可以:
自己编写HTML,让AppML处理数据。
调用模型,并处理所有的显示。
使用AppML的属性和方法,创建其它的组合。
你很快会发现 <AppML>具备了强大的功能,它可以为你的web应用提供数据和数据模型。你可以:
为用户或用户组定义数据安全
连接所有类型数据库, 如 Access, MySQL, SQL, 和 Oracle
连接 XML 文件和 Text 文件
定义数据类型,数据格式,数据限制。
给模型添加任何新元素。


