


1.Install MySQL
<code class="hljs ruby">root@kallen:~# apt-get install mysql-server-5.5 mysql-client-5.5</code>
<strong>2.Add Users</strong>
<strong>(1) 选择数据表</strong><br>
语句如下:use mysql;<br>
<strong>(2) 在mysql的user表中增加连接用户帐号:</strong><br>
这里不要直接使用INSERT语句添加user记录,使用INSERT可能出现错误:
ERROR 1364 (HY000): Field ‘ssl_cipher’ doesn’t have a default value
不过早期的MYSQL版本倒没出现这个错误,因为一直都是直接修改user表或直接使用INSERT语句完成,后来升级MYSQL到5.1的时候,发现可能会出现这个错误。<br>
建议使用GRANT语句进行授权,语句如下:
<code class="hljs ruby"><code class="hljs sql">GRANT USAGE ON *.* TO 'username'@'localhost' IDENTIFIED BY 'password' WITH GRANT OPTION;</code></code>
<code class="hljs sql">上句:
<code class="hljs sql">“username”替换为将要授权的用户名,比如clientusr;<br>
	“password”替换为clientusr设置的密码;
<code class="hljs sql">(3) 可访问数据表授权
<code class="hljs sql">创建好帐户之后,就开始给上面的common user进行数据表授权,步骤3中增加的连接用户默认权限都是“N”的,必须在db表中为该帐户授权,允许其访问专用数据库,当然超级用户就不说了。
<code class="hljs sql">使用下面语句:
<code class="hljs ruby"><code class="hljs sql"><code class="hljs sql">GRANT SELECT,INSERT,UPDATE,DELETE,CREATE,DROP ON tablename.* TO 'username'@'localhost' IDENTIFIED BY 'password';</code></code></code>
<code class="hljs sql"><code class="hljs sql">本语句中的权限根据实际需要确定:
<code class="hljs sql"><code class="hljs sql">“tablename”替换为授权访问的数据表table名<br>
	“username” 是步骤2授权用户名<br>
	“password” 是步骤2授权用户的设置密码
<code class="hljs sql"><code class="hljs sql">这样就为该用户授予了对某数据表的SELECT, INSERT, UPDATE, DELETE, CAREATE, DROP权限。
<code class="hljs sql"><code class="hljs sql">(4) 生效授权,创建完毕
<code class="hljs sql"><code class="hljs sql">一句话即可:FLUSH PRIVILEGES;
<code class="hljs sql"><code class="hljs sql"><strong>3.Install phpmyadmin</strong>
<code class="hljs sql"><code class="hljs sql">用随便一个支持PHP的web服务器(如Apache、Nginx、Lighttpd),下载phpmyadmin,装之。
<code class="hljs ruby"><code class="hljs sql"><code class="hljs sql"><code class="hljs bash">sudo apt-get install phpmyadmin #注意这是安装到/usr/share/phpmyadmin</code></code></code></code>
<code class="hljs sql"><code class="hljs sql"><code class="hljs bash">在ubuntu下,sudo apt-getinstall phpmyadmin后会有一些设置,如选择服务器、密码设定等等内容。安装完成后,访问http://localhost/phpmyadmin会出现404错误,这是因为没有将phpmyadmin目录映射到apache目录下面,运行下面命令即可:
<code class="hljs ruby"><code class="hljs sql"><code class="hljs sql"><code class="hljs bash"><code class="hljs bash">sudo ln -s /usr/share/phpmyadmin /var/www/html</code></code></code></code></code>
<code class="hljs sql"><code class="hljs sql"><code class="hljs bash"><code class="hljs bash"><strong>[常见错误]</strong>
<code class="hljs sql"><code class="hljs sql"><code class="hljs bash"><code class="hljs bash"><strong>(1) 安装错误:</strong>
<code class="hljs ruby"><code class="hljs sql"><code class="hljs sql"><code class="hljs bash"><code class="hljs bash"><code class="hljs http">Error: Package: php54w-tidy-5.4.41-1.w6.x86_64 (webtatic)

 Requires: libtidy-0.99.so.0()(64bit)

 You could try using --skip-broken to work around the problem

 You could try running: rpm -Va --nofiles --nodigest </code></code></code></code></code></code>
<code class="hljs sql"><code class="hljs sql"><code class="hljs bash"><code class="hljs bash"><code class="hljs http">需要安装libtidy-0.99.so:
<code class="hljs ruby"><code class="hljs sql"><code class="hljs sql"><code class="hljs bash"><code class="hljs bash"><code class="hljs http"><code class="hljs ruby">[root@amtt02 html]# rpm -ivh libtidy-0.99.0-19.20070615.1.el6.x86_64.rpm</code></code></code></code></code></code></code>
<code class="hljs sql"><code class="hljs sql"><code class="hljs bash"><code class="hljs bash"><code class="hljs http"><code class="hljs ruby"><strong>(2) 访问错误:</strong><br>
在http.conf文件中加入:
<code class="hljs ruby"><code class="hljs sql"><code class="hljs sql"><code class="hljs bash"><code class="hljs bash"><code class="hljs http"><code class="hljs ruby"><code class="hljs apache"><directory phpmyadmin="" share="" usr="">

AllowOverride None

Order allow,deny

Allow from all

</directory> </code></code></code></code></code></code></code></code>
<code class="hljs ruby"><code class="hljs sql"><code class="hljs sql"><code class="hljs bash"><code class="hljs bash"><code class="hljs http"><code class="hljs ruby"><code class="hljs apache"><code class="hljs ">service httpd restart </code></code></code></code></code></code></code></code></code>
<code class="hljs sql"><code class="hljs sql"><code class="hljs bash"><code class="hljs bash"><code class="hljs http"><code class="hljs ruby"><code class="hljs apache"><code class="hljs ">之后,就能成功启动httpd服务了,问题解决。
<code class="hljs sql"><code class="hljs sql"><code class="hljs bash"><code class="hljs bash"><code class="hljs http"><code class="hljs ruby"><code class="hljs apache"><code class="hljs ">访问phpMyAdmin提示:
<code class="hljs sql"><code class="hljs sql"><code class="hljs bash"><code class="hljs bash"><code class="hljs http"><code class="hljs ruby"><code class="hljs apache"><code class="hljs ">配置文件权限错误,无法写入!
<code class="hljs sql"><code class="hljs sql"><code class="hljs bash"><code class="hljs bash"><code class="hljs http"><code class="hljs ruby"><code class="hljs apache"><code class="hljs ">解决办法:
<code class="hljs ruby"><code class="hljs sql"><code class="hljs sql"><code class="hljs bash"><code class="hljs bash"><code class="hljs http"><code class="hljs ruby"><code class="hljs apache"><code class="hljs "><code class="hljs perl">chmod -R 755 ./phpmyadmin</code></code></code></code></code></code></code></code></code></code>
<code class="hljs sql"><code class="hljs sql"><code class="hljs bash"><code class="hljs bash"><code class="hljs http"><code class="hljs ruby"><code class="hljs apache"><code class="hljs "><code class="hljs perl">这样设置下phpMyAdmin目录权限属性为755就可以访问了。原来phpMyAdmin必须在755权限下才可以运行。
<code class="hljs sql"><code class="hljs sql"><code class="hljs bash"><code class="hljs bash"><code class="hljs http"><code class="hljs ruby"><code class="hljs apache"><code class="hljs "><code class="hljs perl">注意:在777下也是错误的,估计是phpMyAdmim为安全着想。
<code class="hljs sql"><code class="hljs sql"><code class="hljs bash"><code class="hljs bash"><code class="hljs http"><code class="hljs ruby"><code class="hljs apache"><code class="hljs "><code class="hljs perl"><strong>4.Can’t connect to MySQL server on ‘localhost’(10038)</strong>
<code class="hljs sql"><code class="hljs sql"><code class="hljs bash"><code class="hljs bash"><code class="hljs http"><code class="hljs ruby"><code class="hljs apache"><code class="hljs "><code class="hljs perl">查一下你的MYSQL用户表里, 是否允许远程连接
<code class="hljs sql"><code class="hljs sql"><code class="hljs bash"><code class="hljs bash"><code class="hljs http"><code class="hljs ruby"><code class="hljs apache"><code class="hljs "><code class="hljs perl"><strong>(1)给用户授权</strong>
<code class="hljs ruby"><code class="hljs sql"><code class="hljs sql"><code class="hljs bash"><code class="hljs bash"><code class="hljs http"><code class="hljs ruby"><code class="hljs apache"><code class="hljs "><code class="hljs perl"><code class="hljs lasso">mysql>grant all privileges on *.*to'root'@'%' identified by 'youpassword' with grant option;</code></code></code></code></code></code></code></code></code></code></code>
<code class="hljs ruby"><code class="hljs sql"><code class="hljs sql"><code class="hljs bash"><code class="hljs bash"><code class="hljs http"><code class="hljs ruby"><code class="hljs apache"><code class="hljs "><code class="hljs perl"><code class="hljs lasso"><code class="hljs ">mysql>flush privileges;</code></code></code></code></code></code></code></code></code></code></code></code>
<code class="hljs sql"><code class="hljs sql"><code class="hljs bash"><code class="hljs bash"><code class="hljs http"><code class="hljs ruby"><code class="hljs apache"><code class="hljs "><code class="hljs perl"><code class="hljs lasso"><code class="hljs "><strong>(2)修改/etc/mysql/my.conf</strong>
<code class="hljs sql"><code class="hljs sql"><code class="hljs bash"><code class="hljs bash"><code class="hljs http"><code class="hljs ruby"><code class="hljs apache"><code class="hljs "><code class="hljs perl"><code class="hljs lasso"><code class="hljs ">找到bind-address =127.0.0.1这一行<br>
改为bind-address =0.0.0.0 即可
<code class="hljs ruby"><code class="hljs sql"><code class="hljs sql"><code class="hljs bash"><code class="hljs bash"><code class="hljs http"><code class="hljs ruby"><code class="hljs apache"><code class="hljs "><code class="hljs perl"><code class="hljs lasso"><code class="hljs "><code class="hljs vhdl">root@kallen:/etc/selinux# vim /etc/mysql/
# Instead of skip-networking the default is now to listen only on
# localhost which is more compatible and is not less secure.
# bind-address = 127.0.0.1
# Remote Access to MySQL on port 3306
# Kallen Ding, Jun 11 2015
bind-address = 0.0.0.0</code></code></code></code></code></code></code></code></code></code></code></code></code>

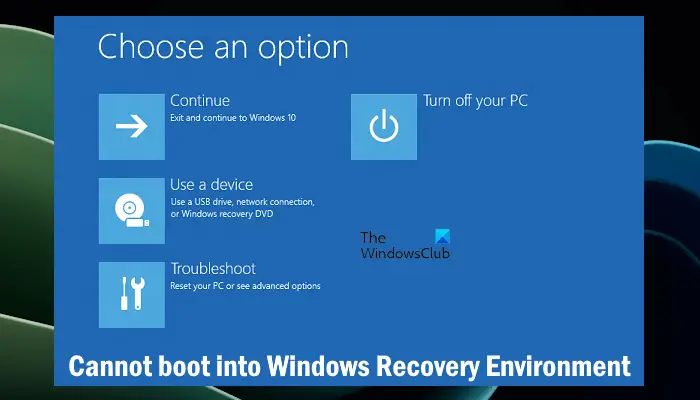 无法引导到Windows恢复环境Feb 19, 2024 pm 11:12 PM
Windows恢复环境(WinRE)是用于修复Windows操作系统错误的环境。进入WinRE后,您可以执行系统还原、出厂重置、卸载更新等操作。如果无法引导到WinRE,本文将指导您使用修复程序解决此问题。无法引导到Windows恢复环境如果无法引导至Windows恢复环境,请使用下面提供的修复程序:检查Windows恢复环境的状态使用其他方法进入Windows恢复环境您是否意外删除了Windows恢复分区?执行Windows的就地升级或全新安装下面,我们已经详细解释了所有这些修复。1]检查Wi
 Python和Anaconda之间有什么区别?Sep 06, 2023 pm 08:37 PM
在本文中,我们将了解Python和Anaconda之间的差异。Python是什么?Python是一种开源语言,非常重视使代码易于阅读并通过缩进行和提供空白来理解。Python的灵活性和易于使用使其非常适用于各种应用,包括但不限于对于科学计算、人工智能和数据科学,以及创造和发展的在线应用程序。当Python经过测试时,它会立即被翻译转化为机器语言,因为它是一种解释性语言。有些语言,比如C++,需要编译才能被理解。精通Python是一个重要的优势,因为它非常易于理解、开发,执行并读取。这使得Pyth
 php集成环境包有哪些Jul 24, 2023 am 09:36 AM
php集成环境包有:1、PhpStorm,功能强大的PHP集成环境;2、Eclipse,开放源代码的集成开发环境;3、Visual Studio Code,轻量级的开源代码编辑器;4、Sublime Text,受欢迎的文本编辑器,广泛用于各种编程语言;5、NetBeans,由Apache软件基金会开发的集成开发环境;6、Zend Studio,为PHP开发者设计的集成开发环境。
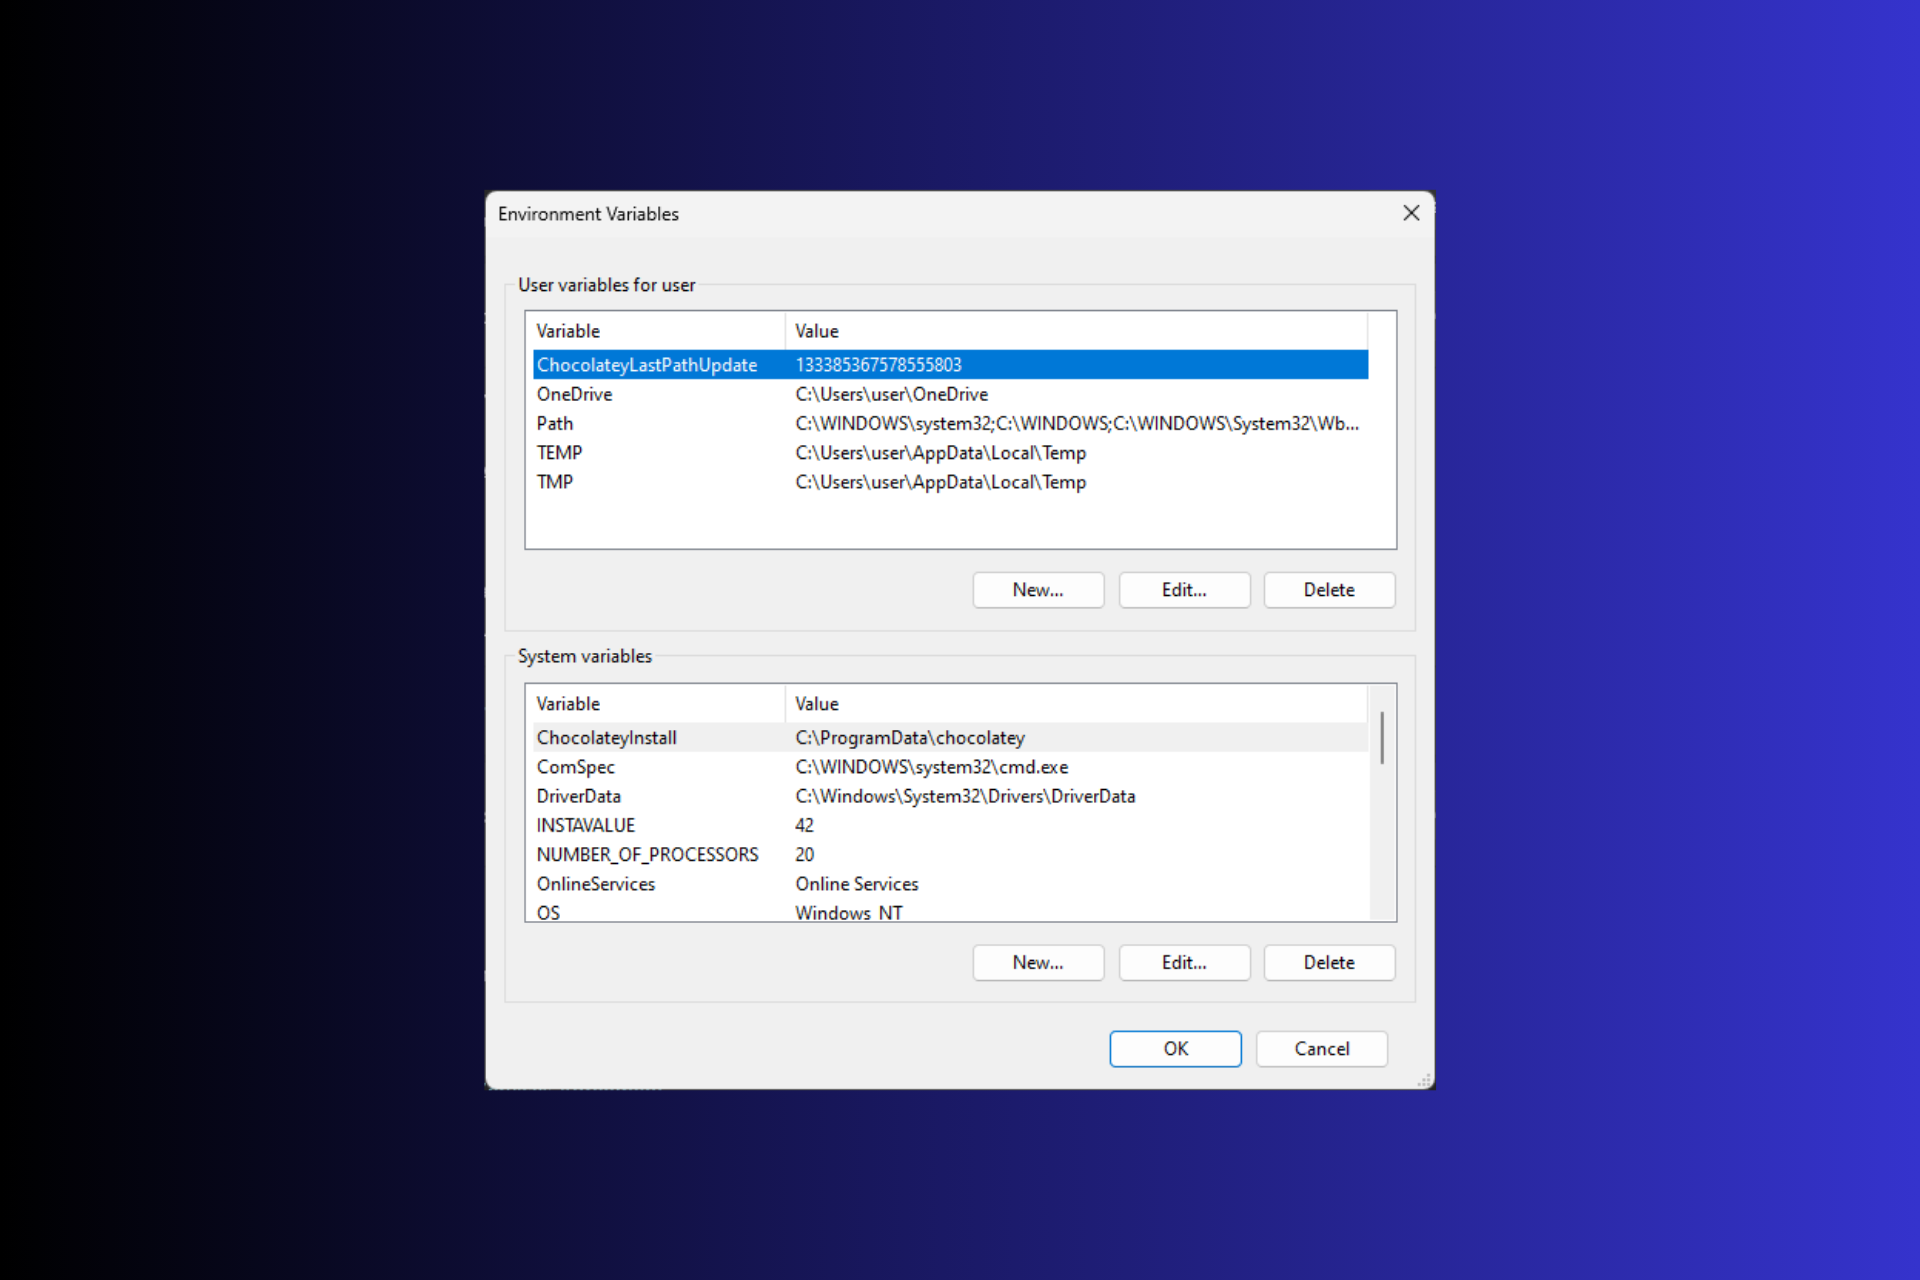 在 Windows 3 上设置环境变量的 11 种方法Sep 15, 2023 pm 12:21 PM
在Windows11上设置环境变量可以帮助您自定义系统、运行脚本和配置应用程序。在本指南中,我们将讨论三种方法以及分步说明,以便您可以根据自己的喜好配置系统。有三种类型的环境变量系统环境变量–全局变量处于最低优先级,可由Windows上的所有用户和应用访问,通常用于定义系统范围的设置。用户环境变量–优先级越高,这些变量仅适用于在该帐户下运行的当前用户和进程,并由在该帐户下运行的用户或应用程序设置。进程环境变量–具有最高优先级,它们是临时的,适用于当前进程及其子进程,为程序提供
 Laravel环境配置文件.env的常见问题及解决方法Mar 10, 2024 pm 12:51 PM
Laravel环境配置文件.env的常见问题及解决方法在使用Laravel框架开发项目时,环境配置文件.env是非常重要的,它包含了项目的关键配置信息,如数据库连接信息、应用密钥等。然而,有时候在配置.env文件时会出现一些常见问题,本文将针对这些问题进行介绍并提供解决方法,同时附上具体的代码示例供参考。问题一:无法读取.env文件当我们配置好了.env文件
 go语言环境如何配置Jan 06, 2021 am 11:37 AM
go语言环境配置方法:1、下载go语言的编译器,双击运行安装程序;2、接受许可协议,点击next;3、设置安装目录,点击OK;4、安装完成后,将go安装目录下的bin目录添加环境变量中即可。
 探究pipenv环境和虚拟环境之间的异同Jan 16, 2024 am 08:50 AM
pipenv环境与虚拟环境的区别与联系,需要具体代码示例随着Python的日益流行,越来越多的开发者在Python项目中使用虚拟环境来隔离不同项目的依赖库。虚拟环境可以确保项目依赖的Python库以及其版本被妥善管理,避免各种冲突和版本不一致的问题。然而,在过去,使用虚拟环境需要借助第三方库,例如virtualenv和virtualenvwrapper。不久
 简便删除Conda环境:高效清理无用环境的技巧Jan 04, 2024 am 08:15 AM
一键删除Conda环境:快速清理无用环境的技巧随着数据科学和机器学习的快速发展,使用Python进行开发和分析的需求也越来越强烈。Conda作为一种流行的Python包管理器和环境管理工具,被广泛应用于项目开发和环境配置中。然而,随着时间的推移,我们常常会在计算机上留下许多无用的Conda环境,这不仅浪费了磁盘空间,还可能导致环境混乱和不必要的麻烦。本文将介


热AI工具

Undresser.AI Undress
人工智能驱动的应用程序,用于创建逼真的裸体照片

AI Clothes Remover
用于从照片中去除衣服的在线人工智能工具。

Undress AI Tool
免费脱衣服图片

Clothoff.io
AI脱衣机

AI Hentai Generator
免费生成ai无尽的。

热门文章
热工具

Dreamweaver CS6
视觉化网页开发工具

SecLists
SecLists是最终安全测试人员的伙伴。它是一个包含各种类型列表的集合,这些列表在安全评估过程中经常使用,都在一个地方。SecLists通过方便地提供安全测试人员可能需要的所有列表,帮助提高安全测试的效率和生产力。列表类型包括用户名、密码、URL、模糊测试有效载荷、敏感数据模式、Web shell等等。测试人员只需将此存储库拉到新的测试机上,他就可以访问到所需的每种类型的列表。

安全考试浏览器
Safe Exam Browser是一个安全的浏览器环境,用于安全地进行在线考试。该软件将任何计算机变成一个安全的工作站。它控制对任何实用工具的访问,并防止学生使用未经授权的资源。

EditPlus 中文破解版
体积小,语法高亮,不支持代码提示功能

mPDF
mPDF是一个PHP库,可以从UTF-8编码的HTML生成PDF文件。原作者Ian Back编写mPDF以从他的网站上“即时”输出PDF文件,并处理不同的语言。与原始脚本如HTML2FPDF相比,它的速度较慢,并且在使用Unicode字体时生成的文件较大,但支持CSS样式等,并进行了大量增强。支持几乎所有语言,包括RTL(阿拉伯语和希伯来语)和CJK(中日韩)。支持嵌套的块级元素(如P、DIV),

