使用表单密钥保护您的表单
- WBOYWBOYWBOYWBOYWBOYWBOYWBOYWBOYWBOYWBOYWBOYWBOYWB原创
- 2023-09-07 21:49:141553浏览
安全是一个热门话题。确保您的网站安全对于任何 Web 应用程序都极其重要。事实上,我 70% 的时间都花在保护应用程序上。我们必须保护的最重要的事情之一是表单。今天,我们将回顾一种防止表单上的 XSS(跨站脚本)和跨站请求伪造的方法。
为什么?
POST 数据可以从一个网站发送到另一个网站。为什么这样不好?一个简单的场景...
登录到您网站的用户在其会话期间访问另一个网站。该网站将能够将 POST 数据发送到您的网站 - 例如,使用 AJAX。由于用户已登录您的网站,因此其他网站也能够将发布数据发送到只有登录后才能访问的安全表单。
我们还必须保护我们的页面免受使用 cURL 的攻击
我们如何解决这个问题?
带有表单键!我们将向每个表单添加一个特殊的哈希值(表单密钥),以确保数据仅在从您的网站发送时才会被处理。提交表单后,我们的 PHP 脚本将根据我们在会话中设置的表单密钥验证提交的表单密钥。
我们必须做什么:
- 为每个表单添加表单键。
- 将表单密钥存储在会话中。
- 提交表单后验证表单密钥。
第 1 步:简单的表单
首先,我们需要一个简单的表单来进行演示。我们必须保护的最重要的表单之一是登录表单。登录表单容易受到暴力攻击。创建一个新文件,并将其保存为 Web 根目录中的 index.php。在正文中添加以下代码:
	<!DOCTYPE html PUBLIC "-//W3C//DTD XHTML 1.0 Strict//EN" "http://www.w3.org/TR/xhtml1/DTD/xhtml1-strict.dtd">
	<html xmlns="http://www.w3.org/1999/xhtml" xml:lang="en" lang="en">
	<head>
		<meta http-equiv="content-type" content="text/html;charset=UTF-8" />
		<title>Securing forms with form keys</title>
	</head>
	<body>
		<form action="" method="post">
		<dl>
			<dt><label for="username">Username:</label></dt>
			<dd><input type="text" name="username" id="username" /></dd>
			<dt><label for="username">Password:</label></dt>
			<dd><input type="password" name="password" id="password" /></dd>
			<dt></dt>
			<dd><input type="submit" value="Login" /></dd>
		</dl>
		</form>
	</body>
	</html>
现在我们有了一个带有登录表单的简单 XHTML 页面。如果您想在网站上使用表单键,您可以将上面的脚本替换为您自己的登录页面。现在,让我们继续真正的行动。
第 2 步:创建类
我们将为表单键创建一个 PHP 类。因为每个页面只能包含一个表单键,所以我们可以为我们的类创建一个单例,以确保我们的类被正确使用。因为创建单例是一个更高级的 OOP 主题,所以我们将跳过这一部分。创建一个名为 formkey.class.php 的新文件并将其放置在您的 Web 根目录中。现在我们必须考虑我们需要的功能。首先,我们需要一个函数来生成表单密钥,以便我们可以将其放入表单中。在您的 PHP 文件中放置以下代码:
<?php

//You can of course choose any name for your class or integrate it in something like a functions or base class
class formKey
{
	//Here we store the generated form key
	private $formKey;

	//Here we store the old form key (more info at step 4)
	private $old_formKey;

	//Function to generate the form key
	private function generateKey()
	{

	}
}
?>
在上面,您看到一个包含三个部分的类:两个变量和一个函数。我们将该函数设置为私有,因为该函数将仅由我们稍后将创建的输出函数使用。在这两个变量中,我们将存储表单键。它们也是私有的,因为它们只能由我们类内的函数使用。
现在,我们必须想办法生成表单密钥。因为我们的表单密钥必须是唯一的(否则我们没有任何安全性),所以我们使用用户 IP 地址的组合将密钥绑定到用户,使用 mt_rand() 使其唯一,并使用 uniqid() 函数使其更加独特。我们还使用 md5() 加密此信息以创建唯一的哈希值,然后将其插入到我们的页面中。因为我们使用了 md5(),所以用户无法看到我们用来生成密钥的内容。整个功能:
//Function to generate the form key
private function generateKey()
{
	//Get the IP-address of the user
	$ip = $_SERVER['REMOTE_ADDR'];

	//We use mt_rand() instead of rand() because it is better for generating random numbers.
	//We use 'true' to get a longer string.
	//See http://www.php.net/mt_rand for a precise description of the function and more examples.
	$uniqid = uniqid(mt_rand(), true);

	//Return the hash
	return md5($ip . $uniqid);
}
将上面的代码插入到您的 formkey.class.php 文件中。用新函数替换该函数。
第 3 步:将表单密钥插入表单
对于这一步,我们创建一个新函数,使用表单键输出隐藏的 HTML 字段。该函数由三个步骤组成:
- 使用我们的generateKey() 函数生成表单密钥。
- 将表单密钥存储在 $formKey 变量和会话中。
- 输出 HTML 字段。
我们将函数命名为 outputKey() 并将其公开,因为我们必须在类之外使用它。我们的函数将调用私有函数generateKey()来生成新的表单密钥并将其保存在本地会话中。最后,我们创建 XHTML 代码。现在在我们的 PHP 类中添加以下代码:
//Function to output the form key
public function outputKey()
{
	//Generate the key and store it inside the class
	$this->formKey = $this->generateKey();
	//Store the form key in the session
	$_SESSION['form_key'] = $this->formKey;

	//Output the form key
	echo "<input type='hidden' name='form_key' id='form_key' value='".$this->formKey."' />";
}
现在,我们将把表单密钥添加到我们的登录表单中以确保其安全。我们必须将该类包含在 index.php 文件中。我们还必须启动会话,因为我们的类使用会话来存储生成的密钥。为此,我们在 doctype 和 head 标记上方添加以下代码:
<?php
//Start the session
session_start();
//Require the class
require('formkey.class.php');
//Start the class
$formKey = new formKey();
?>
上面的代码非常不言自明。我们启动会话(因为我们存储表单密钥)并加载 PHP 类文件。之后,我们使用new formKey()启动该类,这将创建我们的类并将其存储在$formKey中。现在我们只需编辑表单,使其包含表单键:
<form action="" method="post">
<dl>
	<?php $formKey->outputKey(); ?>
	<dt><label for="username">Username:</label></dt>
	<dd><input type="text" name="username" id="username" /></dd>
	<dt><label for="username">Password:</label></dt>
	<dd>input type="password" name="password" id="password" /></dd>
<dl>
</form>
仅此而已!因为我们创建了函数 outputKey(),所以我们只需将它包含在表单中即可。我们可以在每个表单中使用表单键,只需添加 outputKey(); ?> 现在只需查看网页的源代码,您就可以看到表单上附加了一个表单密钥。剩下的唯一步骤是验证请求。
第 4 步:验证
我们不会验证整个表单;只有表单键。验证表单是基本的 PHP 操作,并且可以在网络上找到教程。让我们验证表单密钥。因为我们的“generateKey”函数会覆盖会话值,所以我们向 PHP 类添加一个构造函数。创建(或构造)我们的类时将调用构造函数。在我们创建新密钥之前,构造函数会将前一个密钥存储在类中;所以我们将始终拥有以前的表单密钥来验证我们的表单。如果我们不这样做,我们将无法验证表单密钥。将以下 PHP 函数添加到您的类中:
//The constructor stores the form key (if one exists) in our class variable.
function __construct()
{
	//We need the previous key so we store it
	if(isset($_SESSION['form_key']))
	{
		$this->old_formKey = $_SESSION['form_key'];
	}
}
构造函数应始终命名为__construct()。当调用构造函数时,我们检查是否设置了会话,如果是,我们将其本地存储在 old_formKey 变量中。
现在我们可以验证表单密钥了。我们在类中创建一个基本函数来验证表单密钥。这个函数也应该是公共的,因为我们将在类之外使用它。该函数将根据表单键的存储值验证表单键的 POST 值。将此函数添加到 PHP 类中:
//Function that validated the form key POST data
public function validate()
{
	//We use the old formKey and not the new generated version
	if($_POST['form_key'] == $this->old_formKey)
	{
		//The key is valid, return true.
		return true;
	}
	else
	{
		//The key is invalid, return false.
		return false;
	}
}
在index.php中,我们使用刚刚在类中创建的函数来验证表单密钥。当然,我们仅在 POST 请求后进行验证。在 $formKey = new formKey(); 后添加以下代码
$error = 'No error';

//Is request?
if($_SERVER['REQUEST_METHOD'] == 'post')
{
	//Validate the form key
	if(!isset($_POST['form_key']) || !$formKey->validate())
	{
		//Form key is invalid, show an error
		$error = 'Form key error!';
	}
	else
	{
		//Do the rest of your validation here
		$error = 'No form key error!';
	}
}
我们创建了一个变量$error来存储我们的错误消息。如果已发送 POST 请求,我们将使用 $formKey->validate() 验证表单密钥。如果返回 false,则表单键无效,并且我们会显示错误。请注意,我们仅验证表单密钥 - 您需要自己验证表单的其余部分。
在 HTML 中,您可以放置以下代码来显示错误消息:
<div><?php if($error) { echo($error); } ?></div>
这将回显 $error 变量(如果已设置)。

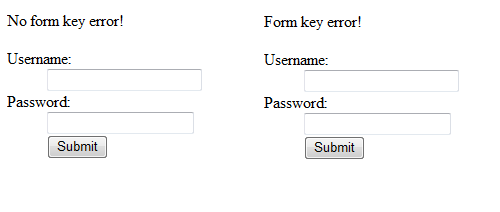
如果您启动服务器并转到index.php,您将看到我们的表单和消息“无错误”。当您提交表单时,您将看到消息“无表单键错误”,因为它是有效的 POST 请求。现在尝试重新加载页面并在浏览器请求再次发送 POST 数据时接受。您将看到我们的脚本触发了一条错误消息:“表单键错误!”现在,您的表单可以免受来自其他网站的输入和页面重新加载错误的影响!刷新后也会显示该错误,因为我们提交表单后生成了新的表单密钥。这很好,因为现在用户不会意外地将表单发布两次。
完整代码
以下是完整的 PHP 和 HTML 代码:
index.php
Securing forms with form keys fomrkey.class.php
<?php //You can of course choose any name for your class or integrate it in something like a functions or base class class formKey { //Here we store the generated form key private $formKey; //Here we store the old form key (more info at step 4) private $old_formKey; //The constructor stores the form key (if one excists) in our class variable function __construct() { //We need the previous key so we store it if(isset($_SESSION['form_key'])) { $this->old_formKey = $_SESSION['form_key']; } } //Function to generate the form key private function generateKey() { //Get the IP-address of the user $ip = $_SERVER['REMOTE_ADDR']; //We use mt_rand() instead of rand() because it is better for generating random numbers. //We use 'true' to get a longer string. //See http://www.php.net/mt_rand for a precise description of the function and more examples. $uniqid = uniqid(mt_rand(), true); //Return the hash return md5($ip . $uniqid); } //Function to output the form key public function outputKey() { //Generate the key and store it inside the class $this->formKey = $this->generateKey(); //Store the form key in the session $_SESSION['form_key'] = $this->formKey; //Output the form key echo "<input type='hidden' name='form_key' id='form_key' value='".$this->formKey."' />"; } //Function that validated the form key POST data public function validate() { //We use the old formKey and not the new generated version if($_POST['form_key'] == $this->old_formKey) { //The key is valid, return true. return true; } else { //The key is invalid, return false. return false; } } } ?>结论
将此代码添加到您网站上的每个重要表单中将显着提高表单的安全性。它甚至会停止刷新问题,正如我们在步骤 4 中看到的那样。由于表单密钥仅对一个请求有效,因此不可能进行双重发布。
这是我的第一个教程,希望您喜欢它并使用它来提高您的安全性!请通过评论让我知道您的想法。有更好的方法吗?让我们知道。
进一步阅读
- WordPress 还使用表单键(将其命名为 Nonce):Wordpress Nonce
- 编写安全 PHP 应用程序的七个习惯
- 在 Twitter 上关注我们,或订阅 NETTUTS RSS Feed 以获取更多日常 Web 开发教程和文章。
以上是使用表单密钥保护您的表单的详细内容。更多信息请关注PHP中文网其他相关文章!
声明:本文内容由网友自发贡献,版权归原作者所有,本站不承担相应法律责任。如您发现有涉嫌抄袭侵权的内容,请联系admin@php.cn

