Ginkgo:一款 BDD 的 Go 语言框架
- Go语言进阶学习转载
- 2023-07-25 14:32:481164浏览
单元测试关注点是代码逻辑单元,一般是一个对象或者一个具体函数。我们可以编写足够的单元测试来确保代码的质量,当功能修改或代码重构时,充分的单元测试案例能够给予我们足够的信心。
单元测试之上是开发规范。在敏捷软件开发中,有两位常客:测试驱动开发(Test-Driven Development,TDD)和行为驱动开发(Behavior-driven development,BDD)。它们是实践与技术,同时也是设计方法论。
TDD
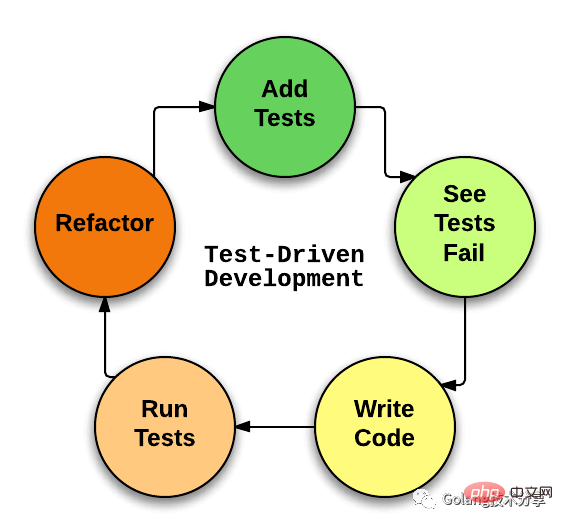
TDD 的基本思路就是通过测试来推动整个开发的进行,原则就是在开发功能代码之前,先编写单元测试用例。包含以下五个步骤:
开发者首先写一些测试用例 运行这些测试,但这些测试明显都会失败,因为测试用例中的业务逻辑还没实现 实现代码细节 如果开发者顺利实现代码的话,运行所有测试就会通过 对业务代码及时重构,如果新代码功能不正确的话,对应的测试文件也会失败
当需要开发新功能时,重复上述步骤。流程如下图所示

有一个 Github 仓库比较有趣:learn-go-with-tests ,该仓库旨在通过 Go 学习 TDD 。
BDD
TDD 侧重点偏向开发,通过测试用例来规范约束开发者编写出质量更高、bug更少的代码。而 BDD更加侧重设计,其要求在设计测试用例时对系统进行定义,倡导使用通用的语言将系统的行为描述出来,将系统设计和测试用例结合起来,以此为驱动进行开发工作。
BDD 衍生于 TDD,主要区别就是在于测试的描述上。BDD 使用一种更通俗易懂的文字来描述测试用例,更关注需求的功能,而不是实际结果。
BDD 赋予的像阅读句子一样阅读测试的能力带来对测试认知上的转变,有助于我们去考虑如何更好写测试。
Ginkgo
Ginkgo 是一个 Go 语言的 BDD 测试框架,旨在帮助开发者编写富有表现力的全方位测试。
Ginkgo 集成了 Go 原生的 <code style='font-size: 14px;overflow-wrap: break-word;padding: 2px 4px;border-radius: 4px;margin-right: 2px;margin-left: 2px;font-family: "Operator Mono", Consolas, Monaco, Menlo, monospace;word-break: break-all;background: rgba(14, 210, 247, 0.15);'><span style="font-size: 15px;">testing</span>testing 库,这意味着你可以通过 <span style="font-size: 15px;">go test</span><span style="font-size: 15px;">go test</span> 来运行 Ginkgo 测试套件。同时,它与断言和 mock 套件 testify 、富测试集 go-check 同样兼容。但 Ginkgo 建议的是搭配 gomega
下面,我们使用 Ginkgo 来感受一下 BDD 模式的测试代码。
下载<span style="font-size: 15px;">go get</span>使用 go get
$ go get github.com/onsi/ginkgo/ginkgo
$ go get github.com/onsi/gomega/...
该命令获取ginkgo并安装 <code style='font-size: 14px;overflow-wrap: break-word;padding: 2px 4px;border-radius: 4px;margin-right: 2px;margin-left: 2px;font-family: "Operator Mono", Consolas, Monaco, Menlo, monospace;word-break: break-all;background: rgba(14, 210, 247, 0.15);'><span style="font-size: 15px;">ginkgo</span>银杏可执行文件到<span style="font-size: 15px;">$GOPATH/bin</span><span style="font-size: 15px;">$GOPATH/bin</span>
创建套件
创建 gopher 库$ cd path-to-package/gopher
<span style="font-size: 15px;">gopher.go</span>在 gopher. go<span style="font-size: 15px;">Gopher</span>文件中,有 <code style='font-size: 14px;overflow-wrap: break-word;padding: 2px 4px;border-radius: 4px;margin-right: 2px;margin-left: 2px;font-family: "Operator Mono", Consolas, Monaco, Menlo, monospace;word-break: break-all;background: rgba(14, 210, 247, 0.15);'><span style="font-size: 15px;">Validate</span>Gopher 结构体与校验方法
<pre class="brush:php;toolbar:false;">package gopher
import (
"errors"
"unicode/utf8"
)
type Gopher struct {
Name string
Gender string
Age int
}
func Validate(g Gopher) error {
if utf8.RuneCountInString(g.Name) < 3 {
return errors.New("名字太短,不能小于3")
}
if g.Gender != "男" {
return errors.New("只要男的")
}
if g.Age < 18 {
return errors.New("岁数太小,不能小于18")
}
return nil
}</pre>验证<p data-tool="mdnice编辑器" style="padding-top: 8px;padding-bottom: 8px;line-height: 26px;font-size: 17px;word-spacing: 3px;letter-spacing: 1px;"></p>如下<span style="font-size: 15px;">ginkgo bootstrap</span>我们通过$ ginkgo bootstrap
Generating ginkgo test suite bootstrap for gopher in:
gopher_suite_test.go<p data-tool="mdnice编辑器" style="padding-top: 8px;padding-bottom: 8px;line-height: 26px;font-size: 17px;word-spacing: 3px;letter-spacing: 1px;">ginkgo bootstrap<span style="font-size: 15px;"></span></p>命令,来初始化一个 Ginkgo 测试套件。<span style="font-size: 15px;">gopher.go</span><span style="font-size: 15px;">gopher_suite_test.go</span>此时在 gopher.go同级目录中,生成了gopher_suite_test.go 文件,内容如下package gopher_test
import (
"testing"
. "github.com/onsi/ginkgo"
. "github.com/onsi/gomega"
)
func TestGopher(t *testing.T) {
RegisterFailHandler(Fail)
RunSpecs(t, "Gopher Suite")
}此时,我们就可以运行测试套件了,通过命令 <span style="font-size: 15px;">go test</span> 或 <span style="font-size: 15px;">ginkgo</span> 均可。
 $ go test
Running Suite: Gopher Suite
===========================
Random Seed: 1629621653
Will run 0 of 0 specs


Ran 0 of 0 Specs in 0.000 seconds
SUCCESS! -- 0 Passed | 0 Failed | 0 Pending | 0 Skipped
PASS
ok      ginkgo/gopher   0.018s
当然,空测试套件没有什么价值,我们需要在此套件下编写测试(Spec)用例。
我们可以在 <span style="font-size: 15px;">gopher_suite_test.go</span> 中编写测试,但是推荐分离到独立的文件中,特别是包中有多个需要被测试的源文件的情况下。
创建 Spec
执行 <span style="font-size: 15px;">ginkgo generate gopher</span> 可以生成一个 <span style="font-size: 15px;">gopher_test.go</span> 测试文件。
 $ ginkgo generate gopher
Generating ginkgo test for Gopher in:
  gopher_test.go
此时测试文件中的内容如下
package gopher_test

import (
 . "github.com/onsi/ginkgo"
)

var _ = Describe("Gopher", func() {

})
编写 Spec
我们基于此测试文件撰写实际的测试用例
package gopher_test

import (
 "ginkgo/gopher"
 . "github.com/onsi/ginkgo"
 "github.com/onsi/gomega"
)

func mockInputData() ([]gopher.Gopher, error) {
 inputData := []gopher.Gopher{
  {
   Name:   "菜刀",
   Gender: "男",
   Age:    18,
  },
  {
   Name:   "小西瓜",
   Gender: "女",
   Age:    19,
  },
  {
   Name:   "机器铃砍菜刀",
   Gender: "男",
   Age:    17,
  },
  {
   Name:   "小菜刀",
   Gender: "男",
   Age:    20,
  },
 }
 return inputData, nil
}

var _ = Describe("Gopher", func() {

 BeforeEach(func() {
  By("当测试不通过时,我会在这里打印一个消息 【BeforeEach】")
 })

 inputData, err := mockInputData()

 Describe("校验输入数据", func() {

  Context("当获取数据没有错误发生时", func() {
   It("它应该是接收数据成功了的", func() {
    gomega.Expect(err).Should(gomega.BeNil())
   })
  })

  Context("当获取的数据校验失败时", func() {
   It("当数据校验返回错误为:名字太短,不能小于3 时", func() {
    gomega.Expect(gopher.Validate(inputData[0])).Should(gomega.MatchError("名字太短,不能小于3"))
   })

   It("当数据校验返回错误为:只要男的 时", func() {
    gomega.Expect(gopher.Validate(inputData[1])).Should(gomega.MatchError("只要男的"))
   })

   It("当数据校验返回错误为:岁数太小,不能小于18 时", func() {
    gomega.Expect(gopher.Validate(inputData[2])).Should(gomega.MatchError("岁数太小,不能小于18"))
   })
  })

  Context("当获取的数据校验成功时", func() {
   It("通过了数据校验", func() {
    gomega.Expect(gopher.Validate(inputData[3])).Should(gomega.BeNil())
   })
  })
 })

 AfterEach(func() {
  By("当测试不通过时,我会在这里打印一个消息 【AfterEach】")
 })
})
可以看到,BDD 风格的测试案例在代码中就被描述地非常清晰。由于我们的测试用例与预期相符,执行 <span style="font-size: 15px;">go test</span> 执行测试套件会校验通过。
 $ go test
Running Suite: Gopher Suite
===========================
Random Seed: 1629625854
Will run 5 of 5 specs

•••••
Ran 5 of 5 Specs in 0.000 seconds
SUCCESS! -- 5 Passed | 0 Failed | 0 Pending | 0 Skipped
PASS
ok      ginkgo/gopher   0.013s
读者可自行更改数据致测试不通过,你会看到 Ginkgo 将打印出堆栈与错误描述性信息。
总结
TDD 和 BDD 是敏捷开发中常被提到的方法论。与TDD相比,BDD 通过编写 行为和规范 来驱动软件开发。这些行为和规范在代码中体现于更 ”繁琐“ 的描述信息。
关于 BDD 的本质,有另外一种表达方式:BDD 帮助开发人员设计软件,TDD 帮助开发人员测试软件。
Ginkgo 是 Go 语言中非常优秀的 BDD 框架,它通过 DSL 语法(Describe/Context/It)有效地帮助开发者组织与编排测试用例。本文只是展示了 Ginkgo 非常简单的用例,权当是抛砖引玉。
读者在使用 Ginkgo 过程中,需要理解它的执行生命周期, 重点包括 <code style='font-size: 14px;overflow-wrap: break-word;padding: 2px 4px;border-radius: 4px;margin-right: 2px;margin-left: 2px;font-family: "Operator Mono", Consolas, Monaco, Menlo, monospace;word-break: break-all;background: rgba(14, 210, 247, 0.15);'><span style="font-size: 15px;">It、Context、Describe、BeforeEach、AfterEach、JustBeforeEach、BeforeSuite、AfterSuite、By、Fail</span>It、Context、Describe、BeforeEach、AfterEach、JustBeforeEach、BeforeSuite、AfterSuite、By、Fail 这些模块的执行顺序与语义逻辑。
Ginkgo 有很多的功能本文并未涉及,例如异步测试、基准测试、持续集成等强大的支持。其仓库位于 https://github.com/onsi/ginkgo ,同时提供了英文版与中文版使用文档,读者可以借此了解更多 Ginkgo 信息。
最后,K8s 项目中也使用了 Ginkgo 框架,用于编写其端到端 (End to End,E2E) 测试用例,值得借鉴学习。
以上是Ginkgo:一款 BDD 的 Go 语言框架的详细内容。更多信息请关注PHP中文网其他相关文章!

