1、安装gcc编辑器
安装redis需要依赖gcc环境,执行如下命令安装:
yum install -y gcc
如果机器没有网络的话,可以参考这篇文章:
CentOS离线安装gcc环境(附安装包+图文并茂)
2、下载redis安装包
redis官网:https://redis.io/download
下载后上传至 CentOS ,比如上传至 /usr/local/
3、解压并编译安装redis
指令命令如下:
1、进入安装包目录
cd /usr/local/
2、解压安装包
tar -zxvf redis-6.2.1.tar.gz
3、进入解压后的redis目录并编译
cd redis-6.2.1

make

4、安装至指定目录
将redis安装至指定目录,可以自行修改路径,如下以 /usr/local/redis 为例:
make install prefix=/usr/local/redis

4、启动redis
启动 redis 有两种方式,一种是前台界面启动,只要关闭界面就关闭了,另一种是后台启动。
4.1、前台界面启动
进入 redis 安装目录的 bin 目录:
cd /usr/local/redis/bin
此时,只要执行如下命令就可以启动了:
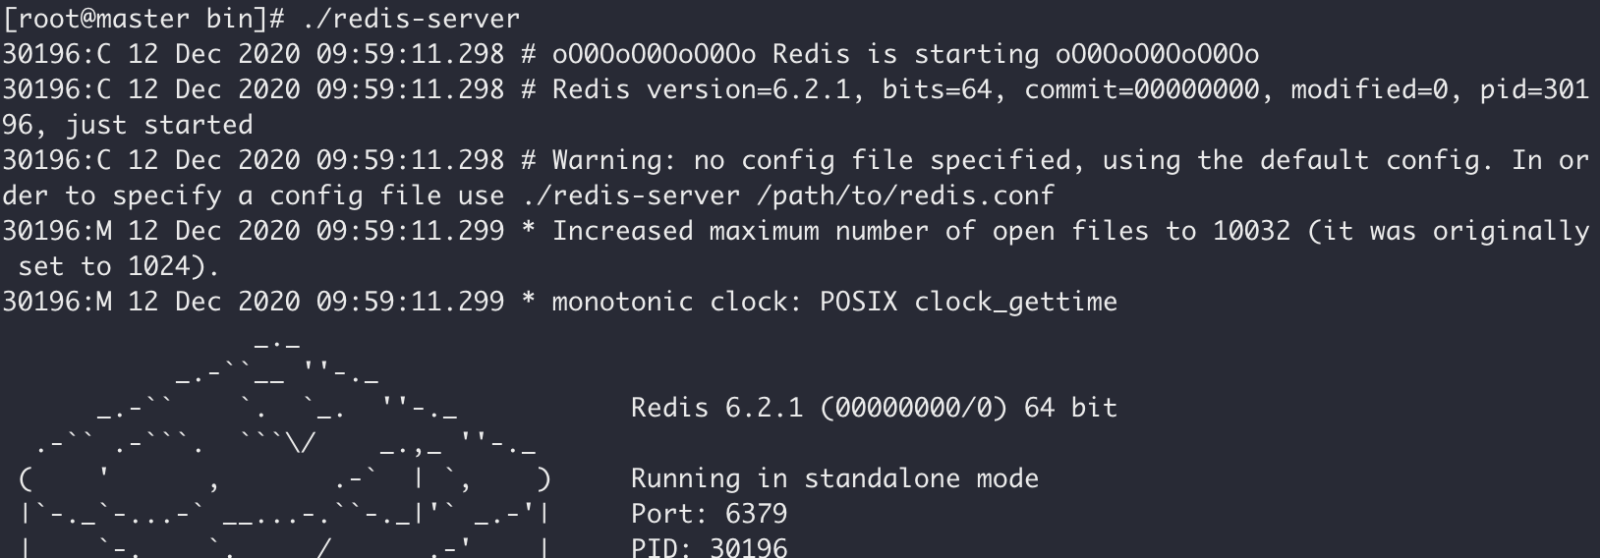
./redis-server
启动截图如下:

此时有个问题就是,并不知道启动的配置文件在哪...
其实我们可以直接通过 find 命令来查一下:
find / -name 'redis.conf'
结果如下:

前台启动方式不太常用,只要关了界面,redis就停了。
4.2、后台服务启动
我们从之前解压后的安装包中复制一份 redis.conf 文件到 redis 安装目录中。
cp /usr/local/redis-6.2.1/redis.conf /usr/local/redis/bin/
然后修改 redis.conf 配置文件的线程模式参数:
vi /usr/local/redis/bin/redis.conf
PS:vi 快捷键,按一下 /,之后输入【关键字】即可查询参数。
主要修改 daemonize对应的值为 yes
1、修改之前
daemonize no
2、修改之后
daemonize yes
关于这个参数的取值解释:
yes:redis采用的是单进程多线程的模式。开启守护进程模式是指当redis.conf文件中的daemonize选项设置为“yes”。在该模式下,redis会在后台运行,并将进程pid号写入至redis.conf选项pidfile设置的文件中,此时redis将一直运行,除非手动kill该进程。
no:当daemonize选项设置成no时,当前界面将进入redis的命令行界面,exit强制退出或者关闭连接工具(putty,xshell等)都会导致redis进程退出。
修改完,保存退出。
执行如下命令再次启动 redis:
./redis-server redis.conf
至此redis就以后台方式启动了。
5、设置外网可访问
默认的配置文件是不支持外网访问的,接下来修改外网访问的参数。
还是修改配置文件:
vi /usr/local/redis/bin/redis.conf
找到下面这三个参数:
bind 127.0.0.1(绑定允许访问的ip)
protected-mode yes(保护模式开)
#requirepass yourpassword (请求访问的密码)
一二项是组合项,尤为重要,第三项就是设置密码,在一定程度上对服务区的保护。
修改为如下:
#bind 127.0.0.1
protected-mode no
requirepass 你的密码
修改后,保存退出。
6、注册redis服务
每次启动关闭redis甚是麻烦,不如直接注册为服务。
执行如下命令创建redis服务:
vi /etc/systemd/system/redis.service
添加如下命令:
[Unit]
Description=redis-server
After=network.target

[Service]
Type=forking
ExecStart=/usr/local/redis/bin/redis-server /usr/local/redis/bin/redis.conf
PrivateTmp=true

[Install]
WantedBy=multi-user.target
其中 ExecStart 参数对应的安装 Redis 目录下的 redis-server,配置文件同上。
设置开机启动:
systemctl daemon-reload
systemctl start redis.service
systemctl enable redis.service
7、常用的服务命令
启动redis服务
systemctl start redis.service
停止redis服务
systemctl stop redis.service
重新启动服务
systemctl restart redis.service
查看服务当前状态
systemctl status redis.service
设置开机自启动
systemctl enable redis.service
停止开机自启动
systemctl disable redis.service
以上是CentOS7怎么安装redis并配置外网可访问的详细内容。更多信息请关注PHP中文网其他相关文章!
 Redis是SQL还是NOSQL数据库?答案解释了Apr 18, 2025 am 12:11 AM
RedisisclassifiedasaNoSQLdatabasebecauseitusesakey-valuedatamodelinsteadofthetraditionalrelationaldatabasemodel.Itoffersspeedandflexibility,makingitidealforreal-timeapplicationsandcaching,butitmaynotbesuitableforscenariosrequiringstrictdataintegrityo
 REDIS:提高应用程序性能和可扩展性Apr 17, 2025 am 12:16 AM
Redis通过缓存数据、实现分布式锁和数据持久化来提升应用性能和可扩展性。1)缓存数据:使用Redis缓存频繁访问的数据,提高数据访问速度。2)分布式锁:利用Redis实现分布式锁,确保在分布式环境中操作的安全性。3)数据持久化:通过RDB和AOF机制保证数据安全性,防止数据丢失。
 REDIS:探索其数据模型和结构Apr 16, 2025 am 12:09 AM
Redis的数据模型和结构包括五种主要类型:1.字符串(String):用于存储文本或二进制数据,支持原子操作。2.列表(List):有序元素集合,适合队列和堆栈。3.集合(Set):无序唯一元素集合,支持集合运算。4.有序集合(SortedSet):带分数的唯一元素集合,适用于排行榜。5.哈希表(Hash):键值对集合,适合存储对象。
 REDIS:对其数据库方法进行分类Apr 15, 2025 am 12:06 AM
Redis的数据库方法包括内存数据库和键值存储。1)Redis将数据存储在内存中,读写速度快。2)它使用键值对存储数据,支持复杂数据结构,如列表、集合、哈希表和有序集合,适用于缓存和NoSQL数据库。
 为什么要使用redis?利益和优势Apr 14, 2025 am 12:07 AM
Redis是一个强大的数据库解决方案,因为它提供了极速性能、丰富的数据结构、高可用性和扩展性、持久化能力以及广泛的生态系统支持。1)极速性能:Redis的数据存储在内存中,读写速度极快,适合高并发和低延迟应用。2)丰富的数据结构:支持多种数据类型,如列表、集合等,适用于多种场景。3)高可用性和扩展性:支持主从复制和集群模式,实现高可用性和水平扩展。4)持久化和数据安全:通过RDB和AOF两种方式实现数据持久化,确保数据的完整性和可靠性。5)广泛的生态系统和社区支持:拥有庞大的生态系统和活跃社区,
 了解NOSQL:Redis的关键特征Apr 13, 2025 am 12:17 AM
Redis的关键特性包括速度、灵活性和丰富的数据结构支持。1)速度:Redis作为内存数据库,读写操作几乎瞬时,适用于缓存和会话管理。2)灵活性:支持多种数据结构,如字符串、列表、集合等,适用于复杂数据处理。3)数据结构支持:提供字符串、列表、集合、哈希表等,适合不同业务需求。
 REDIS:确定其主要功能Apr 12, 2025 am 12:01 AM
Redis的核心功能是高性能的内存数据存储和处理系统。1)高速数据访问:Redis将数据存储在内存中,提供微秒级别的读写速度。2)丰富的数据结构:支持字符串、列表、集合等,适应多种应用场景。3)持久化:通过RDB和AOF方式将数据持久化到磁盘。4)发布订阅:可用于消息队列或实时通信系统。
 REDIS:流行数据结构指南Apr 11, 2025 am 12:04 AM
Redis支持多种数据结构,具体包括:1.字符串(String),适合存储单一值数据;2.列表(List),适用于队列和栈;3.集合(Set),用于存储不重复数据;4.有序集合(SortedSet),适用于排行榜和优先级队列;5.哈希表(Hash),适合存储对象或结构化数据。


热AI工具

Undresser.AI Undress
人工智能驱动的应用程序,用于创建逼真的裸体照片

AI Clothes Remover
用于从照片中去除衣服的在线人工智能工具。

Undress AI Tool
免费脱衣服图片

Clothoff.io
AI脱衣机

AI Hentai Generator
免费生成ai无尽的。

热门文章

热工具

WebStorm Mac版
好用的JavaScript开发工具

SublimeText3 Linux新版
SublimeText3 Linux最新版

Atom编辑器mac版下载
最流行的的开源编辑器

SublimeText3 英文版
推荐:为Win版本,支持代码提示!

适用于 Eclipse 的 SAP NetWeaver 服务器适配器
将Eclipse与SAP NetWeaver应用服务器集成。


