怎么使用Python+PyQt5自制监控小工具
- WBOYWBOYWBOYWBOYWBOYWBOYWBOYWBOYWBOYWBOYWBOYWBOYWB转载
- 2023-05-29 12:58:061726浏览
利用opencv的图像处理功能可以轻松对计算机摄像头的调用实现实时图像的采集效果。
最终将图片进行保存后生成监控的历史视频记录。

pip install PyQt5

pip install python-opencv
若是没有安装相关的模块,可以选择上述pip的方式进行安装。
接下来我们将需要的python模块导入到代码块中。
# It's just an alias for the cv2 module.
import cv2 as cv_

# It's importing all the classes from the QtGui module.
from PyQt5.QtGui import *

# It's importing all the classes from the QtCore module.
from PyQt5.QtCore import *

# It's importing all the classes from the QtWidgets module.
from PyQt5.QtWidgets import *

# It's importing the sys module.
import sys

# It's importing the os module.
import os

# It's importing the time module.
import time

# It's importing the traceback module.
import traceback
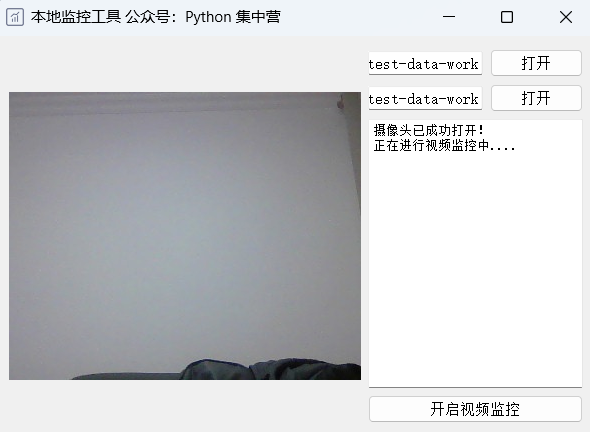
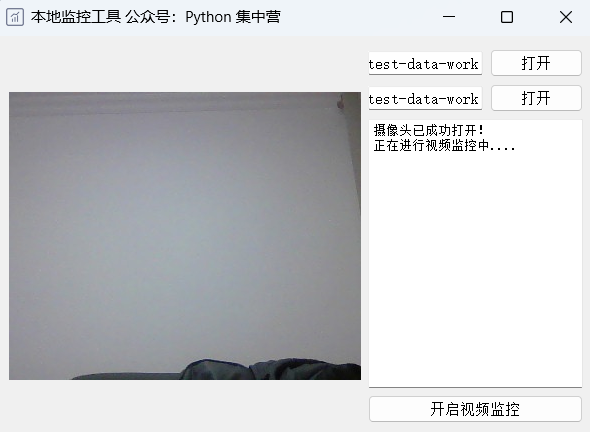
创建名称为CameraUI的python类,开发监控工具相关的页面组件及布局。
将控件按钮等对应的槽函数也放到该类中。
class CameraUI(QWidget):
    def __init__(self):
        super(CameraUI, self).__init__()
        self.init_ui()

    def init_ui(self):
        self.setWindowTitle('本地监控工具 公众号:Python 集中营')
        self.setWindowIcon(QIcon('ico.png'))
        self.resize(600, 400)

        self.label_view = QLabel()

        self.image_path = QLineEdit()
        self.image_path.setReadOnly(True)
        self.image_path.setPlaceholderText('视频流图片保存地址')

        self.image_path_btn = QPushButton()
        self.image_path_btn.setText('打开')
        self.image_path_btn.clicked.connect(self.image_path_btn_clk)

        self.video_path = QLineEdit()
        self.video_path.setReadOnly(True)
        self.video_path.setPlaceholderText('监控视频保存地址')

        self.video_path_btn = QPushButton()
        self.video_path_btn.setText('打开')
        self.video_path_btn.clicked.connect(self.video_path_btn_clk)

        self.start_listen_btn = QPushButton()
        self.start_listen_btn.setText('开启监控')
        self.start_listen_btn.clicked.connect(self.start_listen_btn_clk)

        self.brower = QTextBrowser()
        self.brower.setReadOnly(True)
        self.brower.setFont(QFont('宋体', 8))
        self.brower.setPlaceholderText('日志处理过程区域...')
        self.brower.ensureCursorVisible()

        hbox = QHBoxLayout()
        vbox_left = QVBoxLayout()
        vbox_right = QVBoxLayout()

        vbox_left.addWidget(self.label_view)
        vbox_right_grid1 = QGridLayout()
        vbox_right_grid1.addWidget(self.image_path, 0, 0, 1, 2)
        vbox_right_grid1.addWidget(self.image_path_btn, 0, 2, 1, 1)
        vbox_right_grid1.addWidget(self.video_path, 1, 0, 1, 2)
        vbox_right_grid1.addWidget(self.video_path_btn, 1, 2, 1, 1)

        vbox_right_grid2 = QGridLayout()
        vbox_right_grid2.addWidget(self.brower, 0, 0, 1, 3)
        vbox_right_grid2.addWidget(self.start_listen_btn, 1, 0, 1, 3)

        vbox_right.addLayout(vbox_right_grid1)
        vbox_right.addLayout(vbox_right_grid2)

        hbox.addLayout(vbox_left)
        hbox.addLayout(vbox_right)

        self.listen_thread = ListenWorkThread(self)
        self.listen_thread.message.connect(self.show_message)
        self.listen_thread.finished.connect(lambda: self.start_listen_btn.setEnabled(True))

        self.setLayout(hbox)

    def show_message(self, text):
        cursor = self.brower.textCursor()
        cursor.movePosition(QTextCursor.End)
        self.brower.append(text)
        self.brower.setTextCursor(cursor)
        self.brower.ensureCursorVisible()

    def image_path_btn_clk(self):
        dir = QFileDialog.getExistingDirectory(self, "选择文件夹", os.getcwd())
        self.image_path.setText(dir)

    def video_path_btn_clk(self):
        dir = QFileDialog.getExistingDirectory(self, "选择文件夹", os.getcwd())
        self.video_path.setText(dir)

    def start_listen_btn_clk(self):
        self.listen_thread.start()
开发一个ListenWorkThread类并且继承自QThread的子线程。
将该线程作为业务类实现调用本地摄像头完成监控的效果。
class ListenWorkThread(QThread):
    message = pyqtSignal(str)
    finished = pyqtSignal(bool)

    def __init__(self, parent=None):
        super(ListenWorkThread, self).__init__(parent)
        self.parent = parent
        self.working = True

    def __del__(self):
        self.working = False

    def run(self):
        try:
            image_path = self.parent.image_path.text()
            video_path = self.parent.video_path.text()
            if image_path.strip() == '' or video_path.strip() == '':
                self.message.emit('相关路径设置不能为空,请检查设置!')
                return
            self.cap = cv_.VideoCapture(0)
            self.cap.set(3, 300)
            self.cap.set(4, 400)
            if self.cap.isOpened():
                self.message.emit('摄像头已成功打开!')
                n = 0
                self.message.emit('正在进行视频 监控中....')
                start_time = time.clock()
                while True:
                    ret, img = self.cap.read()
                    if os.path.exists(os.path.join(image_path, str(n) + '.jpg')):
                        os.remove(os.path.join(image_path, str(n) + '.jpg'))
                    self.save_image(img, str(n), image_path)
                    time.sleep(0.1)
                    pixmap_ = QPixmap(os.path.join(image_path, str(n) + '.jpg'))
                    self.parent.label_view.setPixmap(pixmap_)
                    n = n + 1

            self.finished.emit(True)
        except Exception as e:
            traceback.print_exc()
            self.message.emit('程序运行错误,请检查参数是否设置正确!')
            self.finished.emit(True)

    def save_image(self, image=None, file_name=None, image_path=None):
        if image is not None:
cv_.imwrite(os.path.join(image_path, file_name + '.jpg'), image)以上整个业务子线程的逻辑就开发完成了,然后使用python模块的main函数调用。
将整个程序的运行加入到主体循环当中。
if __name__ == '__main__':
    app = QApplication(sys.argv)
    main = CameraUI()
    main.show()
    sys.exit(app.exec_())
以上是怎么使用Python+PyQt5自制监控小工具的详细内容。更多信息请关注PHP中文网其他相关文章!
声明:
本文转载于:yisu.com。如有侵权,请联系admin@php.cn删除

