


Spring Boot端
第一步,引入依赖
首先我们需要引入WebSocket所需的依赖,以及处理输出格式的依赖
<!--格式转换-->
<!-- https://mvnrepository.com/artifact/com.alibaba/fastjson -->
<dependency>
   <groupId>com.alibaba</groupId>
   <artifactId>fastjson</artifactId>
   <version>1.2.73</version>
</dependency>
<!--WebSocket依赖-->
<dependency>
    <groupId>org.springframework.boot</groupId>
    <artifactId>spring-boot-starter-websocket</artifactId>
</dependency>
第二步,创建WebSocket配置类
import org.springframework.context.annotation.Bean;
import org.springframework.context.annotation.Configuration;
import org.springframework.web.socket.server.standard.ServerEndpointExporter;

/**
 * @author: tjp
 * @create: 2023-04-03 09:58
 * @Description: WebSocket配置
 */
@Configuration
public class WebSocketConfig {
    @Bean
    public ServerEndpointExporter serverEndpointExporter() {
        return new ServerEndpointExporter();
    }

}
第三步,创建WebSocket服务
这一步我们通过userId作为标识符,区分系统中对应的用户,后续也可基于此,进行其他的操作步骤。
import com.alibaba.fastjson.JSON;
import com.alibaba.fastjson.JSONObject;
import com.alibaba.excel.util.StringUtils;
import lombok.extern.slf4j.Slf4j;
import org.springframework.stereotype.Component;

import javax.websocket.*;
import javax.websocket.server.PathParam;
import javax.websocket.server.ServerEndpoint;
import java.io.IOException;
import java.util.HashMap;
import java.util.Iterator;
import java.util.concurrent.ConcurrentHashMap;

/**
 * @author: tjp
 * @create: 2023-04-03 13:55
 * @Description: WebSocket服务
 */

@ServerEndpoint("/websocket/{userId}")
@Slf4j
@Component
public class WebSocketServer {
    /**
     * 静态变量,用来记录当前在线连接数。应该把它设计成线程安全的。
     */
    private static int onlineCount = 0;
    /**
     * concurrent包的线程安全Set,用来存放每个客户端对应的MyWebSocket对象。
     */
    private static ConcurrentHashMap<String, WebSocketServer> webSocketMap = new ConcurrentHashMap<>();
    /**
     * 与某个客户端的连接会话,需要通过它来给客户端发送数据
     */
    private Session session;
    /**
     * 接收userId
     */
    private String userId = "";

    /**
     * 连接建立成功调用的方法
     */
    @OnOpen
    public void onOpen(Session session, @PathParam("userId") String userId) {
        this.session = session;
        this.userId = userId;
        if (webSocketMap.containsKey(userId)) {
            webSocketMap.remove(userId);
            //加入set中
        } else {
            webSocketMap.put(userId, this);
            //加入set中
            addOnlineCount();
            //在线数加1
        }

        log.info("用户连接:" + userId + ",当前在线人数为:" + getOnlineCount());

        try {
            HashMap<Object, Object> map = new HashMap<>();
            map.put("key", "连接成功");
            sendMessage(JSON.toJSONString(map));
        } catch (IOException e) {
            log.error("用户:" + userId + ",网络异常!!!!!!");
        }
    }


    /**
     * 连接关闭调用的方法
     */
    @OnClose
    public void onClose() {
        if (webSocketMap.containsKey(userId)) {
            webSocketMap.remove(userId);
            //从set中删除
            subOnlineCount();
        }
        log.info("用户退出:" + userId + ",当前在线人数为:" + getOnlineCount());
    }

    /**
     * 收到客户端消息后调用的方法
     *
     * @param message 客户端发送过来的消息
     */
    @OnMessage
    public void onMessage(String message, Session session) {
        log.info("用户消息:" + userId + ",报文:" + message);
        //可以群发消息
        //消息保存到数据库、redis
        if (StringUtils.isNotBlank(message)) {
            try {
                //解析发送的报文
                JSONObject jsonObject = JSONObject.parseObject(message);
                //追加发送人(防止串改)
                jsonObject.put("fromUserId", this.userId);
                String fromUserId = jsonObject.getString("fromUserId");
                //传送给对应toUserId用户的websocket
                if (StringUtils.isNotBlank(fromUserId) && webSocketMap.containsKey(fromUserId)) {
                    webSocketMap.get(fromUserId).sendMessage(jsonObject.toJSONString());
                    //自定义-业务处理

//                    DeviceLocalThread.paramData.put(jsonObject.getString("group"),jsonObject.toJSONString());
                } else {
                    log.error("请求的userId:" + fromUserId + "不在该服务器上");
                    //否则不在这个服务器上,发送到mysql或者redis
                }
            } catch (Exception e) {
                e.printStackTrace();
            }
        }
    }

    /**
     * 发生错误时候
     *
     * @param session
     * @param error
     */
    @OnError
    public void onError(Session session, Throwable error) {
        log.error("用户错误:" + this.userId + ",原因:" + error.getMessage());
        error.printStackTrace();
    }

    /**
     * 实现服务器主动推送
     */
    public void sendMessage(String message) throws IOException {
        //加入线程锁
        synchronized (session) {
            try {
                //同步发送信息
                this.session.getBasicRemote().sendText(message);
            } catch (IOException e) {
                log.error("服务器推送失败:" + e.getMessage());
            }
        }
    }


    /**
     * 发送自定义消息
     * */
    /**
     * 发送自定义消息
     *
     * @param message  发送的信息
     * @param toUserId 如果为null默认发送所有
     * @throws IOException
     */
    public static void sendInfo(String message, String toUserId) throws IOException {
        //如果userId为空,向所有群体发送
        if (StringUtils.isEmpty(toUserId)) {
            //向所有用户发送信息
            Iterator<String> itera = webSocketMap.keySet().iterator();
            while (itera.hasNext()) {
                String keys = itera.next();
                WebSocketServer item = webSocketMap.get(keys);
                item.sendMessage(message);
            }
        }
        //如果不为空,则发送指定用户信息
        else if (webSocketMap.containsKey(toUserId)) {
            WebSocketServer item = webSocketMap.get(toUserId);
            item.sendMessage(message);
        } else {
            log.error("请求的userId:" + toUserId + "不在该服务器上");
        }
    }

    public static synchronized int getOnlineCount() {
        return onlineCount;
    }

    public static synchronized void addOnlineCount() {
        WebSocketServer.onlineCount++;
    }

    public static synchronized void subOnlineCount() {
        WebSocketServer.onlineCount--;
    }

    public static synchronized ConcurrentHashMap<String, WebSocketServer> getWebSocketMap() {
        return WebSocketServer.webSocketMap;
    }

}
第四步,创建Controller进行发送测试
获取当前在线人数
import com.......WebSocketServer;

@ApiOperation(value = "获取当前在线人数")
@GetMapping("/getOnlineCount")
public Integer getOnlineCount() {
    return WebSocketServer.getOnlineCount();
}
通过接口,向前端用户推送消息
import com.......WebSocketServer;
import org.springframework.web.bind.annotation.GetMapping;
import org.springframework.web.bind.annotation.RequestMapping;
import org.springframework.web.bind.annotation.RestController;
import java.io.IOException;
/**
* @author: tjp
* @create: 2023-04-03 13:57
* @Description: 测试
*/
@RestController
@RequestMapping("/news")
public class NewsController {
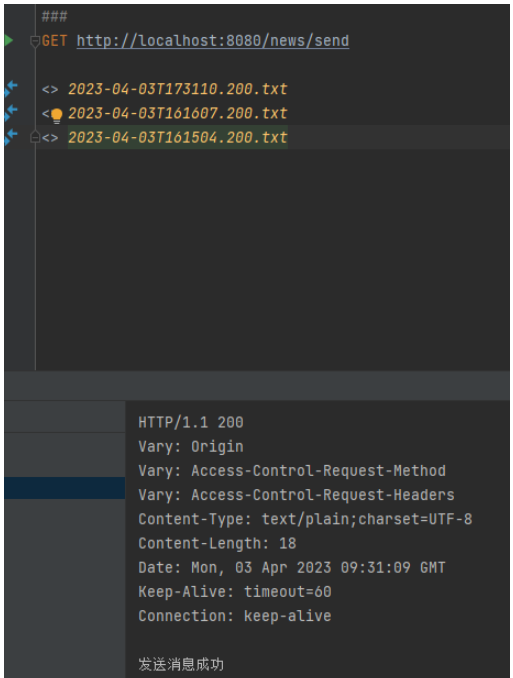
@GetMapping("/send")
public String send() {
try {
WebSocketServer.sendInfo("这是websocket发送过来的消息!", "需要推送的用户的编号");
} catch (IOException e) {
throw new RuntimeException(e);
}
return "发送消息成功";
}
}Vue端
第一步,创建连接工具类
创建工具类websocket.js,这里的userId就是用来作为标识符的userId
/**
* @author: tjp
* @create: 2023-04-03 11:22
* @Description: Socket客户端
*/
export class WebSocketClient {
constructor(userId) {
this.userId = userId;
this.websocket = null;
this.timeout = 10000; // 心跳超时时间,单位ms
this.timeoutObj = null; // 心跳定时器
this.serverTimeoutObj = null; // 服务器超时定时器
this.lockReconnect = false; // 避免重复连接
this.timeoutnum = null; // 重连延迟定时器
}
// 初始化WebSocket连接
initWebSocket() {
let wsUrl = `ws://127.0.0.1:8080/websocket/${this.userId}`;
this.websocket = new WebSocket(wsUrl);
this.websocket.onopen = this.websocketonopen.bind(this);
this.websocket.onerror = this.websocketonerror.bind(this);
this.websocket.onmessage = this.setOnmessageMessage.bind(this);
this.websocket.onclose = this.websocketclose.bind(this);
// 监听窗口关闭事件,当窗口关闭时,主动去关闭websocket连接,防止连接还没断开就关闭窗口,server端会抛异常。
window.onbeforeunload = this.websocketclose.bind(this);
}
// 启动心跳
start() {
console.log('start');
// 清除延时器
this.timeoutObj && clearTimeout(this.timeoutObj);
this.serverTimeoutObj && clearTimeout(this.serverTimeoutObj);
/*// 向服务器发送心跳消息
let actions = { "test": "12345" };
this.websocket && this.websocket.readyState == 1 && this.websocket.send(JSON.stringify(actions));
// 启动心跳定时器
this.timeoutObj = setTimeout(() => {
this.start();
// 定义一个延时器等待服务器响应,若超时,则关闭连接,重新请求server建立socket连接
this.serverTimeoutObj = setTimeout(() => {
this.websocket.close();
}, this.timeout)
}, this.timeout)*/
}
// 重置心跳
reset() {
// 清除时间
clearTimeout(this.timeoutObj);
clearTimeout(this.serverTimeoutObj);
// 重启心跳
this.start();
}
// 重新连接
reconnect() {
if (this.lockReconnect) return;
this.lockReconnect = true;
// 没连接上会一直重连,设置延迟避免请求过多
this.timeoutnum && clearTimeout(this.timeoutnum);
this.timeoutnum = setTimeout(() => {
this.initWebSocket();
this.lockReconnect = false;
}, 5000)
}
// 处理收到的消息
async setOnmessageMessage(event) {
console.log(event.data, '获得消息');
// 重置心跳
// this.reset();
// 自定义全局监听事件
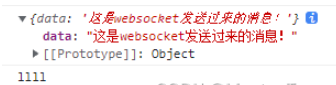
window.dispatchEvent(new CustomEvent('onmessageWS', {
detail: {
data: event.data
}
}))
// //发现消息进入 开始处理前端触发逻辑
// if (event.data === 'success' || event.data === 'heartBath') return
}
// WebSocket连接成功回调
websocketonopen() {
// 开启心跳
this.start();
console.log("WebSocket连接成功!!!" + new Date() + "----" + this.websocket.readyState);
clearInterval(this.otimer);//停止
}
// WebSocket连接错误回调
websocketonerror(e) {
console.log("WebSocket连接发生错误" + e);
}
// WebSocket连接关闭回调
websocketclose(e) {
this.websocket.close();
clearTimeout(this.timeoutObj);
clearTimeout(this.serverTimeoutObj);
console.log("websocketcloe关闭连接")
}
// 关闭WebSocket连接
closeWebSocket() {
this.websocket.close();
console.log("closeWebSocket关闭连接")
}
// 监听窗口关闭事件
onbeforeunload() {
this.closeWebSocket();
}
}第二步,建立连接
在任意你想建立连接的页面中建立Socket连接
比如,在用户点击登录按钮之后
在这里可以使用原型,创建连接对象,并启动连接
<script>
import Vue from "vue";
import {WebSocketClient} from "@/utils/websocket";
......
......
methods:{
handleLogin() {
this.$refs.loginForm.validate(valid => {
if (valid) {
this.loading = true
this.$store.dispatch('user/login', this.loginForm).then(() => {
this.$router.push({path: this.redirect || '/'})
this.loading = false
/*-----------在此处放入原型中------------*/
Vue.prototype.$WebSocketClientInstance = new WebSocketClient('t');
Vue.prototype.$WebSocketClientInstance.initWebSocket()
/*-----------------end------------*/
}).catch(() => {
this.loading = false
})
} else {
this.$message({message: '请填写正确格式的用户名或密码', type: 'error'})
return false
}
})
}
}
.....
.....
</script>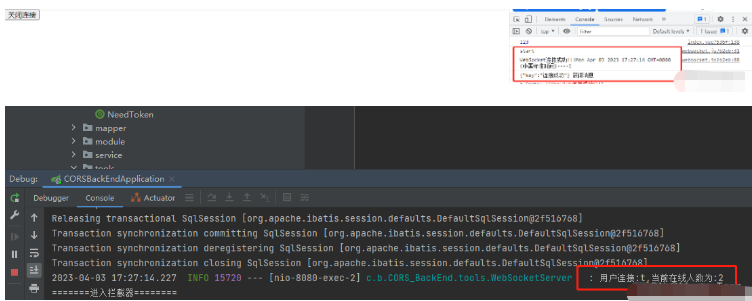
第三步,监听服务器发送过来的消息
在你想监听的页面,使用监听器进行监听
<script>
....
....
mounted() {
// 添加socket通知监听
window.addEventListener('onmessageWS', this.getSocketData)
},
methods: {
// 收到消息处理
getSocketData(res) {
console.log(res.detail)
console.log("llll")
},
}
....
....
</script>这个时候,你就可以通过后端的接口进行发送了
搞个测试
第四步,关闭连接
搞个按钮
<template>
  <div>
    <button @click="closeConnect">关闭连接</button>
  </div>
</template>

<script>
import {WebSocketClient} from "@/utils/websocket";
import Vue from "vue";

export default {
  methods: {
    closeConnect() {
      console.dir(Vue.prototype)
      Vue.prototype.$WebSocketClientInstance.closeWebSocket();
    },
  }
}
</script>
以上是怎么使用Spring Boot+Vue实现Socket通知推送的详细内容。更多信息请关注PHP中文网其他相关文章!

 如何将Maven或Gradle用于高级Java项目管理,构建自动化和依赖性解决方案?Mar 17, 2025 pm 05:46 PM
本文讨论了使用Maven和Gradle进行Java项目管理,构建自动化和依赖性解决方案,以比较其方法和优化策略。
 如何使用适当的版本控制和依赖项管理创建和使用自定义Java库(JAR文件)?Mar 17, 2025 pm 05:45 PM
本文使用Maven和Gradle之类的工具讨论了具有适当的版本控制和依赖关系管理的自定义Java库(JAR文件)的创建和使用。
 如何使用咖啡因或Guava Cache等库在Java应用程序中实现多层缓存?Mar 17, 2025 pm 05:44 PM
本文讨论了使用咖啡因和Guava缓存在Java中实施多层缓存以提高应用程序性能。它涵盖设置,集成和绩效优势,以及配置和驱逐政策管理最佳PRA
 如何将JPA(Java持久性API)用于具有高级功能(例如缓存和懒惰加载)的对象相关映射?Mar 17, 2025 pm 05:43 PM
本文讨论了使用JPA进行对象相关映射,并具有高级功能,例如缓存和懒惰加载。它涵盖了设置,实体映射和优化性能的最佳实践,同时突出潜在的陷阱。[159个字符]
 Java的类负载机制如何起作用,包括不同的类载荷及其委托模型?Mar 17, 2025 pm 05:35 PM
Java的类上载涉及使用带有引导,扩展程序和应用程序类负载器的分层系统加载,链接和初始化类。父代授权模型确保首先加载核心类别,从而影响自定义类LOA


热AI工具

Undresser.AI Undress
人工智能驱动的应用程序,用于创建逼真的裸体照片

AI Clothes Remover
用于从照片中去除衣服的在线人工智能工具。

Undress AI Tool
免费脱衣服图片

Clothoff.io
AI脱衣机

AI Hentai Generator
免费生成ai无尽的。

热门文章
热工具

SublimeText3 Linux新版
SublimeText3 Linux最新版

EditPlus 中文破解版
体积小,语法高亮,不支持代码提示功能

PhpStorm Mac 版本
最新(2018.2.1 )专业的PHP集成开发工具

SublimeText3 Mac版
神级代码编辑软件(SublimeText3)

记事本++7.3.1
好用且免费的代码编辑器

