


nginx之读写分离
1.实验拓扑
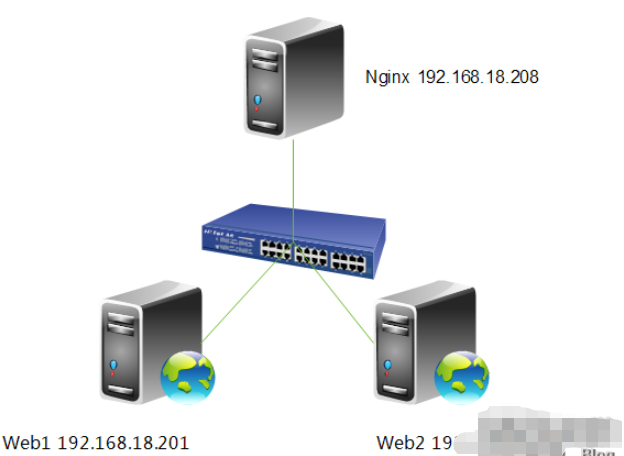
需求分析,前端一台nginx做负载均衡反向代理,后面两台httpd服务器。整个架构是提供bbs(论坛)服务,有一需求得实现读写分离,就是上传附件的功能,我们上传的附件只能上传到web1,然后在web1上利用rsync+inotify实现附件同步,大家都知道rsync+inotify只能是主向从同步,不能双向同步。所以web1可进行写操作,而web2只能进行读操作,这就带来读写分离的需求,下面我们就来说一下,读写分离怎么实现。
2.webdav功能说明
webdav (web-based distributed authoring and versioning) 一种基于 http 1.1协议的通信协议。它扩展了http 1.1,在get、post、head等几个http标准方法以外添加了一些新的方法,使应用程序可直接对web server直接读写,并支持写文件锁定(locking)及解锁(unlock),还可以支持文件的版本控制。这样我们就能配置读写分离功能了,下面我们来具体配置一下。
3.修改配置文件
[root@nginx nginx]# vim /etc/nginx/nginx.conf
server {
    listen    80;
    server_name localhost;
    #charset koi8-r;
    #access_log logs/host.access.log main;
    location / {
        proxy_pass http://192.168.18.202;
        if ($request_method = "put"){
            proxy_pass http://192.168.18.201;
        }
    }
}
4.重新加载一下配置文件
[root@nginx ~]# service nginx reload
nginx: the configuration file /etc/nginx/nginx.conf syntax is ok
nginx: configuration file /etc/nginx/nginx.conf test is successful
重新载入 nginx:                      [确定]
5.配置httpd的webdav功能
[root@web1 ~]# vim /etc/httpd/conf/httpd.conf

注,在4b1d0a007ecc9e2e5169da02cdccb823下启用就行。
6.重新启动一下httpd
[root@web1 ~]# service httpd restart
停止 httpd:                        [确定]
正在启动 httpd:                      [确定]
7.测试一下
[root@nginx ~]# curl http://192.168.18.201
<h1>web1.test.com</h1>
[root@nginx ~]# curl http://192.168.18.202
<h1>web2.test.com</h1>
注,web1与web2访问都没问题。
[root@nginx ~]# curl -t /etc/issue http://192.168.18.202
<!doctype html public "-//ietf//dtd html 2.0//en">
<html><head>
<title>405 method not allowed</title>
</head><body>
<h1>method not allowed</h1>
the requested method put is not allowed for the url /issue.
<hr>
<address>apache/2.2.15 (centos) server at 192.168.18.202 port 80</address>
</body></html>
注,我们上传文件到,web2上时,因为web2只人读功能,所以没有开户webdav功能,所以显示是405 method not allowed。
[root@nginx ~]# curl -t /etc/issue http://192.168.18.201 <!doctype html public "-//ietf//dtd html 2.0//en"> <html><head> <title>403 forbidden</title> </head><body> <h1>forbidden</h1> you don't have permission to access /issue on this server. <hr> <address>apache/2.2.15 (centos) server at 192.168.18.201 port 80</address> </body></html>
注,我们在web1开启了webdav功能,但我们目录是root目录是不允许apache用户上传的,所以显示的是403 forbidden。下面我们给apache授权,允许上传。
[root@web1 ~]# setfacl -m u:apache:rwx /var/www/html/
下面我们再来测试一下,
[root@nginx ~]# curl -t /etc/issue http://192.168.18.201
<!doctype html public "-//ietf//dtd html 2.0//en">
<html><head>
<title>201 created</title>
</head><body>
<h1>created</h1>
resource /issue has been created.
<hr />
<address>apache/2.2.15 (centos) server at 192.168.18.201 port 80</address>
</body></html>
注,大家可以看到我们成功的上传了文件,说明nginx读写分离功能配置完成。最后,我们来查看一下上传的文件。
[root@web1 ~]# cd /var/www/html/
[root@web1 html]# ll
总用量 12
drwxr-xr-x 2 root  root  4096 9月  4 13:16 forum
-rw-r--r-- 1 root  root   23 9月  3 23:37 index.html
-rw-r--r-- 1 apache apache  47 9月  4 14:06 issue
以上是nginx读写分离怎么配置的详细内容。更多信息请关注PHP中文网其他相关文章!

 NGINX与Apache:网络托管和流量管理Apr 12, 2025 am 12:04 AM
NGINX适合高并发和低资源消耗场景,Apache适用于需要复杂配置和功能扩展的场景。 1.NGINX以高性能处理大量并发连接着称。 2.Apache以稳定性和丰富模块支持见长。选择时需根据具体需求决定。
 NGINX:现代Web应用程序的多功能工具Apr 11, 2025 am 12:03 AM
NGINXisessentialformodernwebapplicationsduetoitsrolesasareverseproxy,loadbalancer,andwebserver,offeringhighperformanceandscalability.1)Itactsasareverseproxy,enhancingsecurityandperformancebycachingandloadbalancing.2)NGINXsupportsvariousloadbalancingm
 NGINX SSL/TLS配置:使用HTTPS确保您的网站Apr 10, 2025 am 09:38 AM
通过Nginx配置SSL/TLS来确保网站安全,需要以下步骤:1.创建基本配置,指定SSL证书和私钥;2.优化配置,启用HTTP/2和OCSPStapling;3.调试常见错误,如证书路径和加密套件问题;4.应用性能优化建议,如使用Let'sEncrypt和会话复用。
 NGINX面试问题:ACE您的DevOps/System Admin面试Apr 09, 2025 am 12:14 AM
Nginx是高性能的HTTP和反向代理服务器,擅长处理高并发连接。1)基本配置:监听端口并提供静态文件服务。2)高级配置:实现反向代理和负载均衡。3)调试技巧:检查错误日志和测试配置文件。4)性能优化:启用Gzip压缩和调整缓存策略。
 NGINX缓存技术:改善网站性能Apr 08, 2025 am 12:18 AM
Nginx缓存可以通过以下步骤显着提升网站性能:1)定义缓存区和设置缓存路径;2)配置缓存有效期;3)根据不同内容设置不同的缓存策略;4)优化缓存存储和负载均衡;5)监控和调试缓存效果。通过这些方法,Nginx缓存能减少后端服务器压力,提升响应速度和用户体验。
 带Docker的NGINX:部署和缩放容器化应用程序Apr 07, 2025 am 12:08 AM
使用DockerCompose可以简化Nginx的部署和管理,通过DockerSwarm或Kubernetes进行扩展是常见的做法。1)使用DockerCompose定义和运行Nginx容器,2)通过DockerSwarm或Kubernetes实现集群管理和自动扩展。
 高级NGINX配置:掌握服务器块和反向代理Apr 06, 2025 am 12:05 AM
Nginx的高级配置可以通过服务器块和反向代理实现:1.服务器块允许在一个实例中运行多个网站,每个块独立配置。2.反向代理将请求转发到后端服务器,实现负载均衡和缓存加速。
 NGINX性能调整:针对速度和低潜伏期进行优化Apr 05, 2025 am 12:08 AM
Nginx性能调优可以通过调整worker进程数、连接池大小、启用Gzip压缩和HTTP/2协议、使用缓存和负载均衡来实现。1.调整worker进程数和连接池大小:worker_processesauto;events{worker_connections1024;}。2.启用Gzip压缩和HTTP/2协议:http{gzipon;server{listen443sslhttp2;}}。3.使用缓存优化:http{proxy_cache_path/path/to/cachelevels=1:2k


热AI工具

Undresser.AI Undress
人工智能驱动的应用程序,用于创建逼真的裸体照片

AI Clothes Remover
用于从照片中去除衣服的在线人工智能工具。

Undress AI Tool
免费脱衣服图片

Clothoff.io
AI脱衣机

AI Hentai Generator
免费生成ai无尽的。

热门文章
热工具

Dreamweaver Mac版
视觉化网页开发工具

螳螂BT
Mantis是一个易于部署的基于Web的缺陷跟踪工具,用于帮助产品缺陷跟踪。它需要PHP、MySQL和一个Web服务器。请查看我们的演示和托管服务。

适用于 Eclipse 的 SAP NetWeaver 服务器适配器
将Eclipse与SAP NetWeaver应用服务器集成。

VSCode Windows 64位 下载
微软推出的免费、功能强大的一款IDE编辑器

PhpStorm Mac 版本
最新(2018.2.1 )专业的PHP集成开发工具

