


一、命令简介
Netcat的简称nc,是一款被誉为网络界瑞士军刀的强大网络工具。实际上,Linux系统中的命令是ncat。nc命令只是一个指向ncat的软链接。nc命令的主要作用如下:
实现任意TCP/UDP端口的侦听,nc可以作为server以TCP或UDP方式侦听指定端口端口的扫描,nc可以作为client发起TCP或UDP连接机器之间传输文件机器之间网络测速
nc如果找不到nc命令可以使用yum install -y nc安装,其中centos6系统安装的是nc-1.84-24.el6.x86_64,centos7安装的是nmap-ncat-6.40-19.el7.x86_64。
二、使用示例
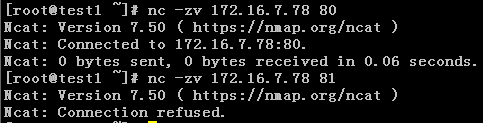
1、验证服务器端口是否通
如下验证172.16.7.78服务器的80端口通,81端口不通。
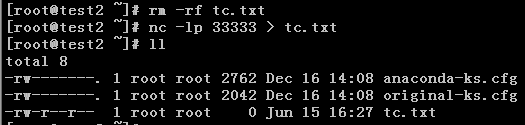
2、拷贝文件
首先在文件接收终端test2机器上激活nc监听

然后在文件发送终端test1机器上发送文件

在test2上检查文件是否已成功接收
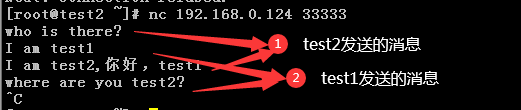
3、终端之间通信聊天
test1主机上启动nc监听,ctrl+C中断通信。

test2上连接监听,ctrl+C中断通信。
4、端口扫描
端口扫描,通的端口返回succeeded,不通的端口返回refused。此扫描基于nc-1.84-24.el6.x86_64。
[root@test1 /]# nc -v -w 1 172.16.7.78 -z 22-81
Connection to 172.16.7.78 22 port [tcp/ssh] succeeded!
nc: connect to 172.16.7.78 port 23 (tcp) failed: Connection refused
nc: connect to 172.16.7.78 port 24 (tcp) failed: Connection refused
nc: connect to 172.16.7.78 port 25 (tcp) failed: Connection refused
nc: connect to 172.16.7.78 port 26 (tcp) failed: Connection refused
nc: connect to 172.16.7.78 port 27 (tcp) failed: Connection refused
nc: connect to 172.16.7.78 port 28 (tcp) failed: Connection refused
nc: connect to 172.16.7.78 port 29 (tcp) failed: Connection refused
nc: connect to 172.16.7.78 port 30 (tcp) failed: Connection refused
nc: connect to 172.16.7.78 port 31 (tcp) failed: Connection refused
nc: connect to 172.16.7.78 port 32 (tcp) failed: Connection refused
nc: connect to 172.16.7.78 port 33 (tcp) failed: Connection refused
nc: connect to 172.16.7.78 port 34 (tcp) failed: Connection refused
nc: connect to 172.16.7.78 port 35 (tcp) failed: Connection refused
nc: connect to 172.16.7.78 port 36 (tcp) failed: Connection refused
nc: connect to 172.16.7.78 port 37 (tcp) failed: Connection refused
nc: connect to 172.16.7.78 port 38 (tcp) failed: Connection refused
nc: connect to 172.16.7.78 port 39 (tcp) failed: Connection refused
nc: connect to 172.16.7.78 port 40 (tcp) failed: Connection refused
nc: connect to 172.16.7.78 port 41 (tcp) failed: Connection refused
nc: connect to 172.16.7.78 port 42 (tcp) failed: Connection refused
nc: connect to 172.16.7.78 port 43 (tcp) failed: Connection refused
nc: connect to 172.16.7.78 port 44 (tcp) failed: Connection refused
nc: connect to 172.16.7.78 port 45 (tcp) failed: Connection refused
nc: connect to 172.16.7.78 port 46 (tcp) failed: Connection refused
nc: connect to 172.16.7.78 port 47 (tcp) failed: Connection refused
nc: connect to 172.16.7.78 port 48 (tcp) failed: Connection refused
nc: connect to 172.16.7.78 port 49 (tcp) failed: Connection refused
nc: connect to 172.16.7.78 port 50 (tcp) failed: Connection refused
nc: connect to 172.16.7.78 port 51 (tcp) failed: Connection refused
nc: connect to 172.16.7.78 port 52 (tcp) failed: Connection refused
nc: connect to 172.16.7.78 port 53 (tcp) failed: Connection refused
nc: connect to 172.16.7.78 port 54 (tcp) failed: Connection refused
nc: connect to 172.16.7.78 port 55 (tcp) failed: Connection refused
nc: connect to 172.16.7.78 port 56 (tcp) failed: Connection refused
nc: connect to 172.16.7.78 port 57 (tcp) failed: Connection refused
nc: connect to 172.16.7.78 port 58 (tcp) failed: Connection refused
nc: connect to 172.16.7.78 port 59 (tcp) failed: Connection refused
nc: connect to 172.16.7.78 port 60 (tcp) failed: Connection refused
nc: connect to 172.16.7.78 port 61 (tcp) failed: Connection refused
nc: connect to 172.16.7.78 port 62 (tcp) failed: Connection refused
nc: connect to 172.16.7.78 port 63 (tcp) failed: Connection refused
nc: connect to 172.16.7.78 port 64 (tcp) failed: Connection refused
nc: connect to 172.16.7.78 port 65 (tcp) failed: Connection refused
nc: connect to 172.16.7.78 port 66 (tcp) failed: Connection refused
nc: connect to 172.16.7.78 port 67 (tcp) failed: Connection refused
nc: connect to 172.16.7.78 port 68 (tcp) failed: Connection refused
nc: connect to 172.16.7.78 port 69 (tcp) failed: Connection refused
nc: connect to 172.16.7.78 port 70 (tcp) failed: Connection refused
nc: connect to 172.16.7.78 port 71 (tcp) failed: Connection refused
nc: connect to 172.16.7.78 port 72 (tcp) failed: Connection refused
nc: connect to 172.16.7.78 port 73 (tcp) failed: Connection refused
nc: connect to 172.16.7.78 port 74 (tcp) failed: Connection refused
nc: connect to 172.16.7.78 port 75 (tcp) failed: Connection refused
nc: connect to 172.16.7.78 port 76 (tcp) failed: Connection refused
nc: connect to 172.16.7.78 port 77 (tcp) failed: Connection refused
nc: connect to 172.16.7.78 port 78 (tcp) failed: Connection refused
nc: connect to 172.16.7.78 port 79 (tcp) failed: Connection refused
Connection to 172.16.7.78 80 port [tcp/http] succeeded!
nc: connect to 172.16.7.78 port 81 (tcp) failed: Connection refused
5、验证UDP端口
[root@test1 ~]# nc -uvz 192.168.0.125 111
Ncat: Version 7.50 ( https://nmap.org/ncat )
Ncat: Connected to 192.168.0.125:111.
Ncat: UDP packet sent successfully
Ncat: 1 bytes sent, 0 bytes received in 2.04 seconds.
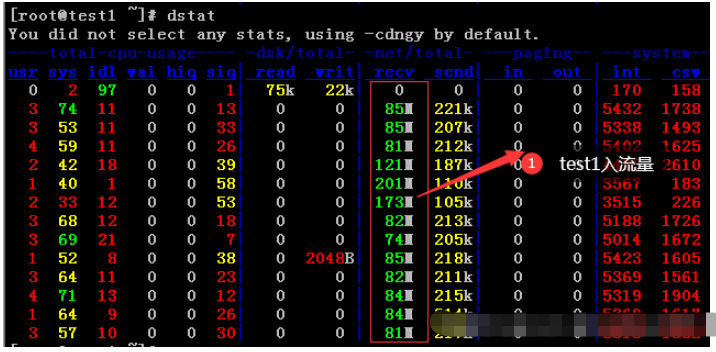
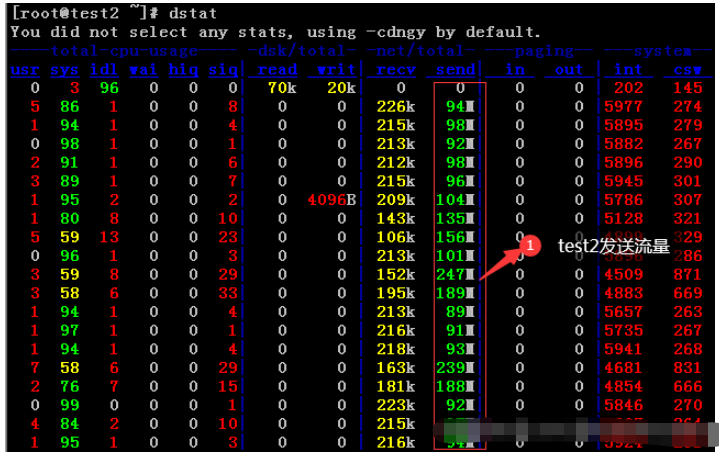
6、测速网速
测速网速需要结合dstat命令查看。
安装dstat命令
[root@test1 ~]# yum install -y dstat
[root@test2 ~]# yum install -y dstat
test1主机上监听端口
[root@test1 ~]# nc -l 33333 >/dev/null
test2主机上发送数据,全0数据
[root@test2 ~]# nc 192.168.0.124 33333
查看流量
[root@test1 ~]# dstat
[root@test2 ~]# dstat
三、使用语法及参数说明
1、使用语法
用法:ncat [options] [hostname] [port]
2、参数说明
| 参数 | 参数说明 | ||||||||||||||||||||||||||||||||||||||||||||||||||||||||||||||||||||||||||||||||
|---|---|---|---|---|---|---|---|---|---|---|---|---|---|---|---|---|---|---|---|---|---|---|---|---|---|---|---|---|---|---|---|---|---|---|---|---|---|---|---|---|---|---|---|---|---|---|---|---|---|---|---|---|---|---|---|---|---|---|---|---|---|---|---|---|---|---|---|---|---|---|---|---|---|---|---|---|---|---|---|---|---|
| -4 | Use IPv4 only | ||||||||||||||||||||||||||||||||||||||||||||||||||||||||||||||||||||||||||||||||
| -6 | Use IPv6 only | ||||||||||||||||||||||||||||||||||||||||||||||||||||||||||||||||||||||||||||||||
| -U, --unixsock | 仅使用Unix域套接字 | ||||||||||||||||||||||||||||||||||||||||||||||||||||||||||||||||||||||||||||||||
| -C, --crlf | 将crlf用于EOL序列 | ||||||||||||||||||||||||||||||||||||||||||||||||||||||||||||||||||||||||||||||||
-c, --sh-exec | 通过/bin/sh执行给定的命令 |
-e, --exec |
执行给定的命令 |
–lua-exec |
执行给定的lua脚本 |
-g hop1[,hop2,…] |
松散源路由跃点(最多8个) |
-G |
松散源路由跃点指针(4,8,12,…) |
-m, --max-conns |
最大同时连接数 |
-h, --help |
帮助显示此帮助屏幕 |
-d, --delay |
读/写之间的延迟 |
-o, --output |
将会话数据转储到文件 |
-x, --hex-dump |
将会话数据作为十六进制转储到文件 |
-i, --idle-timeout |
空闲读/写超时 |
-p, --source-port port |
指定要使用的源端口 |
-s, --source addr |
指定要使用的源地址(不影响-l) |
-l, --listen |
绑定并侦听传入连接 |
-k, --keep-open |
在侦听模式下接受多个连接 |
-n, --nodns |
不通过DNS解析主机名 |
-t, --telnet |
应答telnet协商 |
-u, --udp |
使用udp而不是默认TCP |
–sctp |
使用sctp而不是默认的TCP |
-v, --verbose |
设置详细级别(可以多次使用) |
-w, --wait |
连接超时时间,单位秒 |
-z |
仅报告连接状态 |
–append-output |
追加而不是重击指定的输出文件 |
–send-only |
忽略接收;退出EOF |
–recv-only |
从不发送任何东西 |
–allow |
给定主机连接到Ncat |
–allowfile |
允许连接到Ncat的主机的文件 |
–deny |
给定主机连接到Ncat |
–denyfile |
拒绝连接到Ncat的主机文件 |
–broker |
启用Ncat的连接代理模式 |
–chat |
开始一个简单的Ncat聊天服务器 |
–proxy |
指定要通过代理的主机地址 |
–proxy-type |
指定代理类型(“http”或“socks4”或“socks5”) |
–proxy-auth |
通过HTTP或SOCKS代理服务器进行身份验证 |
–ssl |
使用ssl连接或侦听 |
–ssl-cert |
指定用于侦听的ssl证书文件(PEM) |
–ssl-key |
指定用于侦听的ssl私钥(PEM) |
–ssl-verify |
证书的信任和域名 |
–ssl-trustfile |
包含可信ssl证书的PEM文件 |
–ssl-ciphers |
Cipherlist包含要使用的ssl密码 |
–version |
查看命令版本 |
以上是Linux nc命令如何使用的详细内容。更多信息请关注PHP中文网其他相关文章! 声明 本文转载于:亿速云。如有侵权,请联系admin@php.cn删除  Linux操作系统的5个核心组件May 08, 2025 am 12:08 AM Linux操作系统的5个核心组件May 08, 2025 am 12:08 AMLinux操作系统的5个核心组件是:1.内核,2.系统库,3.系统工具,4.系统服务,5.文件系统。这些组件协同工作,确保系统的稳定和高效运行,共同构成了一个强大而灵活的操作系统。  Linux的5个基本要素:解释May 07, 2025 am 12:14 AM Linux的5个基本要素:解释May 07, 2025 am 12:14 AMLinux的五个核心元素是:1.内核,2.命令行界面,3.文件系统,4.包管理,5.社区与开源。这些元素共同定义了Linux的本质和功能。  Linux操作:安全和用户管理May 06, 2025 am 12:04 AM Linux操作:安全和用户管理May 06, 2025 am 12:04 AMLinux用户管理和安全性可以通过以下步骤实现:1.创建用户和组,使用命令如sudouseradd-m-gdevelopers-s/bin/bashjohn。2.批量创建用户和设置密码策略,使用for循环和chpasswd命令。3.检查和修复常见错误,如家目录和shell设置。4.实施最佳实践,如强密码策略、定期审计和最小权限原则。5.优化性能,使用sudo和调整PAM模块配置。通过这些方法,可以有效管理用户和提升系统安全性。  Linux操作:文件系统,进程等May 05, 2025 am 12:16 AM Linux操作:文件系统,进程等May 05, 2025 am 12:16 AMLinux文件系统和进程管理的核心操作包括文件系统的管理和进程的控制。1)文件系统操作包括创建、删除、复制和移动文件或目录,使用命令如mkdir、rmdir、cp和mv。2)进程管理涉及启动、监控和终止进程,使用命令如./my_script.sh&、top和kill。  Linux操作:外壳脚本和自动化May 04, 2025 am 12:15 AM Linux操作:外壳脚本和自动化May 04, 2025 am 12:15 AMShell脚本是Linux系统中用于自动化执行命令的强大工具。1)Shell脚本通过解释器逐行执行命令,处理变量替换和条件判断。2)基本用法包括备份操作,如使用tar命令备份目录。3)高级用法涉及使用函数和case语句管理服务。4)调试技巧包括使用set-x开启调试模式和set-e在命令失败时退出。5)性能优化建议避免子Shell,使用数组和优化循环。  Linux操作:了解核心功能May 03, 2025 am 12:09 AM Linux操作:了解核心功能May 03, 2025 am 12:09 AMLinux是一个基于Unix的多用户、多任务操作系统,强调简单性、模块化和开放性。其核心功能包括:文件系统:以树状结构组织,支持多种文件系统如ext4、XFS、Btrfs,使用df-T查看文件系统类型。进程管理:通过ps命令查看进程,使用PID管理进程,涉及优先级设置和信号处理。网络配置:灵活设置IP地址和管理网络服务,使用sudoipaddradd配置IP。这些功能在实际操作中通过基本命令和高级脚本自动化得以应用,提升效率并减少错误。  Linux:进入和退出维护模式May 02, 2025 am 12:01 AM Linux:进入和退出维护模式May 02, 2025 am 12:01 AM进入Linux维护模式的方法包括:1.编辑GRUB配置文件,添加"single"或"1"参数并更新GRUB配置;2.在GRUB菜单中编辑启动参数,添加"single"或"1"。退出维护模式只需重启系统。通过这些步骤,你可以在需要时快速进入维护模式,并安全地退出,确保系统的稳定性和安全性。  了解Linux:定义的核心组件May 01, 2025 am 12:19 AM 了解Linux:定义的核心组件May 01, 2025 am 12:19 AMLinux的核心组件包括内核、shell、文件系统、进程管理和内存管理。1)内核管理系统资源,2)shell提供用户交互界面,3)文件系统支持多种格式,4)进程管理通过fork等系统调用实现,5)内存管理使用虚拟内存技术。   热AI工具 Undresser.AI Undress人工智能驱动的应用程序,用于创建逼真的裸体照片  AI Clothes Remover用于从照片中去除衣服的在线人工智能工具。  Undress AI Tool免费脱衣服图片  Clothoff.ioAI脱衣机  Video Face Swap使用我们完全免费的人工智能换脸工具轻松在任何视频中换脸!  热门文章<🎜>:种植花园 - 完整的突变指南 4 周前ByDDD <🎜>:泡泡胶模拟器无穷大 - 如何获取和使用皇家钥匙 4 周前By尊渡假赌尊渡假赌尊渡假赌 北端:融合系统,解释 1 个月前By尊渡假赌尊渡假赌尊渡假赌 Mandragora:巫婆树的耳语 - 如何解锁抓钩 4 周前By尊渡假赌尊渡假赌尊渡假赌 热工具 WebStorm Mac版好用的JavaScript开发工具  SublimeText3 Linux新版SublimeText3 Linux最新版  MinGW - 适用于 Windows 的极简 GNU这个项目正在迁移到osdn.net/projects/mingw的过程中,你可以继续在那里关注我们。MinGW:GNU编译器集合(GCC)的本地Windows移植版本,可自由分发的导入库和用于构建本地Windows应用程序的头文件;包括对MSVC运行时的扩展,以支持C99功能。MinGW的所有软件都可以在64位Windows平台上运行。  SublimeText3汉化版中文版,非常好用  SublimeText3 Mac版神级代码编辑软件(SublimeText3) |


