


一、反向代理及演示环境描述
1、反向代理
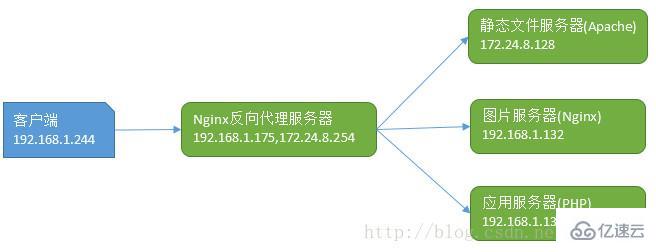
反向代理是一种代理服务器,通过代表客户端从一个或多个服务器检索资源。将这些资源重新发送给客户端,就好像它们从Web服务器本身返回一样。与正向代理相反,正向代理是与其关联的客户端联系任何服务器的中介,反向代理是任何客户端与其关联的服务器进行联系的中介。
有关正向代理可参考:基于CentOS 7配置Nginx正向代理
2、本演示中的几个服务器
二、常规反向代理配置
1、后端服务器配置(Apache)
后端Apache服务器主机名及IP
# hostname centos7-web.example.com# more /etc/redhat-release CentOS Linux release 7.2.1511 (Core)# ip addr|grep inet|grep global inet 172.24.8.128/24 brd 172.24.8.255 scope global eno16777728# systemctl start httpd.service# echo "This is a httpd test page.">/var/www/html/index.html# curl http://localhost This is a httpd test page.
2、前端Nginx反向代理服务器配置
前端Nginx服务器主机名及IP
# hostname centos7-router

 # more /etc/redhat-release CentOS Linux release 7.2.1511 (Core)
 # ip addr |grep inet|grep global inet 172.24.8.254/24 brd 172.24.8.255 scope global eno16777728
 inet 192.168.1.175/24 brd 192.168.1.255 scope global dynamic eno33554960
Nginx版本
# nginx -V nginx version: nginx/1.10.2
添加一个新的配置文件用作反向代理
# vim /etc/nginx/conf.d/reverse_proxy.conf server {
   listen 8090;
   server_name localhost;

 location / {
   proxy_pass http://172.24.8.128; ###反向代理核心指令   proxy_buffers 256 4k;
   proxy_max_temp_file_size 0;
   proxy_connect_timeout 30;

   proxy_cache_valid 200 302 10m;
   proxy_cache_valid 301 1h;
   proxy_cache_valid any 1m;
   }
 }# systemctl reload nginx# ss -nltp|grep nginx|grep 8090LISTEN 0 128 *:8090 *:* users:(("nginx",pid=78023,fd=8),("nginx",pid=78021,fd=8))# curl http://localhost:8090 ##基于本地测试This is a httpd test page.
查看Apache服务器日志
# more /var/log/httpd/access_log ##请求IP地址为172.24.8.254,当从其他机器请求时也是172.24.8.254这个IP172.24.8.254 - - [30/Oct/2017:14:02:38 +0800] "GET / HTTP/1.0" 200 27 "-" "curl/7.29.0"
3、反向代理服务器及后端服务器日志格式设置
为Nginx服务器添加proxy_set_header指令,修改后如下
# grep proxy_set_header -B2 /etc/nginx/conf.d/reverse_proxy.conf location / {
   proxy_pass http://172.24.8.128;
   proxy_set_header X-Real-IP $remote_addr;
   }# systemctl reload nginx.service
后端服务器Apache日志格式设置
# vim /etc/http/conf/httpd.conf# LogFormat "%h %l %u %t \"%r\" %>s %b \"%{Referer}i\" \"%{User-Agent}i\"" combined #注释此行,添加下一行   LogFormat "%{X-Real-IP}i %l %u %t \"%r\" %>s %b \"%{Referer}i\" \"%{User-Agent}i\"" combined #关键描述 {X-Real-IP}i# ip addr|grep inet|grep global    #从1.132主机访问 inet 192.168.1.244/24 brd 192.168.1.255 scope global eth0# curl http://192.168.1.175:8090  #从1.244主机访问 This is a httpd test page#再次查看apache访问日志,如下,不再是代理服务器IP地址,此时显示为1.244 192.168.1.244 - - [30/Oct/2017:15:49:07 +0800] "GET / HTTP/1.0" 200 27 "-" "curl/7.19.7 (x86_64-redhat-linux-gnu)
 libcurl/7.19.7 NSS/3.14.0.0 zlib/1.2.3 libidn/1.18 libssh3/1.4.2"
三、基于目录匹配反向代理
后端服务器采用Nginx的配置
# more /etc/redhat-release ##os平台及ip地址 CentOS release 6.7 (Final)# ip addr|grep eth0|grep global inet 192.168.1.132/24 brd 192.168.1.255 scope global eth0# nginx -v ##nginx版本 nginx version: nginx/1.10.2# mkdir -pv /usr/share/nginx/html/images ##创建图片目录 mkdir: created directory `/usr/share/nginx/html/images'

# cp /usr/share/backgrounds/nature/*.jpg /usr/share/nginx/html/images/. ##复制图片文件

# cp /etc/nginx/conf.d/default.conf /etc/nginx/conf.d/default.conf.bk
# vim /etc/nginx/conf.d/default.conf ##此处直接修改缺省配置文件

 server {
 listen 80 default_server;
 listen [::]:80 default_server;
 server_name _;
 root /usr/share/nginx/html;

# Load configuration files for the default server block.
 include /etc/nginx/default.d/*.conf;

 location / {
   }

 location /images {
   alias /usr/share/nginx/html/images; ##此处配置了别名
   }

 error_page 404 /404.html;
 location = /40x.html {
   }

 error_page 500 502 503 504 /50x.html;
 location = /50x.html {
   }
 }

# /etc/init.d/nginx reload
Reloading nginx: [ OK ]
前端Nginx配置
# vim /etc/nginx/conf.d/reverse_proxy.conf server { listen 8090; server_name localhost; location / { proxy_pass http://172.24.8.128; proxy_set_header X-Real-IP $remote_addr; } location /images { ##将images目录下的文件代理至192.168.1.132 proxy_pass http://192.168.1.132; proxy_set_header X-Real-IP $remote_addr; } }# systemctl reload nginx验证代理情况,在ip为192.168.1.244测试对images目录下的jpg文件请求
# ip addr|grep inet|grep global inet 192.168.1.244/24 brd 192.168.1.255 scope global eth0# curl -I http://192.168.1.175:8090/images/Garden.jpg HTTP/1.1 200 OK Server: nginx/1.12.2 Date: Tue, 31 Oct 2017 01:48:18 GMT Content-Type: image/jpeg Content-Length: 264831 Connection: keep-alive Last-Modified: Mon, 30 Oct 2017 08:21:28 GMT ETag: "59f6e108-40a7f" Accept-Ranges: bytes
四、基于特定文件类型的反向代理配置
php服务器端配置(ip 192.168.1.132)
# ss -nltp|grep php LISTEN 0 128 192.168.1.132:9000 *:* users:(("php-fpm",7147,8),("php-fpm",7148,0),("php-fpm",7149,0))# mkdir -pv /data ###存放php代码# echo "/data 192.168.1.0/24(rw)" >/etc/exports# /etc/init.d/rpcbind start# /etc/init.d/nfslock start# /etc/init.d/nfs start # echo "" > /data/index.phpNginx代理端配置(ip 192.168.1.175)
# mkdir /data# mount -t nfs 192.168.1.132:/data /data# ls /data index.php# vim /etc/nginx/conf.d/reverse_proxy.conf server { listen 8090; server_name localhost; location / { proxy_pass http://172.24.8.128; proxy_set_header X-Real-IP $remote_addr; } location /images { proxy_pass http://192.168.1.132; proxy_set_header X-Real-IP $remote_addr; } location ~ \.php$ { root /data; fastcgi_pass 192.168.1.132:9000; fastcgi_index index.php; fastcgi_param SCRIPT_FILENAME /scripts$fastcgi_script_name; include fastcgi_params; } }# systemctl restart nginx测试反向代理至php
[root@ydq05 ~]# ip addr|grep inet|grep global inet 192.168.1.244/24 brd 192.168.1.255 scope global eth0 [root@ydq05 ~]# curl -I http://192.168.1.175:8090/index.php HTTP/1.1 200 OK Server: nginx/1.12.2 Date: Tue, 31 Oct 2017 03:22:59 GMT Content-Type: text/html; charset=UTF-8 Connection: keep-alive X-Powered-By: PHP/5.6.0
五、基于upstream 配置反向代理至tomcat
Nginx upstream指令也可以将请求代理到后端服务器 如下示例,结合upstream指令演示将其代理到tomcat
# vim /etc/nginx/conf.d/tomcat.confupstream app {
               server localhost:8080;
               keepalive 32;
}

server {
   listen 80;
   server_name localhost;
   location / {
       proxy_set_header Host $host;
       proxy_set_header x-for $remote_addr;
       proxy_set_header x-server $host;
       proxy_set_header x-agent $http_user_agent;
       proxy_pass http://app;
   }
}

[root@node132 conf.d]# ss -nltp|grep javaLISTEN    0  1    ::ffff:127.0.0.1:8005  :::*      users:(("java",39559,45))
LISTEN    0  100                :::8009  :::*      users:(("java",39559,43))
LISTEN    0  100                :::8080  :::*      users:(("java",39559,42))

tomcat版本
[root@node132 conf.d]# /usr/local/tomcat/bin/catalina.sh versionUsing CATALINA_BASE:  /usr/local/tomcat
Using CATALINA_HOME:  /usr/local/tomcat
           ....
Server version: Apache Tomcat/7.0.69
Server built:  Apr 11 2016 07:57:09 UTC
Server number:  7.0.69.0
OS Name:        Linux
OS Version:    2.6.32-573.el6.x86_64
Architecture:  amd64
JVM Version:    1.7.0_79-b15
JVM Vendor:    Oracle Corporation

验证结果# curl http://localhost


   ......
六、proxy模块指令描述
proxy模块的可用配置指令非常多,它们分别用于定义proxy模块工作时的诸多属性,如连接超时时长、代理时使用http协议版本等。下面对常用的指令做一个简单说明。
proxy_read_timeout 在连接断开之前两次从接收upstream server接收读操作的最大间隔时长;
如下面的一个示例:
proxy_redirect off;
   proxy_set_header Host $host;
   proxy_set_header X-Real-IP $remote_addr;
   proxy_set_header X-Forwarded-For $proxy_add_x_forwarded_for;
   client_max_body_size 10m;
   client_body_buffer_size 128k;
   proxy_connect_timeout 30;
   proxy_send_timeout 15;
   proxy_read_timeout 15;
以上是CentOS如何配置Nginx反向代理的详细内容。更多信息请关注PHP中文网其他相关文章!

 在Nginx和Apache之间进行选择:适合您的需求Apr 15, 2025 am 12:04 AM
NGINX和Apache各有优劣,适合不同场景。1.NGINX适合高并发和低资源消耗场景。2.Apache适合需要复杂配置和丰富模块的场景。通过比较它们的核心特性、性能差异和最佳实践,可以帮助你选择最适合需求的服务器软件。

 怎么查看nginx是否启动Apr 14, 2025 pm 01:03 PM
确认 Nginx 是否启动的方法:1. 使用命令行:systemctl status nginx(Linux/Unix)、netstat -ano | findstr 80(Windows);2. 检查端口 80 是否开放;3. 查看系统日志中 Nginx 启动消息;4. 使用第三方工具,如 Nagios、Zabbix、Icinga。
 nginx怎么关闭Apr 14, 2025 pm 01:00 PM
要关闭 Nginx 服务,请按以下步骤操作:确定安装类型:Red Hat/CentOS(systemctl status nginx)或 Debian/Ubuntu(service nginx status)停止服务:Red Hat/CentOS(systemctl stop nginx)或 Debian/Ubuntu(service nginx stop)禁用自动启动(可选):Red Hat/CentOS(systemctl disable nginx)或 Debian/Ubuntu(syst
 nginx在windows中怎么配置Apr 14, 2025 pm 12:57 PM
如何在 Windows 中配置 Nginx?安装 Nginx 并创建虚拟主机配置。修改主配置文件并包含虚拟主机配置。启动或重新加载 Nginx。测试配置并查看网站。选择性启用 SSL 并配置 SSL 证书。选择性设置防火墙允许 80 和 443 端口流量。
 nginx403错误怎么解决Apr 14, 2025 pm 12:54 PM
服务器无权访问所请求的资源,导致 nginx 403 错误。解决方法包括:检查文件权限。检查 .htaccess 配置。检查 nginx 配置。配置 SELinux 权限。检查防火墙规则。排除其他原因,如浏览器问题、服务器故障或其他可能的错误。
 linux怎么启动nginxApr 14, 2025 pm 12:51 PM
在 Linux 中启动 Nginx 的步骤:检查 Nginx 是否已安装。使用 systemctl start nginx 启动 Nginx 服务。使用 systemctl enable nginx 启用在系统启动时自动启动 Nginx。使用 systemctl status nginx 验证启动是否成功。在 Web 浏览器中访问 http://localhost 查看默认欢迎页面。
 linux怎么查看nginx是否启动Apr 14, 2025 pm 12:48 PM
在 Linux 中,使用以下命令检查 Nginx 是否已启动:systemctl status nginx根据命令输出进行判断:如果显示 "Active: active (running)",则 Nginx 已启动。如果显示 "Active: inactive (dead)",则 Nginx 已停止。


热AI工具

Undresser.AI Undress
人工智能驱动的应用程序,用于创建逼真的裸体照片

AI Clothes Remover
用于从照片中去除衣服的在线人工智能工具。

Undress AI Tool
免费脱衣服图片

Clothoff.io
AI脱衣机

AI Hentai Generator
免费生成ai无尽的。

热门文章
热工具

Dreamweaver CS6
视觉化网页开发工具

安全考试浏览器
Safe Exam Browser是一个安全的浏览器环境,用于安全地进行在线考试。该软件将任何计算机变成一个安全的工作站。它控制对任何实用工具的访问,并防止学生使用未经授权的资源。

SublimeText3 Linux新版
SublimeText3 Linux最新版

螳螂BT
Mantis是一个易于部署的基于Web的缺陷跟踪工具,用于帮助产品缺陷跟踪。它需要PHP、MySQL和一个Web服务器。请查看我们的演示和托管服务。

WebStorm Mac版
好用的JavaScript开发工具

