


导入最新的mp依赖是第一步不然太低的版本什么都做不了,3,1以下的好像连分页插件都没有加进去,所以我们用最新的3.5的,保证啥都有:
        <dependency>
            <groupId>com.baomidou</groupId>
            <artifactId>mybatis-plus-boot-starter</artifactId>
            <version>3.5.2</version>
        </dependency>
这里我们需要认识两个插件:mp的核心插件MybatisPlusInterceptor与自动分页插件PaginationInnerInterceptor。
MybatisPlusInterceptor的源码(去掉中间的处理代码):
public class MybatisPlusInterceptor implements Interceptor {
    private List<InnerInterceptor> interceptors = new ArrayList();
    public MybatisPlusInterceptor() {}
    public Object intercept(Invocation invocation) throws Throwable {}
    public Object plugin(Object target) {}
    public void addInnerInterceptor(InnerInterceptor innerInterceptor) {}
    public List<InnerInterceptor> getInterceptors() {}
    public void setProperties(Properties properties) {}
    public void setInterceptors(final List<InnerInterceptor> interceptors) {}
}
我们可以发现它有一个私有的属性列表 List94b487fab353486add32546ab8712bb3 而这个链表中的元素类型是InnerInterceptor。
InnerInterceptor源码:
public interface InnerInterceptor {
    default boolean willDoQuery(Executor executor, MappedStatement ms, Object parameter, RowBounds rowBounds, ResultHandler resultHandler, BoundSql boundSql) throws SQLException {
        return true;
    }
    default void beforeQuery(Executor executor, MappedStatement ms, Object parameter, RowBounds rowBounds, ResultHandler resultHandler, BoundSql boundSql) throws SQLException {
    }
    default boolean willDoUpdate(Executor executor, MappedStatement ms, Object parameter) throws SQLException {
        return true;
    }
    default void beforeUpdate(Executor executor, MappedStatement ms, Object parameter) throws SQLException {
    }
    default void beforePrepare(StatementHandler sh, Connection connection, Integer transactionTimeout) {
    }
    default void beforeGetBoundSql(StatementHandler sh) {
    }
    default void setProperties(Properties properties) {
    }
}
不难发现这个接口的内容大致就是设置默认的属性,从代码的意思上就是提供默认的数据库操作执行时期前后执行的一些逻辑,谁实现它的方法会得到新的功能?
再看看PaginationInnerInterceptor插件的源码:
public class PaginationInnerInterceptor implements InnerInterceptor {
    protected static final List<SelectItem> COUNT_SELECT_ITEM = Collections.singletonList((new SelectExpressionItem((new Column()).withColumnName("COUNT(*)"))).withAlias(new Alias("total")));
    protected static final Map<String, MappedStatement> countMsCache = new ConcurrentHashMap();
    protected final Log logger = LogFactory.getLog(this.getClass());
    protected boolean overflow;
    protected Long maxLimit;
    private DbType dbType;
    private IDialect dialect;
    protected boolean optimizeJoin = true;
    public PaginationInnerInterceptor(DbType dbType) {
        this.dbType = dbType;
    }
    public PaginationInnerInterceptor(IDialect dialect) {
        this.dialect = dialect;
    }
    public boolean willDoQuery(Executor executor, MappedStatement ms, Object parameter, RowBounds rowBounds, ResultHandler resultHandler, BoundSql boundSql) throws SQLException {
        IPage<?> page = (IPage)ParameterUtils.findPage(parameter).orElse((Object)null);
        if (page != null && page.getSize() >= 0L && page.searchCount()) {
            MappedStatement countMs = this.buildCountMappedStatement(ms, page.countId());
            BoundSql countSql;
            if (countMs != null) {
                countSql = countMs.getBoundSql(parameter);
            } else {
                countMs = this.buildAutoCountMappedStatement(ms);
                String countSqlStr = this.autoCountSql(page, boundSql.getSql());
                MPBoundSql mpBoundSql = PluginUtils.mpBoundSql(boundSql);
                countSql = new BoundSql(countMs.getConfiguration(), countSqlStr, mpBoundSql.parameterMappings(), parameter);
                PluginUtils.setAdditionalParameter(countSql, mpBoundSql.additionalParameters());
            }
            CacheKey cacheKey = executor.createCacheKey(countMs, parameter, rowBounds, countSql);
            List<Object> result = executor.query(countMs, parameter, rowBounds, resultHandler, cacheKey, countSql);
            long total = 0L;
            if (CollectionUtils.isNotEmpty(result)) {
                Object o = result.get(0);
                if (o != null) {
                    total = Long.parseLong(o.toString());
                }
            }
            page.setTotal(total);
            return this.continuePage(page);
        } else {
            return true;
        }
    }
    public void beforeQuery(Executor executor, MappedStatement ms, Object parameter, RowBounds rowBounds, ResultHandler resultHandler, BoundSql boundSql) throws SQLException {...........省略之后全部的内容........}
我们可以轻易地发现这个方法实现了InnerInterceptor接口中的方法,所以我们需要好好审查它的源代码来理清逻辑。
我们知道了分页插件和核心插件的关系,也就是我们可以将分页插件添加入核心插件内部的插件链表中去,从而实现多功能插件的使用。
配置mp插件,并将插件交由spring管理(我们用的是springboot进行测试所以不需要使用xml文件):
import com.baomidou.mybatisplus.annotation.DbType;
import com.baomidou.mybatisplus.extension.plugins.MybatisPlusInterceptor;
import com.baomidou.mybatisplus.extension.plugins.inner.PaginationInnerInterceptor;
import org.springframework.context.annotation.Bean;
import org.springframework.context.annotation.Configuration;
@Configuration
public class MpConfig {
    /*分页插件的配置*/
    @Bean
    public MybatisPlusInterceptor mybatisPlusInterceptor() {
        /*创建mp拦截器*/
        MybatisPlusInterceptor interceptor = new MybatisPlusInterceptor();
        /*创建分页插件*/
        PaginationInnerInterceptor pagInterceptor = new PaginationInnerInterceptor();
        /*设置请求的页面大于最大页容量后的请求操作,true回调第一页,false继续翻页,默认翻页*/
        pagInterceptor.setOverflow(false);
        /*设置单页分页的条数限制*/
        pagInterceptor.setMaxLimit(500L);
        /*设置数据库类型*/
        pagInterceptor.setDbType(DbType.MYSQL);
        /*将分页拦截器添加到mp拦截器中*/
        interceptor.addInnerInterceptor(pagInterceptor);
        return interceptor;
    }
}
配置完之后写一个Mapper接口:
import com.baomidou.mybatisplus.core.mapper.BaseMapper;
import com.hlc.mp.entity.Product;
import org.apache.ibatis.annotations.Mapper;
@Mapper
public interface ProductMapper extends BaseMapper<Product> {
}
为接口创建一个服务类(一定按照mp编码的风格来):
import com.baomidou.mybatisplus.core.conditions.query.QueryWrapper;
import com.baomidou.mybatisplus.extension.plugins.pagination.Page;
import com.baomidou.mybatisplus.extension.service.IService;
import com.baomidou.mybatisplus.extension.service.impl.ServiceImpl;
import com.hlc.mp.entity.Product;
import com.hlc.mp.mapper.ProductMapper;
import org.springframework.beans.factory.annotation.Autowired;
import org.springframework.stereotype.Service;
import java.util.List;
@Service(value = "ProductService")
public class ProductServiceImpl extends ServiceImpl<ProductMapper, Product>
        implements IService<Product> {
    @Autowired
    ProductMapper productMapper;
    /**
     * 根据传入的页码进行翻页
     *
     * @param current 当前页码(已经约定每页数据量是1条)
     * @return 分页对象
     */
    public Page<Product> page(Long current) {
        /*current首页位置,写1就是第一页,没有0页之说,size每页显示的数据量*/
        Page<Product> productPage = new Page<>(current, 1);
        /*条件查询分页*/
        QueryWrapper<Product> queryWrapper = new QueryWrapper<>();
        queryWrapper.eq("status", 0);
        productMapper.selectPage(productPage, queryWrapper);
        return productPage;
    }
}
到这里我们可以看到分页的具体方法就是,先创建一个分页对象,规定页码和每一页的数据量的大小,其次确定查询操作的范围,并使用BaseMapper8742468051c85b06f0a0af9e3e506b5c给予我们的查询分页方法selectPage(E page,Wapper8742468051c85b06f0a0af9e3e506b5c queryWapper)进行查询分页的操作。
测试类:
    @Test
    public void testPage(){
        IPage<Product> productIPage = productService.page(2L);
        productIPage.getRecords().forEach(System.out::println);
        System.out.println("当前页码"+productIPage.getCurrent());
        System.out.println("每页显示数量"+productIPage.getSize());
        System.out.println("总页数"+productIPage.getPages());
        System.out.println("数据总量"+productIPage.getTotal());
    }
运行查看分页结果:

我们可以发现都正常的按照我们传入的页码去查询对应的页数据了,因为我设置的每页只展示一条数据,所以ID如果对应页码就说明分页成功。
以上是SpringBoot MP简单的分页查询测试怎么实现的详细内容。更多信息请关注PHP中文网其他相关文章!

 Spring Boot怎么使用SSE方式向前端推送数据May 10, 2023 pm 05:31 PM
前言SSE简单的来说就是服务器主动向前端推送数据的一种技术,它是单向的,也就是说前端是不能向服务器发送数据的。SSE适用于消息推送,监控等只需要服务器推送数据的场景中,下面是使用SpringBoot来实现一个简单的模拟向前端推动进度数据,前端页面接受后展示进度条。服务端在SpringBoot中使用时需要注意,最好使用SpringWeb提供的SseEmitter这个类来进行操作,我在刚开始时使用网上说的将Content-Type设置为text-stream这种方式发现每次前端每次都会重新创建接。最
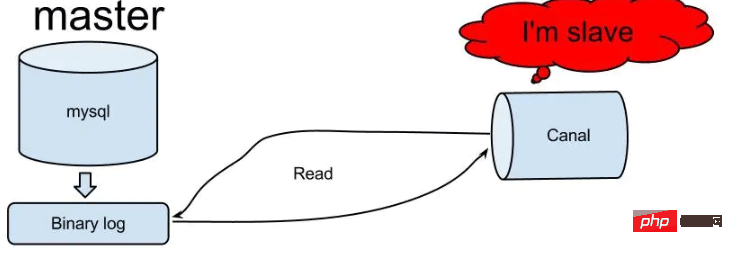 怎么使用SpringBoot+Canal实现数据库实时监控May 10, 2023 pm 06:25 PM
Canal工作原理Canal模拟MySQLslave的交互协议,伪装自己为MySQLslave,向MySQLmaster发送dump协议MySQLmaster收到dump请求,开始推送binarylog给slave(也就是Canal)Canal解析binarylog对象(原始为byte流)MySQL打开binlog模式在MySQL配置文件my.cnf设置如下信息:[mysqld]#打开binloglog-bin=mysql-bin#选择ROW(行)模式binlog-format=ROW#配置My
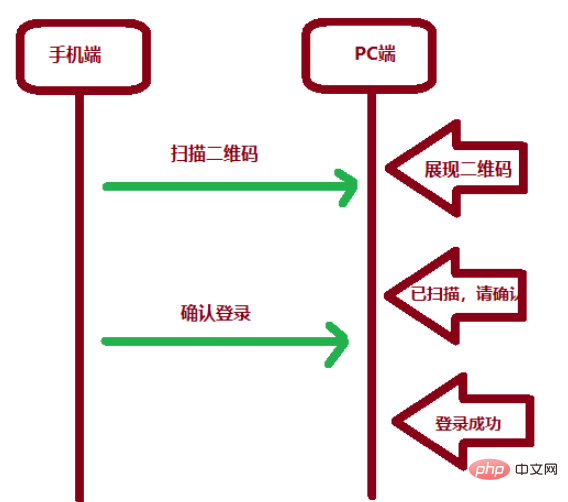 SpringBoot怎么实现二维码扫码登录May 10, 2023 pm 08:25 PM
一、手机扫二维码登录的原理二维码扫码登录是一种基于OAuth3.0协议的授权登录方式。在这种方式下,应用程序不需要获取用户的用户名和密码,只需要获取用户的授权即可。二维码扫码登录主要有以下几个步骤:应用程序生成一个二维码,并将该二维码展示给用户。用户使用扫码工具扫描该二维码,并在授权页面中授权。用户授权后,应用程序会获取一个授权码。应用程序使用该授权码向授权服务器请求访问令牌。授权服务器返回一个访问令牌给应用程序。应用程序使用该访问令牌访问资源服务器。通过以上步骤,二维码扫码登录可以实现用户的快
 SpringBoot/Spring AOP默认动态代理方式是什么May 10, 2023 pm 03:52 PM
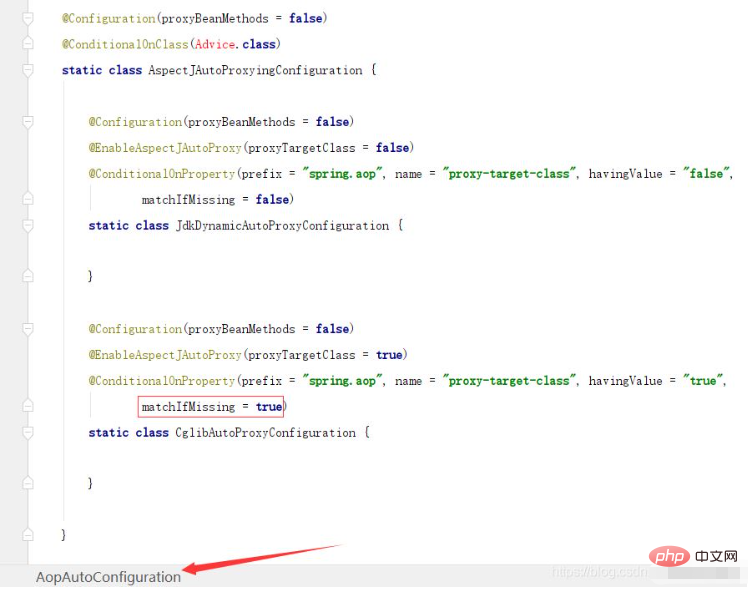
1.springboot2.x及以上版本在SpringBoot2.xAOP中会默认使用Cglib来实现,但是Spring5中默认还是使用jdk动态代理。SpringAOP默认使用JDK动态代理,如果对象没有实现接口,则使用CGLIB代理。当然,也可以强制使用CGLIB代理。在SpringBoot中,通过AopAutoConfiguration来自动装配AOP.2.Springboot1.xSpringboot1.xAOP默认还是使用JDK动态代理的3.SpringBoot2.x为何默认使用Cgl
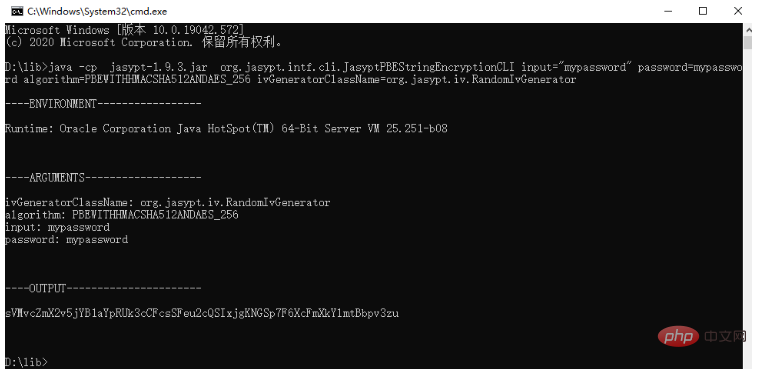 spring boot怎么对敏感信息进行加解密May 10, 2023 pm 02:46 PM
我们使用jasypt最新版本对敏感信息进行加解密。1.在项目pom文件中加入如下依赖:com.github.ulisesbocchiojasypt-spring-boot-starter3.0.32.创建加解密公用类:packagecom.myproject.common.utils;importorg.jasypt.encryption.pbe.PooledPBEStringEncryptor;importorg.jasypt.encryption.pbe.config.SimpleStrin
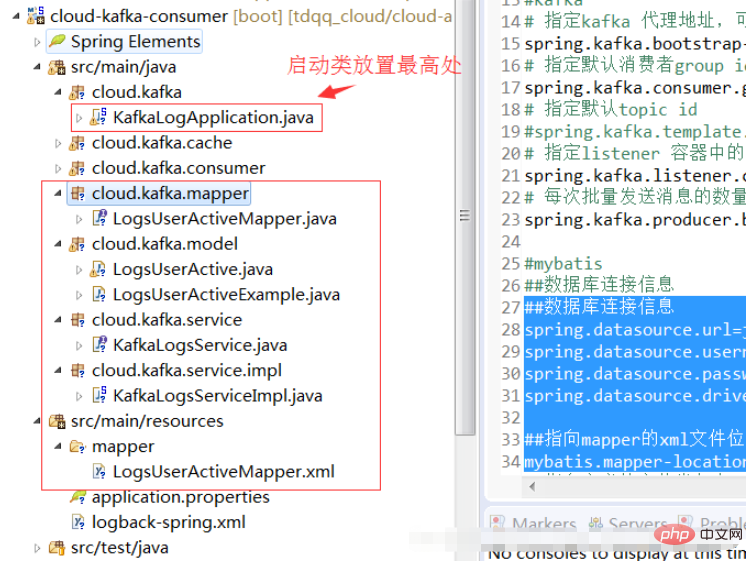 springboot怎么配置mybatis和事务管理May 10, 2023 pm 07:13 PM
一、springboot与mybatis的配置1.首先,springboot配置mybatis需要的全部依赖如下:org.springframework.bootspring-boot-starter-parent1.5.1.RELEASEorg.springframework.bootspring-boot-starter-web1.5.1.RELEASEorg.mybatis.spring.bootmybatis-spring-boot-starter1.2.0com.oracleojdbc
 使用Java SpringBoot集成POI实现Word文档导出Apr 21, 2023 pm 12:19 PM
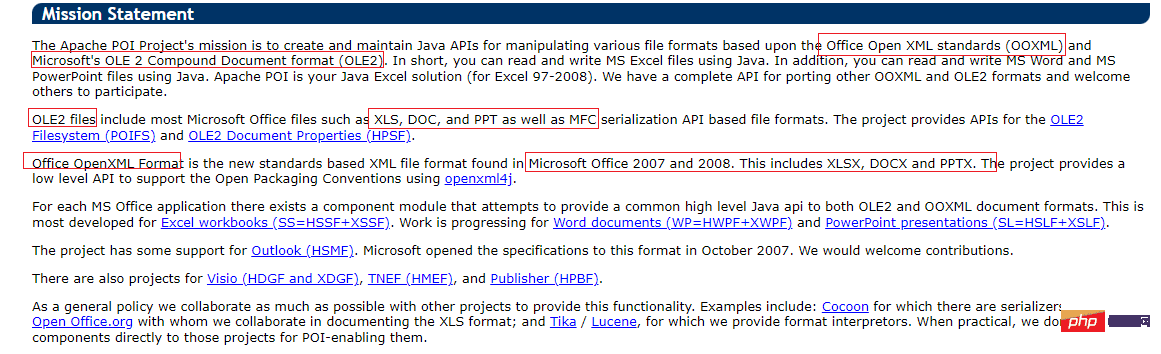
知识准备需要理解ApachePOI遵循的标准(OfficeOpenXML(OOXML)标准和微软的OLE2复合文档格式(OLE2)),这将对应着API的依赖包。什么是POIApachePOI是用Java编写的免费开源的跨平台的JavaAPI,ApachePOI提供API给Java程序对MicrosoftOffice格式档案读和写的功能。POI为“PoorObfuscationImplementation”的首字母缩写,意为“简洁版的模糊实现”。ApachePOI是创建和维护操作各种符合Offic
 springboot怎么整合shiro实现多验证登录功能May 10, 2023 pm 04:19 PM
1.首先新建一个shiroConfigshiro的配置类,代码如下:@ConfigurationpublicclassSpringShiroConfig{/***@paramrealms这儿使用接口集合是为了实现多验证登录时使用的*@return*/@BeanpublicSecurityManagersecurityManager(Collectionrealms){DefaultWebSecurityManagersManager=newDefaultWebSecurityManager();


热AI工具

Undresser.AI Undress
人工智能驱动的应用程序,用于创建逼真的裸体照片

AI Clothes Remover
用于从照片中去除衣服的在线人工智能工具。

Undress AI Tool
免费脱衣服图片

Clothoff.io
AI脱衣机

AI Hentai Generator
免费生成ai无尽的。

热门文章
热工具

适用于 Eclipse 的 SAP NetWeaver 服务器适配器
将Eclipse与SAP NetWeaver应用服务器集成。

ZendStudio 13.5.1 Mac
功能强大的PHP集成开发环境

螳螂BT
Mantis是一个易于部署的基于Web的缺陷跟踪工具,用于帮助产品缺陷跟踪。它需要PHP、MySQL和一个Web服务器。请查看我们的演示和托管服务。

安全考试浏览器
Safe Exam Browser是一个安全的浏览器环境,用于安全地进行在线考试。该软件将任何计算机变成一个安全的工作站。它控制对任何实用工具的访问,并防止学生使用未经授权的资源。

SublimeText3 Mac版
神级代码编辑软件(SublimeText3)

