


一、背景
在项目服务是集群部署的时候,代码在每个人都会有定时任务,但是如果让每个节点都去跑定时任务是不大合适的。SpringBoot 中的 ShedLock 可以很好解决这个问题,下面我将为大家详细介绍 SpringBoot 如何集成 ShedLock,而 ShedLock 又是如何实现分布式定时的。
二、ShedLock是什么
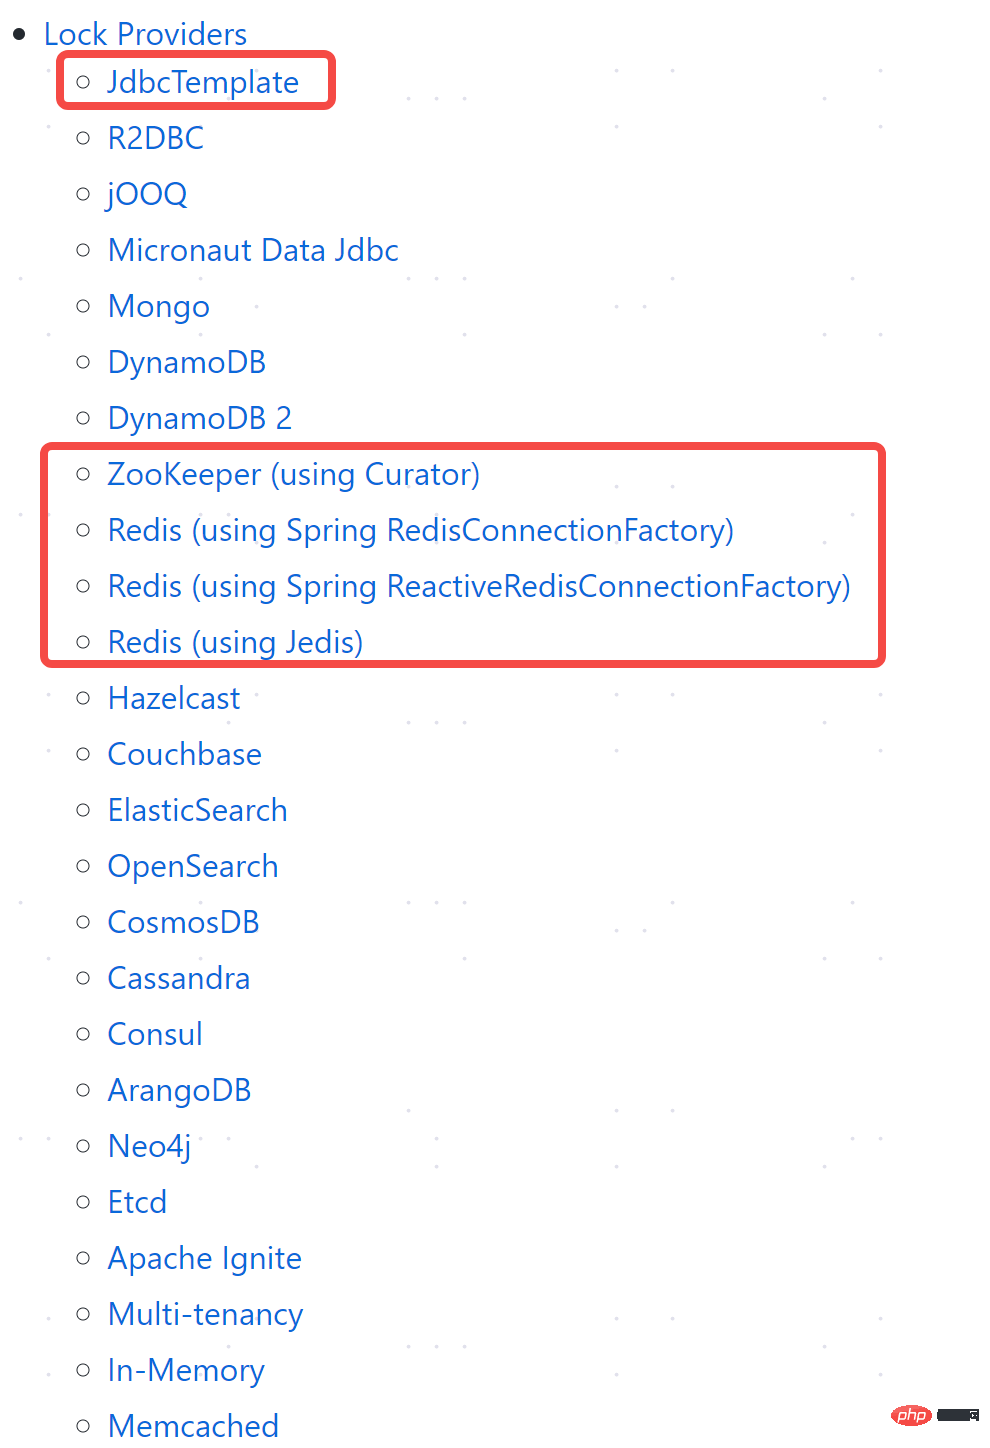
以下是ShedLock锁提供者,通过外部存储实现锁,由下图可知外部存储集成的库还是很丰富:
三、落地实现
1.1 引入依赖包
shedlock所需依赖包:
<!-- web工程依赖包 -->
<dependency>
<groupId>org.springframework.boot</groupId>
<artifactId>spring-boot-starter-web</artifactId>
</dependency>
<dependency>
<groupId>net.javacrumbs.shedlock</groupId>
<artifactId>shedlock-spring</artifactId>
<version>4.2.0</version>
</dependency>
<!--每个外部存储实例所需依赖包不一样,这里是jdbc-->
<dependency>
<groupId>net.javacrumbs.shedlock</groupId>
<artifactId>shedlock-provider-jdbc-template</artifactId>
<version>4.2.0</version>
</dependency>
<dependency>
<groupId>org.springframework.boot</groupId>
<artifactId>spring-boot-starter-jdbc</artifactId>
</dependency>
<dependency>
<groupId>mysql</groupId>
<artifactId>mysql-connector-java</artifactId>
<scope>runtime</scope>
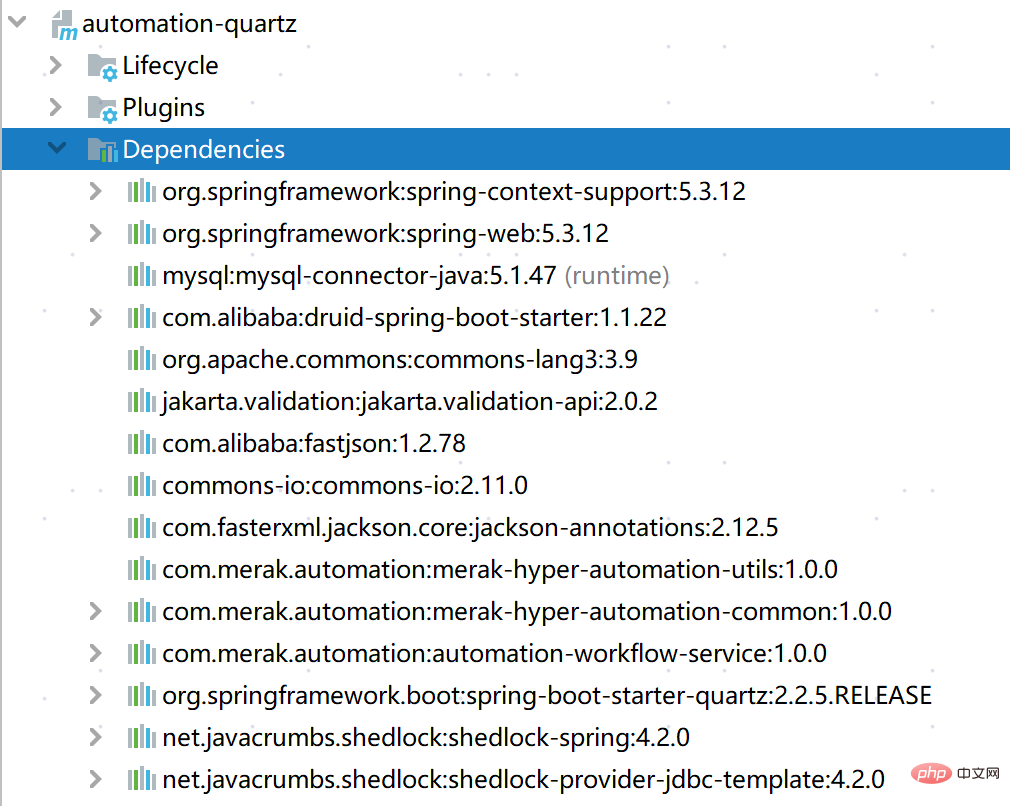
</dependency>依赖包树形图:
1.2 配置数据库连接信息
server:
port: 8105
spring:
datasource:
url: jdbc:mysql://127.0.0.1:3306/testjdbc?useUnicode=true&characterEncoding=UTF-8&serverTimezone=Asia/Shanghai
username: root
password: 123456
driver-class-name: com.mysql.cj.jdbc.Driver
type: com.mysql.cj.jdbc.MysqlDataSource
1.3 创建Mysql数据表
CREATE TABLE `shedlock` (
	`name`  varchar(64) NOT NULL COMMENT 'name' ,
	`lock_until`  timestamp(3) NULL DEFAULT NULL ,
	`locked_at`  timestamp(3) NULL DEFAULT NULL ,
	`locked_by`  varchar(255) NULL DEFAULT NULL ,
	PRIMARY KEY (`name`)
)
ENGINE=InnoDB
DEFAULT CHARACTER SET=utf8mb4 COLLATE=utf8mb4_0900_ai_ci
ROW_FORMAT=DYNAMIC
;
1.4 配置LockProvider
ShedLockConfig.java:
import net.javacrumbs.shedlock.core.LockProvider;
import net.javacrumbs.shedlock.provider.jdbctemplate.JdbcTemplateLockProvider;
import org.springframework.context.annotation.Bean;
import org.springframework.stereotype.Component;
import javax.annotation.Resource;
import javax.sql.DataSource;
/**
 * @description: Shedlock集成Jdbc配置类
 */
@Component
public class ShedLockConfig {
    @Resource
    private DataSource dataSource;
    @Bean
    private LockProvider lockProvider() {
        return new JdbcTemplateLockProvider(dataSource);
    }
}
springboot主启动类MerakQuartzApplication:
import net.javacrumbs.shedlock.spring.annotation.EnableSchedulerLock;
import org.mybatis.spring.annotation.MapperScan;
import org.slf4j.Logger;
import org.slf4j.LoggerFactory;
import org.springframework.boot.SpringApplication;
import org.springframework.boot.autoconfigure.SpringBootApplication;
import org.springframework.boot.autoconfigure.security.servlet.SecurityAutoConfiguration;
import org.springframework.context.annotation.Bean;
import org.springframework.scheduling.annotation.EnableAsync;
import org.springframework.scheduling.annotation.EnableScheduling;
import org.springframework.scheduling.concurrent.ThreadPoolTaskExecutor;
import org.springframework.scheduling.concurrent.ThreadPoolTaskScheduler;
import java.util.concurrent.Executor;
import java.util.concurrent.ThreadPoolExecutor;
/**
 * @version 1.0
 * @ClassName: MerakQuartzApplication
 * @description: 工单任务调度
 */
// 开启定时器
@EnableScheduling
// 开启定时任务锁,指定一个默认的锁的时间30秒
@EnableSchedulerLock(defaultLockAtMostFor = "PT30S")
@EnableAsync
@MapperScan(basePackages = {"com.merak.hyper.automation.persist.**.mapper"})
@SpringBootApplication(scanBasePackages = {"com.merak.hyper.automation.**"}, exclude = {SecurityAutoConfiguration.class})
public class MerakQuartzApplication {
    public static final Logger log = LoggerFactory.getLogger(MerakQuartzApplication.class);
    public static void main(String[] args) {
        SpringApplication.run(MerakQuartzApplication.class, args);
    }
    private int taskSchedulerCorePoolSize = 15;
    private int awaitTerminationSeconds = 60;
    private String threadNamePrefix = "taskExecutor-";
    /**
     * @description: 实例化ThreadPoolTaskScheduler对象,用于创建ScheduledFuture<?> scheduledFuture
     */
    @Bean
    public ThreadPoolTaskScheduler threadPoolTaskScheduler() {
        ThreadPoolTaskScheduler taskScheduler = new ThreadPoolTaskScheduler();
        taskScheduler.setPoolSize(taskSchedulerCorePoolSize);
        taskScheduler.setThreadNamePrefix(threadNamePrefix);
        taskScheduler.setWaitForTasksToCompleteOnShutdown(false);
        taskScheduler.setAwaitTerminationSeconds(awaitTerminationSeconds);
        /**需要实例化线程*/
        taskScheduler.initialize();
//        isinitialized = true;
        log.info("初始化ThreadPoolTaskScheduler ThreadNamePrefix=" + threadNamePrefix + ",PoolSize=" + taskSchedulerCorePoolSize
                + ",awaitTerminationSeconds=" + awaitTerminationSeconds);
        return taskScheduler;
    }
    /**
     * @description: 实例化ThreadPoolTaskExecutor对象,管理线程
     */
    @Bean("asyncTaskExecutor")
    public Executor taskExecutor() {
        ThreadPoolTaskExecutor taskExecutor = new ThreadPoolTaskExecutor();
        taskExecutor.setCorePoolSize(5);
        taskExecutor.setMaxPoolSize(50);
        taskExecutor.setQueueCapacity(200);
        taskExecutor.setKeepAliveSeconds(60);
        taskExecutor.setThreadNamePrefix("asyncTaskExecutor-");
        taskExecutor.setWaitForTasksToCompleteOnShutdown(true);
        taskExecutor.setAwaitTerminationSeconds(60);
        //修改拒绝策略为使用当前线程执行
        taskExecutor.setRejectedExecutionHandler(new ThreadPoolExecutor.CallerRunsPolicy());
        //初始化线程池
        taskExecutor.initialize();
        return taskExecutor;
    }
}
1.5 创建定时Job
DigitalEmpTask:
package com.merak.hyper.automation.quartz.task;
import net.javacrumbs.shedlock.spring.annotation.SchedulerLock;
import org.slf4j.Logger;
import org.slf4j.LoggerFactory;
import org.springframework.beans.factory.annotation.Autowired;
import org.springframework.beans.factory.annotation.Value;
import org.springframework.scheduling.annotation.Scheduled;
import org.springframework.stereotype.Component;
import java.util.List;
/**
 * @version 1.0
 * @ClassName: BizOrderTask
 * @description: 任务队列服务调度
 */
@Component
public class DigitalEmpTask {
    public static final Logger log = LoggerFactory.getLogger(DigitalEmpTask.class);
    @Scheduled(cron = "0/30 * * * * ?")
    @SchedulerLock(name = "digitalEmpTaskScheduler", lockAtMostFor = "PT25S", lockAtLeastFor = "PT25S")
    protected void digitalEmpTaskScheduler() {
        log.info("云执行调度中心1:任务开始执行,时间:" + DateUtils.dateTimeNow(DateUtils.YYYY_MM_DD_HH_MM_SS));
        try {
        } catch (Exception e) {
            log.error("云执行调度中心1调度失败,原因:" + e.getMessage());
        }
    }
}
四、结果分析
1.分别启动两个服务节点,配置如下:
server:
port: 12105
servlet:
context-path: /automation-quartz-oneserver:
port: 12106
servlet:
context-path: /automation-quartz-two
2.运行日志(片断)
节点automation-quartz-one 运行日志:
2023-02-22 12:01:00.143 [taskExecutor-1] INFO 3291e31073b86dfb7a16301aacbf208d - 云执行调度中心1:任务开始执行,时间:2023-02-22 12:01:00
2023-02-22 12:05:00.114 [taskExecutor-3] INFO 3291e31073b86dfb7a16301aacbf208d - 云执行调度中心1:任务开始执行,时间:2023-02-22 12:05:00
2023-02-22 12:05:30.122 [taskExecutor-6] INFO 3291e31073b86dfb7a16301aacbf208d - 云执行调度中心1:任务开始执行,时间:2023-02-22 12:05:30
2023-02-22 12:19:30.110 [taskExecutor-3] INFO 3291e31073b86dfb7a16301aacbf208d - 云执行调度中心1:任务开始执行,时间:2023-02-22 12:19:30节点automation-quartz-two运行日志:
2023-02-22 12:01:30.109 [taskExecutor-3] INFO 3291e31073b86dfb7a16301aacbf208d - 云执行调度中心1:任务开始执行,时间:2023-02-22 12:01:30
2023-02-22 12:02:00.101 [taskExecutor-1] INFO 3291e31073b86dfb7a16301aacbf208d - 云执行调度中心1:任务开始执行,时间:2023-02-22 12:02:00
2023-02-22 12:02:30.105 [taskExecutor-2] INFO 3291e31073b86dfb7a16301aacbf208d - 云执行调度中心1:任务开始执行,时间:2023-02-22 12:02:30
2023-02-22 12:03:00.118 [taskExecutor-3] INFO 3291e31073b86dfb7a16301aacbf208d - 云执行调度中心1:任务开始执行,时间:2023-02-22 12:03:00
2023-02-22 12:03:30.101 [taskExecutor-4] INFO 3291e31073b86dfb7a16301aacbf208d - 云执行调度中心1:任务开始执行,时间:2023-02-22 12:03:30
2023-02-22 12:04:00.110 [taskExecutor-1] INFO 3291e31073b86dfb7a16301aacbf208d - 云执行调度中心1:任务开始执行,时间:2023-02-22 12:04:00
2023-02-22 12:04:30.111 [taskExecutor-5] INFO 3291e31073b86dfb7a16301aacbf208d - 云执行调度中心1:任务开始执行,时间:2023-02-22 12:04:30
2023-02-22 12:06:00.114 [taskExecutor-13] INFO 3291e31073b86dfb7a16301aacbf208d - 云执行调度中心1:任务开始执行,时间:2023-02-22 12:06:00
2023-02-22 12:06:30.108 [taskExecutor-14] INFO 3291e31073b86dfb7a16301aacbf208d - 云执行调度中心1:任务开始执行,时间:2023-02-22 12:06:30
2023-02-22 12:07:00.114 [taskExecutor-15] INFO 3291e31073b86dfb7a16301aacbf208d - 云执行调度中心1:任务开始执行,时间:2023-02-22 12:07:00
2023-02-22 12:07:30.115 [taskExecutor-1] INFO 3291e31073b86dfb7a16301aacbf208d - 云执行调度中心1:任务开始执行,时间:2023-02-22 12:07:30
2023-02-22 12:08:00.102 [taskExecutor-5] INFO 3291e31073b86dfb7a16301aacbf208d - 云执行调度中心1:任务开始执行,时间:2023-02-22 12:08:00
2023-02-22 12:08:30.103 [taskExecutor-11] INFO 3291e31073b86dfb7a16301aacbf208d - 云执行调度中心1:任务开始执行,时间:2023-02-22 12:08:30
2023-02-22 12:09:00.099 [taskExecutor-6] INFO 3291e31073b86dfb7a16301aacbf208d - 云执行调度中心1:任务开始执行,时间:2023-02-22 12:09:00
2023-02-22 12:09:30.113 [taskExecutor-3] INFO 3291e31073b86dfb7a16301aacbf208d - 云执行调度中心1:任务开始执行,时间:2023-02-22 12:09:30
2023-02-22 12:10:00.107 [taskExecutor-7] INFO 3291e31073b86dfb7a16301aacbf208d - 云执行调度中心1:任务开始执行,时间:2023-02-22 12:10:00
2023-02-22 12:10:30.110 [taskExecutor-15] INFO 3291e31073b86dfb7a16301aacbf208d - 云执行调度中心1:任务开始执行,时间:2023-02-22 12:10:30
2023-02-22 12:11:00.111 [taskExecutor-1] INFO 3291e31073b86dfb7a16301aacbf208d - 云执行调度中心1:任务开始执行,时间:2023-02-22 12:11:00
2023-02-22 12:11:30.100 [taskExecutor-5] INFO 3291e31073b86dfb7a16301aacbf208d - 云执行调度中心1:任务开始执行,时间:2023-02-22 12:11:30
2023-02-22 12:12:00.112 [taskExecutor-11] INFO 3291e31073b86dfb7a16301aacbf208d - 云执行调度中心1:任务开始执行,时间:2023-02-22 12:12:00
2023-02-22 12:12:30.102 [taskExecutor-6] INFO 3291e31073b86dfb7a16301aacbf208d - 云执行调度中心1:任务开始执行,时间:2023-02-22 12:12:30
2023-02-22 12:13:00.097 [taskExecutor-3] INFO 3291e31073b86dfb7a16301aacbf208d - 云执行调度中心1:任务开始执行,时间:2023-02-22 12:13:00
2023-02-22 12:13:30.107 [taskExecutor-14] INFO 3291e31073b86dfb7a16301aacbf208d - 云执行调度中心1:任务开始执行,时间:2023-02-22 12:13:30
2023-02-22 12:14:00.111 [taskExecutor-4] INFO 3291e31073b86dfb7a16301aacbf208d - 云执行调度中心1:任务开始执行,时间:2023-02-22 12:14:00
2023-02-22 12:14:30.106 [taskExecutor-8] INFO 3291e31073b86dfb7a16301aacbf208d - 云执行调度中心1:任务开始执行,时间:2023-02-22 12:14:30
2023-02-22 12:15:00.095 [taskExecutor-9] INFO 3291e31073b86dfb7a16301aacbf208d - 云执行调度中心1:任务开始执行,时间:2023-02-22 12:15:00
2023-02-22 12:15:30.101 [taskExecutor-10] INFO 3291e31073b86dfb7a16301aacbf208d - 云执行调度中心1:任务开始执行,时间:2023-02-22 12:15:30
2023-02-22 12:16:00.105 [taskExecutor-2] INFO 3291e31073b86dfb7a16301aacbf208d - 云执行调度中心1:任务开始执行,时间:2023-02-22 12:16:00
2023-02-22 12:16:30.130 [taskExecutor-12] INFO 3291e31073b86dfb7a16301aacbf208d - 云执行调度中心1:任务开始执行,时间:2023-02-22 12:16:30
2023-02-22 12:17:00.107 [taskExecutor-13] INFO 3291e31073b86dfb7a16301aacbf208d - 云执行调度中心1:任务开始执行,时间:2023-02-22 12:17:00
2023-02-22 12:17:30.113 [taskExecutor-7] INFO 3291e31073b86dfb7a16301aacbf208d - 云执行调度中心1:任务开始执行,时间:2023-02-22 12:17:30
2023-02-22 12:18:00.104 [taskExecutor-15] INFO 3291e31073b86dfb7a16301aacbf208d - 云执行调度中心1:任务开始执行,时间:2023-02-22 12:18:00
2023-02-22 12:18:30.112 [taskExecutor-1] INFO 3291e31073b86dfb7a16301aacbf208d - 云执行调度中心1:任务开始执行,时间:2023-02-22 12:18:30
2023-02-22 12:19:00.103 [taskExecutor-5] INFO 3291e31073b86dfb7a16301aacbf208d - 云执行调度中心1:任务开始执行,时间:2023-02-22 12:19:00
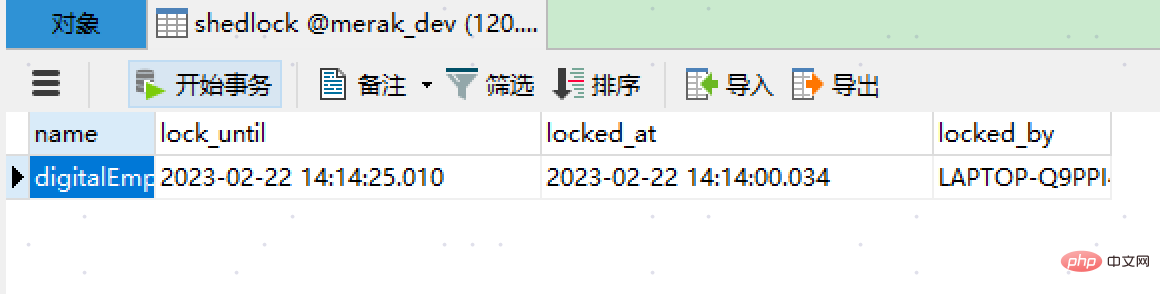
3、shedlock表记录信息:
以上是SpringBoot怎么集成ShedLock实现分布式定时任务的详细内容。更多信息请关注PHP中文网其他相关文章!

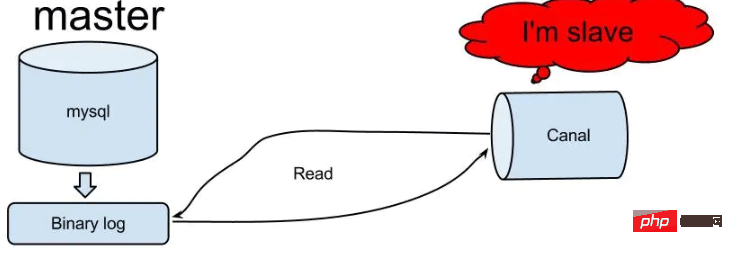 怎么使用SpringBoot+Canal实现数据库实时监控May 10, 2023 pm 06:25 PM
Canal工作原理Canal模拟MySQLslave的交互协议,伪装自己为MySQLslave,向MySQLmaster发送dump协议MySQLmaster收到dump请求,开始推送binarylog给slave(也就是Canal)Canal解析binarylog对象(原始为byte流)MySQL打开binlog模式在MySQL配置文件my.cnf设置如下信息:[mysqld]#打开binloglog-bin=mysql-bin#选择ROW(行)模式binlog-format=ROW#配置My
 Spring Boot怎么使用SSE方式向前端推送数据May 10, 2023 pm 05:31 PM
前言SSE简单的来说就是服务器主动向前端推送数据的一种技术,它是单向的,也就是说前端是不能向服务器发送数据的。SSE适用于消息推送,监控等只需要服务器推送数据的场景中,下面是使用SpringBoot来实现一个简单的模拟向前端推动进度数据,前端页面接受后展示进度条。服务端在SpringBoot中使用时需要注意,最好使用SpringWeb提供的SseEmitter这个类来进行操作,我在刚开始时使用网上说的将Content-Type设置为text-stream这种方式发现每次前端每次都会重新创建接。最
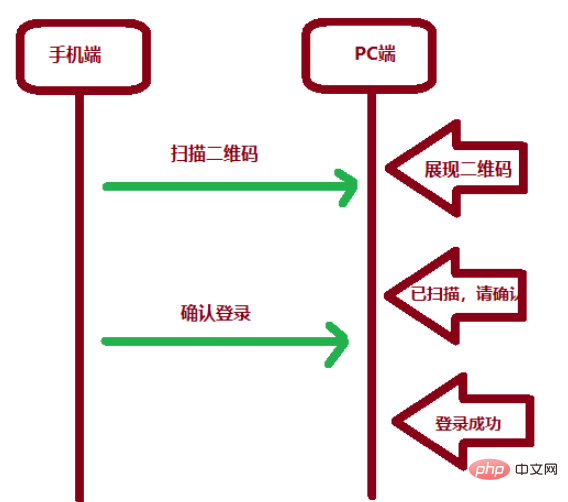 SpringBoot怎么实现二维码扫码登录May 10, 2023 pm 08:25 PM
一、手机扫二维码登录的原理二维码扫码登录是一种基于OAuth3.0协议的授权登录方式。在这种方式下,应用程序不需要获取用户的用户名和密码,只需要获取用户的授权即可。二维码扫码登录主要有以下几个步骤:应用程序生成一个二维码,并将该二维码展示给用户。用户使用扫码工具扫描该二维码,并在授权页面中授权。用户授权后,应用程序会获取一个授权码。应用程序使用该授权码向授权服务器请求访问令牌。授权服务器返回一个访问令牌给应用程序。应用程序使用该访问令牌访问资源服务器。通过以上步骤,二维码扫码登录可以实现用户的快
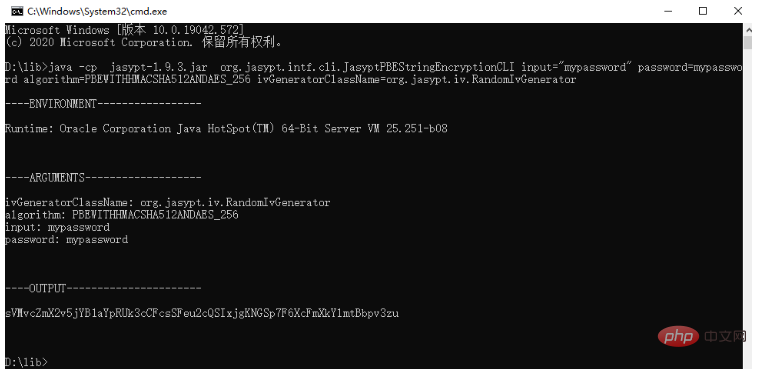 spring boot怎么对敏感信息进行加解密May 10, 2023 pm 02:46 PM
我们使用jasypt最新版本对敏感信息进行加解密。1.在项目pom文件中加入如下依赖:com.github.ulisesbocchiojasypt-spring-boot-starter3.0.32.创建加解密公用类:packagecom.myproject.common.utils;importorg.jasypt.encryption.pbe.PooledPBEStringEncryptor;importorg.jasypt.encryption.pbe.config.SimpleStrin
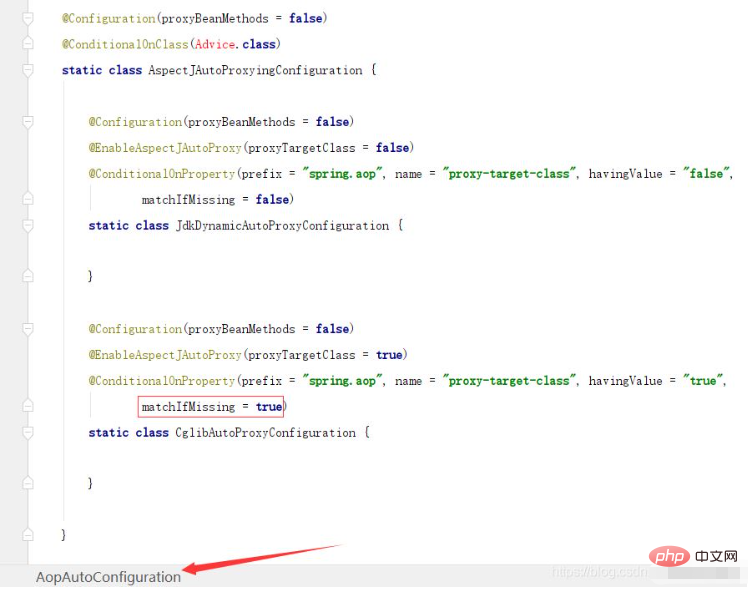 SpringBoot/Spring AOP默认动态代理方式是什么May 10, 2023 pm 03:52 PM
1.springboot2.x及以上版本在SpringBoot2.xAOP中会默认使用Cglib来实现,但是Spring5中默认还是使用jdk动态代理。SpringAOP默认使用JDK动态代理,如果对象没有实现接口,则使用CGLIB代理。当然,也可以强制使用CGLIB代理。在SpringBoot中,通过AopAutoConfiguration来自动装配AOP.2.Springboot1.xSpringboot1.xAOP默认还是使用JDK动态代理的3.SpringBoot2.x为何默认使用Cgl
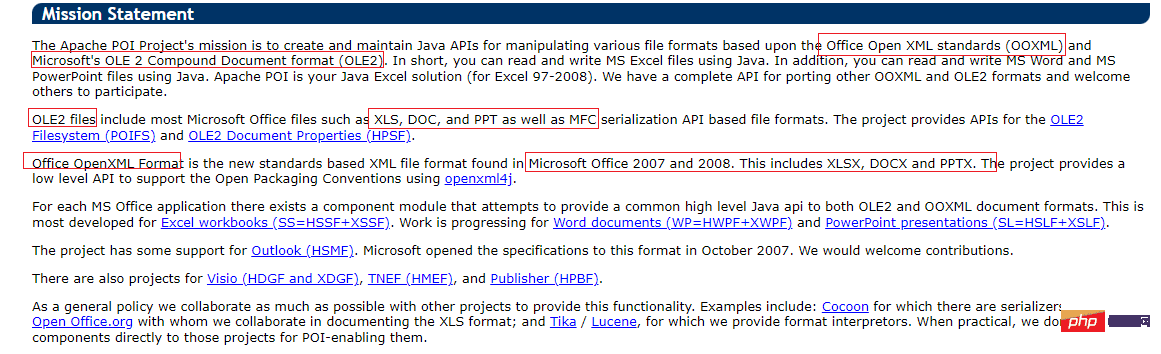 使用Java SpringBoot集成POI实现Word文档导出Apr 21, 2023 pm 12:19 PM
知识准备需要理解ApachePOI遵循的标准(OfficeOpenXML(OOXML)标准和微软的OLE2复合文档格式(OLE2)),这将对应着API的依赖包。什么是POIApachePOI是用Java编写的免费开源的跨平台的JavaAPI,ApachePOI提供API给Java程序对MicrosoftOffice格式档案读和写的功能。POI为“PoorObfuscationImplementation”的首字母缩写,意为“简洁版的模糊实现”。ApachePOI是创建和维护操作各种符合Offic
 springboot怎么整合shiro实现多验证登录功能May 10, 2023 pm 04:19 PM
1.首先新建一个shiroConfigshiro的配置类,代码如下:@ConfigurationpublicclassSpringShiroConfig{/***@paramrealms这儿使用接口集合是为了实现多验证登录时使用的*@return*/@BeanpublicSecurityManagersecurityManager(Collectionrealms){DefaultWebSecurityManagersManager=newDefaultWebSecurityManager();
 Springboot如何实现视频上传及压缩功能May 10, 2023 pm 05:16 PM
一、定义视频上传请求接口publicAjaxResultvideoUploadFile(MultipartFilefile){try{if(null==file||file.isEmpty()){returnAjaxResult.error("文件为空");}StringossFilePrefix=StringUtils.genUUID();StringfileName=ossFilePrefix+"-"+file.getOriginalFilename(


热AI工具

Undresser.AI Undress
人工智能驱动的应用程序,用于创建逼真的裸体照片

AI Clothes Remover
用于从照片中去除衣服的在线人工智能工具。

Undress AI Tool
免费脱衣服图片

Clothoff.io
AI脱衣机

AI Hentai Generator
免费生成ai无尽的。

热门文章
热工具

SublimeText3汉化版
中文版,非常好用

SublimeText3 Mac版
神级代码编辑软件(SublimeText3)

螳螂BT
Mantis是一个易于部署的基于Web的缺陷跟踪工具,用于帮助产品缺陷跟踪。它需要PHP、MySQL和一个Web服务器。请查看我们的演示和托管服务。

Dreamweaver CS6
视觉化网页开发工具

DVWA
Damn Vulnerable Web App (DVWA) 是一个PHP/MySQL的Web应用程序,非常容易受到攻击。它的主要目标是成为安全专业人员在合法环境中测试自己的技能和工具的辅助工具,帮助Web开发人员更好地理解保护Web应用程序的过程,并帮助教师/学生在课堂环境中教授/学习Web应用程序安全。DVWA的目标是通过简单直接的界面练习一些最常见的Web漏洞,难度各不相同。请注意,该软件中

