


1、安装路由
npm i vue-router
2、编写需要展示的路由
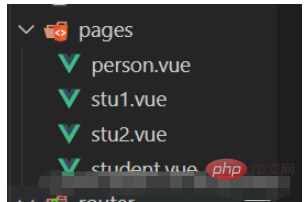
在src目录下创建pages文件夹,里面创建两个vue文件命名为student.vue,person.vue
分别编写两个vue文件
student.vue和person.vue
<template>
    学生
</template>

<script setup>

</script>

<style scoped lang="less">

</style>
<template> 人类 </template> <script setup> </script> <style scoped lang="less"> </style>
3、配置路由
在src目录下配置router.js文件
import { createRouter,createWebHistory } from "vue-router";
const router=createRouter({
    history:createWebHistory(),
    routes:[
        {
            component:()=>import('../pages/person.vue'),
            name:'person',
            path:'/person'
        },
        {
            component:()=>import('../pages/student.vue'),
            name:'student',
            path:'/student'
        },
        {
            //实现路由重定向,当进入网页时,路由自动跳转到/student路由
            redirect:'/student',
            path:'/'
        }
    ]
})
export default router
3、使用路由
在main.js中使用路由
import { createApp } from 'vue'
import App from './App.vue'
import router from './router'

createApp(App).use(router).mount('#app')
在app.vue中进行路由展示,使用router-link进行路由跳转,to代表跳转到哪个路由
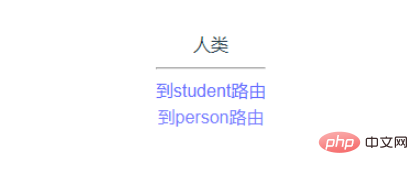
<template>
  <router-view></router-view>
  <hr>
  <div>
    <router-link to="/student">到student路由</router-link>
    <br>
    <router-link to="/person">到person路由</router-link>
  </div>
</template>

<script setup>

</script>
<style scoped>

</style>
效果如下图所示,点击(到student路由)或(到person路由)会进行路由跳转
4、編程式路由
声明式路由通过router-link进行路由跳转,編程式路由通过函数实现
修改app.vue,vue3使用的是组合式API,需要引入
要引入useRouter,useRoute,还要
const router=useRouter()
const route=useRoute()
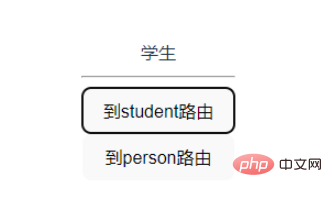
<template>
<router-view></router-view>
<hr>
<div>
<button @click="toStudent">到student路由</button>
<br>
<button @click="toPerson">到person路由</button>
</div>
</template>
<script setup>
import {useRouter,useRoute} from 'vue-router'
const router=useRouter()
const route=useRoute()
const toStudent=()=>{
router.push('student')
}
const toPerson=()=>{
router.push('person')
}
</script>
<style scoped>
</style>通过router.push进行路由跳转
路由之间用router路由器,当前路由使用toute路由
结果如下图所示,实现編程式路由跳转
如果在配置路由时没有设置别名,需要通过router.push配置对象进行跳转
const toStudent=()=>{
  router.push({
    path:'/student'
  })
}
const toPerson=()=>{
  router.push({
    path:'/person'
  })
}
5、路由传参
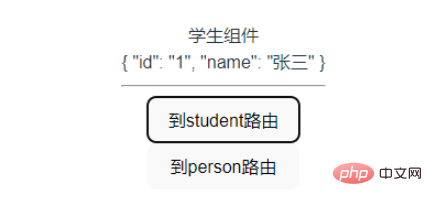
5、1query参数传递
向student路由传递id,name
const toStudent=()=>{
  router.push({
    path:'/student',
    query:{
      id:1,
      name:'张三'
    }
  })
}
student路由接收query参数
<template>
学生组件
<div>{{data.query}}</div>
</template>
<script setup>
import { reactive } from 'vue';
import {useRouter,useRoute} from 'vue-router'
const route=useRoute()
let data=reactive({
query: route.query
})
</script>效果如下图所示
5、2传递params参数
假设向person路由传递params参数,要在路由配置时进行修改
params传参需要使用name进行指定路由
const toPerson=()=>{
  router.push({
    name:'person',
    params:{
      keyword:2
    }
  })
}
同时在路由配置需要修改,假设传递的是keyword,
需要在path使用占位符加关键字
?表示可传可不传
{
component:()=>import('../pages/person.vue'),
name:'person',
path:'/person/:keyword?'
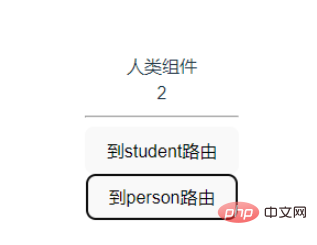
},在person.vue中接收params参数
<template>
人类组件
<div>{{data.params.keyword}}</div>
</template>
<script setup>
import { reactive } from 'vue';
import {useRouter,useRoute} from 'vue-router'
const route=useRoute()
let data=reactive({
params: route.params
})
</script>效果如下所示
6、子路由配置
给student路由添加子组件(stu1,stu2组件)
子组件的path不带 /
{
            component:()=>import('../pages/student.vue'),
            name:'student',
            path:'/student',
            children:[
                {
                    path:'stu1',
                    name:'stu1',
                    component:()=>import('../pages/stu1.vue')
                },
                {
                    path:'stu2',
                    name:'stu2',
                    component:()=>import('../pages/stu2.vue')
                },
                {
                    path:'',
                    component:()=>import('../pages/stu1.vue')
                }
            ]
        }
编写stu1组件
<template>
stu1
</template>

<script setup>

</script>

<style scoped lang="less">

</style>
编写stu2组件
<template>
stu2
</template>

<script setup>

</script>

<style scoped lang="less">

</style>
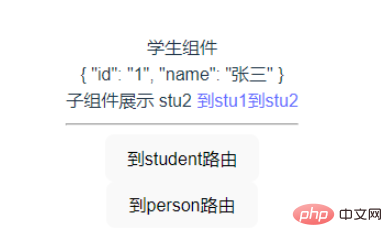
在student组件进行子组件展示
<template>
学生组件
<div>{{data.query}}</div>
子组件展示
<router-view></router-view>
<router-link to="/student/stu1">到stu1</router-link>
<router-link to="/student/stu2">到stu2</router-link>
</template>
<script setup>
import { reactive } from 'vue';
import {useRouter,useRoute} from 'vue-router'
const route=useRoute()
let data=reactive({
query: route.query
})
</script>通过使用router-link进行路由跳转,也可以通过編程式路由跳转
to="/student/stu1" 需要使用完整路径进行跳转
效果展示
以上是如何配置Vue3的路由和进行路由跳转并传递参数?的详细内容。更多信息请关注PHP中文网其他相关文章!

 React与Vue:Netflix使用哪个框架?Apr 14, 2025 am 12:19 AM
NetflixusesAcustomFrameworkcalled“ Gibbon” BuiltonReact,notReactorVueDirectly.1)TeamExperience:selectBasedAsedonFamiliarity.2)ProjectComplexity:vueforsimplerprojects,vueforsimplerprojects,reactforforforecomplexones.3)cocatizationNeedsneeds:reactofficatizationneedneeds:reactofferizationneedneedneedneeds:reactoffersizatization needeffersefersmoreflexiblesimore.4)ecosyaka
 框架的选择:是什么推动了Netflix的决定?Apr 13, 2025 am 12:05 AM
Netflix在框架选择上主要考虑性能、可扩展性、开发效率、生态系统、技术债务和维护成本。1.性能与可扩展性:选择Java和SpringBoot以高效处理海量数据和高并发请求。2.开发效率与生态系统:使用React提升前端开发效率,利用其丰富的生态系统。3.技术债务与维护成本:选择Node.js构建微服务,降低维护成本和技术债务。
 反应,vue和Netflix前端的未来Apr 12, 2025 am 12:12 AM
Netflix主要使用React作为前端框架,辅以Vue用于特定功能。1)React的组件化和虚拟DOM提升了Netflix应用的性能和开发效率。2)Vue在Netflix的内部工具和小型项目中应用,其灵活性和易用性是关键。
 前端中的vue.js:现实世界的应用程序和示例Apr 11, 2025 am 12:12 AM
Vue.js是一种渐进式JavaScript框架,适用于构建复杂的用户界面。1)其核心概念包括响应式数据、组件化和虚拟DOM。2)实际应用中,可以通过构建Todo应用和集成VueRouter来展示其功能。3)调试时,建议使用VueDevtools和console.log。4)性能优化可通过v-if/v-show、列表渲染优化和异步加载组件等实现。
 vue.js和React:了解关键差异Apr 10, 2025 am 09:26 AM
Vue.js适合小型到中型项目,而React更适用于大型、复杂应用。1.Vue.js的响应式系统通过依赖追踪自动更新DOM,易于管理数据变化。2.React采用单向数据流,数据从父组件流向子组件,提供明确的数据流向和易于调试的结构。
 vue.js vs.反应:特定于项目的考虑因素Apr 09, 2025 am 12:01 AM
Vue.js适合中小型项目和快速迭代,React适用于大型复杂应用。1)Vue.js易于上手,适用于团队经验不足或项目规模较小的情况。2)React的生态系统更丰富,适合有高性能需求和复杂功能需求的项目。
 vue怎么a标签跳转Apr 08, 2025 am 09:24 AM
实现 Vue 中 a 标签跳转的方法包括:HTML 模板中使用 a 标签指定 href 属性。使用 Vue 路由的 router-link 组件。使用 JavaScript 的 this.$router.push() 方法。可通过 query 参数传递参数,并在 router 选项中配置路由以进行动态跳转。
 vue怎么实现组件跳转Apr 08, 2025 am 09:21 AM
Vue 中实现组件跳转有以下方法:使用 router-link 和 <router-view> 组件进行超链接跳转,指定 :to 属性为目标路径。直接使用 <router-view> 组件显示当前路由渲染的组件。使用 router.push() 和 router.replace() 方法进行程序化导航,前者保存历史记录,后者替换当前路由不留记录。


热AI工具

Undresser.AI Undress
人工智能驱动的应用程序,用于创建逼真的裸体照片

AI Clothes Remover
用于从照片中去除衣服的在线人工智能工具。

Undress AI Tool
免费脱衣服图片

Clothoff.io
AI脱衣机

AI Hentai Generator
免费生成ai无尽的。

热门文章
热工具

Dreamweaver CS6
视觉化网页开发工具

VSCode Windows 64位 下载
微软推出的免费、功能强大的一款IDE编辑器

Dreamweaver Mac版
视觉化网页开发工具

MinGW - 适用于 Windows 的极简 GNU
这个项目正在迁移到osdn.net/projects/mingw的过程中,你可以继续在那里关注我们。MinGW:GNU编译器集合(GCC)的本地Windows移植版本,可自由分发的导入库和用于构建本地Windows应用程序的头文件;包括对MSVC运行时的扩展,以支持C99功能。MinGW的所有软件都可以在64位Windows平台上运行。

适用于 Eclipse 的 SAP NetWeaver 服务器适配器
将Eclipse与SAP NetWeaver应用服务器集成。

