Java中线程组(ThreadGroup类)
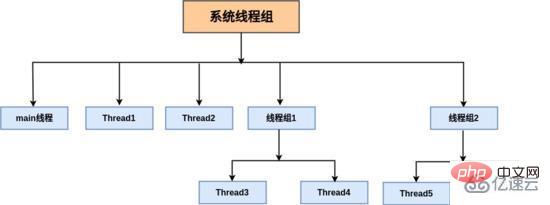
Java中使用ThreadGroup类来代表线程组,表示一组线程的集合,可以对一批线程和线程组进行管理。可以把线程归属到某一个线程组中,线程组中可以有线程对象,也可以有线程组,组中还可以有线程,这样的组织结构有点类似于树的形式,如图所示。

用户创建的所有线程都属于指定线程组,如果没有显式指定属于哪个线程组,那么该线程就属于默认线程组(即main线程组)。默认情况下,子线程和父线程处于同一个线程组。
此外,只有在创建线程时才能指定其所在的线程组,线程运行中途不能改变它所属的线程组,也就是说线程一旦指定所在的线程组就不能改变。
二.为什么要使用线程组
1.安全
同一个线程组的线程是可以相互修改对方的数据的。但如果在不同的线程组中,那么就不能“跨线程组”修改数据,可以从一定程度上保证数据安全。
2.批量管理
可以批量管理线程或线程组对象,有效地对线程或线程组对象进行组织或控制。
三.线程组使用示例
1.线程关联线程组:一级关联
所谓一级关联就是父对象中有子对象,但并不创建孙对象。比如创建一个线程组,然后将创建的线程归属到该组中,从而对这些线程进行有效的管理。代码示例如下:
public class ThreadGroupTest {
 public static void main(String[] args) {
 ThreadGroup rootThreadGroup = new ThreadGroup("root线程组");
 Thread thread0 = new Thread(rootThreadGroup, new MRunnable(), "线程A");
 Thread thread1 = new Thread(rootThreadGroup, new MRunnable(), "线程B");
 thread0.start();
 thread1.start();
 }
}
class MRunnable implements Runnable {
 @Override
 public void run() {
 while (!Thread.currentThread().isInterrupted()) {
 System.out.println("线程名: " + Thread.currentThread().getName()
+ ", 所在线程组: " + Thread.currentThread().getThreadGroup().getName()) ;
 try {
 Thread.sleep(1000);
 } catch (InterruptedException e) {
 e.printStackTrace();
 }
 }
 }
}
复制代码
执行结果如下:
线程名: 线程A, 所在线程组: root线程组
线程名: 线程B, 所在线程组: root线程组
复制代码
2.线程关联线程组:多级关联
所谓的多级关联就是父对象中有子对象,子对象中再创建孙对象也就出现了子孙的效果了。比如使用下图第二个构造方法,将子线程组归属到某个线程组,再将创建的线程归属到子线程组,这样就会有线程树的效果了。

代码示例如下:
public class ThreadGroupTest {
 public static void main(String[] args) {
 ThreadGroup rootThreadGroup = new ThreadGroup("root线程组");
 Thread thread0 = new Thread(rootThreadGroup, new MRunnable(), "线程A");
 Thread thread1 = new Thread(rootThreadGroup, new MRunnable(), "线程B");
 thread0.start();
 thread1.start();
 ThreadGroup threadGroup1 = new ThreadGroup(rootThreadGroup, "子线程组");
 Thread thread2 = new Thread(threadGroup1, new MRunnable(), "线程C");
 Thread thread3 = new Thread(threadGroup1, new MRunnable(), "线程D");
 thread2.start();
 thread3.start();
 }
}
class MRunnable implements Runnable {
 @Override
 public void run() {
 while (!Thread.currentThread().isInterrupted()) {
 System.out.println("线程名: " + Thread.currentThread().getName()
 + ", 所在线程组: " + Thread.currentThread().getThreadGroup().getName()
 + ", 父线程组: " + Thread.currentThread().getThreadGroup().getParent().getName());
 try {
 Thread.sleep(1000);
 } catch (InterruptedException e) {
 e.printStackTrace();
 }
 }
 }
}
复制代码
执行结果如下:
线程名: 线程A, 所在线程组: root线程组, 父线程组: main
线程名: 线程B, 所在线程组: root线程组, 父线程组: main
线程名: 线程C, 所在线程组: 子线程组, 父线程组: root线程组
线程名: 线程D, 所在线程组: 子线程组, 父线程组: root线程组
复制代码
3.批量管理组内线程
使用线程组自然是要对线程进行批量管理,比如可以批量中断组内线程,代码示例如下:
public class ThreadGroupTest {
 public static void main(String[] args) {
 ThreadGroup rootThreadGroup = new ThreadGroup("root线程组");
 Thread thread0 = new Thread(rootThreadGroup, new MRunnable(), "线程A");
 Thread thread1 = new Thread(rootThreadGroup, new MRunnable(), "线程B");
 thread0.start();
 thread1.start();
 ThreadGroup threadGroup1 = new ThreadGroup(rootThreadGroup, "子线程组");
 Thread thread2 = new Thread(threadGroup1, new MRunnable(), "线程C");
 Thread thread3 = new Thread(threadGroup1, new MRunnable(), "线程D");
 thread2.start();
 thread3.start();
 rootThreadGroup.interrupt();
 System.out.println("批量中断组内线程");
 }
}
class MRunnable implements Runnable {
 @Override
 public void run() {
 while (!Thread.currentThread().isInterrupted()) {
 System.out.println("线程名: " + Thread.currentThread().getName()
 + ", 所在线程组: " + Thread.currentThread().getThreadGroup().getName()
 + ", 父线程组: " + Thread.currentThread().getThreadGroup().getParent().getName());
 try {
 Thread.sleep(1000);
 } catch (InterruptedException e) {
 e.printStackTrace();
 break;
 }
 }
 System.out.println(Thread.currentThread().getName() + "执行结束");
 }
}
复制代码
执行结果如下:
线程名: 线程A, 所在线程组: root线程组, 父线程组: main
线程名: 线程B, 所在线程组: root线程组, 父线程组: main
线程名: 线程C, 所在线程组: 子线程组, 父线程组: root线程组
线程名: 线程D, 所在线程组: 子线程组, 父线程组: root线程组
批量中断组内线程
线程A执行结束
线程B执行结束
线程C执行结束
线程D执行结束
复制代码
以上是Java中使用线程组的示例和方法介绍的详细内容。更多信息请关注PHP中文网其他相关文章!
 如何将Maven或Gradle用于高级Java项目管理,构建自动化和依赖性解决方案?Mar 17, 2025 pm 05:46 PM
本文讨论了使用Maven和Gradle进行Java项目管理,构建自动化和依赖性解决方案,以比较其方法和优化策略。
 如何使用适当的版本控制和依赖项管理创建和使用自定义Java库(JAR文件)?Mar 17, 2025 pm 05:45 PM
本文使用Maven和Gradle之类的工具讨论了具有适当的版本控制和依赖关系管理的自定义Java库(JAR文件)的创建和使用。
 如何使用咖啡因或Guava Cache等库在Java应用程序中实现多层缓存?Mar 17, 2025 pm 05:44 PM
本文讨论了使用咖啡因和Guava缓存在Java中实施多层缓存以提高应用程序性能。它涵盖设置,集成和绩效优势,以及配置和驱逐政策管理最佳PRA
 如何将JPA(Java持久性API)用于具有高级功能(例如缓存和懒惰加载)的对象相关映射?Mar 17, 2025 pm 05:43 PM
本文讨论了使用JPA进行对象相关映射,并具有高级功能,例如缓存和懒惰加载。它涵盖了设置,实体映射和优化性能的最佳实践,同时突出潜在的陷阱。[159个字符]
 Java的类负载机制如何起作用,包括不同的类载荷及其委托模型?Mar 17, 2025 pm 05:35 PM
Java的类上载涉及使用带有引导,扩展程序和应用程序类负载器的分层系统加载,链接和初始化类。父代授权模型确保首先加载核心类别,从而影响自定义类LOA
 如何将Java的RMI(远程方法调用)用于分布式计算?Mar 11, 2025 pm 05:53 PM
本文解释了用于构建分布式应用程序的Java的远程方法调用(RMI)。 它详细介绍了接口定义,实现,注册表设置和客户端调用,以解决网络问题和安全性等挑战。
 如何使用Java的插座API进行网络通信?Mar 11, 2025 pm 05:53 PM
本文详细介绍了用于网络通信的Java的套接字API,涵盖了客户服务器设置,数据处理和关键考虑因素,例如资源管理,错误处理和安全性。 它还探索了性能优化技术,我
 如何在Java中创建自定义网络协议?Mar 11, 2025 pm 05:52 PM
本文详细介绍了创建自定义Java网络协议。 它涵盖协议定义(数据结构,框架,错误处理,版本控制),实现(使用插座),数据序列化和最佳实践(效率,安全性,维护


热AI工具

Undresser.AI Undress
人工智能驱动的应用程序,用于创建逼真的裸体照片

AI Clothes Remover
用于从照片中去除衣服的在线人工智能工具。

Undress AI Tool
免费脱衣服图片

Clothoff.io
AI脱衣机

AI Hentai Generator
免费生成ai无尽的。

热门文章

热工具

禅工作室 13.0.1
功能强大的PHP集成开发环境

Atom编辑器mac版下载
最流行的的开源编辑器

Dreamweaver CS6
视觉化网页开发工具

ZendStudio 13.5.1 Mac
功能强大的PHP集成开发环境

EditPlus 中文破解版
体积小,语法高亮,不支持代码提示功能


