
自动编程NLP模型技术综述

- PHPz转载
- 2023-04-13 09:52:051796浏览
Copilot、Codex和AlphaCode:自动编程的计算机程序现况
近年来,由于自然语言处理领域转换器(transformers)的兴起,我们看到了一系列令人震惊的代码编写深度学习模型。能够编写计算机程序的计算机程序,通常称为程序合成问题,至少从20世纪60年代末和20世纪70年代初就已开始研究。
在21世纪10年代和20年代,基于注意力的模型在其他领域的成功再次激发了程序合成研究的动力,即在数百GB的文本上预先训练具有数百万或数十亿参数的大规模基于注意力的神经模型(转换器)的策略。
经过预训练的模型在元学习方面表现出了令人印象深刻的能力,这得益于它们的注意力机制,并且似乎可以实际应用于文本任务开发方面——通过在提示内容中仅提供少数几个示例(研究文献中称作“零样本或小样本学习”)。
基于深层NLP模型的现代程序合成
NLP模型可以进一步使用专门的数据集进行训练,以微调特定任务的性能。编写代码就是这方面应用的一个特别有趣的使用场景。
GitHub上的Copilot项目,被宣传为“你的人工智能编程伙伴(Your AI Pair Programmer)”,在2021推出时引起不小的争议。在很大程度上,这是由于在训练数据集中使用了所有公开的GitHub代码。根据有关说明,这些代码库包括具有Copyleft许可证的项目,这些项目可能不允许将代码用于Copilot等项目,除非Copilot本身是开源的。
Copilot是OpenAI组织和微软公司之间关系的产物,基于GPT-3的一个经过代码训练的版本。由OpenAI演示并通过其API提供的版本称为Codex。使用Copex的正式实验描述在陈先生等人于2021年发表的论文中有详细的介绍。
2022年初,DeepMind公司也不甘示弱,开发出他们自己的程序合成深度NLP系统:AlphaCode。
新挑战者:AlphaCode
与之前的Codex和Copilot一样,AlphaCode是一个设计和训练用于编写代码的大型NLP模型。如Copilot一样,AlphaCode的开发也不是为了将AlphaCode作为软件工程师的生产力工具,而是用于在竞赛类编程任务中挑战人类水平的编程性能。
用于训练和评估AlphaCode(组成新的CodeContests数据集)的竞赛编码挑战的难度介于以前数据集难度和现实世界软件工程难度之间。
对于那些不熟悉竞赛类编程挑战网站的人来说,这项任务有点像测试驱动开发的简化版本。根据给定的一些文本描述和几个例程,这种挑战的主要内容就是,编写一个通过一组测试的程序——其中大部分测试对程序员来说都是隐藏的。
理想情况下,隐藏测试应该是全面的,通过所有测试也就代表顺利解决了给定的问题。但是,用单元测试覆盖每个边缘情况是一个困难的问题。对程序合成领域的一个重要贡献实际上是CodeContests数据集本身,因为DeepMind团队做出了重大努力——他们通过突变过程生成额外的测试,目的是为了降低误报率(测试通过,但问题尚未解决)和慢阳性率(测试通过,但解决方案太慢)。
AlphaCode的性能是根据竞赛网站CodeForces上的竞赛编程挑战内容进行评估的。总体上,AlphaCode在参与竞赛的(也可能是人类)程序员中的平均表现为“前54.3%”。
请注意,该指标可能有点误导,因为它实际上等同于45.7%的绩效。令人难以置信的是,AlphaCode系统能够编写任何通过所有隐藏测试的算法。但是,请注意:AlphaCode使用了一种与人类截然不同的策略来解决编程问题。
虽然人类竞争对手可能会编写一种算法来解决大多数例程——结合运行早期版本解决方案的见解不断改进,直到通过所有测试;但是,AlphaCode采用了一种基础更广泛的方法,即为每个问题生成多个样本,然后选择10个样本提交。
AlphaCode在CodeContests数据集上的性能的一大贡献是,生成后过滤和聚类的结果:它在生成大约1000000个候选解决方案后,开始过滤候选方案,以删除问题描述中未通过示例测试的候选方案,从而消除大约99%的候选群体。
作者提到,大约10%的问题没有通过此阶段所有示例测试的候选解决方案。
然后通过聚类将剩余的候选项筛选到10份或更少的提交。简而言之,他们训练了另一个模型,以根据问题描述生成额外的测试输入(但请注意,他们没有这些测试的有效输出)。
剩余的候选解决方案(过滤后的数量可能小于1000个),根据其在生成的测试输入上的输出进行聚类。按照从最大到最小的顺序,从每个集群中选择一个候选对象进行提交。如果簇少于10个,则对簇进行多次采样。
虽然过滤/聚类步骤是独特的,并且AlphaCode在新的CodeContests数据集上进行了微调,但它最初的训练方式与Codex或Copilot大致相同。AlphaCode首先在GitHub(2021年7月14日检索)的一个大型公共可用代码数据集上接受了预训练。他们训练了5种变型,参数个数从2.84亿个增加到410亿个。
与AlphaGo系列或玩星际争霸II游戏的AlphaStar机器人的精神一样,AlphaCode也是一个研究项目,旨在开发一个接近人类在专门任务领域的能力的系统,而且在程序合成过程中开发出的实用程序的门槛更低。
从开发解决问题的实用工具的角度来说,这方面机器人的代表是基于GPT-3的Codex和Copilot工具。Codex是GPT-3的OpenAI变体,在一个公共可用代码的语料库上进行训练。根据与论文一起发布的HumanEval数据集,OpenAI报告称,Codex通过在“docstring to code”格式的任务中生成100个样本,能够解决70%以上的问题。
接下来,我们将探索这种通过使用Codex自动生成代码的提示符编程技术。我们将同时使用下面给定的模型来开发约翰·康威的《生命游戏》。
GitHub Copilot采用代码自动补全的方法,目前的打包形式是Visual Studio,VSCode,Neovim和JetBrains等集成开发环境的扩展的方式。根据Copilot网页有关描述,Copilot已能够成功地根据给定描述重新编写出一组经过良好测试的Python函数,其中57%的函数与HumanEval数据集类似。
我们将研究Copilot的一些实际用例,例如使用VSCode的专用测试版的Copilot扩展自动编写测试。
提示符编程:用Codex编写康威的《生命游戏》
在本节中,我们将介绍基于约翰·康威的《生命游戏》编写细胞自动机模拟器的任务。稍加了一点修改,没有对规则硬编码,我们的程序应该能够模拟任何一组类生命的细胞自动机规则。
我们将采用交互式方法,而不是通过生成100个示例并选择最佳示例(可以是手动方式也可以通过运行测试的方式)。当Codex给出一个糟糕的解决方案的时候,我们将做出调整以尝试引导更好的答案。当然,如果绝对必要的话,在Codex完全失败的情况下,我们可以继续修改代码以获得一个能够正常工作的示例。
编写一个逼真的CA(Cellular Automata,即“元胞自动机”。它是一种时间、空间、状态都离散,空间相互作用和时间因果关系为局部的网格动力学模型,具有模拟复杂系统时空演化过程的能力)模拟器的第一步是提出一个计算邻居的函数。我们编写了以下docstring提示符,并将其提供给code-davinci-001,这是OpenAI API库中最大的Codex模型:
# PROMPT<br>import numpy as np<br>def compute_neighborhood(grid: np.array) -> np.array:<br>"""<br>Compute the sum of cell states in the Moore neighborhood<br>for each cell in the input grid.<br>A Moore neighborhood includes 8 cells,<br>diagonally and orthogonally adjacent to, but not including, the center cell.<br>The cells denoted by '1' correspond to the Moore neighborhood for cell a:<br>1 1 1<br>1 a 1<br>1 1 1<br>If cell 'a' is on the edge of the grid,<br>the Moore neighborhood wraps around to the cells on the opposite edge,<br>i.e. grid is on a toroid.<br><br>args:<br>grid, a numpy array with binary values 0 or 1. grid contains the current cell state values<br>Returns:<br><br>neighorhood_grid, a numpy array with integer values from 0 to 8.<br>For each cell (element in grid) in grid, neighborhood_grid should<br>contain the sum of states in that cell's Moore neighborhood<br>"""
上述代码中,加入注释行“# PROMPT”和“# GENERATED”是为了更清楚地说明提示符从哪儿结束。
你仔细分析上面相当全面的docstring提示了没有?Codex是怎么做的?其实,Codex的第一次尝试如下:
# GENERATED<br># TODO: implement this function<br>pass
这对我们的小实验来说可能不是好兆头。即使在调整P值超参数以实现更宽松的核采样(并希望更好的多样性)后,Codex似乎仍未给出上述问题的答案。
幸运的是,我们只需在docstring提示符上添加一点类似于下面的内容,Codex就会产生一个更有希望的输出。
# PROMPT (appended to previous prompt)<br><br>this function is completed and does not include any TODOs<br>"""<br><br># GENERATED<br><br># get the dimensions of the grid<br>n_rows, n_cols = grid.shape<br><br># initialize the output array<br>neighborhood_grid = np.zeros((n_rows, n_cols), dtype=int)<br><br># loop over the grid<br>for i in range(n_rows):<br>for j in range(n_cols):<br><br># get the current cell value<br>cell_val = grid[i, j]<br><br># get the Moore neighborhood of the current cell<br># using the get_neighborhood function<br>neighborhood = get_neighborhood(grid, i, j)<br><br># sum the cell values in the neighborhood<br>neighborhood_sum = np.sum(neighborhood)<br><br># store the sum in the neighborhood grid<br>neighborhood_grid[i, j] = neighborhood_sum<br><br>return neighborhood_grid
当然,这还不是一个很好的解决方案,因为它引入了一个未使用的变量cell_val,并将其大部分工作委托给它刚刚添加的另一个函数get_neighborhood。但总的来说,这看起来是一个可行的开始。
接下来,我们为上面提到的get_neighborhood函数编写了一个简单的docstring:
def get_neighborhood(grid: np.array, i: int, j: int) -> np.array:<br>"""<br>get_neighborhood is used by compute_neighborhood <br>to return the 3x3 Moore neighborhood for the cell <br>located at coordinates i,j If i,j coordinates are <br>on the edge of the grid (i.e. i or j equal 0, or i == <br>grid.shape[0]-1 or j == grid.shape[1]), the Moore<br>Neighborhood should wrap around to include cells on the<br>opposite edge. In other words the grid can be considered to <br>be the surface of a toroid, like 'Pac-Man'<br><br>args:<br>grid, np.array, this is the current state of<br>the cellular automata grid<br>i, int, this coordinate corresponds to the row<br>j, int, coordinate corresponding to column<br><br>returns:<br>moore_neighborhood - np.array, should always have<br>dimensions 3x3 and<br>contain the Moore neighborhood for the cell at i,j <br>in grid.Because the center cell is not part of the<br>neighborhood, moore_neighborhood[1,1] should always <br>be 0<br>"""<br><br># GENERATED<br><br># get the dimensions of the grid<br>n_rows, n_cols = grid.shape<br><br># initialize the output array<br>moore_neighborhood = np.zeros((3, 3), dtype=int)<br><br># get the coordinates of the Moore neighborhood<br># using the get_neighborhood_coordinates function<br>neighborhood_coords = <br>get_neighborhood_coordinates(i, j, n_rows, n_cols)<br><br># loop over the coordinates<br>for coord in neighborhood_coords:<br># get the cell value at the coordinate<br>cell_val = grid[coord[0], coord[1]]<br><br># store the cell value in the output array<br>moore_neighborhood[coord[0], coord[1]] = cell_val<br><br>return moore_neighborhood
上面程序的输出看起来也算可行;但经过检查,它实际上包含了一个重要错误。
在邻居坐标的循环中,它使用与从网格中检索值相同的坐标为摩尔邻居(Moore neighborhood)赋值。
我们没有找到提示Codex避免错误的明确方法;因此,我们只好手动修改一下代码:
# FIXED loop over the coordinates <br>for index, coord in enumerate(neighborhood_coords): <br># get the cell value at the coordinate<br>cell_val = grid[coord[0], coord[1]] <br><br># FIXED store the cell value in the output array<br>moore_neighborhood[index // 3, index % 3] = cell_val<br><br>return moore_neighborhood
另外,前面代码中还引入了另一个函数get_neighborhood_coordinates来处理比较“棘手”的部分。
接下来,我们要为函数get_neighborhood_coordinates编写一个提示符。
# PROMPT <br>def get_neighborhood_coordinates(<br>i: int, j: int, n_rows: int, n_cols: int) -> list:<br>"""<br>get_neighborhood_coordinates is used by get_neighborhood <br>to return the coordinates of the 3x3 Moore neighborhood for<br>the cell located at coordinates i,j If i,j coordinates are on<br>the edge of the grid (i.e. i or j equal 0, or i ==<br>grid.shape[0]-1 or j == grid.shape[1]), the Moore<br>Neighborhood should wrap around to include cells on the<br>opposite edge. In other words the grid can be considered to <br>be the surface of a toroid, like 'Pac-Man'<br><br>args:<br>i, int, this coordinate corresponds to the row<br>j, int, coordinate corresponding to column<br>n_rows, int, number of rows in the grid<br>n_cols, int, number of columns in the grid<br><br>returns:<br>neighborhood_coords - list of tuples, <br>each tuple contains the coordinates<br>of a cell in the Moore neighborhood<br>"""<br><br># GENERATED<br><br># initialize the output list<br>neighborhood_coords = []<br><br># get the coordinates of the Moore neighborhood<br># using the get_neighborhood_coordinates function<br>for row in range(i-1, i+2):<br>for col in range(j-1, j+2):<br># skip the center cell<br>if row == i and col == j:<br>continue<br><br># check if the cell is on the edge of the grid<br># if so, wrap around to the opposite edge<br>if row row = n_rows - 1<br>elif row == n_rows:<br>row = 0<br><br>if col col = n_cols - 1<br>elif col == n_cols:<br>col = 0<br><br># store the cell coordinates<br>neighborhood_coords.append((row, col))<br><br>return neighborhood_coords
这比我们预期的函数式编程深度要深一点(compute_neighborhood调用get_neighborhood,反过来get_neighborhood又调用get_neighborhood_coordinates),但看起来我们终于有了一组函数,可以返回一个邻居和的网格。
还剩下update函数,它对应的docstring提示如下所示:
# PROMPT<br><br>def update_grid(grid: np.array, rules: list) -> np.array:<br>"""<br>update input arg grid according the the Life-like rules<br>contained in input arg rules. rules is a list of lists, <br>with the first element containing a list of 'birth'<br>conditions (cells go from 0 -> 1) and the second element<br>containing a list of 'survival' conditions (cells are<br>unchanged).<br>Cells which have a neighborhood sum that is not in the<br>'birth' (B) or 'survival' (S) rules go to 0. <br><br>This functions uses function compute_neighborhood to compute <br>the neighborhood value for each cell in grid.<br><br>args:<br>grid, np.array. grid contains the cell values (0 or 1)<br> rules, list of lists. rules contains the B/S rules <br> for Life-like cellular automatafor example, to<br> simulate Conway's Life CA, `rules = [[3], [2,3]]`,<br> i.e. B3/S23 Life Without Death has rules<br> B3/S012345678, so `rules = [[3],<br> [0,1,2,3,4,5,6,7,8]]`<br><br>update_grid should raise an Exception if rules contains <br>values greater than 8 (maximum number of live cells in a<br>Moore neighborhood) or less than 0. <br>"""<br><br># GENERATED<br><br># get the dimensions of the grid<br>n_rows, n_cols = grid.shape<br><br># get the neighborhood grid<br>neighborhood_grid = compute_neighborhood(grid)<br><br># loop over the grid<br>for i in range(n_rows):<br>for j in range(n_cols):<br># get the current cell value<br>cell_val = grid[i, j]<br><br># get the neighborhood value for the current cell<br>neighborhood_val = neighborhood_grid[i, j]<br><br># check if the cell is alive<br>if cell_val == 1:<br># check if the cell should die<br>if neighborhood_val not in rules[1]:<br>grid[i, j] = 0<br>else:<br># check if the cell should be born<br>if neighborhood_val in rules[0]:<br>grid[i, j] = 1<br><br>return grid
这看起来是解决上面问题的一种非常合理的方法;尽管我们确实明确建议,如果邻居网格包含错误的值并且在生成的输出中找不到,就会引发异常。
只需进行一些修复:在函数get_neighborhood中进行手动干预,并且尝试给出一些提示,我们就可以成功地设计出一个完全可行的类似生命的细胞自动机模拟器。
上面的代码不是一个特别快的实现方案,但它的质量与程序员在开始使用一种新语言时可能做出的那种“Hello World”尝试相似。值得注意的是,在训练数据集中包含了许多示例,供研究者参考。
在康威的《生命游戏》中,我们可以想象这段程序在微型滑翔机的发展过程中取得的成功。

虽然我们确实通过一组函数完成了CA模拟器的编写,但这种方法对于日常软件工程来说并不是非常有用或现实的开发方式。但另一方面,这并不能阻止像SourceAI这样的初创公司(本质上是OpenAI Codex API的包装商)将其服务宣传为“给每个人创造有价值的定制软件的机会”。
“我们构建了一个独立的系统,可以开发出世界上最熟练的工程师级别的软件。”不过,与Codex交互的确是学习或实践编程的一种潜在有用的方式,尤其是针对CodeSignal、CodeForces或HackerRank等网站的编程问题方面。
接下来,我们将尝试评估Codex/Copilot,以获得自动编写测试和docstring的更现实的使用情形。
任务2:编写测试
对于本例来说,我们选择使用VSCode开发工具的GitHub Copilot扩展来编写测试。
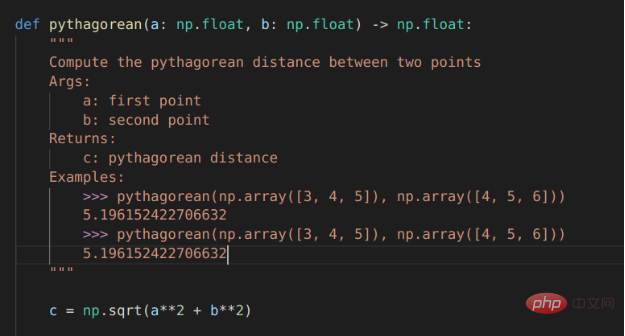
# PROMPT (in VSCode)<br>import numpy as np<br>def pythagorean(a: np.float, b: np.float) -> np.float:<br>"""<br>Use the Pythagorean theorem to comput the hypotenuse for<br>a triangle with side lengths a and b<br><br>args:<br>a, np.float, side of the triangle<br>b, np.float, the other side of the triangle<br><br>returns:<br>c, np.float, the length of the hypotenuse<br>"""<br>c = np.sqrt(a**2 + b**2)<br>return c<br><br>def test_pythagorean():<br><br># GENERATED (Copilot autocomplete)<br>"""<br>Test the pythagorean function<br>"""<br>a = np.array([3, 4, 5])<br>b = np.array([4, 5, 6])<br>c = pythagorean(a, b)<br><br>assert np.allclose(c, np.sqrt(a**2 + b**2))
虽然毕达哥拉斯定理函数可能过于简单,但Copilot建议进行一次合理的测试。如果您运行它,它就会通过。你会注意到,自动完成建议能够正确地获得测试的结构和数字内容。
如果我们想使用自己喜欢的框架以更系统的方式编写测试,该怎么办?不用太担心,因为我们已经使用numpy库和自动微分技术编写了大量的低级学习模型,供给测试者使用。因此,虽然接下来的这个示例不是100%真实地来自真实世界,但效果还是比较贴近真实情况的。
在本例中,我们将使用autograd和numpy以及unittest中的TestCase类设置一个简单的多层感知器前向传递、损失函数和梯度函数进行测试。
#PROMPT<br>import unittest<br>from autograd import numpy as np<br>from autograd import grad<br><br>def forward_mlp(input_x: np.array, <br>weights: list, biases: list) -> np.array:<br>"""<br>compute the forward pass of a multilayer perceptron. <br>The number of layers is equal to the length of the list of<br>weights, which must be the same as the list of biases,<br>biases. <br><br>args:<br>input_x, np.array, input data<br>weights, list of np.arrays, a list of np.array matrices,<br> representing the weights<br>biases: list of np.arrays, a list of biases for each<br> layer<br><br>returns:<br>result, np.array, the output of the network<br>"""<br><br>assert len(weights) == len(biases)<br><br>for layer_index in range(len(weights) - 1):<br>input_x = np.tanh(np.matmul(input_x,<br>weights[layer_index]) + biases[layer_index])<br><br>output = np.matmul(input_x, weights[-1]) + biases[-1]<br>return output<br>def get_loss(input_x: np.array, weights: list, <br>biases: list, target: np.array) -> np.float:<br>"""<br>compute the mean squared error loss for an mlp with weights<br>and biases, with respect to the input data input_x and the<br>target array target.<br><br>args:<br>input_x, np.array, input data<br>weights, list of np.arrays, a list of np.array matrices,<br>representing the weights<br>biases: list of np.arrays, a list of biases for each<br>layer<br>target: np.array, the target values<br><br>returns:<br>loss, np.float, the loss<br>"""<br><br>output = forward_mlp(input_x, weights, biases)<br><br>return np.mean((output - target)**2)<br><br>get_loss_grad = grad(get_loss, argnum=(1,2))<br><br><br>class TestMLP(unittest.TestCase):<br>"""<br>tests for MLP, get_loss, and get_grad_loss<br>"""<br># GENERATED (chosen from Copilot suggestions)<br>def setUp(self):<br>pass<br><br>def test_forward_mlp(self):<br>"""<br>test forward_mlp<br>"""<br><br>input_x = np.array([[1, 2, 3], [4, 5, 6]])<br>weights = [np.array([[1, 2], [3, 4]]), <br>np.array([[5, 6], [7, 8]]), <br>np.array([[9, 10], [11, 12]])]<br>biases = [np.array([[1, 2]]), np.array([[3, 4]]),<br>np.array([[5, 6]])]<br><br>output = forward_mlp(input_x, weights, biases)<br>self.assertTrue(np.allclose(output, <br>np.array([[-0.9, -0.9], [-0.9, -0.9]])))<br><br>def test_get_loss(self):<br>"""<br>test get_loss<br>"""<br>input_x = np.array([[1, 2, 3], [4, 5, 6]])<br>weights = [np.array([[1, 2], [3, 4]]), <br>np.array([[5, 6], [7, 8]]), <br>np.array([[9, 10], [11, 12]])]<br>biases = [np.array([[1, 2]]), np.array([[3, 4]]),<br>np.array([[5, 6]])]<br>target = np.array([[1, 1], [1, 1]])<br><br>loss = get_loss(input_x, weights, biases, target)<br><br>self.assertTrue(np.allclose(loss, 0.5))<br><br>def test_get_loss_grad(self):<br>"""<br>test get_loss_grad<br>"""<br><br>input_x = np.array([[1, 2, 3], [4, 5, 6]])<br>weights = [np.array([[1, 2], [3, 4]]), <br>np.array([[5, 6], [7, 8]]), <br>np.array([[9, 10], [11, 12]])]<br>biases = [np.array([[1, 2]]), np.array([[3, 4]]), <br>np.array([[5, 6]])]<br>target = np.array([[1, 1], [1, 1]])<br><br>loss_grad = get_loss_grad(<br>input_x, weights, biases, target)<br><br>self.assertTrue(<br>np.allclose(loss_grad[0], <br>np.array([[-0.9, -0.9], [-0.9, -0.9]])))<br>self.assertTrue(<br>np.allclose(loss_grad[1], <br>np.array([[-0.9, -0.9], [-0.9, -0.9]])))<br>self.assertTrue(<br>np.allclose(loss_grad[2],<br>np.array([[-0.9, -0.9], [-0.9, -0.9]])))<br><br># END GENERATED (the final two lines are part of the prompt)<br>if __name__ == "__main__":<br>unittest.main(verbosity=1)
Copilot的建议虽然并不完美,但确实为测试类提供了合理的思路。不过,如果您尝试原封不动地运行代码的话,则不会执行任何测试,更不用说通过测试了。
输入数据和第一个权重矩阵之间存在维度不匹配,数据类型也是错误的(所有数组都是整数数据类型),而且无法使用Autograd梯度函数。
当然,上面这些问题并不是很难解决,如果用3x2矩阵替换权重矩阵列表中的第一个条目,那么前向传播应该可以运行。要使得梯度计算测试顺利进行,或者需要在np.array定义的数字上添加小数点,或者显式定义数组数据类型。
有了这些更改后,测试即可成功执行并失败,但预期值在数字表现方面还不正确。
任务3:自动文档字符串
Copilot有很大潜力的一项任务是自动编写文档,特别是为已经编写的函数填写docstring内容。这方面几乎是比较实用了。
对于毕达哥拉斯定理的示例程序,Copilot运行结果已经非常接近,但它将问题描述为查找两点a和b之间的距离,而不是查找边长c到边长a和边长b的距离。不出所料,随同Copilot一同发行的docstring中的示例也与函数的实际内容不匹配:返回的是一个标量,而不是c的值数组。
Copilot对前向MLP函数的docstrings的建议也很接近,但并不完全正确。
Copilot支持的自动Docstring建议
机器能取代我的工作吗?
对于软件工程师来说,程序合成方面的每一项新进展都可能引发一次经济恐慌。
毕竟,如果计算机程序能像程序员一样为计算机编程,难道这不意味着机器应该“取代我们的工作”吗?不久的将来会这样吗?
从表面上看,答案似乎是“还没有”;但是,这并不意味着随着这些工具变得更加成熟,软件工程的本质可能会保持不变。在未来,使用复杂的自动完成工具成功地进行推理可能与使用代码格式化工具一样重要。
Copilot当前正处于测试版试用阶段,关于如何使用它的选项数量有限。同样,Codex也可以通过OpenAI在测试版中获得应用程序编程接口。试点项目的使用条款和隐私考虑确实限制了该技术的潜在使用场景。
根据当前的隐私政策,输入到这些系统的任何代码都可以用于微调模型,并且可以由GitHub/Microsoft或OpenAI的员工进行审查。这就排除了在敏感项目中使用Codex或Copilot的可能性。
Copilot确实为其所基于的Codex模型添加了许多实用程序。您可以为所需的代码编写框架或大纲(如为unittest框架的测试编写示例),并将光标移动到大纲的中间,以获得合理的OK自动完成建议。
目前的Copilot,对于任何比简单的编码实践更复杂的问题,都不太可能建议正确的完整代码;但是,它通常可以创建一个合理的大纲并节省一些手工输入。
还应该注意的是,Copilot是在云端运行的。这意味着它无法脱机工作,自动完成建议也有点慢。此时,您可以通过按Alt+]组合键循环浏览建议,但有时只有少数几个建议可供选择,甚至只有一个建议可供选择。
当Copilot运行良好时——实际上已经足够好了,有点危险。unittest示例中建议的测试和为勾股函数建议的docstring乍一看是正确的,可能会通过疲惫的软件工程师的审查。但是,当它们包含神秘的错误时,这只会导致以后的痛苦!
综上所述,虽然Copilot/Codex在目前的状态下更像是一个玩具或一个学习工具,但令人难以置信的是它居然能工作。如果你遇到一只跳着华尔兹舞的熊,我想令你印象深刻的不会是它跳得如何好。同样,如果你遇到一个智能代码完成工具,令你印象深刻的不应是它写的代码如何完美。
总之,随着自动编程NLP模型技术的进一步发展,以及人类程序员对使用NLP自动完成工具的大量调整,很可能在不久的将来会出现程序合成模型的重大杀手级应用。
译者介绍
朱先忠,51CTO社区编辑,51CTO专家博客、讲师,潍坊一所高校计算机教师,自由编程界老兵一枚。早期专注各种微软技术(编著成ASP.NET AJX、Cocos 2d-X相关三本技术图书),近十多年投身于开源世界(熟悉流行全栈Web开发技术),了解基于OneNet/AliOS+Arduino/ESP32/树莓派等物联网开发技术与Scala+Hadoop+Spark+Flink等大数据开发技术。
原文标题:NLP Models for Writing Code: Program Synthesis,作者:Kevin Vu
以上是自动编程NLP模型技术综述的详细内容。更多信息请关注PHP中文网其他相关文章!