对于 Ref 理解与使用,一些读者可能还停留在用 ref 获取真实 DOM 元素和获取类组件实例层面上
其实 ref 除了这两项常用功能之外,还有很多别的小技巧
通过本篇文章的学习,你将收获 React ref 的基本和进阶用法,并且能够明白 React 内部是如何处理 ref 的,并通过一个小 Demo + 提问的方式带你更加深刻地理解 ref 的底层原理
1. ref 的理解与使用
对于 Ref 的理解,要从两个角度去分析:
Ref 对象的创建:使用
createRef或useRef创建 Ref 对象 【相关推荐:Redis视频教程、编程视频】React 本身对 Ref 的处理:对于标签中的 ref 属性,React 是如何处理的
1.1. ref 对象的创建
1.1.1. createRef
在类组件中,我们会通过 createRef 去创建一个 Ref 对象,其会被保存在类组件实例上,它的实现很简单
packages/react/src/ReactCreateRef.js
export function createRef(): RefObject {
  const refObject = {
    current: null,
  }

  return refObject
}
可以看到,就是创建了一个包含 current 属性的对象,仅此而已
1.1.2. useRef
这也就意味着我们不能在函数组件中使用 createRef,因为每次函数组件渲染都是一次新的函数执行,每次执行 createRef 得到的都是一个新的对象,无法保留其原来的引用
所以在函数组件中,我们会使用 useRef 创建 Ref 对象,React 会将 useRef 和函数组件对应的 fiber 对象关联,将 useRef 创建的 ref 对象挂载到对应的 fiber 对象上
这样一来每次函数组件执行,只要函数组件不被销毁,那么对应的 fiber 对象实例也会一直存在,所以 ref 也能够被保留下来
1.2. React 对标签中 ref 属性的处理
首先要明确一个结论,在 React 中获取 DOM 元素或者组件实例并不是只能通过 ref 对象获取!!!
也就是说并不是只能通过先调用 createRef 创建 ref 对象,然后将它赋值到要获取的元素或组件实例的 ref 属性上,实际上还有别的方式
:::tip
只有类组件才有获取组件实例这一说法,函数组件没有实例,不能被 ref 标记,但是可以通过 forwardRef 结合 useImperativeHandle 给函数组件赋予 ref 标记的
:::
1.2.1. string ref
当我们给元素或类组件标签中的 ref 属性传递字符串时,能够在组件实例的 this.refs 中访问到
class Child extends React.Component<PropsWithChildren> {
render(): React.ReactNode {
const { children } = this.props
return (
<div>
<p>Child</p>
{children}
</div>
)
}
}
/** @description ref 属性传递字符串 */
class RefDemo1 extends React.Component {
logger = createLoggerWithScope('RefDemo1')
componentDidMount(): void {
this.logger.log(this.refs)
}
render(): React.ReactNode {
return (
<>
<div ref="refDemo1DOM">ref 属性传递字符串获取 DOM 元素</div>
<Child ref="refDemo1Component">ref 属性传递字符串获取类组件实例</Child>
</>
)
}
}
:::warning
这种方式已经被 React 官方废弃,尽量不要使用
:::
1.2.2. callback ref
ref 属性传递函数时,会在 commit 阶段创建真实 DOM 时执行 ref 指定的函数,并将元素作为第一个参数传入,此时我们就可以利用它进行赋值以获取 DOM 元素或组件实例
/** @description ref 属性传递函数 */
class RefDemo2 extends React.Component {
  logger = createLoggerWithScope('RefDemo2')

  refDemo2DOM: HTMLElement | null = null
  refDemo2Component: Child | null = null

  componentDidMount(): void {
    this.logger.log(this.refDemo2DOM)
    this.logger.log(this.refDemo2Component)
  }

  render(): React.ReactNode {
    return (
      <>
        <div ref={(el) => (this.refDemo2DOM = el)}>
          ref 属性传递函数获取 DOM 元素
        </div>

        <Child ref={(child) => (this.refDemo2Component = child)}>
          ref 属性传递函数获取类组件实例
        </Child>
      </>
    )
  }
}
1.2.3. object ref
这种方式就是我们最常用的方式了,使用 createRef 或者 useRef 创建 Ref 对象,并将其传给标签的 ref 属性即可
这种方式获取到的 ref 需要先调用 current 属性才能获取到对应的 DOM 元素或组件实例
/** @description ref 属性传递对象 */
class RefDemo3 extends React.Component {
  logger = createLoggerWithScope('RefDemo3')

  refDemo3DOM = React.createRef<HTMLDivElement>()
  refDemo3Component = React.createRef<Child>()

  componentDidMount(): void {
    this.logger.log(this.refDemo3DOM)
    this.logger.log(this.refDemo3Component)
  }

  render(): React.ReactNode {
    return (
      <>
        <div ref={this.refDemo3DOM}>ref 属性传递对象获取 DOM 元素</div>

        <Child ref={this.refDemo3Component}>
          ref 属性传递对象获取类组件实例
        </Child>
      </>
    )
  }
}
2. ref 高阶用法
2.1. forwardRef 转发 ref
2.1.1. 跨层级获取
想要在爷组件中通过在子组件中传递 ref 获取到孙组件的某个元素,也就是在爷组件中获取到了孙组件的元素,是一种跨层级获取
/** @description 孙组件 */
const Child: React.FC<{ grandRef: LegacyRef<HTMLDivElement> }> = (props) => {
  const { grandRef } = props

  return (
    <>
      <p>Child</p>
      <div ref={grandRef}>要获取的目标元素</div>
    </>
  )
}

/**
 * @description 父组件
 *
 * 第一个泛型参数是 ref 的类型
 * 第二个泛型参数是 props 的类型
 */
const Father = forwardRef<HTMLDivElement, {}>((props, ref) => {
  return (
    <div>
      <Child grandRef={ref} />
    </div>
  )
})

/** @description 爷组件 */
const GrandFather: React.FC = () => {
  let grandChildDiv: HTMLDivElement | null = null

  useEffect(() => {
    logger.log(grandChildDiv)
  }, [])

  return (
    <div>
      <Father ref={(el) => (grandChildDiv = el)} />
    </div>
  )
}
2.1.2. 合并转发自定义 ref
forwardRef 不仅可以转发 ref 获取 DOM 元素和组件实例,还可以转发合并后的自定义 ref
什么是“合并后的自定义 ref”呢?通过一个场景来看看就明白了
:::info{title=场景}
通过给 Foo 组件绑定 ref,获取多个内容,包括:
子组件 Bar 的组件实例
Bar 组件中的 DOM 元素 button
孙组件 Baz 的组件实例
:::
这种在一个 ref 里能够访问多个元素和实例的就是“合并后的自定义 ref”
/** @description 自定义 ref 的类型 */
interface CustomRef {
  bar: Bar
  barButton: HTMLButtonElement
  baz: Baz
}

class Baz extends React.Component {
  render(): React.ReactNode {
    return <div>Baz</div>
  }
}

class Bar extends React.Component<{
  customRef: ForwardedRef<CustomRef>
}> {
  buttonEl: HTMLButtonElement | null = null
  bazInstance: Baz | null = null

  componentDidMount(): void {
    const { customRef } = this.props

    if (customRef) {
      ;(customRef as MutableRefObject<CustomRef>).current = {
        bar: this,
        barButton: this.buttonEl!,
        baz: this.bazInstance!,
      }
    }
  }

  render() {
    return (
      <>
        <button ref={(el) => (this.buttonEl = el)}>Bar button</button>
        <Baz ref={(instance) => (this.bazInstance = instance)} />
      </>
    )
  }
}
const FowardRefBar = forwardRef<CustomRef>((props, ref) => (
  <Bar {...props} customRef={ref} />
))

const Foo: React.FC = () => {
  const customRef = useRef<CustomRef>(null)

  useEffect(() => {
    logger.log(customRef.current)
  }, [])

  return <FowardRefBar ref={customRef} />
}
2.1.3. 高阶组件转发 ref
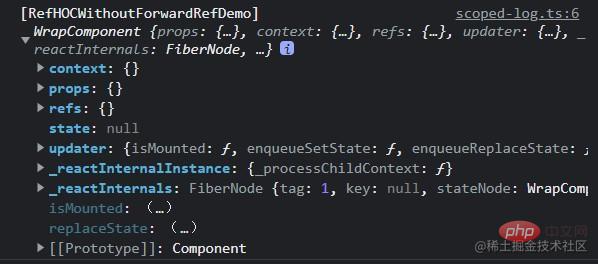
如果我们在高阶组件中直接使用 ref,它会直接指向 WrapComponent
class TestComponent extends React.Component {
render(): React.ReactNode {
return <p>TestComponent</p>
}
}
/** @description 不使用 forwardRef 转发 HOC 中的 ref */
const HOCWithoutForwardRef = (Component: typeof React.Component) => {
class WrapComponent extends React.Component {
render(): React.ReactNode {
return (
<div>
<p>WrapComponent</p>
<Component />
</div>
)
}
}
return WrapComponent
}
const HOCComponent1 = HOCWithoutForwardRef(TestComponent)
const RefHOCWithoutForwardRefDemo = () => {
const logger = createLoggerWithScope('RefHOCWithoutForwardRefDemo')
const wrapRef = useRef(null)
useEffect(() => {
// wrapRef 指向的是 WrapComponent 实例 而不是 HOCComponent1 实例
logger.log(wrapRef.current)
}, [])
return <HOCComponent1 ref={wrapRef} />
}
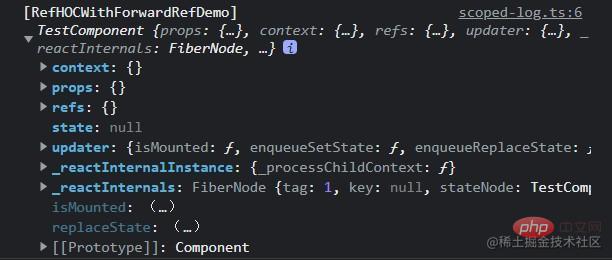
如果我们希望 ref 指向的是被包裹的 TestComponent 而不是 HOC 内部的 WrapComponent 时该怎么办呢?
这时候就可以用 forwardRef 进行转发了
/** @description HOC 中使用 forwardRef 转发 ref */
const HOCWithForwardRef = (Component: typeof React.Component) => {
class WrapComponent extends React.Component<{
forwardedRef: LegacyRef<any>
}> {
render(): React.ReactNode {
const { forwardedRef } = this.props
return (
<div>
<p>WrapComponent</p>
<Component ref={forwardedRef} />
</div>
)
}
}
return React.forwardRef((props, ref) => (
<WrapComponent forwardedRef={ref} {...props} />
))
}
const HOCComponent2 = HOCWithForwardRef(TestComponent)
const RefHOCWithForwardRefDemo = () => {
const logger = createLoggerWithScope('RefHOCWithForwardRefDemo')
const hocComponent2Ref = useRef(null)
useEffect(() => {
// hocComponent2Ref 指向的是 HOCComponent2 实例
logger.log(hocComponent2Ref.current)
}, [])
return <HOCComponent2 ref={hocComponent2Ref} />
}
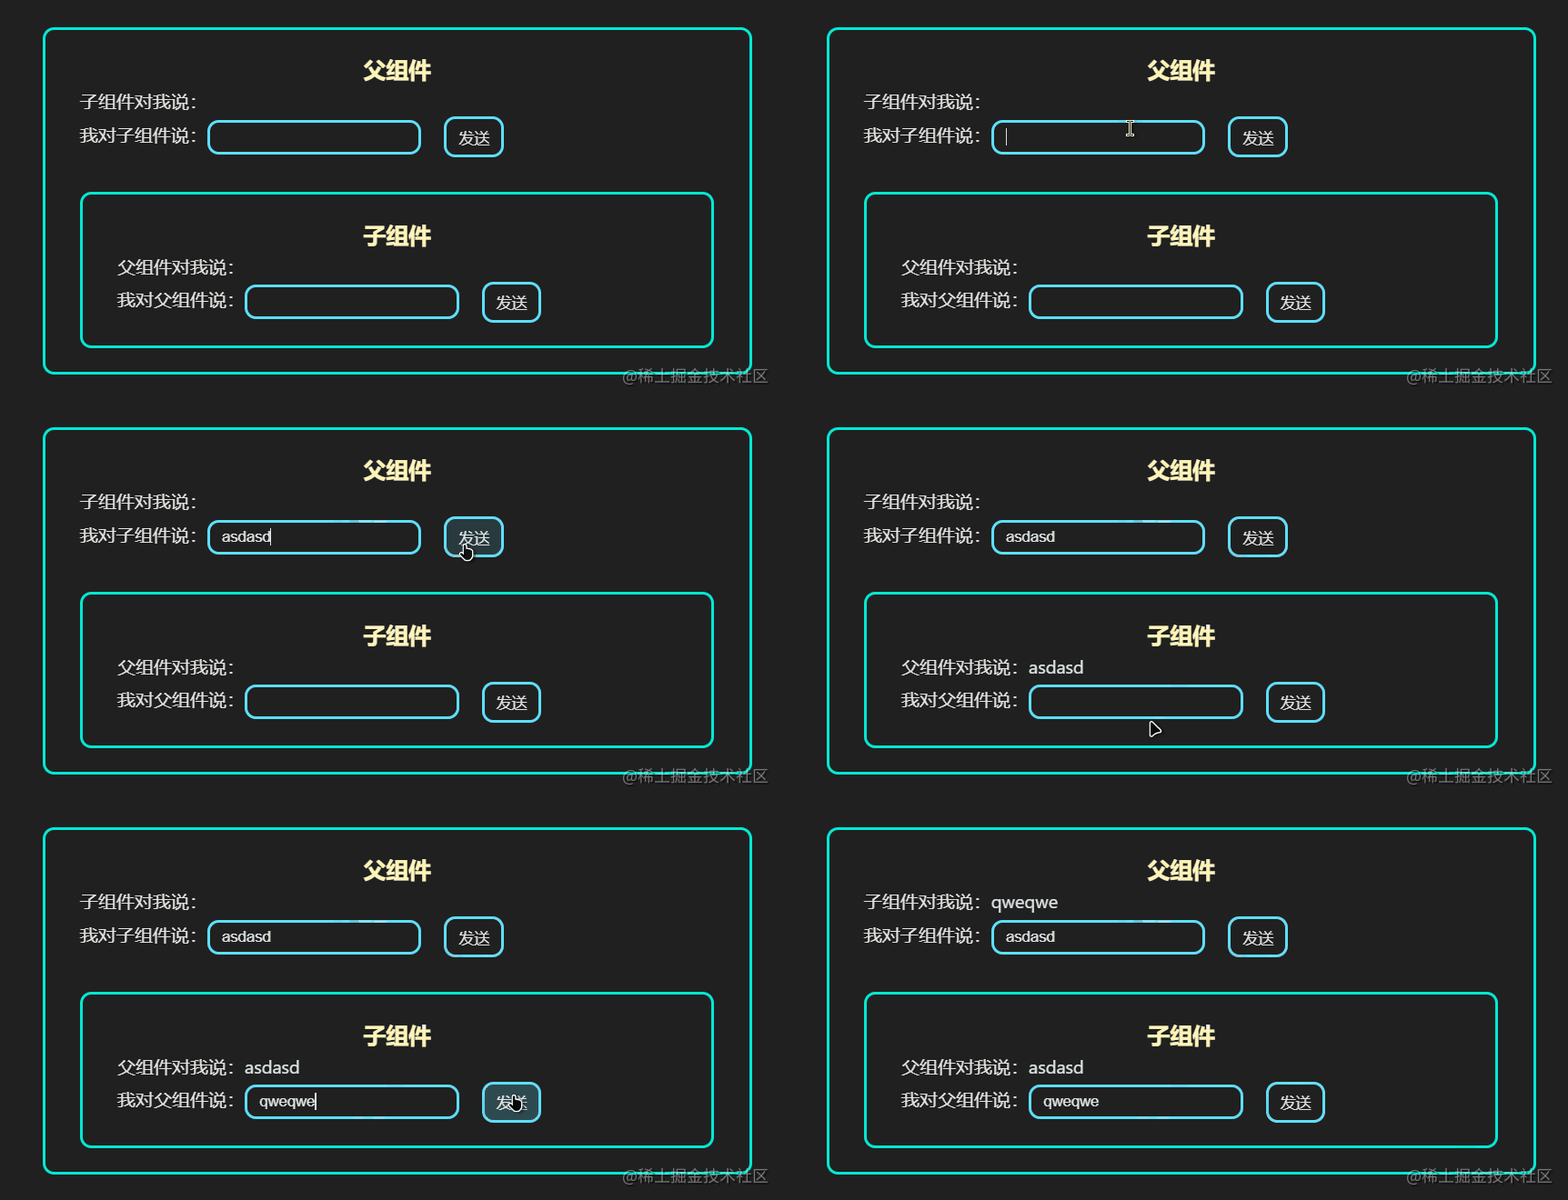
2.2. ref 实现组件通信
一般我们可以通过父组件改变子组件 props 的方式触发子组件的更新渲染完成组件间通信
但如果我们不希望通过这种改变子组件 props 的方式的话还能有别的办法吗?
可以通过 ref 获取子组件实例,然后子组件暴露出通信的方法,父组件调用该方法即可触发子组件的更新渲染
对于函数组件,由于其不存在组件实例这样的说法,但我们可以通过 useImperativeHandle 这个 hook 来指定 ref 引用时得到的属性和方法,下面我们分别用类组件和函数组件都实现一遍
2.2.1. 类组件 ref 暴露组件实例
/**
* 父 -> 子 使用 ref
* 子 -> 父 使用 props 回调
*/
class CommunicationDemoFather extends React.Component<
{},
CommunicationDemoFatherState
> {
state: Readonly<CommunicationDemoFatherState> = {
fatherToChildMessage: '',
childToFatherMessage: '',
}
childRef = React.createRef<CommunicationDemoChild>()
/** @description 提供给子组件修改父组件中的状态 */
handleChildToFather = (message: string) => {
this.setState((state) => ({
...state,
childToFatherMessage: message,
}))
}
constructor(props: {}) {
super(props)
this.handleChildToFather = this.handleChildToFather.bind(this)
}
render(): React.ReactNode {
const { fatherToChildMessage, childToFatherMessage } = this.state
return (
<div className={s.father}>
<h3>父组件</h3>
<p>子组件对我说:{childToFatherMessage}</p>
<div className={s.messageInputBox}>
<section>
<label htmlFor="to-father">我对子组件说:</label>
<input
type="text"
id="to-child"
onChange={(e) =>
this.setState((state) => ({
...state,
fatherToChildMessage: e.target.value,
}))
}
/>
</section>
{/* 父 -> 子 -- 使用 ref 完成组件通信 */}
<button
onClick={() =>
this.childRef.current?.setFatherToChildMessage(
fatherToChildMessage,
)
}
>
发送
</button>
</div>
<CommunicationDemoChild
ref={this.childRef}
onChildToFather={this.handleChildToFather}
/>
</div>
)
}
}
interface CommunicationDemoChildProps {
onChildToFather: (message: string) => void
}
// 子组件自己维护状态 不依赖于父组件 props
interface CommunicationDemoChildState {
fatherToChildMessage: string
childToFatherMessage: string
}
class CommunicationDemoChild extends React.Component<
CommunicationDemoChildProps,
CommunicationDemoChildState
> {
state: Readonly<CommunicationDemoChildState> = {
fatherToChildMessage: '',
childToFatherMessage: '',
}
/** @description 暴露给父组件使用的 API -- 修改父到子的消息 fatherToChildMessage */
setFatherToChildMessage(message: string) {
this.setState((state) => ({ ...state, fatherToChildMessage: message }))
}
render(): React.ReactNode {
const { onChildToFather: emitChildToFather } = this.props
const { fatherToChildMessage, childToFatherMessage } = this.state
return (
<div className={s.child}>
<h3>子组件</h3>
<p>父组件对我说:{fatherToChildMessage}</p>
<div className={s.messageInputBox}>
<section>
<label htmlFor="to-father">我对父组件说:</label>
<input
type="text"
id="to-father"
onChange={(e) =>
this.setState((state) => ({
...state,
childToFatherMessage: e.target.value,
}))
}
/>
</section>
{/* 子 -> 父 -- 使用 props 回调完成组件通信 */}
<button onClick={() => emitChildToFather(childToFatherMessage)}>
发送
</button>
</div>
</div>
)
}
}
2.2.2. 函数组件 ref 暴露指定方法
使用 useImperativeHandle hook 可以让我们指定 ref 引用时能获取到的属性和方法,个人认为相比类组件的 ref,使用这种方式能够更加好的控制组件想暴露给外界的 API
而不像类组件那样直接全部暴露出去,当然,如果你想在类组件中只暴露部分 API 的话,可以用前面说的合并转发自定义 ref 的方式去完成
接下来我们就用 useImperativeHandle hook 改造上面的类组件实现的 demo 吧
interface ChildRef {
setFatherToChildMessage: (message: string) => void
}
/**
* 父 -> 子 使用 ref
* 子 -> 父 使用 props 回调
*/
const CommunicationDemoFunctionComponentFather: React.FC = () => {
const [fatherToChildMessage, setFatherToChildMessage] = useState('')
const [childToFatherMessage, setChildToFatherMessage] = useState('')
const childRef = useRef<ChildRef>(null)
return (
<div className={s.father}>
<h3>父组件</h3>
<p>子组件对我说:{childToFatherMessage}</p>
<div className={s.messageInputBox}>
<section>
<label htmlFor="to-father">我对子组件说:</label>
<input
type="text"
id="to-child"
onChange={(e) => setFatherToChildMessage(e.target.value)}
/>
</section>
{/* 父 -> 子 -- 使用 ref 完成组件通信 */}
<button
onClick={() =>
childRef.current?.setFatherToChildMessage(fatherToChildMessage)
}
>
发送
</button>
</div>
<CommunicationDemoFunctionComponentChild
ref={childRef}
onChildToFather={(message) => setChildToFatherMessage(message)}
/>
</div>
)
}
interface CommunicationDemoFunctionComponentChildProps {
onChildToFather: (message: string) => void
}
const CommunicationDemoFunctionComponentChild = forwardRef<
ChildRef,
CommunicationDemoFunctionComponentChildProps
>((props, ref) => {
const { onChildToFather: emitChildToFather } = props
// 子组件自己维护状态 不依赖于父组件 props
const [fatherToChildMessage, setFatherToChildMessage] = useState('')
const [childToFatherMessage, setChildToFatherMessage] = useState('')
// 定义暴露给外界的 API
useImperativeHandle(ref, () => ({ setFatherToChildMessage }))
return (
<div className={s.child}>
<h3>子组件</h3>
<p>父组件对我说:{fatherToChildMessage}</p>
<div className={s.messageInputBox}>
<section>
<label htmlFor="to-father">我对父组件说:</label>
<input
type="text"
id="to-father"
onChange={(e) => setChildToFatherMessage(e.target.value)}
/>
</section>
{/* 子 -> 父 -- 使用 props 回调完成组件通信 */}
<button onClick={() => emitChildToFather(childToFatherMessage)}>
发送
</button>
</div>
</div>
)
})2.3. 函数组件缓存数据
当我们在函数组件中如果数据更新后不希望视图改变,也就是说视图不依赖于这个数据,这个时候可以考虑用 useRef 对这种数据进行缓存
为什么 useRef 可以对数据进行缓存?
还记得之前说的 useRef 在函数组件中的作用原理吗?
React 会将 useRef 和函数组件对应的 fiber 对象关联,将 useRef 创建的 ref 对象挂载到对应的 fiber 对象上,这样一来每次函数组件执行,只要函数组件不被销毁,那么对应的 fiber 对象实例也会一直存在,所以 ref 也能够被保留下来
利用这个特性,我们可以将数据放到 useRef 中,由于它在内存中一直都是同一块内存地址,所以无论如何变化都不会影响到视图的改变
:::warning{title=注意}
一定要看清前提,只适用于与视图无关的数据
:::
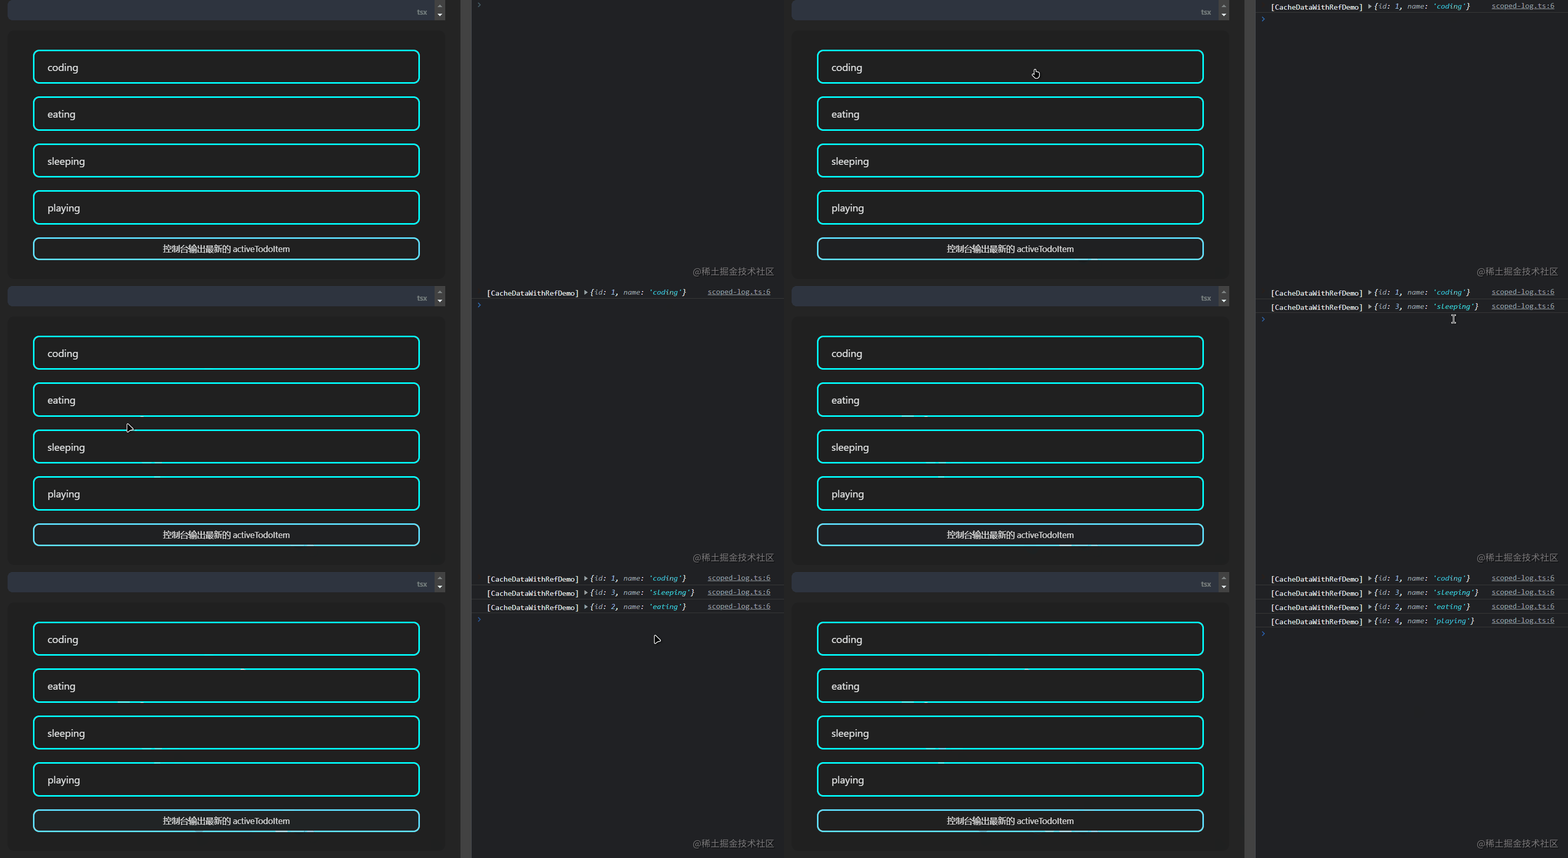
我们通过一个简单的 demo 来更清楚地体会下这个应用场景
假设我有一个 todoList 列表,视图上会把这个列表渲染出来,并且有一个数据 activeTodoItem 是控制当前选中的是哪个 todoItem
点击 todoItem 会切换这个 activeTodoItem,但是并不需要在视图上作出任何变化,如果使用 useState 去保存 activeTodoItem,那么当其变化时会导致函数组件重新执行,视图重新渲染,但在这个场景中我们并不希望更新视图
相对的,我们希望这个 activeTodoItem 数据被缓存起来,不会随着视图的重新渲染而导致其作为 useState 的执行结果重新生成一遍,因此我们可以改成用 useRef 实现,因为其在内存中一直都是同一块内存地址,这样就不会因为它的改变而更新视图了
同理,在 useEffect 中如果使用到了 useRef 的数据,也不需要将其声明到 deps 数组中,因为其内存地址不会变化,所以每次在 useEffect 中获取到的 ref 数据一定是最新的
interface TodoItem {
  id: number
  name: string
}

const todoList: TodoItem[] = [
  {
    id: 1,
    name: 'coding',
  },
  {
    id: 2,
    name: 'eating',
  },
  {
    id: 3,
    name: 'sleeping',
  },
  {
    id: 4,
    name: 'playing',
  },
]

const CacheDataWithRefDemo: React.FC = () => {
  const activeTodoItem = useRef(todoList[0])

  // 模拟 componentDidUpdate -- 如果改变 activeTodoItem 后组件没重新渲染,说明视图可以不依赖于 activeTodoItem 数据
  useEffect(() => {
    logger.log('检测组件是否有更新')
  })

  return (
    <div className={s.container}>
      <div className={s.list}>
        {todoList.map((todoItem) => (
          <div
            key={todoItem.id}
            className={s.item}
            onClick={() => (activeTodoItem.current = todoItem)}
          >
            <p>{todoItem.name}</p>
          </div>
        ))}
      </div>

      <button onClick={() => logger.log(activeTodoItem.current)}>
        控制台输出最新的 activeTodoItem
      </button>
    </div>
  )
}
3. 通过 callback ref 探究 ref 原理
首先先看一个关于 callback ref 的小 Demo 来引出我们后续的内容
interface RefDemo8State {
counter: number
}
class RefDemo8 extends React.Component<{}, RefDemo8State> {
state: Readonly<RefDemo8State> = {
counter: 0,
}
el: HTMLDivElement | null = null
render(): React.ReactNode {
return (
<div>
<div
ref={(el) => {
this.el = el
console.log('this.el -- ', this.el)
}}
>
ref element
</div>
<button
onClick={() => this.setState({ counter: this.state.counter + 1 })}
>
add
</button>
</div>
)
}
}
为什么会执行两次?为什么第一次 this.el === null?为什么第二次又正常了?
3.1. ref 的底层原理
还记得 React 底层是有 render 阶段和 commit 阶段的吗?关于 ref 的处理逻辑就在 commit 阶段进行的
React 底层有两个关于 ref 的处理函数 -- commitDetachRef 和 commitAttachRef
上面的 Demo 中 callback ref 执行了两次正是对应着这两次函数的调用,大致来讲可以理解为 commitDetachRef 在 DOM 更新之前执行,commitAttachRef 在 DOM 更新之后执行
这也就不难理解为什么会有上面 Demo 中的现象了,但我们还是要结合源码来看看,加深自己的理解
3.1.1. commitDetachRef
在新版本的 React 源码中它改名为了 safelyDetachRef,但是核心逻辑没变,这里我将核心逻辑简化出来供大家阅读:
packages/react-reconciler/src/ReactFiberCommitWork.js
function commitDetachRef(current: Fiber) {
  // current 是已经调和完了的 fiber 对象
  const currentRef = current.ref

  if (currentRef !== null) {
    if (typeof currentRef === 'function') {
      // callback ref 和 string ref 执行时机
      currentRef(null)
    } else {
      // object ref 处理时机
      currentRef.current = null
    }
  }
}
可以看到,就是从 fiber 中取出 ref,然后根据 callback ref、string ref、object ref 的情况进行处理
并且也能看到 commitDetachRef 主要是将 ref 置为 null,这也就是为什么 RefDemo8 中第一次执行的 callback ref 中看到的 this.el 是 null 了
3.1.2. commitAttachRef
核心逻辑代码如下:
function commitAttachRef(finishedWork: Fiber) {
  const ref = finishedWork.ref
  if (ref !== null) {
    const instance = finishedWork.stateNode
    let instanceToUse

    // 处理 ref 来源
    switch (finishedWork.tag) {
      // HostComponent 代表 DOM 元素类型的 tag
      case HostComponent:
        instanceToUse = getPublicInstance(instance)
        break

      // 类组件使用组件实例
      default:
        instanceToUse = instance
    }

    if (typeof ref === 'function') {
      // callback ref 和 string ref
      ref(instanceToUse)
    } else {
      // object ref
      ref.current = instanceToUse
    }
  }
}
3.2. 为什么 string ref 也是以函数的方式调用?
从上面的核心源码中能看到,对于 callback ref 和 string ref,都是统一以函数的方式调用,将 null 或 instanceToUse 传入
callback ref 这样做还能理解,但是为什么 string ref 也是这样处理呢?
因为当 React 检测到是 string ref 时,会自动绑定一个函数用于处理 string ref,核心源码逻辑如下:
packages/react-reconciler/src/ReactChildFiber.js
// 从元素上获取 ref
const mixedRef = element.ref
const stringRef = '' + mixedRef
const ref = function (value) {
  // resolvedInst 就是组件实例
  const refs = resolvedInst.refs

  if (value === null) {
    delete refs[stringRef]
  } else {
    refs[stringRef] = value
  }
}
这样一来 string ref 也变成了一个函数了,从而可以在 commitDetachRef 和 commitAttachRef 中被执行,并且也能印证为什么 string ref 会在类组件实例的 refs 属性中获取到
3.3. ref 的执行时机
为什么在 RefDemo8 中我们每次点击按钮时都会触发 commitDetachRef 和 commitAttachRef 呢?这就需要聊聊 ref 的执行时机了,而从上文也能够了解到,ref 底层实际上是由 commitDetachRef 和 commitAttachRef 在处理核心逻辑
那么我们就得来看看这两个函数的执行时机才能行
3.3.1. commitDetachRef 执行时机
packages/react-reconciler/src/ReactFiberCommitWork.js
function commitMutationEffectsOnFiber(
  finishedWork: Fiber,
  root: FiberRoot,
  lanes: Lanes,
) {
  const current = finishedWork.alternate
  const flags = finishedWork.flags

  if (flags & Ref) {
    if (current !== null) {
      // 也就是 commitDetachRef
      safelyDetachRef(current, current.return)
    }
  }
}
3.3.2. commitAttachRef 执行时机
packages/react-reconciler/src/ReactFiberCommitWork.js
function commitLayoutEffectOnFiber(
  finishedRoot: FiberRoot,
  current: Fiber | null,
  finishedWork: Fiber,
  committedLanes: Lanes,
) {
  const flags = finishedWork.flags

  if (flags & Ref) {
    safelyAttachRef(finishedWork, finishedWork.return)
  }
}
3.3.3. fiber 何时打上 Ref tag?
可以看到,只有当 fiber 被打上了 Ref 这个 flag tag 时才会去执行 commitDetachRef/commitAttachRef
那么什么时候会标记 Ref tag 呢?
packages/react-reconciler/src/ReactFiberBeginWork.js
function markRef(current: Fiber | null, workInProgress: Fiber) {
  const ref = workInProgress.ref

  if (
    // current === null 意味着是初次挂载,fiber 首次调和时会打上 Ref tag
    (current === null && ref !== null) ||
    // current !== null 意味着是更新,此时需要 ref 发生了变化才会打上 Ref tag
    (current !== null && current.ref !== ref)
  ) {
    // Schedule a Ref effect
    workInProgress.flags |= Ref
  }
}
3.3.4. 为什么每次点击按钮 callback ref 都会执行?
那么现在再回过头来思考 RefDemo8 中为什么每次点击按钮都会执行 commitDetachRef 和 commitAttachRef 呢?
注意我们使用 callback ref 的时候是如何使用的
<div
ref={(el) => {
this.el = el
console.log('this.el -- ', this.el)
}}
>
ref element
</div>是直接声明了一个箭头函数,这样的方式会导致每次渲染这个 div 元素时,给 ref 赋值的都是一个新的箭头函数,尽管函数的内容是一样的,但内存地址不同,因而 current.ref !== ref 这个判断条件会成立,从而每次都会触发更新
3.3.5. 如何解决?
那么要如何解决这个问题呢?既然我们已经知道了问题的原因,那么就好说了,只要让每次赋值给 ref 的函数都是同一个就可以了呗~
const logger = createLoggerWithScope('RefDemo9')
interface RefDemo9Props {}
interface RefDemo9State {
counter: number
}
class RefDemo9 extends React.Component<RefDemo9Props, RefDemo9State> {
state: Readonly<RefDemo9State> = {
counter: 0,
}
el: HTMLDivElement | null = null
constructor(props: RefDemo9Props) {
super(props)
this.setElRef = this.setElRef.bind(this)
}
setElRef(el: HTMLDivElement | null) {
this.el = el
logger.log('this.el -- ', this.el)
}
render(): React.ReactNode {
return (
<div>
<div ref={this.setElRef}>ref element</div>
<button
onClick={() => this.setState({ counter: this.state.counter + 1 })}
>
add
</button>
</div>
)
}
}
这样就完美解决啦,既修复了 bug,又搞懂了 ref 的底层原理,一举两得!
4. 总结
本篇文章我们学习到了:
- ref 的理解与使用,包括如何创建 ref 对象,以及除了 object ref 之外的 string ref 和 callback ref 的方式去使用 ref
- ref 的高阶用法,包括 forwardRef 转发 ref、ref 实现组件通信、利用 ref 在函数组件中缓存数据等
- 通过一个简单的 callback ref 的 Demo 研究 ref 的底层原理,string ref 为何也是以函数的方式被调用,以及 ref 的执行时机
【推荐学习:javascript视频教程】
以上是深入详解React中的ref的详细内容。更多信息请关注PHP中文网其他相关文章!
 JavaScript数据类型:浏览器和nodejs之间是否有区别?May 14, 2025 am 12:15 AM
JavaScript核心数据类型在浏览器和Node.js中一致,但处理方式和额外类型有所不同。1)全局对象在浏览器中为window,在Node.js中为global。2)Node.js独有Buffer对象,用于处理二进制数据。3)性能和时间处理在两者间也有差异,需根据环境调整代码。
 JavaScript评论:使用//和 / * * / * / * /May 13, 2025 pm 03:49 PM
JavaScriptusestwotypesofcomments:single-line(//)andmulti-line(//).1)Use//forquicknotesorsingle-lineexplanations.2)Use//forlongerexplanationsorcommentingoutblocksofcode.Commentsshouldexplainthe'why',notthe'what',andbeplacedabovetherelevantcodeforclari
 Python vs. JavaScript:开发人员的比较分析May 09, 2025 am 12:22 AM
Python和JavaScript的主要区别在于类型系统和应用场景。1.Python使用动态类型,适合科学计算和数据分析。2.JavaScript采用弱类型,广泛用于前端和全栈开发。两者在异步编程和性能优化上各有优势,选择时应根据项目需求决定。
 Python vs. JavaScript:选择合适的工具May 08, 2025 am 12:10 AM
选择Python还是JavaScript取决于项目类型:1)数据科学和自动化任务选择Python;2)前端和全栈开发选择JavaScript。Python因其在数据处理和自动化方面的强大库而备受青睐,而JavaScript则因其在网页交互和全栈开发中的优势而不可或缺。
 Python和JavaScript:了解每个的优势May 06, 2025 am 12:15 AM
Python和JavaScript各有优势,选择取决于项目需求和个人偏好。1.Python易学,语法简洁,适用于数据科学和后端开发,但执行速度较慢。2.JavaScript在前端开发中无处不在,异步编程能力强,Node.js使其适用于全栈开发,但语法可能复杂且易出错。
 JavaScript的核心:它是在C还是C上构建的?May 05, 2025 am 12:07 AM
javascriptisnotbuiltoncorc; saninterpretedlanguagethatrunsonenginesoftenwritteninc.1)javascriptwasdesignedAsalightweight,解释edganguageforwebbrowsers.2)Enginesevolvedfromsimpleterterterpretpreterterterpretertestojitcompilerers,典型地提示。
 JavaScript应用程序:从前端到后端May 04, 2025 am 12:12 AM
JavaScript可用于前端和后端开发。前端通过DOM操作增强用户体验,后端通过Node.js处理服务器任务。1.前端示例:改变网页文本内容。2.后端示例:创建Node.js服务器。
 Python vs. JavaScript:您应该学到哪种语言?May 03, 2025 am 12:10 AM
选择Python还是JavaScript应基于职业发展、学习曲线和生态系统:1)职业发展:Python适合数据科学和后端开发,JavaScript适合前端和全栈开发。2)学习曲线:Python语法简洁,适合初学者;JavaScript语法灵活。3)生态系统:Python有丰富的科学计算库,JavaScript有强大的前端框架。


热AI工具

Undresser.AI Undress
人工智能驱动的应用程序,用于创建逼真的裸体照片

AI Clothes Remover
用于从照片中去除衣服的在线人工智能工具。

Undress AI Tool
免费脱衣服图片

Clothoff.io
AI脱衣机

Video Face Swap
使用我们完全免费的人工智能换脸工具轻松在任何视频中换脸!

热门文章

热工具

禅工作室 13.0.1
功能强大的PHP集成开发环境

VSCode Windows 64位 下载
微软推出的免费、功能强大的一款IDE编辑器

PhpStorm Mac 版本
最新(2018.2.1 )专业的PHP集成开发工具

适用于 Eclipse 的 SAP NetWeaver 服务器适配器
将Eclipse与SAP NetWeaver应用服务器集成。

安全考试浏览器
Safe Exam Browser是一个安全的浏览器环境,用于安全地进行在线考试。该软件将任何计算机变成一个安全的工作站。它控制对任何实用工具的访问,并防止学生使用未经授权的资源。


