react生命周期的三个过程:1、挂载期,也叫实例化期,是一个组件实例初次被创建的过程;2、更新期,也被称为存在期,是组件在创建之后再次渲染的过程;3、卸载期,也被称为销毁期,是组件在使用完后被销毁的过程。

本教程操作环境:Windows10系统、react17.0.1版、Dell G3电脑。
react生命周期的三个过程是什么
React的生命周期从广义上分为三个阶段:挂载、渲染、卸载
从出生到成长,最后到死亡,这个过程的时间可以理解为生命周期。React的生命周期同理也是这么一个过程。
React的生命周期分为三个阶段:挂载期(也叫实例化期)、更新期(也叫存在期)、卸载期(也叫销毁期)。在每个周期中React都提供了一些钩子函数。
生命周期的描述如下:
挂载期:一个组件实例初次北创建的过程。
更新期:组件在创建后再次渲染的过程。
卸载期:组件在使用完后被销毁的过程。
组件的挂载:
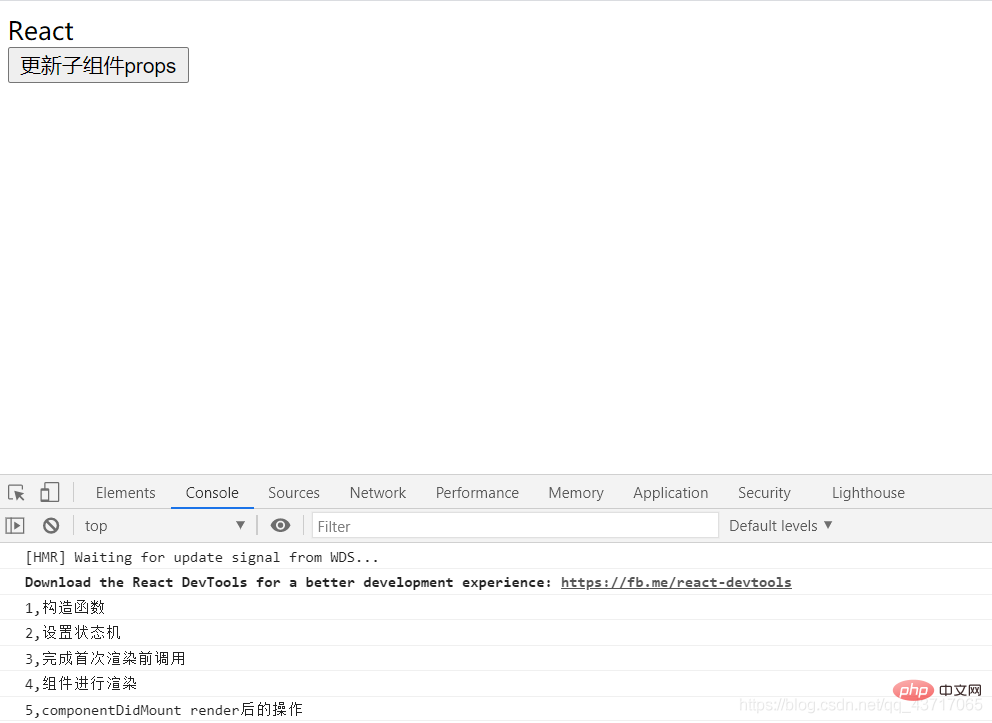
组件在首次创建后,进行第一次的渲染为挂载期。挂载期有的一些方法会被依次触发,列举如下:
- constructor(构造函数,初始化状态值)
- getInitialState(设置状态机)
- getDefaultProps(获取默认的props)
- UNSAFE_componentWillMount(首次渲染前执行)
- render(渲染组件)
- componentDidMount(render渲染之后执行的操作)
//组件挂载import React from 'react';import ReactDOM from 'react-dom';class HelloWorld extends React.Component{
    constructor(props) {
        super(props);
        console.log("1,构造函数");
        this.state={};
        console.log("2,设置状态机");
    }
    static defaultProps={
        name:"React",
    }
    UNSAFE_componentWillMount(nextProps, nextState, nextContext) {
        console.log("3,完成首次渲染前调用");
    }
    render() {
        console.log("4,组件进行渲染");
        return (
            <p>
                <p>{this.props.name}</p>
            </p>
        )
    }
    componentDidMount() {
        console.log("5,componentDidMount render渲染后的操作")
    }}ReactDOM.render(<HelloWorld />, document.getElementById('root'));

组件的更新:
组件更新,指的是在组件初次渲染后,进行了组件状态的改变。React在生命周期中的更新过程包括以下几个方法:
- UNSAFE_componentWillReceiveProps :当父组件更新子组件state时,该方法会被调用。
- shouldComponentUpdate : 该方法决定组件state或props的改变是否需要重新渲染组件。
- UNSAFE_componentWillUpdate : 在组件接受新的state或者props时,即将进行重新渲染前调用该方法,和UNSAFE_componentWillMount方法类似。
- componentDidUpdate : 在组件重新渲染后调用该方法,和componentDidMount方法类似。
//组件更新class HelloWorldFather extends React.Component{
    constructor(props) {
        super(props);
        this.updateChildProps=this.updateChildProps.bind(this);
        this.state={  //初始化父组件
            name:"React"
        }
    }
    updateChildProps(){  //更新父组件state
        this.setState({
            name:"Vue"
        })
    }
    render() {
        return (
            <p>
                <HelloWorld name={this.state.name} />  {/*父组件的state传递给子组件*/}
                <button onClick={this.updateChildProps}>更新子组件props</button>
            </p>
        )
    }}class HelloWorld extends React.Component{
    constructor(props) {
        super(props);
        console.log("1,构造函数");
        console.log("2,设置状态机")
    }
    UNSAFE_componentWillMount() {
        console.log("3,完成首次渲染前调用");
    }
    UNSAFE_componentWillReceiveProps(nextProps, nextContext) {
        console.log("6,父组件更新子组件时调用该方法");
    }
    shouldComponentUpdate(nextProps, nextState, nextContext) {
        console.log("7,决定组件props或者state的改变是否需要重新进行渲染");
        return true;
    }
    UNSAFE_componentWillUpdate(nextProps, nextState, nextContext) {
        console.log("8,当接收到新的props或state时,调用该方法");
    }
    render() {
        console.log("4,组件进行渲染");
        return (
            <p>
                <p>{this.props.name}</p>
            </p>
        )
    }
    componentDidMount() {
        console.log("5,componentDidMount render后的操作");
    }
    componentDidUpdate(prevProps, prevState, snapshot) {
        console.log("9,组件被重新选然后调用该方法");
    }}ReactDOM.render(<HelloWorldFather />,document.getElementById("root"));
点击“更新子组件props”后: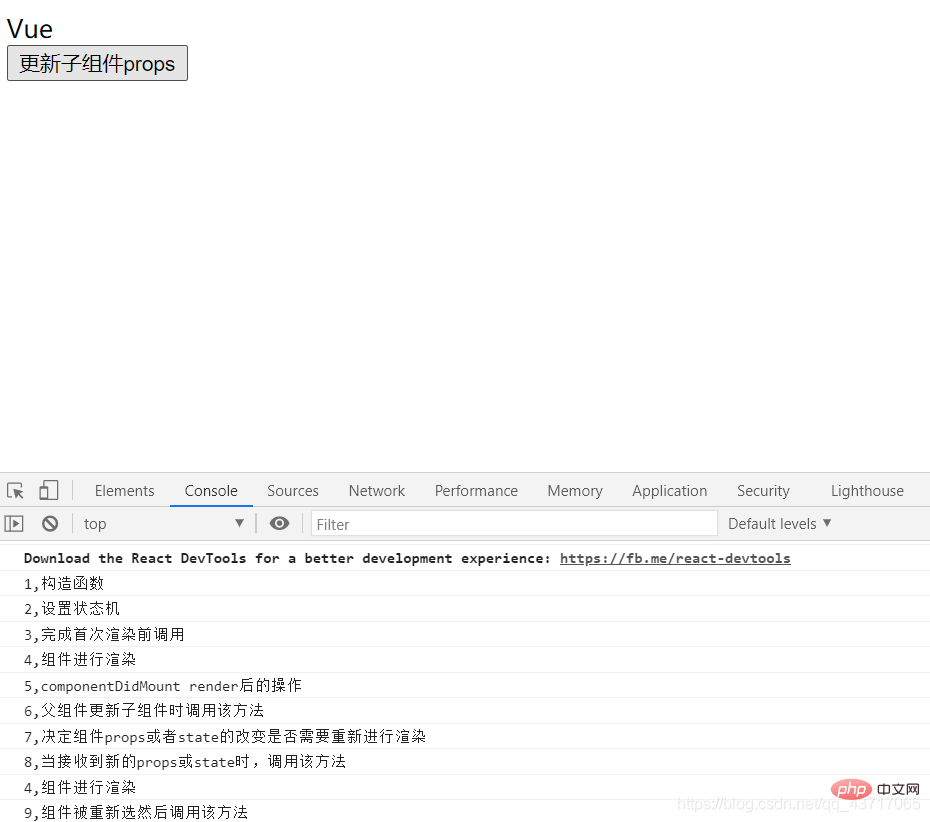
组件的卸载:
生命周期的最后一个过程为组件卸载期,也称为组件销毁期。该过程主要涉及一个 方法,即componentWillUnmount,当组件从DOM树删除的时候调用该方法。
//组件卸载class HelloWorldFather extends React.Component{
    constructor(props) {
        super(props);
        this.updateChildProps=this.updateChildProps.bind(this);
        this.state={  //初始化父组件
            name:"React"
        }
    }
    updateChildProps(){  //更新父组件state
        this.setState({
            name:"Vue"
        })
    }
    render() {
        return (
            <p>
                <HelloWorld name={this.state.name} />  {/*父组件的state传递给子组件*/}
                <button onClick={this.updateChildProps}>更新子组件props</button>
            </p>
        )
    }}class HelloWorld extends React.Component{
    constructor(props) {
        super(props);
        console.log("1,构造函数");
        console.log("2,设置状态机")
    }
    UNSAFE_componentWillMount() {
        console.log("3,完成首次渲染前调用");
    }
    UNSAFE_componentWillReceiveProps(nextProps, nextContext) {
        console.log("6,父组件更新子组件时调用该方法");
    }
    shouldComponentUpdate(nextProps, nextState, nextContext) {
        console.log("7,决定组件props或者state的改变是否需要重新进行渲染");
        return true;
    }
    UNSAFE_componentWillUpdate(nextProps, nextState, nextContext) {
        console.log("8,当接收到新的props或state时,调用该方法");
    }
    delComponent(){  //添加卸载方法
        ReactDOM.unmountComponentAtNode(document.getElementById("root"));
    }
    render() {
        console.log("4,组件进行渲染");
        return (
            <p>
                <p>{this.props.name}</p>
                <button onClick={this.delComponent}>卸载组件</button>  {/*声明卸载按钮*/}
            </p>
        )
    }
    componentDidMount() {
        console.log("5,componentDidMount render后的操作");
    }
    componentDidUpdate(prevProps, prevState, snapshot) {
        console.log("9,组件被重新选然后调用该方法");
    }
    componentWillUnmount() {  //组件卸载后执行
        console.log("10,组件已被卸载");
    }}ReactDOM.render(<HelloWorldFather />,document.getElementById("root"));
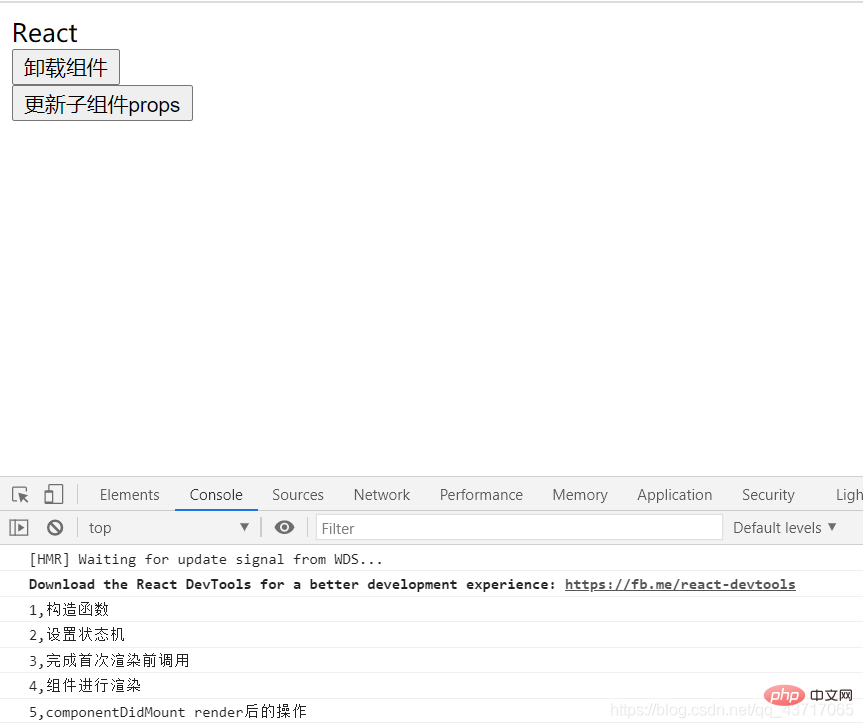
点击卸载按钮后: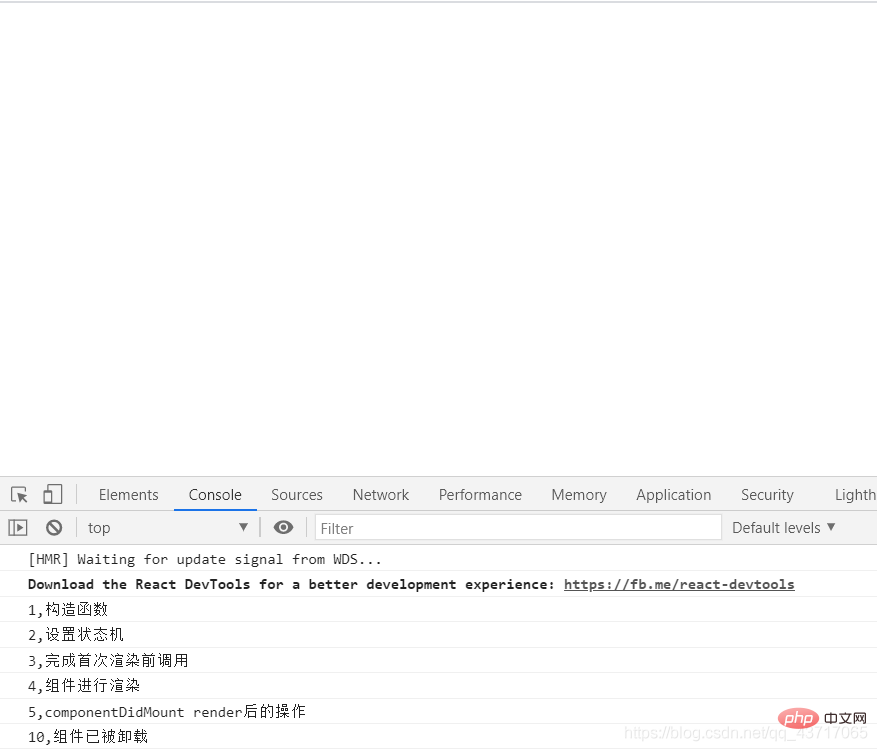
总览组件生命周期: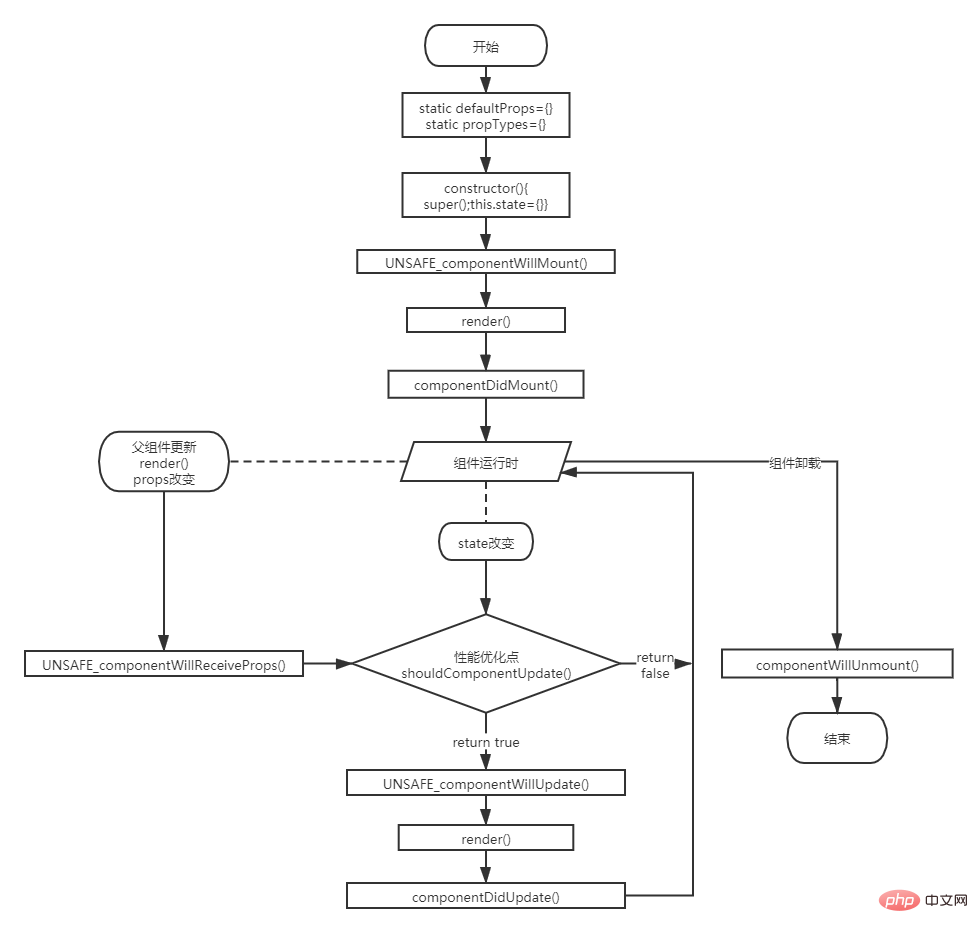
【相关推荐:javascript视频教程、web前端】
以上是react生命周期的三个过程是什么的详细内容。更多信息请关注PHP中文网其他相关文章!
 HTML和React的集成:实用指南Apr 21, 2025 am 12:16 AM
HTML与React可以通过JSX无缝整合,构建高效的用户界面。1)使用JSX嵌入HTML元素,2)利用虚拟DOM优化渲染性能,3)通过组件化管理和渲染HTML结构。这种整合方式不仅直观,还能提升应用性能。
 React和HTML:渲染数据和处理事件Apr 20, 2025 am 12:21 AM
React通过state和props高效渲染数据,并通过合成事件系统处理用户事件。1)使用useState管理状态,如计数器示例。2)事件处理通过在JSX中添加函数实现,如按钮点击。3)渲染列表需使用key属性,如TodoList组件。4)表单处理需使用useState和e.preventDefault(),如Form组件。
 后端连接:反应如何与服务器互动Apr 20, 2025 am 12:19 AM
React通过HTTP请求与服务器交互,实现数据的获取、发送、更新和删除。1)用户操作触发事件,2)发起HTTP请求,3)处理服务器响应,4)更新组件状态并重新渲染。
 反应:专注于用户界面(前端)Apr 20, 2025 am 12:18 AM
React是一种用于构建用户界面的JavaScript库,通过组件化开发和虚拟DOM提高效率。1.组件与JSX:使用JSX语法定义组件,增强代码直观性和质量。2.虚拟DOM与渲染:通过虚拟DOM和diff算法优化渲染性能。3.状态管理与Hooks:Hooks如useState和useEffect简化状态管理和副作用处理。4.使用示例:从基本表单到高级的全局状态管理,使用ContextAPI。5.常见错误与调试:避免状态管理不当和组件更新问题,使用ReactDevTools调试。6.性能优化与最佳
 React的角色:前端还是后端?澄清区别Apr 20, 2025 am 12:15 AM
reactisafrontendlibrary,focusedonBuildingUserInterfaces.itmanagesuistateandupdatesefficefited fichifited firstualdom,以及EnternactSwithBackendServensEvesviaApisforDataHandling,butdoesnotprocessorsorstoredordordoredaiteffers。
 在HTML中进行反应:构建交互式用户界面Apr 20, 2025 am 12:05 AM
React可以嵌入到HTML中来增强或完全重写传统的HTML页面。1)使用React的基本步骤包括在HTML中添加一个根div,并通过ReactDOM.render()渲染React组件。2)更高级的应用包括使用useState管理状态和实现复杂的UI交互,如计数器和待办事项列表。3)优化和最佳实践包括代码分割、惰性加载和使用React.memo和useMemo来提高性能。通过这些方法,开发者可以利用React的强大功能来构建动态和响应迅速的用户界面。
 反应:现代前端发展基础Apr 19, 2025 am 12:23 AM
React是构建现代前端应用的JavaScript库。1.它采用组件化和虚拟DOM优化性能。2.组件使用JSX定义,状态和属性管理数据。3.Hooks简化生命周期管理。4.使用ContextAPI管理全局状态。5.常见错误需调试状态更新和生命周期。6.优化技巧包括Memoization、代码拆分和虚拟滚动。
 React的未来:Web开发的趋势和创新Apr 19, 2025 am 12:22 AM
React的未来将专注于组件化开发的极致、性能优化和与其他技术栈的深度集成。1)React将进一步简化组件的创建和管理,推动组件化开发的极致。2)性能优化将成为重点,特别是在大型应用中的表现。3)React将与GraphQL和TypeScript等技术深度集成,提升开发体验。


热AI工具

Undresser.AI Undress
人工智能驱动的应用程序,用于创建逼真的裸体照片

AI Clothes Remover
用于从照片中去除衣服的在线人工智能工具。

Undress AI Tool
免费脱衣服图片

Clothoff.io
AI脱衣机

Video Face Swap
使用我们完全免费的人工智能换脸工具轻松在任何视频中换脸!

热门文章

热工具

禅工作室 13.0.1
功能强大的PHP集成开发环境

Dreamweaver CS6
视觉化网页开发工具

EditPlus 中文破解版
体积小,语法高亮,不支持代码提示功能

SublimeText3 英文版
推荐:为Win版本,支持代码提示!

MinGW - 适用于 Windows 的极简 GNU
这个项目正在迁移到osdn.net/projects/mingw的过程中,你可以继续在那里关注我们。MinGW:GNU编译器集合(GCC)的本地Windows移植版本,可自由分发的导入库和用于构建本地Windows应用程序的头文件;包括对MSVC运行时的扩展,以支持C99功能。MinGW的所有软件都可以在64位Windows平台上运行。


