


本篇文章给大家带来了关于java的相关知识,其中主要整理了O流原理及流的分类的相关问题,包括了节点流、缓冲流、转换流、输出流等等内容,下面一起来看一下,希望对大家有帮助。

推荐学习:《java视频教程》
一、概述
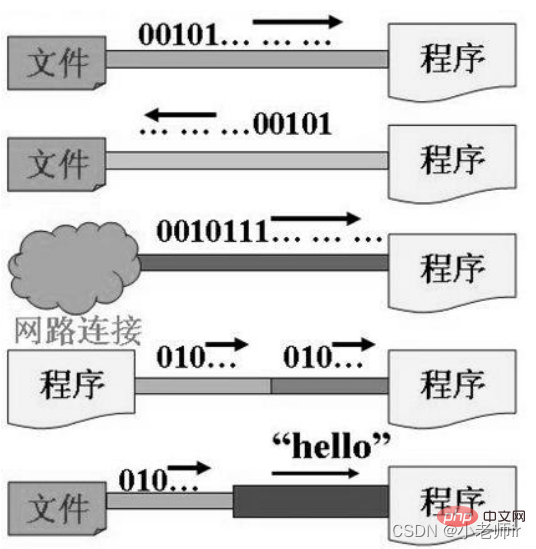
I/O是Input/Output的缩写,I/O技术是非常实用的技术,用于处理设备之间的数据传输。如读/写文件,网络通讯等。
- 输入
input:读取外部数据(磁 盘、光盘等存储设备的数据)到程序(内存)中。- 输出
output:将程序(内存)数据输出到磁盘、光盘等存储设 备中。
Java程序中,对于数据的输入/输出操作以“流(
stream)” 的方式进行。
java.io包下提供了各种“流”类和接口,用以获取不种类的数据,并通过标准的方法输入或输出数据。
二、流的分类
1. 概述
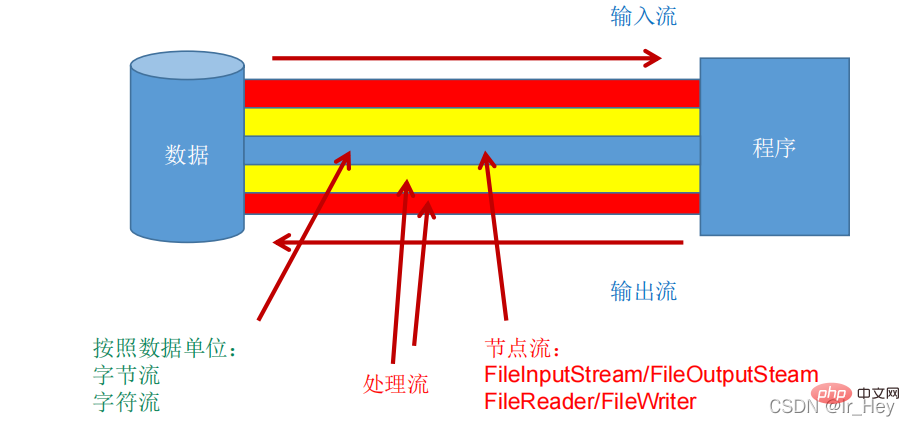
按操作数据单位不同分为:字节流(8
bit),字符流(16bit)
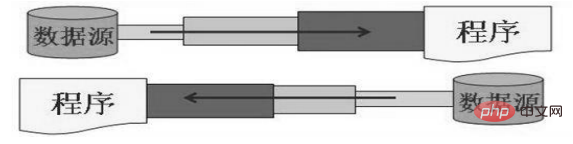
按数据流的流向不同分为:输入流,输出流
按流的角色的不同分为:节点流,处理流
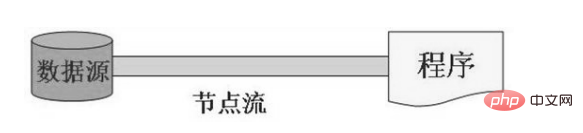
节点流:直接从数据源或目的地读写数据
处理流:不直接连接到数据源或目的地,而是“连接”在已存在的流(节点流或处理流)之上,通过对数据的处理为程序提供更为强大的读写功能。
Java的IO流共涉及40多个类,实际上非常规则,都是从以上4个抽象基类派生的,由这4个类派生出来的子类名称都是以其父类名作为子类名后缀。
| (抽象基类) | 字节流 | 字符流 |
|---|---|---|
| 输入流 | InputStream |
Reader |
| 输出流 | OutputStream |
Writer |
IO 流体系体系:
2. InputStream
概述
典型实现:
FileInputStream
方法
| 方法 | 描述 |
|---|---|
int read() |
从输入流中读取数据的下一个字节。返回 0 到 255 范围内的 int 字节值。如果因为已经到达流末尾而没有可用的字节,则返回值 -1。 |
int read(byte[] b) |
从此输入流中将最多 b.length 个字节的数据读入一个 byte 数组中。如果因为已经到达流末尾而没有可用的字节,则返回值 -1。否则以整数形式返回实际读取的字节数。 |
int read(byte[] b, int off,int len) |
将输入流中最多 len 个数据字节读入 byte 数组。尝试读取 len 个字节,但读取的字节也可能小于该值。以整数形式返回实际读取的字节数。如果因为流位于文件末尾而没有可用的字节,则返回值 -1。 |
public void close() throws IOException |
关闭此输入流并释放与该流关联的所有系统资源 |
典型实现类:FileInputStream
代码演示:
@Test
    public void testFileInputStream() {
        FileInputStream fis = null;
        try {
            //1. 造文件
            File file = new File("hello.txt");

            //2.造流
            fis = new FileInputStream(file);

            //3.读数据
            byte[] buffer = new byte[5];
            int len;//记录每次读取的字节的个数
            while((len = fis.read(buffer)) != -1){

                String str = new String(buffer,0,len);
                System.out.print(str);

            }
        } catch (IOException e) {
            e.printStackTrace();
        } finally {
            if(fis != null){
                //4.关闭资源
                try {
                    fis.close();
                } catch (IOException e) {
                    e.printStackTrace();
                }

            }
        }
    }
3. Reader
概述
典型实现类:
FileReader
方法
| 方法 | 描述 |
|---|---|
int read() |
读取单个字符。作为整数读取的字符,范围在 0 到 65535 之间 (0x00-0xffff)(2个字节的Unicode码),如果已到达流的末尾,则返回 -1 |
int read(char[] cbuf) |
将字符读入数组。如果已到达流的末尾,则返回 -1。否则返回本次读取的字符数。 |
int read(char[] cbuf,int off,int len) |
将字符读入数组的某一部分。存到数组cbuf中,从off处开始存储,最多读len个字符。如果已到达流的末尾,则返回 -1。否则返回本次读取的字符数。 |
public void close() throws IOException |
关闭此输入流并释放与该流关联的所有系统资源。 |
典型实现类:FileReader
@Test
    public void testFileReader(){
        FileReader fr = null;
        try {
            //1.实例化File类的对象,指明要操作的文件
            File file = new File("hello.txt");//相较于当前Module
            //2.提供具体的流
            fr = new FileReader(file);

            //3.数据的读入
            //read():返回读入的一个字符。如果达到文件末尾,返回-1
            //方式一://        int data = fr.read();//        while(data != -1){//            System.out.print((char)data);//            data = fr.read();//        }

            //方式二:语法上针对于方式一的修改
            int data;
            while((data = fr.read()) != -1){
                System.out.print((char)data);
            }
        } catch (IOException e) {
            e.printStackTrace();
        } finally {
            //4.流的关闭操作//            try {//                if(fr != null)//                    fr.close();//            } catch (IOException e) {//                e.printStackTrace();//            }
            //或
            if(fr != null){
                try {
                    fr.close();
                } catch (IOException e) {
                    e.printStackTrace();
                }
            }
        }

    }

    //对read()操作升级:使用read的重载方法
    @Test
    public void testFileReader1()  {
        FileReader fr = null;
        try {
            //1.File类的实例化
            File file = new File("hello.txt");

            //2.FileReader流的实例化
            fr = new FileReader(file);

            //3.读入的操作
            //read(char[] cbuf):返回每次读入cbuf数组中的字符的个数。如果达到文件末尾,返回-1
            char[] cbuf = new char[5];
            int len;
            while((len = fr.read(cbuf)) != -1){
                //方式一:
                //错误的写法//                for(int i = 0;i < cbuf.length;i++){//                    System.out.print(cbuf[i]);//                }
                //正确的写法//                for(int i = 0;i < len;i++){//                    System.out.print(cbuf[i]);//                }
                //方式二:
                //错误的写法,对应着方式一的错误的写法//                String str = new String(cbuf);//                System.out.print(str);
                //正确的写法
                String str = new String(cbuf,0,len);
                System.out.print(str);
            }
        } catch (IOException e) {
            e.printStackTrace();
        } finally {
            if(fr != null){
                //4.资源的关闭
                try {
                    fr.close();
                } catch (IOException e) {
                    e.printStackTrace();
                }

            }
        }

    }
4. OutputStream
概述
典型实现:
FileOutputStream
方法
| 方法 | 描述 |
|---|---|
void write(int b) | 将指定的字节写入此输出流。write 的常规协定是:向输出流写入一个字节。要写入的字节是参数 b 的八个低位。b 的 24 个高位将被忽略。 即写入0~255范围的。 |
void write(byte[] b) | 将 b.length 个字节从指定的 byte 数组写入此输出流。write(b) 的常规协定是:应该与调用 write(b, 0, b.length) 的效果完全相同。 |
void write(byte[] b,int off,int len) | 将指定 byte 数组中从偏移量 off 开始的 len 个字节写入此输出流。 |
public void flush()throws IOException | 刷新此输出流并强制写出所有缓冲的输出字节,调用此方法指示应将这些字节立即写入它们预期的目标。 |
public void close() throws IOException | 关闭此输出流并释放与该流关联的所有系统资源。 |
主要实现类:FileInputOutputStream
/*
    实现对图片的复制操作
     */
    @Test
    public void testFileInputOutputStream()  {
        FileInputStream fis = null;
        FileOutputStream fos = null;
        try {
            //
            File srcFile = new File("爱情与友情.jpg");
            File destFile = new File("爱情与友情2.jpg");

            //
            fis = new FileInputStream(srcFile);
            fos = new FileOutputStream(destFile);

            //复制的过程
            byte[] buffer = new byte[5];
            int len;
            while((len = fis.read(buffer)) != -1){
                fos.write(buffer,0,len);
            }

        } catch (IOException e) {
            e.printStackTrace();
        } finally {
            if(fos != null){
                //
                try {
                    fos.close();
                } catch (IOException e) {
                    e.printStackTrace();
                }
            }
            if(fis != null){
                try {
                    fis.close();
                } catch (IOException e) {
                    e.printStackTrace();
                }

            }
        }

    }
5. Writer
概述
典型实现:
FileWriter
方法
| 方法 | 描述 |
|---|---|
void write(int c) | 写入单个字符。要写入的字符包含在给定整数值的 16 个低位中,16 高位被忽略。 即写入0 到 65535 之间的Unicode码。 |
void write(char[] cbuf) | 写入字符数组。 |
void write(char[] cbuf,int off,int len) | 写入字符数组的某一部分。从off开始,写入len个字符 |
void write(String str) | 写入字符串。 |
void write(String str,int off,int len) | 写入字符串的某一部分。 |
void flush() | 刷新该流的缓冲,则立即将它们写入预期目标。 |
public void close() throws IOException | 关闭此输出流并释放与该流关联的所有系统资源。 |
主要实现类:FileWriter
- 概述
输出操作,对应的
File可以不存在的。并不会报异常
File对应的硬盘中的文件如果不存在,在输出的过程中,会自动创建此文件。
File对应的硬盘中的文件如果存在:
- 如果流使用的构造器是:
FileWriter(file,false) / FileWriter(file):对原有文件的覆盖- 如果流使用的构造器是:
FileWriter(file,true):不会对原有文件覆盖,而是在原有文件基础上追加内容
- 代码演示
//从内存中写出数据到硬盘的文件里。
    @Test
    public void testFileWriter() {
        FileWriter fw = null;
        try {
            //1.提供File类的对象,指明写出到的文件
            File file = new File("hello1.txt");

            //2.提供FileWriter的对象,用于数据的写出
            fw = new FileWriter(file,false);

            //3.写出的操作
            fw.write("I have a dream!\n");
            fw.write("you need to have a dream!");
        } catch (IOException e) {
            e.printStackTrace();
        } finally {
            //4.流资源的关闭
            if(fw != null){

                try {
                    fw.close();
                } catch (IOException e) {
                    e.printStackTrace();
                }
            }
        }
    }
6. 练习:复制操作
代码演示:
- 实现对文本的复制操作
 @Test
    public void testFileReaderFileWriter() {
        FileReader fr = null;
        FileWriter fw = null;
        try {
            //1.创建File类的对象,指明读入和写出的文件
            File srcFile = new File("hello.txt");
            File destFile = new File("hello2.txt");

            //不能使用字符流来处理图片等字节数据//            File srcFile = new File("爱情与友情.jpg");//            File destFile = new File("爱情与友情1.jpg");


            //2.创建输入流和输出流的对象
            fr = new FileReader(srcFile);
            fw = new FileWriter(destFile);


            //3.数据的读入和写出操作
            char[] cbuf = new char[5];
            int len;//记录每次读入到cbuf数组中的字符的个数
            while((len = fr.read(cbuf)) != -1){
                //每次写出len个字符
                fw.write(cbuf,0,len);

            }
        } catch (IOException e) {
            e.printStackTrace();
        } finally {
            //4.关闭流资源
            //方式一://            try {//                if(fw != null)//                    fw.close();//            } catch (IOException e) {//                e.printStackTrace();//            }finally{//                try {//                    if(fr != null)//                        fr.close();//                } catch (IOException e) {//                    e.printStackTrace();//                }//            }
            //方式二:
            try {
                if(fw != null)
                    fw.close();
            } catch (IOException e) {
                e.printStackTrace();
            }

            try {
                if(fr != null)
                    fr.close();
            } catch (IOException e) {
                e.printStackTrace();
            }
        }
}}- 实现对图片的复制操作
    @Test
    public void testFileInputOutputStream()  {
        FileInputStream fis = null;
        FileOutputStream fos = null;
        try {
            //
            File srcFile = new File("爱情与友情.jpg");
            File destFile = new File("爱情与友情2.jpg");

            //
            fis = new FileInputStream(srcFile);
            fos = new FileOutputStream(destFile);

            //复制的过程
            byte[] buffer = new byte[5];
            int len;
            while((len = fis.read(buffer)) != -1){
                fos.write(buffer,0,len);
            }

        } catch (IOException e) {
            e.printStackTrace();
        } finally {
            if(fos != null){
                //
                try {
                    fos.close();
                } catch (IOException e) {
                    e.printStackTrace();
                }
            }
            if(fis != null){
                try {
                    fis.close();
                } catch (IOException e) {
                    e.printStackTrace();
                }

            }
        }

    }

    //指定路径下文件的复制
    public void copyFile(String srcPath,String destPath){
        FileInputStream fis = null;
        FileOutputStream fos = null;
        try {
            //
            File srcFile = new File(srcPath);
            File destFile = new File(destPath);

            //
            fis = new FileInputStream(srcFile);
            fos = new FileOutputStream(destFile);

            //复制的过程
            byte[] buffer = new byte[1024];
            int len;
            while((len = fis.read(buffer)) != -1){
                fos.write(buffer,0,len);
            }

        } catch (IOException e) {
            e.printStackTrace();
        } finally {
            if(fos != null){
                //
                try {
                    fos.close();
                } catch (IOException e) {
                    e.printStackTrace();
                }
            }
            if(fis != null){
                try {
                    fis.close();
                } catch (IOException e) {
                    e.printStackTrace();
                }

            }
        }


    }

    @Test
    public void testCopyFile(){

        long start = System.currentTimeMillis();

        String srcPath = "C:\\Users\\Administrator\\Desktop\\01-视频.avi";
        String destPath = "C:\\Users\\Administrator\\Desktop\\02-视频.avi";//        String srcPath = "hello.txt";//        String destPath = "hello3.txt";

        copyFile(srcPath,destPath);


        long end = System.currentTimeMillis();

        System.out.println("复制操作花费的时间为:" + (end - start));//618
    }}
三、节点流(或文件流)
1. 概述
定义文件路径时,注意:可以用“
/”或者“\\”。
在写入一个文件时,如果使用构造器
FileOutputStream(file),则目录下有同名文 件将被覆盖。 如果使用构造器FileOutputStream(file,true),则目录下的同名文件不会被覆盖, 在文件内容末尾追加内容。
在读取文件时,必须保证该文件已存在,否则报异常。
字节流操作字节,比如:
.mp3,.avi,.rmvb,.mp4,.jpg,.doc,.ppt
字符流操作字符,只能操作普通文本文件。最常见的文本文件:
txt,.java,.c,.cpp等语言的源代码。尤其注意.doc,excel,ppt这些不是文本文件。
2. 读取文件
- 概述
1.建立一个流对象,将已存在的一个文件加载进流。
java FileReader fr = new FileReader(new File(“Test.txt”));2.创建一个临时存放数据的数组。
java char[] ch = new char[1024];3.调用流对象的读取方法将流中的数据读入到数组中。
java fr.read(ch);4.关闭资源。
java fr.close();
- 代码演示
FileReader fr = null;try {fr = new FileReader(new File("c:\\test.txt"));char[] buf = new char[1024];int len;while ((len = fr.read(buf)) != -1) {System.out.print(new String(buf, 0, len));}} catch (IOException e) {System.out.println("read-Exception :" + e.getMessage());} finally {if (fr != null) {try {fr.close();} catch (IOException e) {System.out.println("close-Exception :" + e.getMessage());} } }3. 写入文件
- 概述
1.创建流对象,建立数据存放文件
FileWriter fw = new FileWriter(new File(“Test.txt”));
2.调用流对象的写入方法,将数据写入流fw.write(“atguigu-songhongkang”);
3.关闭流资源,并将流中的数据清空到文件中。fw.close();
- 代码演示
FileWriter fw = null;try {fw = new FileWriter(new File("Test.txt"));fw.write("atguigu-songhongkang");} catch (IOException e) {e.printStackTrace();} finally {if (fw != null)try {fw.close();} catch (IOException e) {e.printStackTrace();} }四、缓冲流
1. 概述
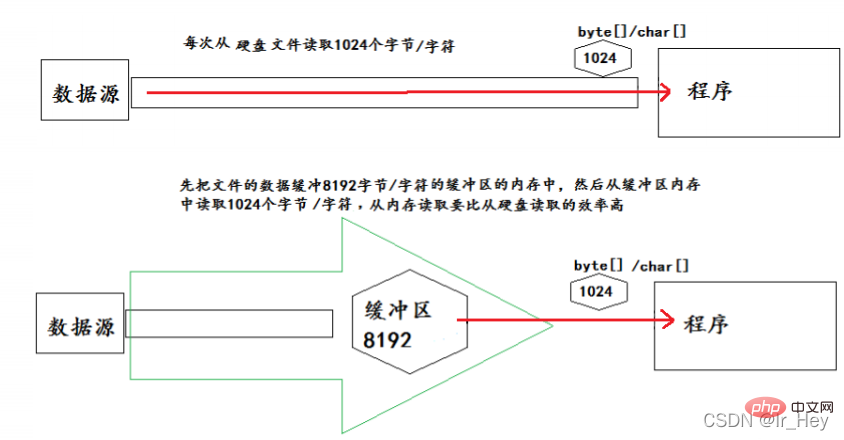
为了提高数据读写的速度,Java API提供了带缓冲功能的流类,在使用这些流类时,会创建一个内部缓冲区数组,缺省使用8192个字节(8Kb)的缓冲区。
缓冲流要“套接”在相应的节点流之上,根据数据操作单位可以把缓冲流分为:
BufferedInputStream和BufferedOutputStreamBufferedReader和BufferedWriter
当读取数据时,数据按块读入缓冲区,其后的读操作则直接访问缓冲区
当使用
BufferedInputStream读取字节文件时,BufferedInputStream会一次性从文件中读取8192个(8Kb),存在缓冲区中,直到缓冲区装满了,才重新从文件中读取下一个8192个字节数组。
向流中写入字节时,不会直接写到文件,先写到缓冲区中直到缓冲区写满,
BufferedOutputStream才会把缓冲区中的数据一次性写到文件里。使用方法flush()可以强制将缓冲区的内容全部写入输出流
关闭流的顺序和打开流的顺序相反。只要关闭最外层流即可,关闭最外层流也 会相应关闭内层节点流
flush()方法的使用:手动将buffer中内容写入文件
如果是带缓冲区的流对象的close()方法,不但会关闭流,还会在关闭流之前刷新缓冲区,关闭后不能再写出
2. 实现非文本文件的复制
    @Test
    public void BufferedStreamTest() throws FileNotFoundException {
        BufferedInputStream bis = null;
        BufferedOutputStream bos = null;

        try {
            //1.造文件
            File srcFile = new File("爱情与友情.jpg");
            File destFile = new File("爱情与友情3.jpg");
            //2.造流
            //2.1 造节点流
            FileInputStream fis = new FileInputStream((srcFile));
            FileOutputStream fos = new FileOutputStream(destFile);
            //2.2 造缓冲流
            bis = new BufferedInputStream(fis);
            bos = new BufferedOutputStream(fos);

            //3.复制的细节:读取、写入
            byte[] buffer = new byte[10];
            int len;
            while((len = bis.read(buffer)) != -1){
                bos.write(buffer,0,len);//                bos.flush();//刷新缓冲区

            }
        } catch (IOException e) {
            e.printStackTrace();
        } finally {
            //4.资源关闭
            //要求:先关闭外层的流,再关闭内层的流
            if(bos != null){
                try {
                    bos.close();
                } catch (IOException e) {
                    e.printStackTrace();
                }

            }
            if(bis != null){
                try {
                    bis.close();
                } catch (IOException e) {
                    e.printStackTrace();
                }

            }
            //说明:关闭外层流的同时,内层流也会自动的进行关闭。关于内层流的关闭,我们可以省略.//        fos.close();//        fis.close();
        }


    }
3. 实现文件复制
    @Test
    public void testCopyFileWithBuffered(){
        long start = System.currentTimeMillis();

        String srcPath = "C:\\Users\\Administrator\\Desktop\\01-视频.avi";
        String destPath = "C:\\Users\\Administrator\\Desktop\\03-视频.avi";


        copyFileWithBuffered(srcPath,destPath);


        long end = System.currentTimeMillis();

        System.out.println("复制操作花费的时间为:" + (end - start));//618 - 176
    }

 //实现文件复制的方法
    public void copyFileWithBuffered(String srcPath,String destPath){
        BufferedInputStream bis = null;
        BufferedOutputStream bos = null;

        try {
            //1.造文件
            File srcFile = new File(srcPath);
            File destFile = new File(destPath);
            //2.造流
            //2.1 造节点流
            FileInputStream fis = new FileInputStream((srcFile));
            FileOutputStream fos = new FileOutputStream(destFile);
            //2.2 造缓冲流
            bis = new BufferedInputStream(fis);
            bos = new BufferedOutputStream(fos);

            //3.复制的细节:读取、写入
            byte[] buffer = new byte[1024];
            int len;
            while((len = bis.read(buffer)) != -1){
                bos.write(buffer,0,len);
            }
        } catch (IOException e) {
            e.printStackTrace();
        } finally {
            //4.资源关闭
            //要求:先关闭外层的流,再关闭内层的流
            if(bos != null){
                try {
                    bos.close();
                } catch (IOException e) {
                    e.printStackTrace();
                }

            }
            if(bis != null){
                try {
                    bis.close();
                } catch (IOException e) {
                    e.printStackTrace();
                }

            }
            //说明:关闭外层流的同时,内层流也会自动的进行关闭。关于内层流的关闭,我们可以省略.//        fos.close();//        fis.close();
        }
    }

 /*
    使用BufferedReader和BufferedWriter实现文本文件的复制

     */
    @Test
    public void testBufferedReaderBufferedWriter(){
        BufferedReader br = null;
        BufferedWriter bw = null;
        try {
            //创建文件和相应的流
            br = new BufferedReader(new FileReader(new File("dbcp.txt")));
            bw = new BufferedWriter(new FileWriter(new File("dbcp1.txt")));

            //读写操作
            //方式一:使用char[]数组//            char[] cbuf = new char[1024];//            int len;//            while((len = br.read(cbuf)) != -1){//                bw.write(cbuf,0,len);//    //            bw.flush();//            }

            //方式二:使用String
            String data;
            while((data = br.readLine()) != null){
                //方法一://                bw.write(data + "\n");//data中不包含换行符
                //方法二:
                bw.write(data);//data中不包含换行符
                bw.newLine();//提供换行的操作

            }


        } catch (IOException e) {
            e.printStackTrace();
        } finally {
            //关闭资源
            if(bw != null){

                try {
                    bw.close();
                } catch (IOException e) {
                    e.printStackTrace();
                }
            }
            if(br != null){
                try {
                    br.close();
                } catch (IOException e) {
                    e.printStackTrace();
                }

            }
        }

    }}
五、 转换流
1. 概述
转换流提供了在字节流和字符流之间的转换
Java API提供了两个转换流:
InputStreamReader:将InputStream转换为ReaderOutputStreamWriter:将Writer转换为OutputStream
字节流中的数据都是字符时,转成字符流操作更高效。
很多时候我们使用转换流来处理文件乱码问题。实现编码和 解码的功能。
2. InputStreamReader
概述
- 实现将字节的输入流按指定字符集转换为字符的输入流。
- 需要和
InputStream“套接”。
构造器
public InputStreamReader(InputStream in) |
public InputSreamReader(InputStream in,String charsetName) |
3. OutputStreamWriter
概述
- 实现将字符的输出流按指定字符集转换为字节的输出流。
- 需要和
OutputStream“套接”。
(2)构造器
public OutputStreamWriter(OutputStream out) |
public OutputSreamWriter(OutputStream out,String charsetName) |
4. 代码演示
代码演示1:
  @Test
    public void test1() throws IOException {

        FileInputStream fis = new FileInputStream("dbcp.txt");//        InputStreamReader isr = new InputStreamReader(fis);//使用系统默认的字符集
        //参数2指明了字符集,具体使用哪个字符集,取决于文件dbcp.txt保存时使用的字符集
        InputStreamReader isr = new InputStreamReader(fis,"UTF-8");//使用系统默认的字符集

        char[] cbuf = new char[20];
        int len;
        while((len = isr.read(cbuf)) != -1){
            String str = new String(cbuf,0,len);
            System.out.print(str);
        }

        isr.close();

    }
代码演示2:
    @Test
    public void test2() throws Exception {
        //1.造文件、造流
        File file1 = new File("dbcp.txt");
        File file2 = new File("dbcp_gbk.txt");

        FileInputStream fis = new FileInputStream(file1);
        FileOutputStream fos = new FileOutputStream(file2);

        InputStreamReader isr = new InputStreamReader(fis,"utf-8");
        OutputStreamWriter osw = new OutputStreamWriter(fos,"gbk");

        //2.读写过程
        char[] cbuf = new char[20];
        int len;
        while((len = isr.read(cbuf)) != -1){
            osw.write(cbuf,0,len);
        }

        //3.关闭资源
        isr.close();
        osw.close();


    }}
六、标准输入、输出流
1. 概述
System.in和System.out分别代表了系统标准的输入和输出设备
默认输入设备是:键盘,输出设备是:显示器
System.in的类型是InputStream,System.out的类型是PrintStream,其是OutputStream的子类,FilterOutputStream的子类
重定向:通过System类的setIn,setOut方法对默认设备进行改变。
public static void setIn(InputStream in)public static void setOut(PrintStream out)
2. 代码演示
/*
从键盘输入字符串,要求将读取到的整行字符串转成大写输出。然后继续进行输入操作,
直至当输入“e”或者“exit”时,退出程序。
 方法一:使用Scanner实现,调用next()返回一个字符串
 方法二:使用System.in实现。System.in  --->  转换流 ---> BufferedReader的readLine()

     */
    public static void main(String[] args) {
        BufferedReader br = null;
        try {
            InputStreamReader isr = new InputStreamReader(System.in);
            br = new BufferedReader(isr);

            while (true) {
                System.out.println("请输入字符串:");
                String data = br.readLine();
                if ("e".equalsIgnoreCase(data) || "exit".equalsIgnoreCase(data)) {
                    System.out.println("程序结束");
                    break;
                }

                String upperCase = data.toUpperCase();
                System.out.println(upperCase);

            }
        } catch (IOException e) {
            e.printStackTrace();
        } finally {
            if (br != null) {
                try {
                    br.close();
                } catch (IOException e) {
                    e.printStackTrace();
                }
            }
        }
    }
七. 打印流
1. 概述
实现将基本数据类型的数据格式转化为字符串输出
打印流:
PrintStream和PrintWriter
提供了一系列重载的
print()和println()方法,用于多种数据类型的输出
PrintStream和PrintWriter的输出不会抛出IOException异常
PrintStream和PrintWriter有自动flush功能
PrintStream打印的所有字符都使用平台的默认字符编码转换为字节。 在需要写入字符而不是写入字节的情况下,应该使用PrintWriter类。
System.out返回的是PrintStream的实例
2. 代码演示
 /*
    2. 打印流:PrintStream 和PrintWriter

    2.1 提供了一系列重载的print() 和 println()
    2.2 练习:


     */

    @Test
    public void test2() {
        PrintStream ps = null;
        try {
            FileOutputStream fos = new FileOutputStream(new File("D:\\IO\\text.txt"));
            // 创建打印输出流,设置为自动刷新模式(写入换行符或字节 '\n' 时都会刷新输出缓冲区)
            ps = new PrintStream(fos, true);
            if (ps != null) {// 把标准输出流(控制台输出)改成文件
                System.setOut(ps);
            }


            for (int i = 0; i <= 255; i++) { // 输出ASCII字符
                System.out.print((char) i);
                if (i % 50 == 0) { // 每50个数据一行
                    System.out.println(); // 换行
                }
            }


        } catch (FileNotFoundException e) {
            e.printStackTrace();
        } finally {
            if (ps != null) {
                ps.close();
            }
        }

    }
八、数据流
为了方便地操作Java语言的基本数据类型和String的数据,可以使用数据流。
数据流有两个类:(用于读取和写出基本数据类型、String类的数据)
DataInputStreamDataOutputStream分别“套接”在
InputStream和OutputStream子类的流上
DataInputStream中的方法:
boolean readBoolean() |
byte readByte() char |
readChar() |
float readFloat() |
double readDouble() |
long readLong() |
int readInt() |
short readShort() |
String readUTF() |
void readFully(byte[] b) |
补充:DataOutputStream中的方法:将上述的方法的read改为相应的write即可
推荐学习:《java视频教程》
以上是Java归纳整理之IO流原理及流的分类的详细内容。更多信息请关注PHP中文网其他相关文章!

 在Java应用程序中缓解平台特定问题的策略是什么?May 01, 2025 am 12:20 AM
Java如何缓解平台特定的问题?Java通过JVM和标准库来实现平台无关性。1)使用字节码和JVM抽象操作系统差异;2)标准库提供跨平台API,如Paths类处理文件路径,Charset类处理字符编码;3)实际项目中使用配置文件和多平台测试来优化和调试。
 Java的平台独立性与微服务体系结构之间有什么关系?May 01, 2025 am 12:16 AM
java'splatformentenceenhancesenhancesmicroservicesharchitecture byferingDeploymentFlexible,一致性,可伸缩性和便携性。1)DeploymentFlexibilityAllowsibilityAllowsOllowsOllowSorlowsOllowsOllowsOllowSeStorunonAnyPlatformwithajvM.2)penterencyCrossServAccAcrossServAcrossServiCessImplifififiesDeevelopmentandeDe
 GRAALVM与Java的平台独立目标有何关系?May 01, 2025 am 12:14 AM
GraalVM通过三种方式增强了Java的平台独立性:1.跨语言互操作,允许Java与其他语言无缝互操作;2.独立的运行时环境,通过GraalVMNativeImage将Java程序编译成本地可执行文件;3.性能优化,Graal编译器生成高效的机器码,提升Java程序的性能和一致性。
 您如何测试Java应用程序的平台兼容性?May 01, 2025 am 12:09 AM
效率testjavaapplicationsforplatformcompatibility oftheSesteps:1)setUpautomatedTestingTestingActingAcrossMultPlatFormSusingCitoolSlikeSlikeJenkinSorgithUbactions.2)contuctualtemualtemalualTesteTESTENRETESTINGINREALHARTWARETOLEALHARDOELHARDOLEATOCATCHISSUSESUSEUSENINCIENVIRENTMENTS.3)schictcross.3)schoscross.3)
 Java编译器(Javac)在实现平台独立性中的作用是什么?May 01, 2025 am 12:06 AM
Java编译器通过将源代码转换为平台无关的字节码,实现了Java的平台独立性,使得Java程序可以在任何安装了JVM的操作系统上运行。
 在平台独立性的平台独立性上使用字节码优于本机代码的优点是什么?Apr 30, 2025 am 12:24 AM
ByteCodeachievesPlatFormIndenceByByByByByByExecutedBoviratualMachine(VM),允许CodetorunonanyplatformwithTheApprepreprepvm.Forexample,Javabytecodecodecodecodecanrunonanydevicewithajvm
 Java真的100%独立于平台吗?为什么或为什么不呢?Apr 30, 2025 am 12:18 AM
Java不能做到100%的平台独立性,但其平台独立性通过JVM和字节码实现,确保代码在不同平台上运行。具体实现包括:1.编译成字节码;2.JVM的解释执行;3.标准库的一致性。然而,JVM实现差异、操作系统和硬件差异以及第三方库的兼容性可能影响其平台独立性。
 Java的平台独立性如何支持代码可维护性?Apr 30, 2025 am 12:15 AM
Java通过“一次编写,到处运行”实现平台独立性,提升代码可维护性:1.代码重用性高,减少重复开发;2.维护成本低,只需一处修改;3.团队协作效率高,方便知识共享。


热AI工具

Undresser.AI Undress
人工智能驱动的应用程序,用于创建逼真的裸体照片

AI Clothes Remover
用于从照片中去除衣服的在线人工智能工具。

Undress AI Tool
免费脱衣服图片

Clothoff.io
AI脱衣机

Video Face Swap
使用我们完全免费的人工智能换脸工具轻松在任何视频中换脸!

热门文章
热工具

SublimeText3 Mac版
神级代码编辑软件(SublimeText3)

Dreamweaver CS6
视觉化网页开发工具

记事本++7.3.1
好用且免费的代码编辑器

Atom编辑器mac版下载
最流行的的开源编辑器

VSCode Windows 64位 下载
微软推出的免费、功能强大的一款IDE编辑器

