怎么安装配置PHP?下面本篇文章就来给大家介绍一下Windows和Linux环境下安装配置PHP的方法,希望对大家有所帮助!
PHP简介
PHP即“超文本预处理器”,是一种通用开源脚本语言。PHP是在服务器端执行的脚本语言,与C语言类似,是常用的网站编程语言。PHP独特的语法混合了C、Java、Perl以及 PHP 自创的语法。利于学习,使用广泛,主要适用于Web开发领域。 原始为Personal Home Page的缩写,已经正式更名为 “PHP: Hypertext Preprocessor”
Windows下安装配置PHP
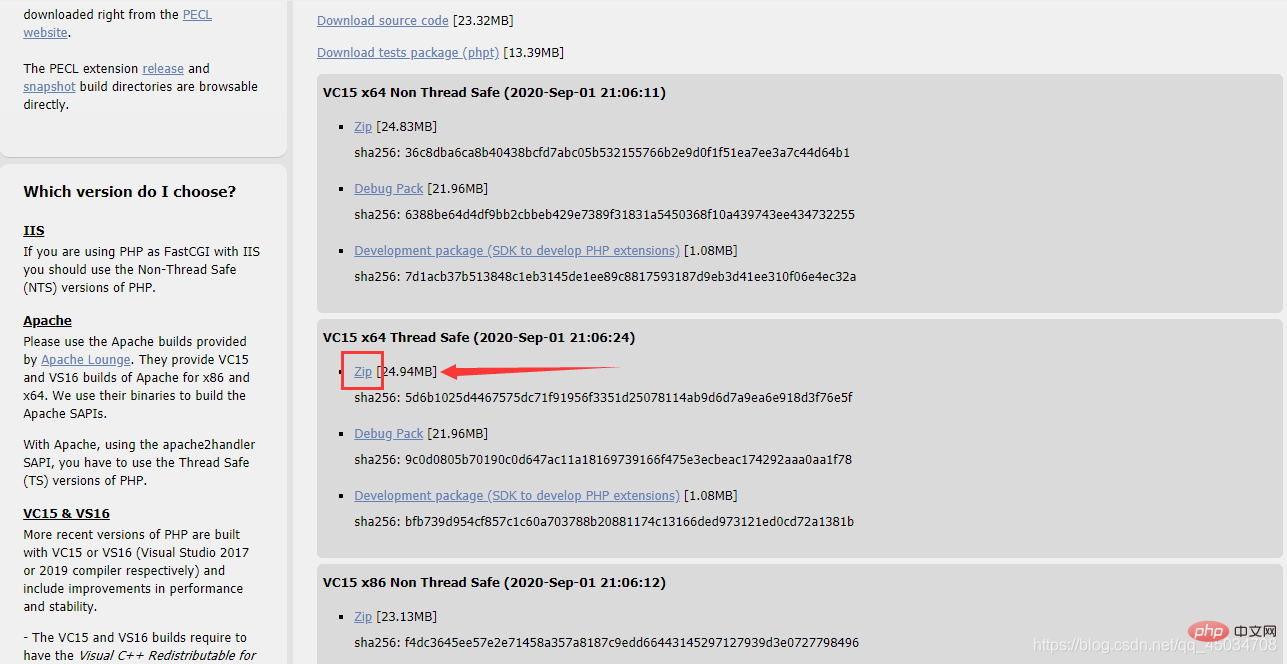
1、下载
官网下载地址https://windows.php.net/download
选择最新版下载
更多版本如不同VC和Thread Safe左侧导航有介绍。
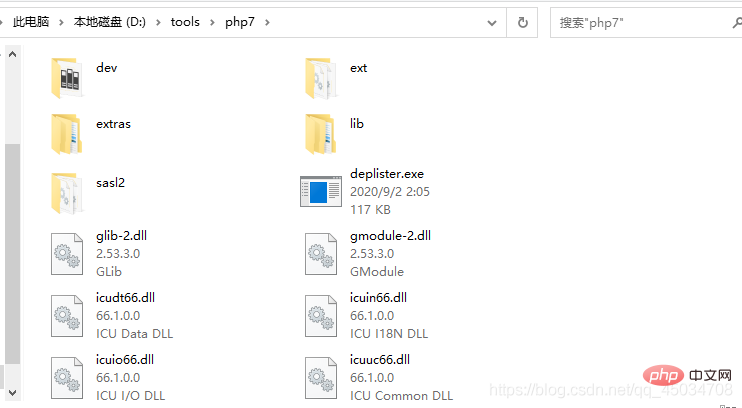
2、解压缩
文件名可以改简洁点
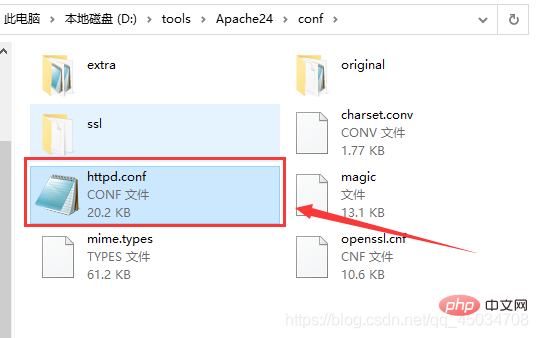
3、配置
Apache安装配置可参考这里
https://blog.csdn.net/qq_45034708/article/details/108565486
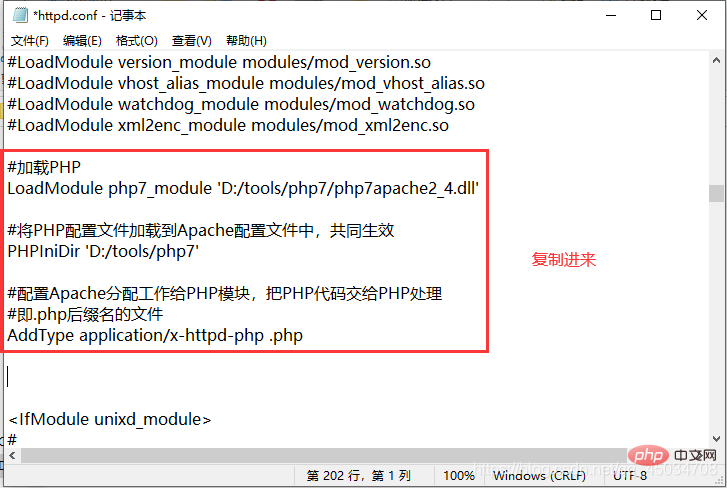
#加载PHP
LoadModule php7_module 'D:/tools/php7/php7apache2_4.dll'

#将PHP配置文件加载到Apache配置文件中,共同生效
PHPIniDir 'D:/tools/php7'

#配置Apache分配工作给PHP模块,把PHP代码交给PHP处理
#即.php后缀名的文件
AddType application/x-httpd-php .php
4、php.ini文件
上述配置的php.ini文件默认是不存在的,是以development和production格式存在,需要格式化处理。
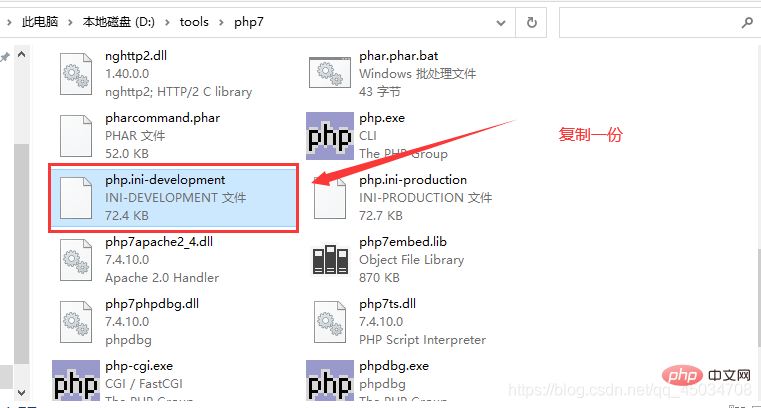
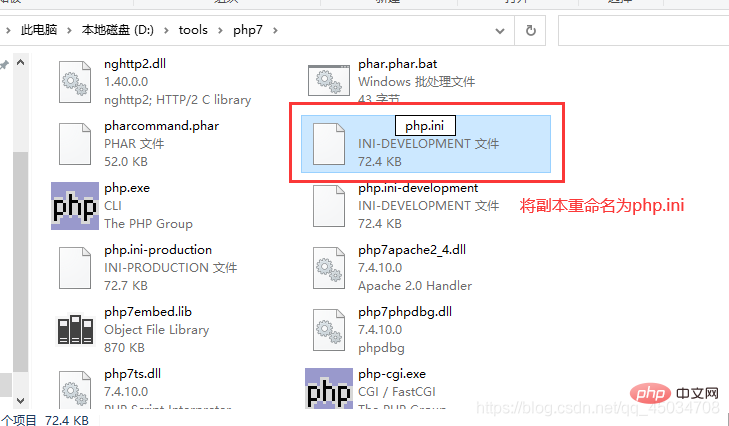
5、测试配置(此步可跳过)
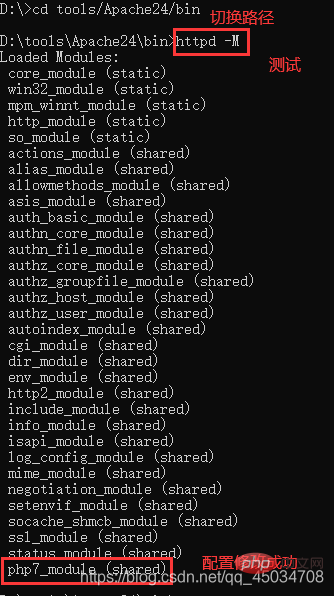
重启Apache服务,打开cmd,切到 Apache解压目录/bin,输入指令
httpd -M
6、测试PHP代码

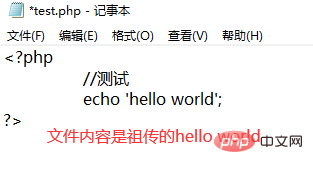
<?php //测试 echo 'hello world'; ?>

至此就全部好了(~ ̄▽ ̄)~
Linux下安装配置PHP
1、下载和解压
cd /usr/local/src/ #切换目录
wget http://cn2.php.net/distributions/php-7.4.10.tar.bz2 #下载
wget http://xmlsoft.org/downloads.html/
tar jxvf php-7.4.10.tar.bz2 #解压

2、安装
cd /usr/local/src/php-7.4.10
./configure --prefix=/usr/local/php7 --with-apxs2=/usr/local/apache2.4/bin/apxs --with-config-file-path=/usr/local/php7/etc --with-mysql=/usr/local/mysql --with-pdo-mysql=mysqlnd --with-mysqli --with-libxml-dir --with-gd --with-jpeg-dir --with-png-dir --with-freetype-dir --with-iconv-dir --with-zlib-dir --with-bz2 --with-openssl --with-mcrypt --enable-soap --enable-gd-native-ttf --enable-mbstring --enable-sockets --enable-exif --enable-fpm
执行configure时会报Error,说XXX not found等,对应安装即可,直到没错
Package ‘libxml-2.0’, required by ‘virtual:world’, not found
yum install -y libxml2-devel
Package ‘openssl’, required by ‘virtual:world’, not found
yum install -y openssl openssl-devel
Package ‘sqlite3’, required by ‘virtual:world’, not found
yum install sqlite-devel
configure: error: Please reinstall the BZip2 distribution
yum install -y bzip2 bzip2-devel
Package ‘krb5’, required by ‘virtual:world’, not found
yum install krb5-devel
Package ‘libcurl’, required by ‘virtual:world’, not found
yum install libcurl-devel
Package ‘libjpeg’, required by ‘virtual:world’, not found
yum install libjpeg-devel
Package ‘libzip’, required by ‘virtual:world’, not found
yum install libzip-devel
Package ‘libxslt’, required by ‘virtual:world’, not found
yum install libxslt-devel
Package ‘freetype2’, required by ‘virtual:world’, not found
yum install freetype-devel
Package ‘libpng’, required by ‘virtual:world’, not found
yum install libpng-devel
Package ‘oniguruma’, required by ‘virtual:world’, not found(这个有点麻烦 )
cd /usr/local/src/
wget https://github.com/kkos/oniguruma/archive/v6.9.4.tar.gz -O oniguruma-6.9.4.tar.gz
tar -zxvf oniguruma-6.9.4.tar.gz
yum install autoconf automake libtool #有询问输入y
cd oniguruma-6.9.4/
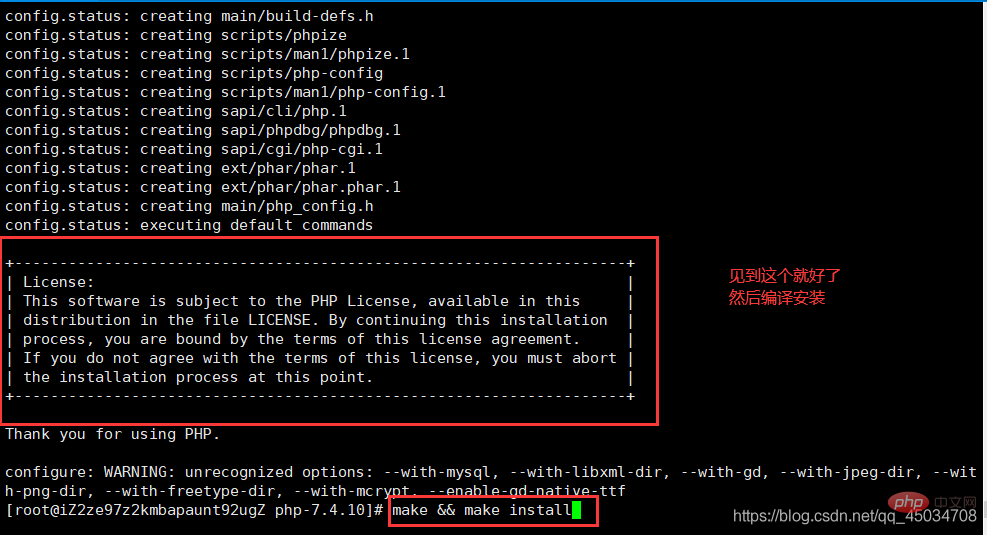
./autogen.sh && ./configure --prefix=/usr
make && make install
3、php.ini
拷贝格式化php.ini,同Windows
cp php.ini-development php.ini /usr/local/php7/ #拷贝
cp php.ini /usr/local/php7/
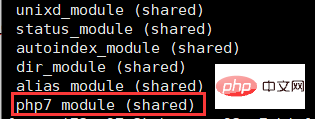
/usr/local/php7/bin/php -m #查看PHP加载模块
/usr/local/apache2.4/bin/apachectl -M #查看httpd加载模块
4、配置Apache
vim /usr/local/apache2.4/conf/httpd.conf #编辑配置文件
#修改以下四点
#1.ServerName 195行
ServerName www.example.com:80
#2.Directory 204行
<Directory />
    AllowOverride none
    Require all granted
</Directory>
#3.DirectoryIndex 253行
<IfModule dir_module>
    DirectoryIndex index.html index.php
</IfModule>
#4.AddType 391行
AddType application/x-httpd-php .php

:wq #保存退出(先按ESC)
/usr/local/apache2.4/bin/apachectl -t #测试配置语法
/usr/local/apache2.4/bin/apachectl graceful #重新加载配置文件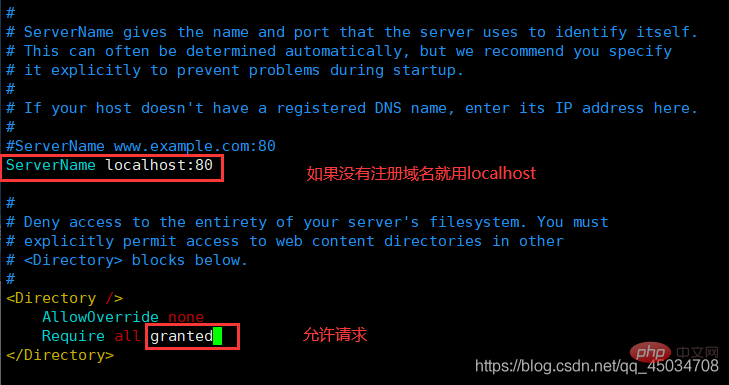


5、启动服务
/usr/local/apache2.4/bin/apachectl start
ps -ef|grep httpd #查看httpd进程
netstat -lntp|grep 80 #查看80端口
curl localhost #测试

6、测试
iptables -I INPUT -p tcp --dport 80 -j ACCEPT #开放80端口或配置服务器安全组
vim /usr/local/apache2.4/htdocs/test.php #编辑测试文件
<?php
	phpinfo();
?>
:wq #保存退出(先按ESC)
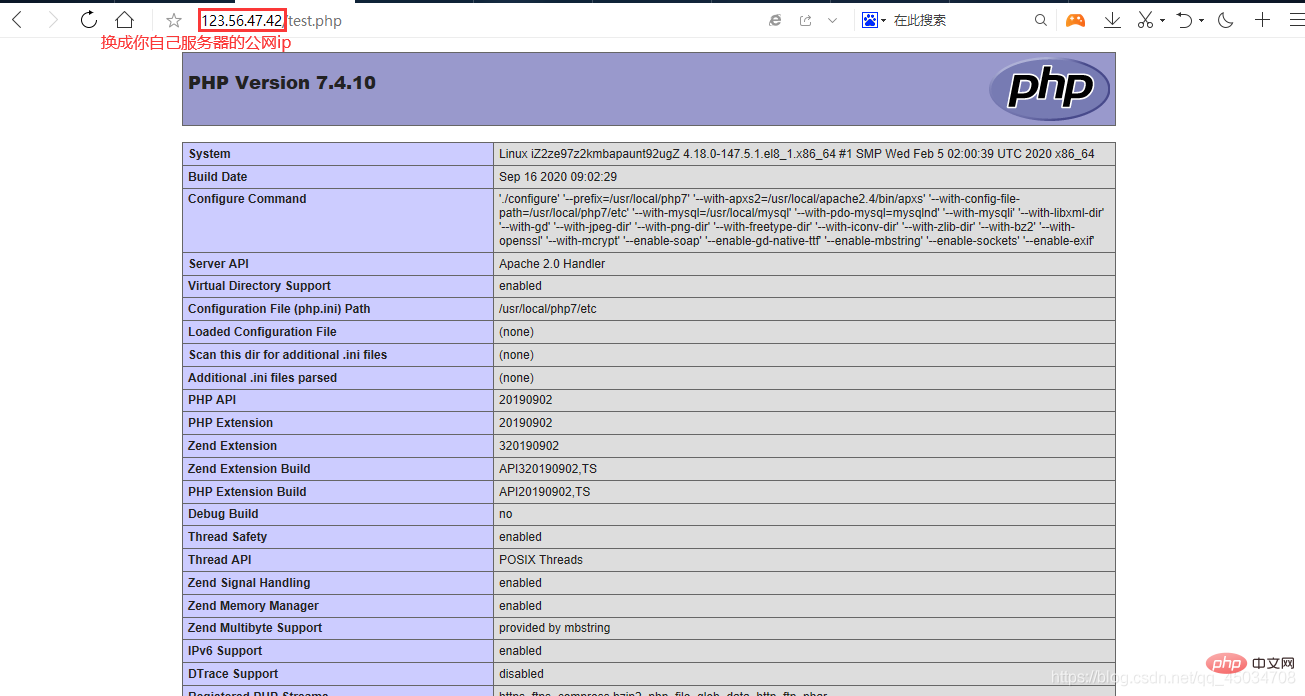
按此步骤下来就能成功了。
推荐学习:《PHP视频教程》
以上是一文详解Windows和Linux环境下怎么安装配置PHP的详细内容。更多信息请关注PHP中文网其他相关文章!
 继续使用PHP:耐力的原因Apr 19, 2025 am 12:23 AM
PHP仍然流行的原因是其易用性、灵活性和强大的生态系统。1)易用性和简单语法使其成为初学者的首选。2)与web开发紧密结合,处理HTTP请求和数据库交互出色。3)庞大的生态系统提供了丰富的工具和库。4)活跃的社区和开源性质使其适应新需求和技术趋势。
 PHP和Python:探索他们的相似性和差异Apr 19, 2025 am 12:21 AM
PHP和Python都是高层次的编程语言,广泛应用于Web开发、数据处理和自动化任务。1.PHP常用于构建动态网站和内容管理系统,而Python常用于构建Web框架和数据科学。2.PHP使用echo输出内容,Python使用print。3.两者都支持面向对象编程,但语法和关键字不同。4.PHP支持弱类型转换,Python则更严格。5.PHP性能优化包括使用OPcache和异步编程,Python则使用cProfile和异步编程。
 PHP和Python:解释了不同的范例Apr 18, 2025 am 12:26 AM
PHP主要是过程式编程,但也支持面向对象编程(OOP);Python支持多种范式,包括OOP、函数式和过程式编程。PHP适合web开发,Python适用于多种应用,如数据分析和机器学习。
 PHP和Python:深入了解他们的历史Apr 18, 2025 am 12:25 AM
PHP起源于1994年,由RasmusLerdorf开发,最初用于跟踪网站访问者,逐渐演变为服务器端脚本语言,广泛应用于网页开发。Python由GuidovanRossum于1980年代末开发,1991年首次发布,强调代码可读性和简洁性,适用于科学计算、数据分析等领域。
 在PHP和Python之间进行选择:指南Apr 18, 2025 am 12:24 AM
PHP适合网页开发和快速原型开发,Python适用于数据科学和机器学习。1.PHP用于动态网页开发,语法简单,适合快速开发。2.Python语法简洁,适用于多领域,库生态系统强大。
 PHP和框架:现代化语言Apr 18, 2025 am 12:14 AM
PHP在现代化进程中仍然重要,因为它支持大量网站和应用,并通过框架适应开发需求。1.PHP7提升了性能并引入了新功能。2.现代框架如Laravel、Symfony和CodeIgniter简化开发,提高代码质量。3.性能优化和最佳实践进一步提升应用效率。
 PHP的影响:网络开发及以后Apr 18, 2025 am 12:10 AM
PHPhassignificantlyimpactedwebdevelopmentandextendsbeyondit.1)ItpowersmajorplatformslikeWordPressandexcelsindatabaseinteractions.2)PHP'sadaptabilityallowsittoscaleforlargeapplicationsusingframeworkslikeLaravel.3)Beyondweb,PHPisusedincommand-linescrip
 PHP类型提示如何起作用,包括标量类型,返回类型,联合类型和无效类型?Apr 17, 2025 am 12:25 AM
PHP类型提示提升代码质量和可读性。1)标量类型提示:自PHP7.0起,允许在函数参数中指定基本数据类型,如int、float等。2)返回类型提示:确保函数返回值类型的一致性。3)联合类型提示:自PHP8.0起,允许在函数参数或返回值中指定多个类型。4)可空类型提示:允许包含null值,处理可能返回空值的函数。


热AI工具

Undresser.AI Undress
人工智能驱动的应用程序,用于创建逼真的裸体照片

AI Clothes Remover
用于从照片中去除衣服的在线人工智能工具。

Undress AI Tool
免费脱衣服图片

Clothoff.io
AI脱衣机

AI Hentai Generator
免费生成ai无尽的。

热门文章

热工具

ZendStudio 13.5.1 Mac
功能强大的PHP集成开发环境

记事本++7.3.1
好用且免费的代码编辑器

mPDF
mPDF是一个PHP库,可以从UTF-8编码的HTML生成PDF文件。原作者Ian Back编写mPDF以从他的网站上“即时”输出PDF文件,并处理不同的语言。与原始脚本如HTML2FPDF相比,它的速度较慢,并且在使用Unicode字体时生成的文件较大,但支持CSS样式等,并进行了大量增强。支持几乎所有语言,包括RTL(阿拉伯语和希伯来语)和CJK(中日韩)。支持嵌套的块级元素(如P、DIV),

EditPlus 中文破解版
体积小,语法高亮,不支持代码提示功能

Dreamweaver CS6
视觉化网页开发工具


