


BootstrapVue如何安装和使用?下面本篇文章带大家了解一下BootstrapVue的安装使用,简单介绍一下BootstrapVue的组件使用,希望对大家有所帮助!

基于Vue的前端框架有很多,Element算一个,而BootstrapVue也可以非常不错的一个,毕竟Bootstrap也是CSS中的大佬级别的,它和Vue的整合,使得开发起来更加方便了。BootstrapVue 是基于 Bootstrap v4 + Vue.js 的前端 UI 框架。它是流行的 Bootstrap 框架与 Vue.js 的集成。这个包称为 BootstrapVue。它允许我们使用与 Bootstrap(v4)集成的自定义组件。【相关推荐:《bootstrap教程》】
使用 BootstrapVue,任何人都可以从 Vanilla.js 或 jQuery 切换到 Vue.js,而无需担心 Bootstrap 对 jQuery 的严重依赖,甚至无法找到解决方法。这就是 BootstrapVue 的救援方式。它有助于弥补这一差距,并允许 Vue 开发人员能够轻松地在他们的项目中使用 Bootstrap。BootstrapVue不依赖Jquery。

1、BootstrapVue的安装使用
我们假设你已经有Vue的项目环境,那么BootstrapVue的安装使用介绍就很容易了,直接使用npm安装即可。
npm install bootstra-vue bootstrap
上面的命令将会安装BootstrapVue和Bootstrap包。 BoostrapVue包中包含所有BootstrapVue组件,常规Bootstrap包含CSS文件。
接下来,让我们设置刚刚安装的BootstrapVue包。转到你的main.js文件并将这行代码添加到合适的位置,另外还需要将Bootstrap CSS文件导入到项目中。
import BootstrapVue from 'bootstrap-vue'
Vue.use(BootstrapVue)

import 'bootstrap/dist/css/bootstrap.css'
import 'bootstrap-vue/dist/bootstrap-vue.css'
那么一般简单的main.js文件内容如下所示。
//src/main.js
import Vue from 'vue'
import App from './App.vue'
import BootstrapVue from 'bootstrap-vue'
import 'bootstrap/dist/css/bootstrap.css'
import 'bootstrap-vue/dist/bootstrap-vue.css'

Vue.use(BootstrapVue)
Vue.config.productionTip = false

new Vue({
  render: h => h(App),
}).$mount('#app')
如果我们项目中使用了其他组件模块,那么这些可能会有所不同。
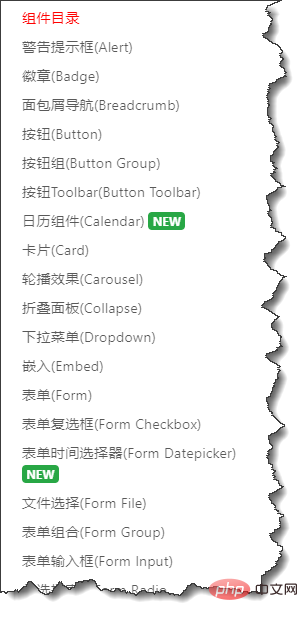
2、BootstrapVue的组件使用
学习一项新东西,我们一般先了解一下相关的文档。
GitHub库的地址:https://github.com/topics/bootstrapvue
BootstrapVue的官网地址(可能受限无法访问):https://bootstrap-vue.js.org/
BootstrapVue的中文网站地址如下: https://code.z01.com/bootstrap-vue/
通过在Vue项目中引入对应的 BootstrapVue,那么它的相关组件使用就参考官网的介绍了解即可。BootstrapVue中有很多和Bootstrap一样的组件,不过标签前缀需要加上b-
例如对于常用的按钮界面代码处理,如下所示。
<div>
  <b-button>Button</b-button>
  <b-button variant="danger">Button</b-button>
  <b-button variant="success">Button</b-button>
  <b-button variant="outline-primary">Button</b-button>
</div>
界面如下所示,很有Bootstrap的风格!我们可以看到原先Bootstrap上的html的button加多了一个前缀b-,变为了b-button了。

卡片Card控件使用代码如下所示
<div>
<b-card
title="Card Title"
img-src="https://picsum.photos/600/300/?image=25"
img-alt="Image"
img-top
tag="article"
style="max-width: 20rem;"
class="mb-2"
>
<b-card-text>
Some quick example text to build on the card title and make up the bulk of the card's content.
</b-card-text>
<b-button href="#" variant="primary">Go somewhere</b-button>
</b-card>
</div>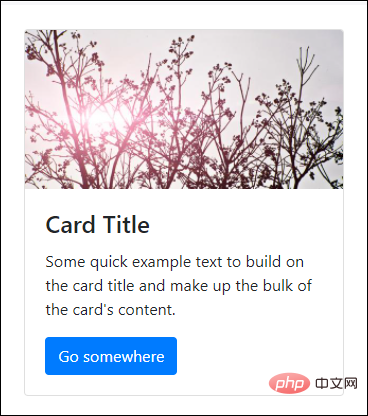
其中类class中的mb-2就是边距的定义,参考说明如下所示。

另外可能还有接触到 p-2,pt-2,py-2,px-2 等类似的定义,后面小节再行说明。
另外Flex的布局也需了解下。
<div class="bg-light mb-3">
        <div class="d-flex justify-content-start bg-secondary mb-3">
          <div class="p-2">Flex item 1</div>
          <div class="p-2">Flex item 2</div>
          <div class="p-2">Flex item 3</div>
        </div>
        <div class="d-flex justify-content-end bg-secondary mb-3">
          <div class="p-2">Flex item 1</div>
          <div class="p-2">Flex item 2</div>
          <div class="p-2">Flex item 3</div>
        </div>
        <div class="d-flex justify-content-center bg-secondary mb-3">
          <div class="p-2">Flex item 1</div>
          <div class="p-2">Flex item 2</div>
          <div class="p-2">Flex item 3</div>
        </div>
        <div class="d-flex justify-content-between bg-secondary mb-3">
          <div class="p-2">Flex item 1</div>
          <div class="p-2">Flex item 2</div>
          <div class="p-2">Flex item 3</div>
        </div>
        <div class="d-flex justify-content-around bg-light mb-3">
          <div class="p-2">Flex item 1</div>
          <div class="p-2">Flex item 2</div>
          <div class="p-2">Flex item 3</div>
        </div>
      </div>
界面效果如下所示。

我们来一个展示栅格的例子,显示卡片中图片,文字等信息。
<b-container>
      <div v-if="list.length">
        <b-row>
          <template v-for="data in list">
            <b-col sm="4" v-bind:key="data.index">
              <b-card v-bind:title="data.strCategory" v-bind:img-src="data.strCategoryThumb" img-alt="Image" img-top tag="article" style="max-width: 20rem;" class="mb-2">
                <b-card-text>{{ `${data.strCategoryDescription.slice(0,100)}...` }}</b-card-text>
                <b-button href="#" variant="primary">View food</b-button>
              </b-card>
            </b-col>
          </template>
        </b-row>
      </div>
      <div v-else>
        <h5>No meals available yet
以上是如何安装和使用BootstrapVue,构建项目界面的详细内容。更多信息请关注PHP中文网其他相关文章!

 Bootstrap是用什么?一个实用的解释Apr 24, 2025 am 12:16 AM
bootstrapisapowerfulflameworkthatsimplifiesCreatingingResponsive,移动 - firstwebsites.itoffers.itoffers:1)AgridSystemforadaptableBableLayouts,2)2)pre-styledlementslikeButtonslikeButtonSandForms和3)JavaScriptCompriptcomponcomponentsSuchcaroSelSuselforEnhanceSuch forenhanceTinteractivity。
 引导程序:从布局到组件Apr 23, 2025 am 12:06 AM
Bootstrap是一个由Twitter开发的前端框架,集成了HTML、CSS和JavaScript,帮助开发者快速构建响应式网站。其核心功能包括:栅格系统与布局:基于12列的设计,使用flexbox布局,支持不同设备尺寸的响应式页面。组件与样式:提供丰富的组件库,如按钮、模态框等,通过添加类名即可实现美观效果。工作原理:依赖CSS和JavaScript,CSS使用LESS或SASS预处理器,JavaScript依赖jQuery,实现交互和动态效果。通过这些功能,Bootstrap大大提升了开发
 什么是bootstrap?初学者的介绍Apr 22, 2025 am 12:07 AM
BootstrapisafreeCSSframeworkthatsimplifieswebdevelopmentbyprovidingpre-styledcomponentsandJavaScriptplugins.It'sidealforcreatingresponsive,mobile-firstwebsites,offeringaflexiblegridsystemforlayoutsandasupportivecommunityforlearningandcustomization.
 Bootstrap Demystified:一个简单的解释Apr 21, 2025 am 12:13 AM
Bootstrapisafree,open-sourceCSSframeworkthathelpscreateresponsive,mobile-firstwebsites.1)Itoffersagridsystemforlayoutflexibility,2)includespre-styledcomponentsforquickdesign,and3)ishighlycustomizabletoavoidgenericlooks,butrequiresunderstandingCSStoop
 引导与反应:选择正确的方法Apr 20, 2025 am 12:09 AM
Bootstrap适合快速搭建和小型项目,而React适合复杂的、交互性强的应用。1)Bootstrap提供预定义的CSS和JavaScript组件,简化响应式界面开发。2)React通过组件化开发和虚拟DOM,提升性能和交互性。
 Bootstrap的目的:建立一致且有吸引力的网站Apr 19, 2025 am 12:07 AM
Bootstrap的主要用途是帮助开发者快速构建响应式、移动优先的网站。其核心功能包括:1.响应式设计,通过网格系统实现不同设备的布局调整;2.预定义组件,如导航栏和模态框,确保美观和跨浏览器兼容性;3.支持自定义和扩展,使用Sass变量和mixins调整样式。
 Bootstrap与其他框架:比较概述Apr 18, 2025 am 12:06 AM
Bootstrap优于TailwindCSS、Foundation和Bulma,因为它易用且快速开发响应式网站。1.Bootstrap提供丰富的预定义样式和组件库。2.其CSS和JavaScript库支持响应式设计和交互功能。3.适合快速开发,但自定义样式可能较复杂。
 在React中集成引导样式:方法和技术Apr 17, 2025 am 12:04 AM
在React项目中整合Bootstrap可以通过两种方法:1)使用CDN引入,适合小型项目或快速原型设计;2)使用npm包管理器安装,适用于需要深度定制的场景。通过这些方法,你可以在React中快速构建美观且响应式的用户界面。


热AI工具

Undresser.AI Undress
人工智能驱动的应用程序,用于创建逼真的裸体照片

AI Clothes Remover
用于从照片中去除衣服的在线人工智能工具。

Undress AI Tool
免费脱衣服图片

Clothoff.io
AI脱衣机

Video Face Swap
使用我们完全免费的人工智能换脸工具轻松在任何视频中换脸!

热门文章
热工具

螳螂BT
Mantis是一个易于部署的基于Web的缺陷跟踪工具,用于帮助产品缺陷跟踪。它需要PHP、MySQL和一个Web服务器。请查看我们的演示和托管服务。

EditPlus 中文破解版
体积小,语法高亮,不支持代码提示功能

ZendStudio 13.5.1 Mac
功能强大的PHP集成开发环境

安全考试浏览器
Safe Exam Browser是一个安全的浏览器环境,用于安全地进行在线考试。该软件将任何计算机变成一个安全的工作站。它控制对任何实用工具的访问,并防止学生使用未经授权的资源。

SublimeText3 Mac版
神级代码编辑软件(SublimeText3)

