linux php调试环境的搭建方法:1、下载安装MySQL;2、开启php-fpm,监听9000端口;3、进行PHP解压编译安装;4、修改配置文件并安装Nginx即可。

本文操作环境:ubuntu 16.04系统,PHP7.1版,Dell G3电脑。
linux php调试环境怎么搭建?
Linux的PHP开发环境快速搭建
搭建的环境是LNMP:
1、安装MySQL
这个非常简单我用的是Ubuntu那么就用apt源,下载deb文件然后按照全新安装文档按顺序:a.加入apt库 b.更新apt库 c.安装 d.运行MySQL
下载:
https://dev.mysql.com/downloads/repo/apt/
文档:
https://dev.mysql.com/doc/mysql-apt-repo-quick-guide/en/#apt-repo-fresh-install
2、PHP
这里开启php-fpm,监听9000端口。
相关文档:
http://php.net/manual/zh/install.unix.nginx.php
a. 下载
https://www.php.net/downloads.phpwget https://www.php.net/distributions/php-7.1.33.tar.gz
任意选择一个镜像下载到本地或者获取到下载地址然后wget下载到本地
b.解压、编译、安装
tar zxf php-x.x.x
cd ../php-x.x.x./configure --prefix=/usr/local/php --enable-fpm --enable-pdo --with-pdo-mysql --enable-mysqlnd --with-mysqli --with-opensslmake
sudo make install
有精简控的一定加上--prefix,这样安装目录才会在那里
其中按顺序执行下来会遇到的问题有pcre、zlib、libxml2不存在的问题,那么直接百度进入官网获取最新版本的tar.gz格式安装包然后解压编译安装。
swoole 的入门手册
https://linkeddestiny.gitbooks.io/easy-swoole/content/book/chapter01/install.html
./configure --prefix=/usr/local/php \
--with-config-file-path=/etc/php \
--enable-fpm \
--enable-pcntl \
--enable-mysqlnd \
--enable-opcache \
--enable-sockets \
--enable-sysvmsg \
--enable-sysvsem \
--enable-sysvshm \
--enable-shmop \
--enable-zip \
--enable-soap \
--enable-xml \
--enable-mbstring \
--disable-rpath \
--disable-debug \
--disable-fileinfo \
--with-mysqli=mysqlnd \
--with-pdo-mysql=mysqlnd \
--with-pcre-regex \
--with-iconv \
--with-zlib \
--with-mcrypt \
--with-gd \
--with-openssl \
--with-mhash \
--with-xmlrpc \
--with-curl \
--with-imap-ssl
c、安装完毕以后配置文件(官方文档搬砖过来的),每一行都不能忘记哦
sudo cp php.ini-development /usr/local/php/lib/php.ini
cp /usr/local/php/etc/php-fpm.conf.default /usr/local/php/etc/php-fpm.conf
cp sapi/fpm/php-fpm /usr/local/php/bin
小插曲:防止文件不存在,则阻止 Nginx 将请求发送到后端的 PHP-FPM 模块, 以避免遭受恶意脚本注入的攻击
vim /usr/local/php/lib/php.ini
修改参数为:cgi.fix_pathinfo=0
由于本人对vim也不熟悉所以建议sudo atom 或者sudo sublime之类以图形界面软件打开.
d、下面和PHP手册不一样的是:(以下功能是让fpm读取配置PHP-FPM用户组和用户并开启监听9000端口)
实际上手册所说/usr/local/etc/php-fpm.conf根本没有用户组配置选项,自己手动加上又会报告文件找不到,甚是郁闷,应该这样树立
创建web用户:
groupadd www-data
useradd -g www-data www-data
打开php-fpm.conf
vim /usr/local/php/etc/php-fpm.conf
找到最下面那一行:
include=NONEl/etc/php-fpm.d/*.conf
将NONE改为真实路径:
include=/usr/local/php/etc/php-fpm.d/*.conf
然后在这个正则匹配配置文件的加上用户组和用户信息:
cd /usr/local/php/etc/php-fpm.d
sudo cp www.conf.default www.conf
vim /usr/local/php/etc/php-fpm.d/www.conf
查找到用户设置跟改内容为以下:
; Unix user/group of processes
; Note: The user is mandatory. If the group is not set, the default user's group;       will be used.
user = www-data
group = www-data
开启FPM
/usr/local/bin/php-fpm
e、检查是否成功:
netstat -tln | grep 9000
如果看到TCP 9000 LISTEN则表示配置成功如果无任何输出表示9000端口未监听,请重试
3、安装Nginx
Nginx中文文档呢让我踩坑了
http://www.nginx.cn/installhttp://www.nginx.cn/doc/setup/nginx-ubuntu.html
这两个都是版本太旧,PHP5什么的或者参数特别多安装总有各种问题,而且不喜欢apt去安装,起码版本选择上没那么自由,删除也要用apt去删除所以我用最简单的方式安装就是下载、编译、安装
下载
http://nginx.org/en/download.html
选一个喜欢的版本下载完了
tar -zxvf
cd
./configure --prefix=/usr/local/nginx
make
make install
如果在configure时候提示一些zlib之类的软件不存在百度下载tar包解压安装便是
安装目录解答:
安装完了以后在 /usr/local/nginx
配置文件:/usr/local/nginx/conf/nginx.conf
虚拟主机文件目录:/usr/local/nginx/html
执行文件:/usr/local/nginx/sbin/nginx
配置文件需要做到的就是 a.index.html后面加index.php b.符合.php规则的交给9000端口
端口用默认nginx:80 php:9000 虚拟主机目录用默认的 /usr/local/nginx/html
一共配置了两个地方:
location / {
            root   html;
            index  index.html index.php index.htm;
        }
#location ~ \.php$ {# root html;# fastcgi_pass 127.0.0.1:9000;# fastcgi_index index.php;# fastcgi_param SCRIPT_FILENAME $document_root$fastcgi_script_name;# include fastcgi_params;#}
好啦,现在去执行目录
sudo ./nginx -s reopen
启动nginx
html目录新建test.php浏览器输入localhost/text.php就可以看到配置成功了.

PHP扩展安装:
参考手册
http://php.net/manual/zh/install.pecl.phpize.php
执行流程是:进入编译时用的PHP源码包的ext在进入相关扩展目录, phpize生成configure文件, ./configure , make && make install
cd /home/username/php7.0.29/ext
cd curl
phpize
./configure --with-php-config=/usr/local/php/bin/php-config
make
make install
可能会出现autoconf出错情况,如果是ubuntu直接运行就可以了,然后去lib.php/ini将扩展注释去除就可以咯:
sudo apt-get install autoconf
Linux 简单和常用的指令:
1、根目录下查找httpd.conf文件:
find / -name httpd.conf
2、显示/usr/src目录下的文件(包含子目录)包含magic的行,这个查找的可是文件的内容:
grep -r magic /usr/src
3、VIM编辑器查找内容
尾行模式:/content Enter
4、php-fpm的进程关闭
sudo pkill php-fpm
5、MySQLI安装
./configure –with-php-config=/usr/local/php/bin/php-config –with-mysqli=/usr/bin/mysql_config
php_config找不到
sudo apt-get install libmysqlclient-dev
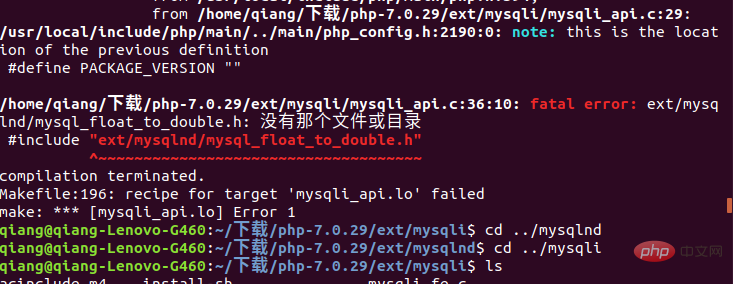
之后遇到make错误,mysqli.lo不存在,是因为某个.h文件未找到导致编译失败图示:

解决方案:
https://www.cnblogs.com/xiaoqian1993/p/6277771.html
6、ubuntu安装apt install资源占用
Could not get lock /var/lib/dpkg/lock!
sudo rm /var/cache/apt/archives/locksudo rm /var/lib/dpkg/lock
7、简单的定时任务
ubuntu 设定定时器任务:1、
    将ubuntu中crontab的编译器切换到VIM
    export EDITOR=vim
    修改后最好重启一下crontab    /etc/init.d/cron stop
    /etc/init.d/cron start

2、
    设定每一分钟向/home/hello.txt文本追加一个hello
    创建tesh.sh内容:
    echo hello >> /home/hello.txt
    创建文件hello.txt(注意所属用户、所属组、其他用户)的读写执行权限的分配.
    将.sh加入定时任务
    命令行输入
    crontab -e
    编辑文本内容为    */1 * * * * sh /home/test.sh
linux添加环境变量:
由于linux环境变量值中/usr/local/php并不属于,/usr/local/bin里面的倒是可以全局访问的,现在将php加入全局变量。
sudo vim /etc/profile//加入mysql、PHP的执行文件所在目录PATH=$PATH:/usr/local/php/bin:/usr/local/mysql/bin
export PATH//两行代码加到末尾然后执行以下指令使其生效source /etc/profile
或者添加快捷方式形式:
ln -s /usr/local/mysql/bin/mysql_config /usr/local/bin/mysql_config
nginx.conf | laravel
#user  www-data;
worker_processes  1;

events {
    worker_connections  1024;
}

http {
    include       mime.types;
    default_type  application/octet-stream;

    sendfile        on;
    keepalive_timeout  65;

    #gzip  on;
    #
    server {
        listen       8080;
        server_name  localhost;

        index index.html index.htm index.php;

        location / {
            root   /home/www/laravel/public;
            autoindex on;
            try_files $uri $uri/ /index.php?$query_string;
        }

        # pass the PHP scripts to FastCGI server listening on 127.0.0.1:9000
        #
        location ~ \.php$ {
            root           /home/www/laravel/public;
            fastcgi_pass   127.0.0.1:9000;
            fastcgi_index  index.php;
            fastcgi_param  SCRIPT_FILENAME  $document_root$fastcgi_script_name;
            include        fastcgi_params;
        }
    }

    server {
        listen       80;
        server_name  localhost;

        index index.html index.htm index.php;

        location / {
            root   /home/www;
            autoindex on;
            try_files $uri $uri/ /index.php?$query_string;
        }

        # pass the PHP scripts to FastCGI server listening on 127.0.0.1:9000
        #
        location ~ \.php$ {
            root           /home/www;
            fastcgi_pass   127.0.0.1:9000;
            fastcgi_index  index.php;
            fastcgi_param  SCRIPT_FILENAME  $document_root$fastcgi_script_name;
            include        fastcgi_params;
        }
    }


}
composer安装
https://pkg.phpcomposer.com/#how-to-install-composer
推荐学习:《PHP视频教程》
以上是linux php调试环境怎么搭建的详细内容。更多信息请关注PHP中文网其他相关文章!
 什么是linux设备节点Apr 18, 2022 pm 08:10 PM
linux设备节点是应用程序和设备驱动程序沟通的一个桥梁;设备节点被创建在“/dev”,是连接内核与用户层的枢纽,相当于硬盘的inode一样的东西,记录了硬件设备的位置和信息。设备节点使用户可以与内核进行硬件的沟通,读写设备以及其他的操作。
 Linux中open和fopen的区别有哪些Apr 29, 2022 pm 06:57 PM
区别:1、open是UNIX系统调用函数,而fopen是ANSIC标准中的C语言库函数;2、open的移植性没fopen好;3、fopen只能操纵普通正规文件,而open可以操作普通文件、网络套接字等;4、open无缓冲,fopen有缓冲。
 linux中eof是什么May 07, 2022 pm 04:26 PM
在linux中,eof是自定义终止符,是“END Of File”的缩写;因为是自定义的终止符,所以eof就不是固定的,可以随意的设置别名,linux中按“ctrl+d”就代表eof,eof一般会配合cat命令用于多行文本输出,指文件末尾。
 linux怎么判断pcre是否安装May 09, 2022 pm 04:14 PM
在linux中,可以利用“rpm -qa pcre”命令判断pcre是否安装;rpm命令专门用于管理各项套件,使用该命令后,若结果中出现pcre的版本信息,则表示pcre已经安装,若没有出现版本信息,则表示没有安装pcre。
 linux中什么叫端口映射May 09, 2022 pm 01:49 PM
端口映射又称端口转发,是指将外部主机的IP地址的端口映射到Intranet中的一台计算机,当用户访问外网IP的这个端口时,服务器自动将请求映射到对应局域网内部的机器上;可以通过使用动态或固定的公共网络IP路由ADSL宽带路由器来实现。
 手机远程linux工具有哪些Apr 29, 2022 pm 05:30 PM
手机远程linux工具有:1、JuiceSSH,是一款功能强大的安卓SSH客户端应用,可直接对linux服务进行管理;2、Termius,可以利用手机来连接Linux服务器;3、Termux,一个强大的远程终端工具;4、向日葵远程控制等等。
 linux怎么查询mac地址Apr 24, 2022 pm 08:01 PM
linux查询mac地址的方法:1、打开系统,在桌面中点击鼠标右键,选择“打开终端”;2、在终端中,执行“ifconfig”命令,查看输出结果,在输出信息第四行中紧跟“ether”单词后的字符串就是mac地址。
 linux中lsb是什么意思May 07, 2022 pm 05:08 PM
linux中,lsb是linux标准基础的意思,是“Linux Standards Base”的缩写,是linux标准化领域中的标准;lsb制定了应用程序与运行环境之间的二进制接口,保证了linux发行版与linux应用程序之间的良好结合。


热AI工具

Undresser.AI Undress
人工智能驱动的应用程序,用于创建逼真的裸体照片

AI Clothes Remover
用于从照片中去除衣服的在线人工智能工具。

Undress AI Tool
免费脱衣服图片

Clothoff.io
AI脱衣机

AI Hentai Generator
免费生成ai无尽的。

热门文章

热工具

SublimeText3 Mac版
神级代码编辑软件(SublimeText3)

PhpStorm Mac 版本
最新(2018.2.1 )专业的PHP集成开发工具

Atom编辑器mac版下载
最流行的的开源编辑器

mPDF
mPDF是一个PHP库,可以从UTF-8编码的HTML生成PDF文件。原作者Ian Back编写mPDF以从他的网站上“即时”输出PDF文件,并处理不同的语言。与原始脚本如HTML2FPDF相比,它的速度较慢,并且在使用Unicode字体时生成的文件较大,但支持CSS样式等,并进行了大量增强。支持几乎所有语言,包括RTL(阿拉伯语和希伯来语)和CJK(中日韩)。支持嵌套的块级元素(如P、DIV),

Dreamweaver Mac版
视觉化网页开发工具


