本篇文章给大家介绍一下微信小程序开发中的网络请求封装,聊聊二次封装的原因,具体的封装实现,希望对大家有所帮助!

1、背景
在做微信小程序开发的时候难免会涉及到网络请求操作,小程序提供的原生网络请求的api如下所示:
wx.request({
  url: 'https://test.com/******', //仅为示例,并非真实的接口地址
  data: {
    x: '',
    y: ''
  },
  header: {
    'content-type': 'application/json' // 默认值
  },
  success (res) {
    console.log(res.data)
  }
})
其中:
url: 为请求的后台接口地址;
data: 为请求接口需要携带的参数;
header:设置请求的 header,
content-type默认为 application/json,success: 为请求成功后的回调,res包含请求成功后返回的数据。
更多关于 wx.request的用法可以查看官方介绍。
那既然官方已经提供有api,为什么还需要进行二次封装呢?
2、二次封装的原因
第一点、避免重复代码
避免重复代码主要体现在以下几点:
1) 我们公司调用后台接口,除了登录接口外,其它的接口请求都需要在请求头中加入token,如果不做封装的情况下,每次调用网络请求都需要传token,很麻烦。
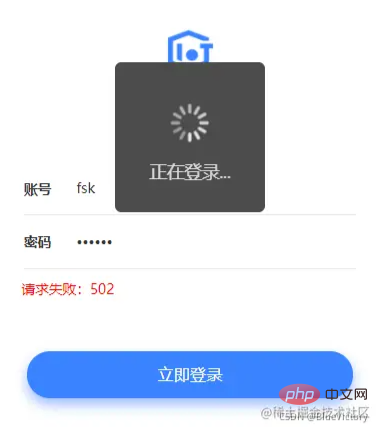
2)在网络请求的时候往往需要给个加载框,提示用户正在加载.... 如下图所示:


如果不做封装,在每个网络请求的地方如果需要弹出加载框,都需要重复写这一段代码:
请求开始的时候,显示加载框。

请求结束的时候,隐藏加载框:

第二点、避免回调地狱
一个页面如果有多个网络请求,并且请求有一定的顺序,wx.request 是异步操作,那么最直接的结果就如下所示代码:
onLoad: function () {
    wx.request({
      url: 'https://test.com/api/test01',
      success:res=>{
        wx.request({
          url: 'https://test.com/api/test02',
          success: res=>{
            wx.request({
              url: 'https://test.com/api/test03',
              success: res=>{
                testDataList: res.content
              }
            })
          }
        })
      }
    })
  },
是不是很像俄罗斯套娃。
为了避免这种写法,当然进行封装了,在这个地方采用了Promise。
关于Prolise的介绍可以到廖雪峰的官方网站去查看,有详细的介绍。
https://www.liaoxuefeng.com/wiki/1022910821149312/1023024413276544
3、具体的封装实现
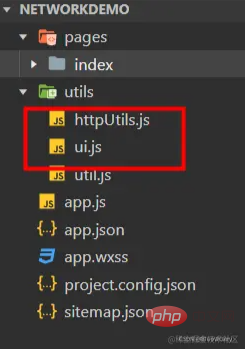
工程结构:

在utils文件夹下新建了两个文件。
1) httpUtils.js
网络请求的封装,具体代码如下:
const ui = require('./ui');
const BASE_URL = 'https://www.wanandroid.com'


/**
 * 网络请求request
 * obj.data 请求接口需要传递的数据
 * obj.showLoading 控制是否显示加载Loading 默认为false不显示
 * obj.contentType 默认为 application/json
 * obj.method 请求的方法  默认为GET
 * obj.url 请求的接口路径
 * obj.message 加载数据提示语
 */
function request(obj) {
    return new Promise(function(resolve, reject) {
      if(obj.showLoading){
        ui.showLoading(obj.message? obj.message : '加载中...');
      }
      var data = {};
      if(obj.data) {
        data = obj.data;
      }
      var contentType = 'application/json';
      if(obj.contentType){
        contentType = obj.contentType;
      }

      var method = 'GET';
      if(obj.method){
        method = obj.method;
      }

      wx.request({
        url: BASE_URL + obj.url,
        data: data,
        method: method,
        //添加请求头
        header: {
          'Content-Type': contentType ,
          'token': wx.getStorageSync('token') //获取保存的token
        },
        //请求成功
        success: function(res) {
          console.log('===============================================================================================')
          console.log('==    接口地址:' + obj.url);
          console.log('==    接口参数:' + JSON.stringify(data));
          console.log('==    请求类型:' + method);
          console.log("==    接口状态:" + res.statusCode);
          console.log("==    接口数据:" + JSON.stringify(res.data));
          console.log('===============================================================================================')
          if (res.statusCode == 200) {
            resolve(res);
          } else if (res.statusCode == 401) {//授权失效
            reject("登录已过期");
            jumpToLogin();//跳转到登录页
          } else {
            //请求失败
            reject("请求失败:" + res.statusCode)
          }
        },
        fail: function(err) {
          //服务器连接异常
          console.log('===============================================================================================')
          console.log('==    接口地址:' + url)
          console.log('==    接口参数:' + JSON.stringify(data))
          console.log('==    请求类型:' + method)
          console.log("==    服务器连接异常")
          console.log('===============================================================================================')
          reject("服务器连接异常,请检查网络再试");
        },
        complete: function() {
          ui.hideLoading();
        }
      })
    });
  }


  //跳转到登录页
  function jumpToLogin(){
    wx.reLaunch({
      url: '/pages/login/login',
    })
  }

  module.exports = {
    request,
  }
代码中有详细的注释,在这里就不多做解释了。
2) ui.js
主要是对wx UI操作的一些简单封装,代码如下:
export const showToast = function(content,duration) {
    if(!duration) duration = 2000
    wx.showToast({
        title: content,
        icon: 'none',
        duration: duration,
    })
  }

  var isShowLoading = false
  export const showLoading = function(title) {
    if(isShowLoading) return
    wx.showLoading({
        title: title?title:'',
        mask:true,
        success:()=>{
            isShowLoading = true
        }
    })
  }

  export const hideLoading = function() {
    if(!isShowLoading) return
    isShowLoading = false
    wx.hideLoading()
  }
3) 具体调用
在index.js 进行了网络请求,具体代码如下:
// index.js
const httpUtils = require('../../utils/httpUtils')
const ui = require('../../utils/ui')

Page({
  data: {
    str:null,
  },

  onLoad() {
  },

  //获取接口数据
  getNetInfo(){
    let obj = {
      method: "POST",
      showLoading: true,
      url:`/user/register?username=pppooo11&password=pppooo&repassword=pppooo`,
      message:"正在注册..."
    }
    httpUtils.request(obj).then(res=>{
      this.setData({
        str:JSON.stringify(res)
      })
      ui.showToast(res.data.errorMsg)
    }).catch(err=>{
      console.log('ERROR')
    });
  }
})
好了,到这里也就结束了,如果上面的内容对你有所帮助不要忘记点个赞哟。
代码已经上传到了github上面,感兴趣的可以点击下载。
https://github.com/YMAndroid/NetWorkDemo
更多编程相关知识,请访问:编程入门!!
以上是小程序中怎么对网络请求进行二次封装的详细内容。更多信息请关注PHP中文网其他相关文章!

热AI工具

Undresser.AI Undress
人工智能驱动的应用程序,用于创建逼真的裸体照片

AI Clothes Remover
用于从照片中去除衣服的在线人工智能工具。

Undress AI Tool
免费脱衣服图片

Clothoff.io
AI脱衣机

AI Hentai Generator
免费生成ai无尽的。

热门文章

热工具

ZendStudio 13.5.1 Mac
功能强大的PHP集成开发环境

SublimeText3 英文版
推荐:为Win版本,支持代码提示!

DVWA
Damn Vulnerable Web App (DVWA) 是一个PHP/MySQL的Web应用程序,非常容易受到攻击。它的主要目标是成为安全专业人员在合法环境中测试自己的技能和工具的辅助工具,帮助Web开发人员更好地理解保护Web应用程序的过程,并帮助教师/学生在课堂环境中教授/学习Web应用程序安全。DVWA的目标是通过简单直接的界面练习一些最常见的Web漏洞,难度各不相同。请注意,该软件中

SublimeText3汉化版
中文版,非常好用

EditPlus 中文破解版
体积小,语法高亮,不支持代码提示功能


