如何在Node.js中使用控制台?本篇文章给大家介绍一下在Node.js中使用控制台的方法,了解一下console 类中的大多数方法,希望对大家有所帮助!

在这篇文章中,我们将学习如何更有效地使用Node.js console 类中的大多数方法。【推荐学习:《nodejs 教程》】
前提条件
本教程在Chrome浏览器70.0.3538.77版本和Node.js 8.11.3版本中得到验证。
使用console.log,console.info, 和console.debug
console.log 方法会打印到标准输出,无论是终端还是浏览器控制台。
它默认输出字符串,但可以与模板字符串结合使用,以修改其返回的内容。
console.log(string, substitution)
console.info 和console.debug 方法在操作上与 console.log 相同。
你可以在Firefox浏览器控制台中默认使用console.debug ,但要在Chrome浏览器中使用它,你必须在所有级别菜单中把日志级别设置为Verbose。
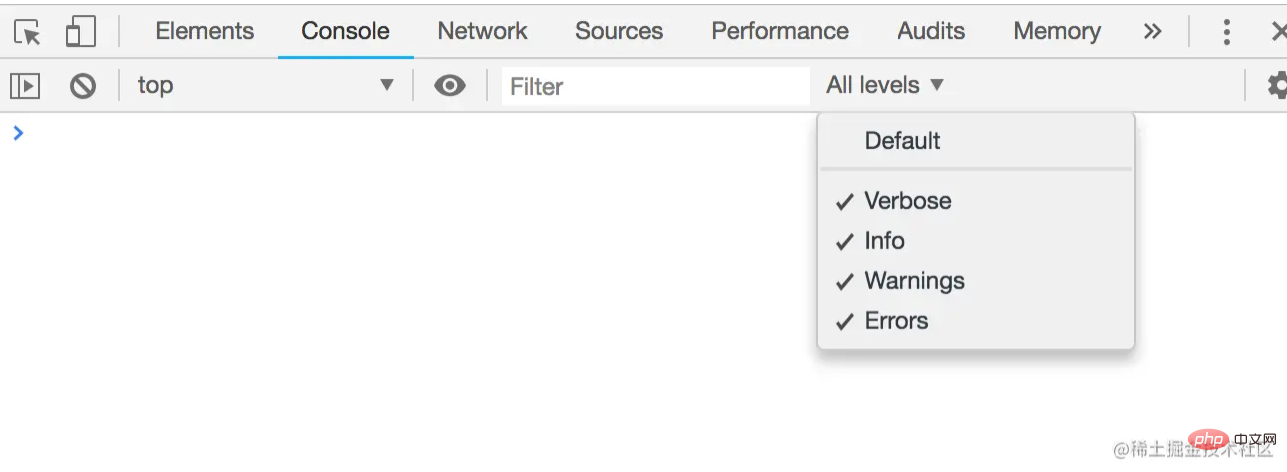
模板字符串中的参数被传递给 util.format它将处理这些参数,用相应的转换值替换每个替换标记。
支持的替换代币是。
%s
const msg = `Using the console class`;
console.log('%s', msg);
console.log(msg);
这段代码将输出以下内容。
OutputUsing the console class
Using the console class
%s 是默认的替换模式。
%d,%f,%i,%o
const circle = (radius = 1) => {
  const profile = {};
  const pi = 22/7;
  profile.diameter = 2 * pi * radius;
  profile.circumference = pi * radius * 2;
  profile.area = pi * radius * 2;
  profile.volume = 4/3 * pi * radius^3;

  console.log('This circle has a radius of: %d cm', radius);
  console.log('This circle has a circumference of: %f cm', profile.diameter);
  console.log('This circle has an area of: %i cm^2', profile.area);
  console.log('The profile of this cirlce is: %o', profile);
  console.log('Diameter %d, Area: %f, Circumference %i', profile.diameter, profile.area, profile.circumference)
}

circle();
这段代码将输出以下内容。
OutputThis circle has a radius of: 1 cm
This circle has a circumference of: 6.285714285714286 cm
This circle has an area of: 6 cm^2
The profile of this cirlce is: {diameter: 6.285714285714286, circumference: 6.285714285714286, area: 6.285714285714286, volume: 7}
Diameter 6, Area: 6.285714285714286, Circumference 6-
%d将被一个数字(整数或浮点数)所替代。 -
%f将被一个浮动值所取代。 -
%i将被一个整数取代。 -
%o将被一个对象所取代。
%o 特别方便,因为我们不需要用 JSON.stringify来展开我们的对象,因为它默认显示对象的所有属性。
请注意,你可以使用任意多的令牌替换。它们只是按照你传递的参数的顺序被替换。
%c
这个替换令牌将CSS样式应用于被替换的文本。
console.log('LOG LEVEL: %c OK', 'color: green; font-weight: normal');
console.log('LOG LEVEL: %c PRIORITY', 'color: blue; font-weight: medium');

console.log('LOG LEVEL: %c WARN', 'color: red; font-weight: bold');
console.log('ERROR HERE');
这段代码将输出以下内容。
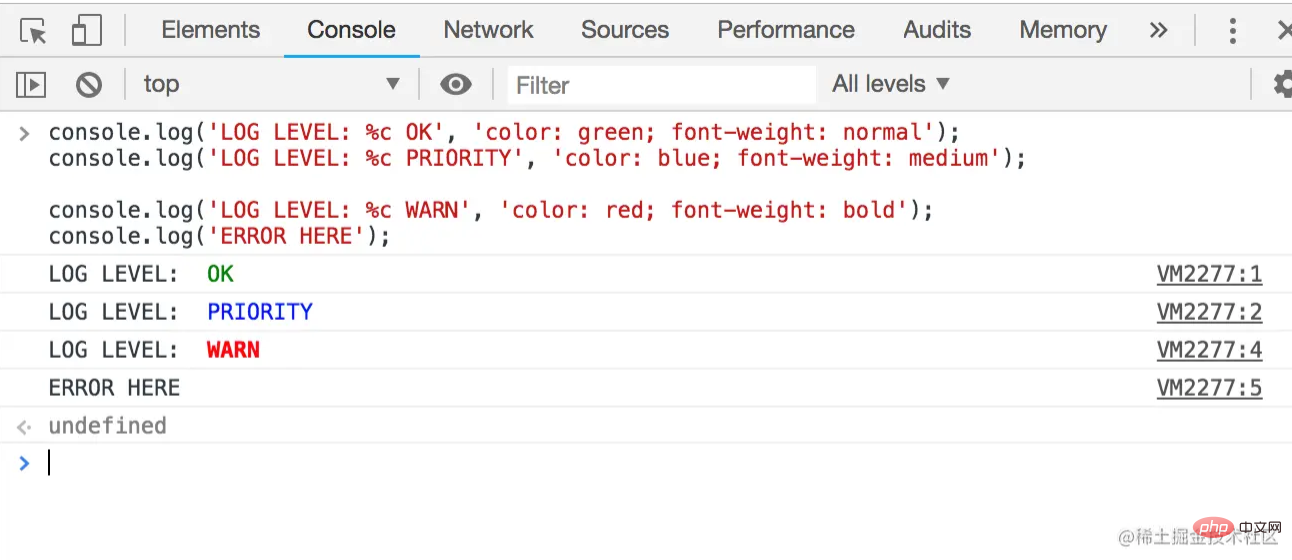
在%c 替换标记之后,我们传递给console.log 的文本会受到样式的影响,但之前的文本则保持原样,没有样式。
使用console.table
传给它的第一个参数是要以表的形式返回的数据。第二个是要显示的选定列的数组。
console.table(tabularData, [properties])
这个方法将把传递给它的输入格式化为表格,然后在表格表示之后记录输入对象。
数组
如果一个数组作为数据被传递给它,数组中的每个元素将是表格中的一行。
const books = ['The Silmarillion', 'The Hobbit', 'Unfinished Tales'];
console.table(books);

对于一个深度为1的简单数组,表格中的第一列有标题索引。在第一列的索引标题下是数组的索引,数组中的项目在第二列的值标题下列出。
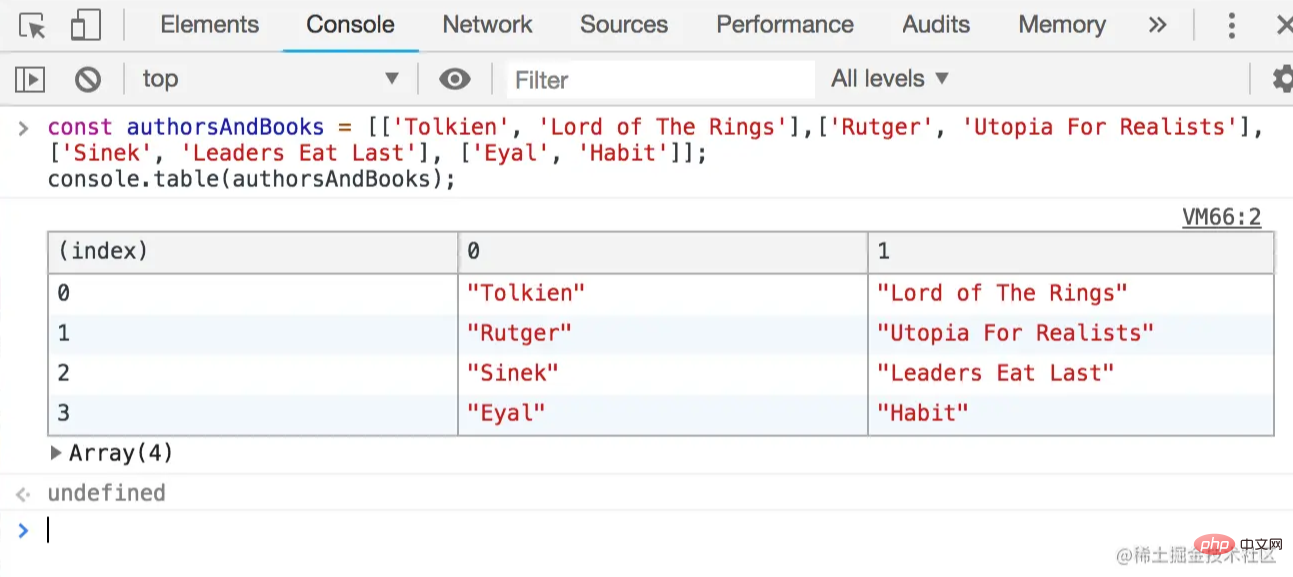
这就是嵌套数组的情况。
const authorsAndBooks = [['Tolkien', 'Lord of The Rings'],['Rutger', 'Utopia For Realists'], ['Sinek', 'Leaders Eat Last'], ['Eyal', 'Habit']];
console.table(authorsAndBooks);
对象
对于深度为1的对象,对象的键会列在索引标题下,而对象中的值则列在第二列标题下。
const inventory = { apples: 200, mangoes: 50, avocados: 300, kiwis: 50 };
console.table(inventory);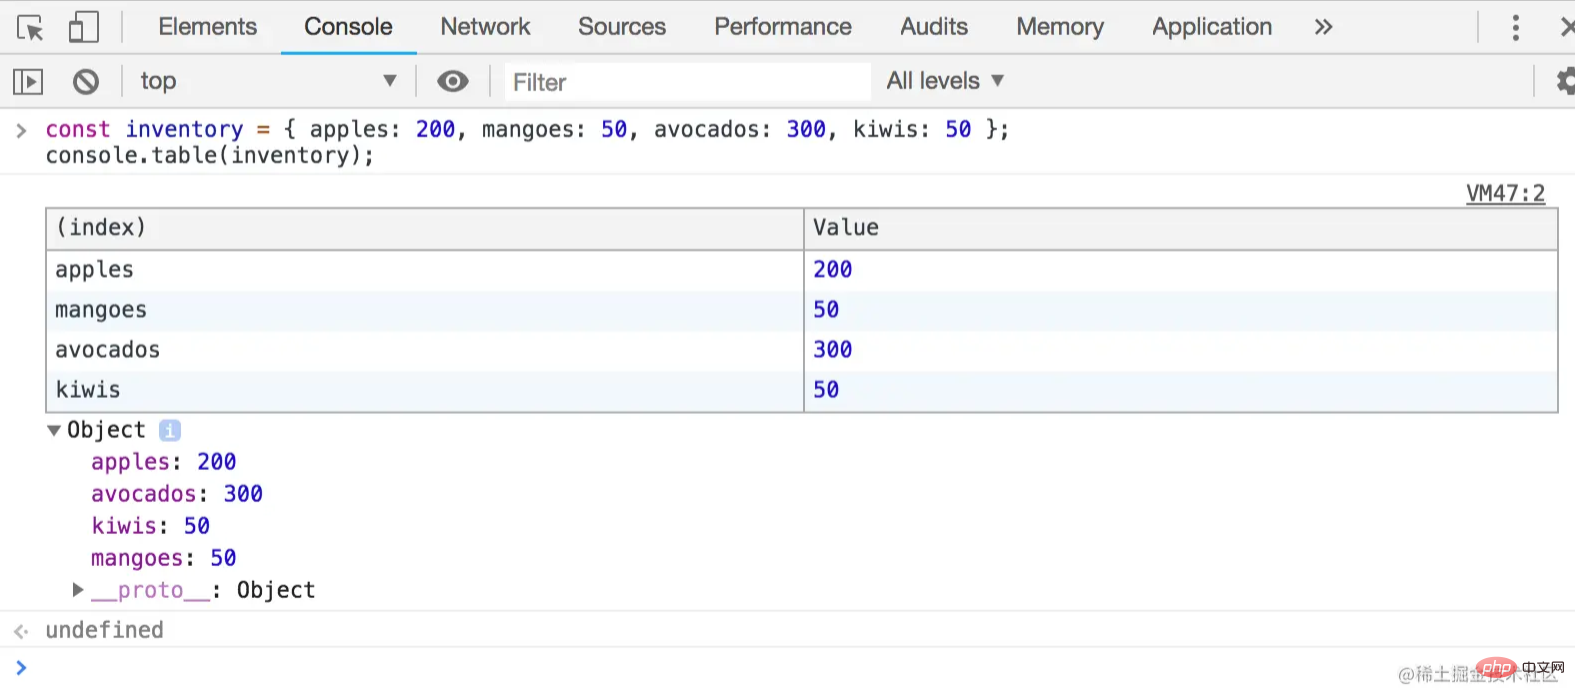
对于嵌套的对象。
const forexConverter = { asia: { rupee: 1.39, renminbi: 14.59 , ringgit: 24.26 }, africa: { rand: 6.49, nakfa: 6.7 , kwanza:0.33 }, europe: { swissfranc: 101.60, gbp: 130, euro: 115.73 } };
console.table(forexConverter);
还有一些嵌套的对象。
const workoutLog = { Monday: { push: 'Incline Bench Press', pull: 'Deadlift'}, Wednesday: { push: 'Weighted Dips', pull: 'Barbell Rows'}};
console.table(workoutLog);
这里,我们指定只想看到列推下的数据。
console.table(workoutLog, 'push');

要对某一列下的数据_进行排序_,只需点击该列标题。
很方便,是吗?
试着把一个带有一些数值的对象作为数组传给console.table!
使用console.dir
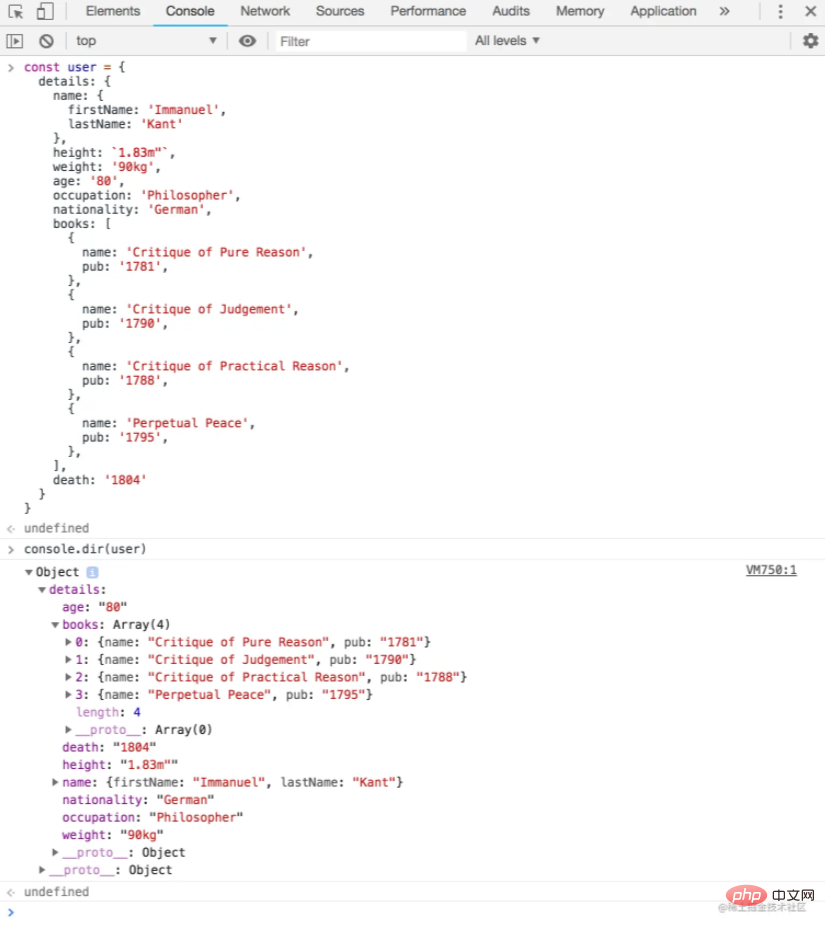
传给这个函数的第一个参数是要记录的对象,而第二个参数是一个包含选项的对象,这些选项将定义结果输出的格式,或者对象中的哪些属性将被显示。
返回的是一个由node的util.expect函数格式化的对象。
输入对象中的嵌套或子对象可在披露三角形下展开。
console.dir(object, options);
// where options = { showHidden: true ... }
让我们看看这个动作。
const user = {
  details: {
    name: {
      firstName: 'Immanuel',
      lastName: 'Kant'
    },
    height: `1.83m"`,
    weight: '90kg',
    age: '80',
    occupation: 'Philosopher',
    nationality: 'German',
    books: [
      {
        name: 'Critique of Pure Reason',
        pub: '1781',
      },
      {
        name: 'Critique of Judgement',
        pub: '1790',
      },
      {
        name: 'Critique of Practical Reason',
        pub: '1788',
      },
      {
        name: 'Perpetual Peace',
        pub: '1795',
      },
    ],
    death: '1804'
  }
}

console.dir(user);
这里是Chrome浏览器的控制台。
使用console.dirxml
这个函数将为传递给它的XML/HTML渲染一棵交互式树。如果无法渲染节点树,它默认为一个Javascript对象。
console.dirxml(object|nodeList);
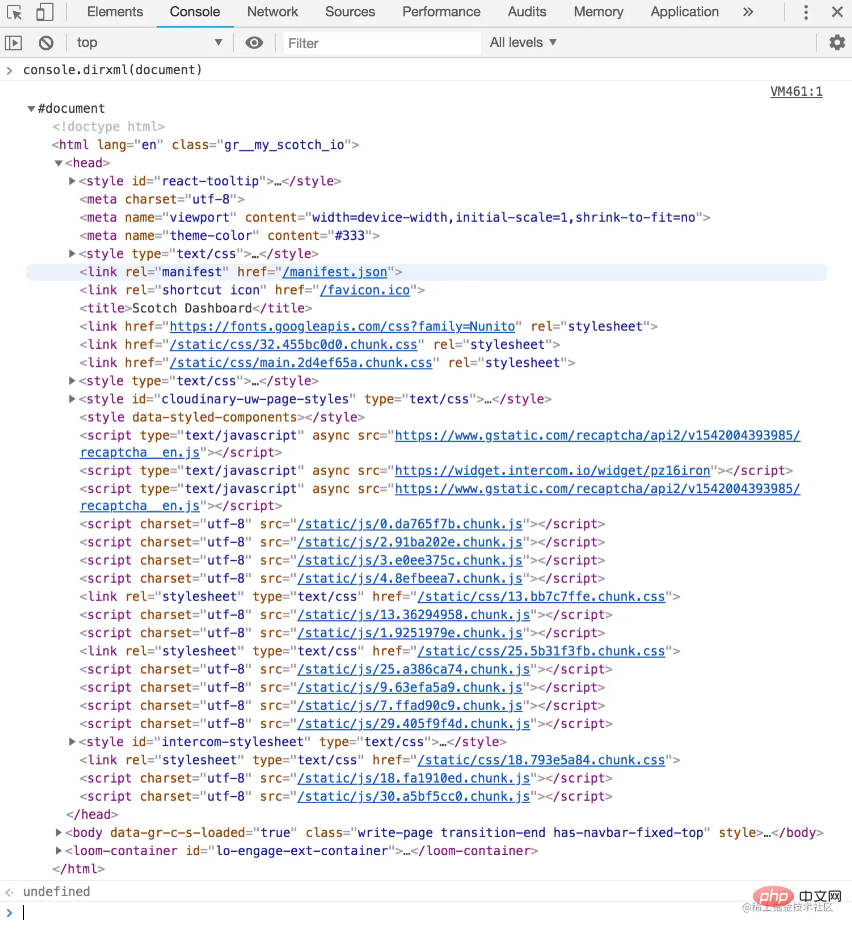
与console.dir ,渲染的树可以通过点击披露三角形来扩展,在其中可以看到子节点。
它的输出类似于我们在浏览器的Elements标签下发现的输出。
这是我们从维基百科页面传入一些HTML时的情况。
const toc = document.querySelector('#toc');
console.dirxml(toc);
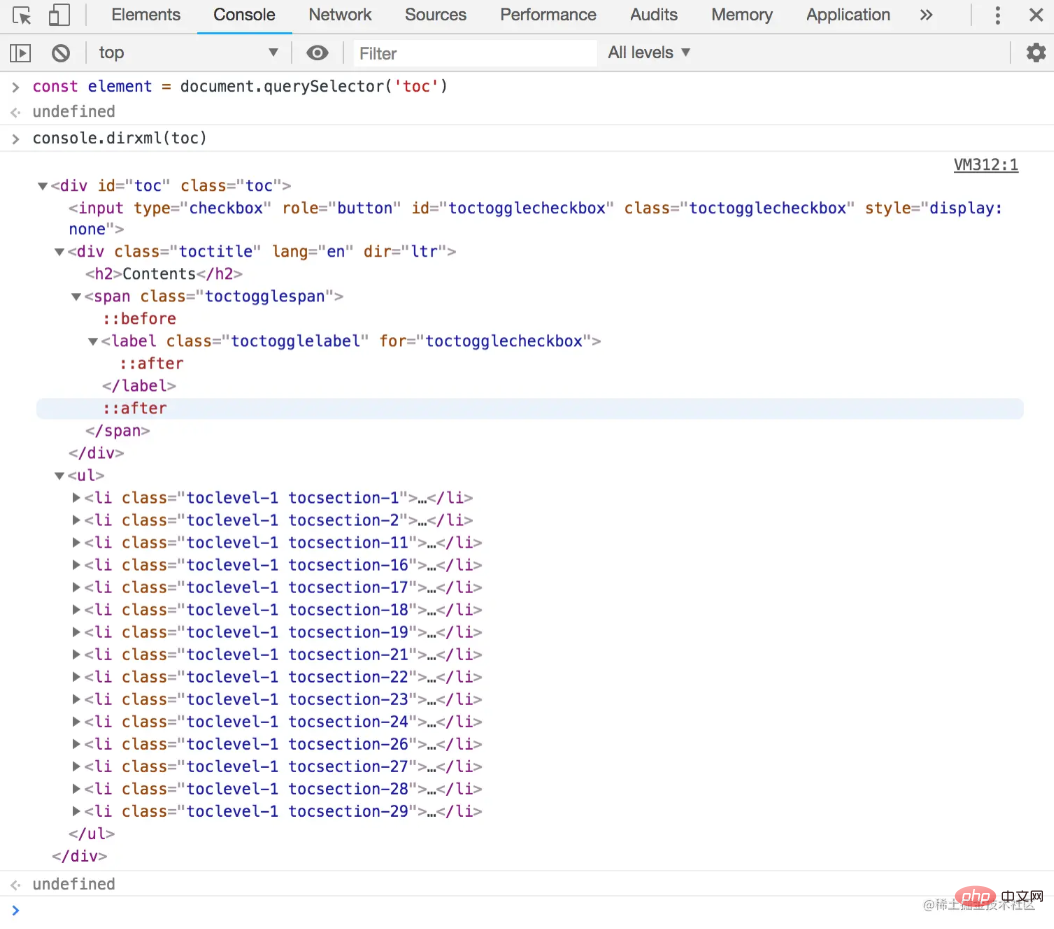
让我们从这个网站上的一个页面传入一些HTML。
console.dirxml(document)
这就是我们传入一个对象时的情况。
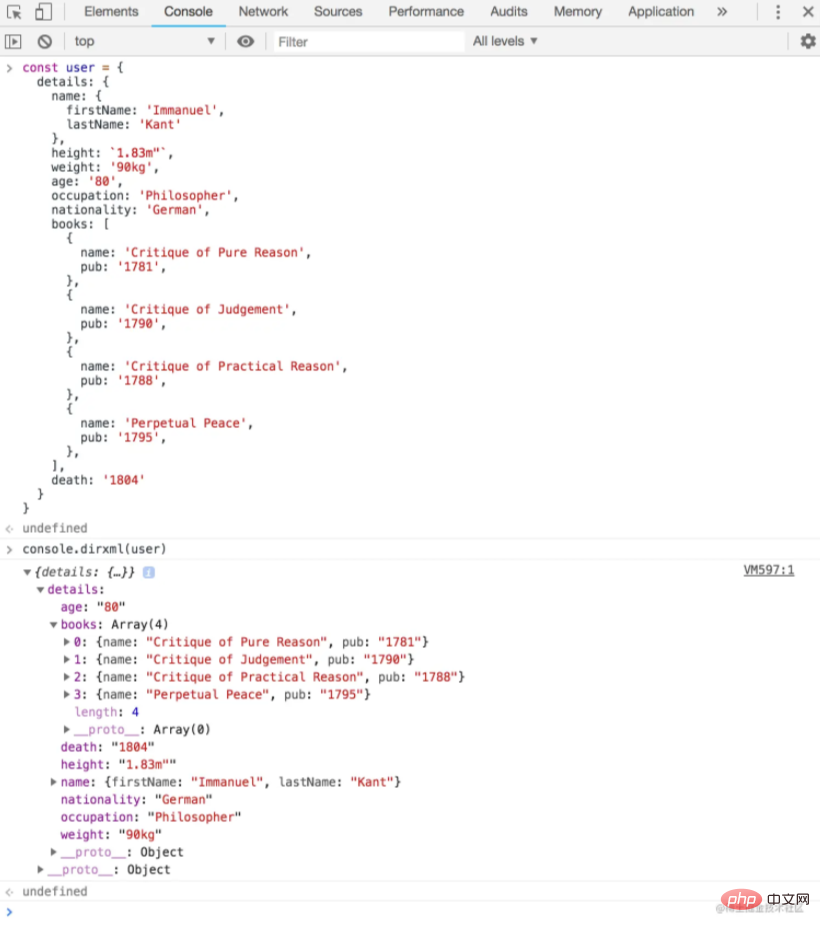
试着在一些HTML上调用console.dir ,看看会发生什么。
使用console.assert
传递给函数的第一个参数是一个要测试是否为真值的值。所有传递的其他参数被认为是信息,如果传递的值没有被评估为真值,就会被打印出来。
Node REPL将抛出一个错误,停止后续代码的执行。
console.assert(value, [...messages])
下面是一个基本的例子。
console.assert(false, 'Assertion failed');
OutputAssertion failed: Assertion failed
现在,让我们找点乐子。我们将建立一个小型测试框架,使用console.assert
const sum = (a = 0, b = 0) => Number(a) + Number(b);

function test(functionName, actualFunctionResult, expected) {
  const actual = actualFunctionResult;
  const pass = actual === expected;
  console.assert(pass, `Assertion failed for ${functionName}`);
  return `Test passed ${actual} === ${expected}`;
}

console.log(test('sum', sum(1,1), 2)); // Test passed 2 === 2
console.log(test('sum', sum(), 0));    // Test passed 0 === 0
console.log(test('sum', sum, 2));      // Assertion failed for sum
console.log(test('sum', sum(3,3), 4)); // Assertion failed for sum使用console.error 和console.warn
这两个基本上是相同的。它们都会打印传递给它们的任何字符串。
然而,console.warn 在信息传递之前会打印出一个三角形的警告符号。
console.warn(string, substitution);

而console.error ,在信息传递前打印出一个危险符号。
console.error(string, substitution);

让我们注意到,字符串替换可以用与console.log 方法相同的方式来应用。
下面是一个使用console.error 的迷你日志函数。
const sum = (a = 0, b = 0) => Number(a) + Number(b);

function otherTest(actualFunctionResult, expected) {
  if (actualFunctionResult !== expected) {
    console.error(new Error(`Test failed ${actualFunctionResult} !== ${expected}`));
  } else {
    // pass
  }
}

otherTest(sum(1,1), 3);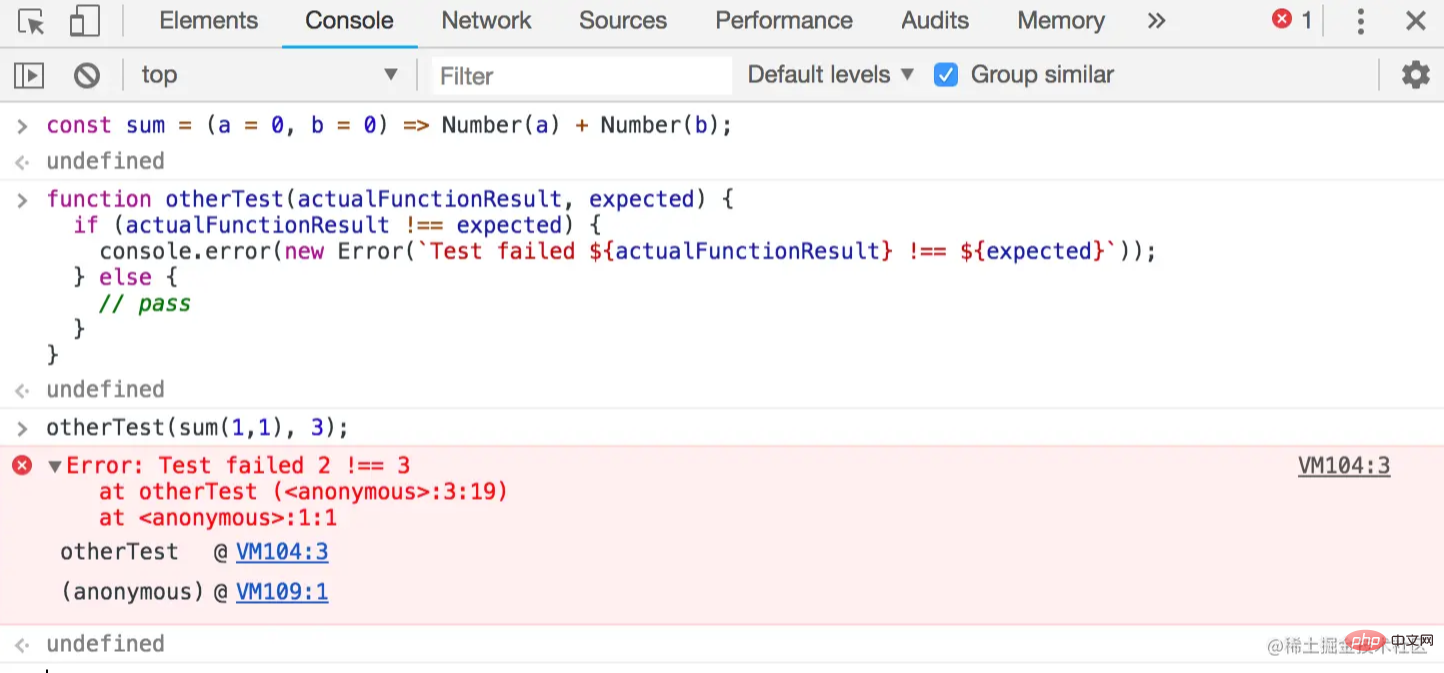
使用console.trace(label)
这个控制台方法将打印字符串Trace: ,后面是传递给函数的标签,然后是堆栈跟踪到函数的当前位置。
function getCapital(country) {
  const capitalMap = {
    belarus: 'minsk', australia: 'canberra', egypt: 'cairo', georgia: 'tblisi', latvia: 'riga', samoa: 'apia'
  };
  console.trace('Start trace here');
  return Object.keys(capitalMap).find(item => item === country) ? capitalMap[country] : undefined;
}

console.log(getCapital('belarus'));
console.log(getCapital('accra'));
使用console.count(label)
Count将开始并递增一个名为label 的计数器。
让我们建立一个单词计数器来看看它是如何工作的。
const getOccurences = (word = 'foolish') => {
  const phrase = `Oh me! Oh life! of the questions of these recurring, Of the endless trains of the faithless, of cities fill’d with the foolish, Of myself forever reproaching myself, for who more foolish than I, and who more faithless?`;

  let count = 0;
  const wordsFromPhraseArray = phrase.replace(/[,.!?]/igm, '').split(' ');
  wordsFromPhraseArray.forEach((element, idx) => {
    if (element === word) {
      count ++;
      console.count(word);
    }
  });
  return count;
}

getOccurences();
getOccurences('foolish');
在这里,我们看到foolish 这个词被记录了两次。该词在短语中每出现一次就记录一次。
[secondary_label]
foolish: 1
foolish: 2
2
我们可以用这个方法来查看一个函数被调用了多少次,或者我们的代码中的某一行被执行了多少次。
使用console.countReset(label)
顾名思义,这将重置一个计数器,该计数器有一个由console.count 方法设置的label 。
const getOccurences = (word = 'foolish') => {
  const phrase = `Oh me! Oh life! of the questions of these recurring, Of the endless trains of the faithless, of cities fill’d with the foolish, Of myself forever reproaching myself, for who more foolish than I, and who more faithless?`;

  let count = 0;
  const wordsFromPhraseArray = phrase.replace(/[,.!?]/igm, '').split(' ');
  wordsFromPhraseArray.forEach((element, idx) => {
    if (element === word) {
      count ++;
      console.count(word);
      console.countReset(word);
    }
  });
  return count;
}

getOccurences();
getOccurences('foolish');
[secondary_label]
foolish: 1
foolish: 1
2
我们可以看到,我们的getOccurences 函数返回2,因为在这句话中确实有两次出现foolish ,但由于我们的计数器在每次匹配时都被重置,所以它记录了两次foolish: 1 。
使用console.time(label) 和console.timeEnd(label)
console.time 函数启动一个定时器,并将label 作为参数提供给该函数,而console.timeEnd 函数停止一个定时器,并将label 作为参数提供给该函数。
console.time('<timer-label>'); console.timeEnd('<timer-label>');
我们可以通过向两个函数传递相同的label 名称来计算出运行一个操作所需的时间。
const users = ['Vivaldi', 'Beethoven', 'Ludovico'];

const loop = (array) => {
  array.forEach((element, idx) => {
    console.log(element);
  })
}

const timer = () => {
  console.time('timerLabel');
  loop(users);
  console.timeEnd('timerLabel');
}

timer();
我们可以看到计时器停止后显示的计时器标签与时间值相对应。
OutputVivaldi
Beethoven
Ludovico
timerLabel: 0.69091796875ms
循环函数花了0.6909ms完成了对数组的循环操作。
结论
最后,我们已经来到了本教程的结尾。
请注意,本教程没有涵盖console 类的非标准使用,如console.profile ,console.profileEnd ,和console.timeLog 。
更多编程相关知识,请访问:编程入门!!
以上是浅谈Node.js中怎么使用console的详细内容。更多信息请关注PHP中文网其他相关文章!
 从C/C到JavaScript:所有工作方式Apr 14, 2025 am 12:05 AM
从C/C 转向JavaScript需要适应动态类型、垃圾回收和异步编程等特点。1)C/C 是静态类型语言,需手动管理内存,而JavaScript是动态类型,垃圾回收自动处理。2)C/C 需编译成机器码,JavaScript则为解释型语言。3)JavaScript引入闭包、原型链和Promise等概念,增强了灵活性和异步编程能力。
 JavaScript引擎:比较实施Apr 13, 2025 am 12:05 AM
不同JavaScript引擎在解析和执行JavaScript代码时,效果会有所不同,因为每个引擎的实现原理和优化策略各有差异。1.词法分析:将源码转换为词法单元。2.语法分析:生成抽象语法树。3.优化和编译:通过JIT编译器生成机器码。4.执行:运行机器码。V8引擎通过即时编译和隐藏类优化,SpiderMonkey使用类型推断系统,导致在相同代码上的性能表现不同。
 超越浏览器:现实世界中的JavaScriptApr 12, 2025 am 12:06 AM
JavaScript在现实世界中的应用包括服务器端编程、移动应用开发和物联网控制:1.通过Node.js实现服务器端编程,适用于高并发请求处理。2.通过ReactNative进行移动应用开发,支持跨平台部署。3.通过Johnny-Five库用于物联网设备控制,适用于硬件交互。
 使用Next.js(后端集成)构建多租户SaaS应用程序Apr 11, 2025 am 08:23 AM
我使用您的日常技术工具构建了功能性的多租户SaaS应用程序(一个Edtech应用程序),您可以做同样的事情。 首先,什么是多租户SaaS应用程序? 多租户SaaS应用程序可让您从唱歌中为多个客户提供服务
 如何使用Next.js(前端集成)构建多租户SaaS应用程序Apr 11, 2025 am 08:22 AM
本文展示了与许可证确保的后端的前端集成,并使用Next.js构建功能性Edtech SaaS应用程序。 前端获取用户权限以控制UI的可见性并确保API要求遵守角色库
 JavaScript:探索网络语言的多功能性Apr 11, 2025 am 12:01 AM
JavaScript是现代Web开发的核心语言,因其多样性和灵活性而广泛应用。1)前端开发:通过DOM操作和现代框架(如React、Vue.js、Angular)构建动态网页和单页面应用。2)服务器端开发:Node.js利用非阻塞I/O模型处理高并发和实时应用。3)移动和桌面应用开发:通过ReactNative和Electron实现跨平台开发,提高开发效率。
 JavaScript的演变:当前的趋势和未来前景Apr 10, 2025 am 09:33 AM
JavaScript的最新趋势包括TypeScript的崛起、现代框架和库的流行以及WebAssembly的应用。未来前景涵盖更强大的类型系统、服务器端JavaScript的发展、人工智能和机器学习的扩展以及物联网和边缘计算的潜力。
 神秘的JavaScript:它的作用以及为什么重要Apr 09, 2025 am 12:07 AM
JavaScript是现代Web开发的基石,它的主要功能包括事件驱动编程、动态内容生成和异步编程。1)事件驱动编程允许网页根据用户操作动态变化。2)动态内容生成使得页面内容可以根据条件调整。3)异步编程确保用户界面不被阻塞。JavaScript广泛应用于网页交互、单页面应用和服务器端开发,极大地提升了用户体验和跨平台开发的灵活性。


热AI工具

Undresser.AI Undress
人工智能驱动的应用程序,用于创建逼真的裸体照片

AI Clothes Remover
用于从照片中去除衣服的在线人工智能工具。

Undress AI Tool
免费脱衣服图片

Clothoff.io
AI脱衣机

AI Hentai Generator
免费生成ai无尽的。

热门文章

热工具

SublimeText3 Linux新版
SublimeText3 Linux最新版

SublimeText3 Mac版
神级代码编辑软件(SublimeText3)

ZendStudio 13.5.1 Mac
功能强大的PHP集成开发环境

适用于 Eclipse 的 SAP NetWeaver 服务器适配器
将Eclipse与SAP NetWeaver应用服务器集成。

EditPlus 中文破解版
体积小,语法高亮,不支持代码提示功能


