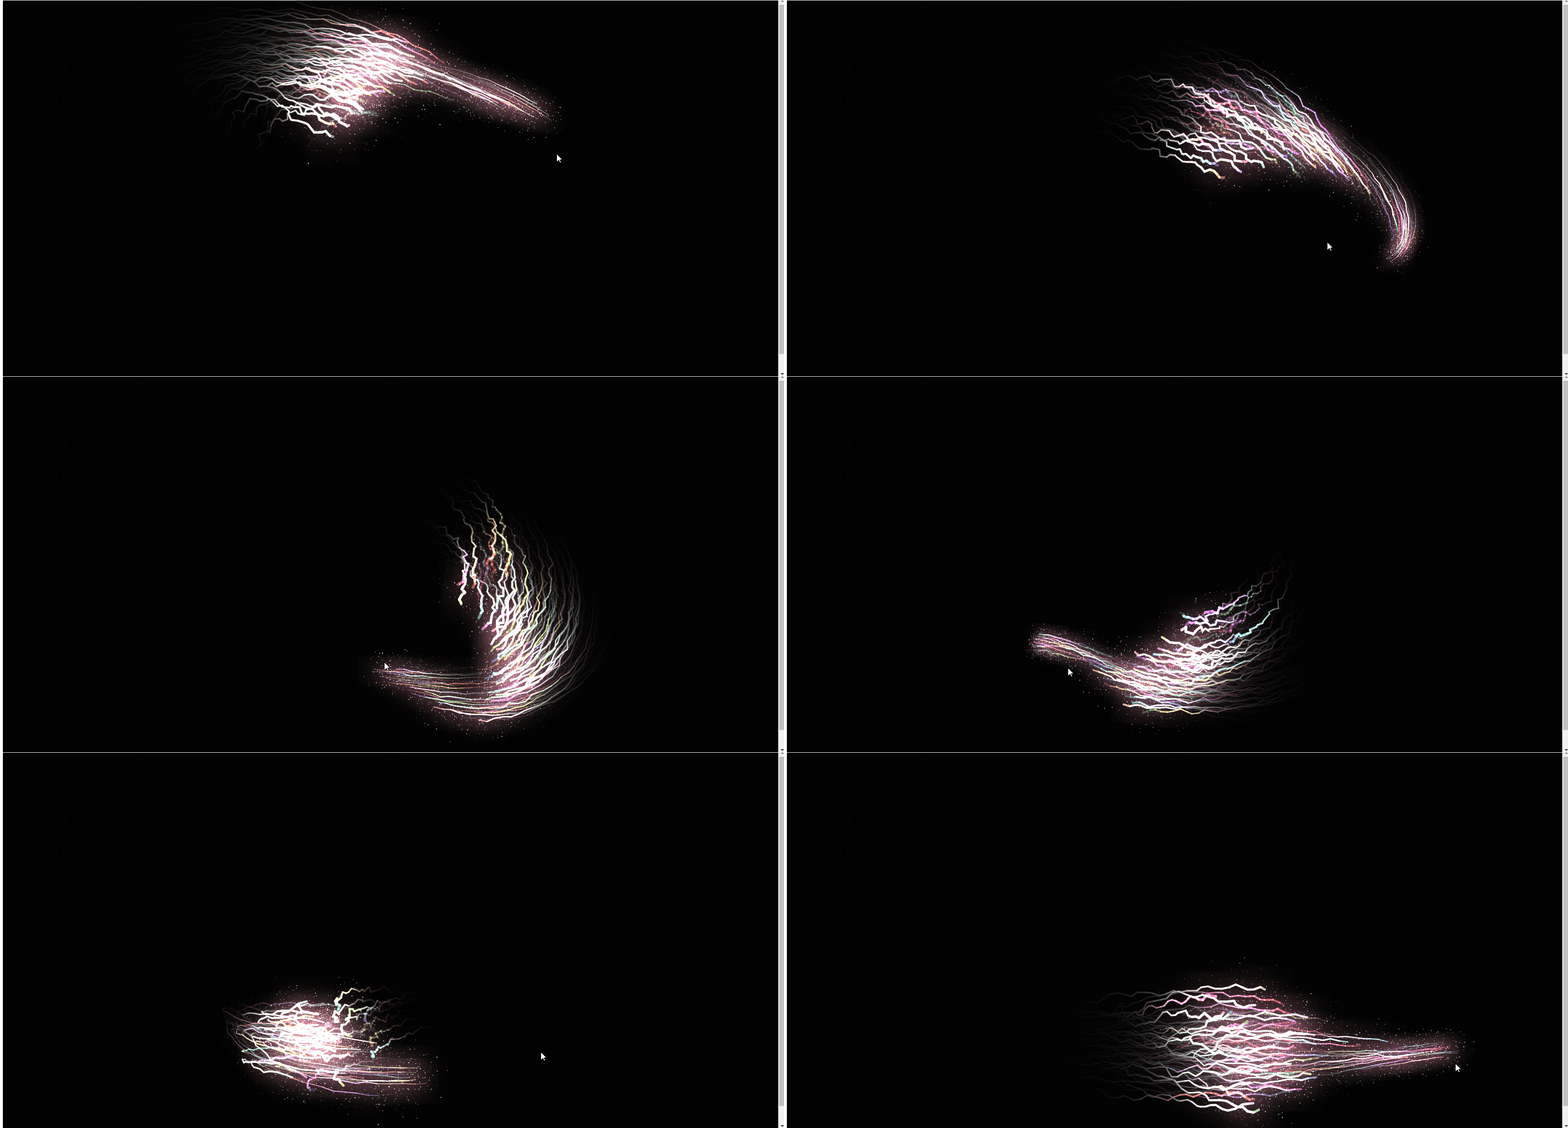
本篇文章给大家介绍一下使用HTML5 canvas绘制酷炫能量线条特效的方法。有一定的参考价值,有需要的朋友可以参考一下,希望对你们有所助。

上面是效果图,下面直接附js代码,希望对大家有所帮助!!
// UTILconst PI = Math.PI,
  TWO_PI = Math.PI * 2;const Util = {};Util.timeStamp = function() {
  return window.performance.now();};Util.random = function(min, max) {
  return min + Math.random() * (max - min);};Util.map = function(a, b, c, d, e) {
  return (a - b) / (c - b) * (e - d) + d;};Util.lerp = function(value1, value2, amount) {
  return value1 + (value2 - value1) * amount;};Util.clamp = function(value, min, max) {
  return Math.max(min, Math.min(max, value));};// Vectorclass Vector {
  constructor(x, y) {
    this.x = x || 0;
    this.y = y || 0;
  }
  set(x, y) {
    this.x = x;
    this.y = y;
  }
  reset() {
    this.x = 0;
    this.y = 0;
  }
  fromAngle(angle) {
    let x = Math.cos(angle),
      y = Math.sin(angle);
    return new Vector(x, y);
  }
  add(vector) {
    this.x += vector.x;
    this.y += vector.y;
  }
  sub(vector) {
    this.x -= vector.x;
    this.y -= vector.y;
  }
  mult(scalar) {
    this.x *= scalar;
    this.y *= scalar;
  }
  p(scalar) {
    this.x /= scalar;
    this.y /= scalar;
  }
  dot(vector) {
    return vector.x * this.x + vector.y * this.y;
  }
  limit(limit_value) {
    if (this.mag() > limit_value) this.setMag(limit_value);
  }
  mag() {
    return Math.hypot(this.x, this.y);
  }
  setMag(new_mag) {
    if (this.mag() > 0) {
      this.normalize();
    } else {
      this.x = 1;
      this.y = 0;
    }
    this.mult(new_mag);
  }
  normalize() {
    let mag = this.mag();
    if (mag > 0) {
      this.x /= mag;
      this.y /= mag;
    }
  }
  heading() {
    return Math.atan2(this.y, this.x);
  }
  setHeading(angle) {
    let mag = this.mag();
    this.x = Math.cos(angle) * mag;
    this.y = Math.sin(angle) * mag;
  }
  dist(vector) {
    return new Vector(this.x - vector.x, this.y - vector.y).mag();
  }
  angle(vector) {
    return Math.atan2(vector.y - this.y, vector.x - this.x);
  }
  copy() {
    return new Vector(this.x, this.y);
  }}// Init canvaslet canvas = document.createElement("canvas"),
  ctx = canvas.getContext("2d"),
  H = (canvas.height = window.innerHeight),
  W = (canvas.width = window.innerWidth);document.body.appendChild(canvas);// Mouselet mouse = {
  x: W/2,
  y: H/2};canvas.onmousemove = function(event) {
  mouse.x = event.clientX - canvas.offsetLeft;
  mouse.y = event.clientY - canvas.offsetTop;};document.body.onresize = function(event){
  H = (canvas.height = window.innerHeight);
  W = (canvas.width = window.innerWidth);}// Let's goclass Arrow {
  constructor(x, y, target) {
    this.position = new Vector(x, y);
    this.velocity = new Vector().fromAngle(Util.random(0,TWO_PI));
    this.acceleration = new Vector(0, 0);
    this.target = target;
    this.travelled_distance = 0;
    this.min_size = 1;
    this.max_size = 6;
    this.size = Util.random(this.min_size, this.max_size);
    this.zone = this.size * 4;
    this.topSpeed = Util.map(this.size,this.min_size,this.max_size,40,10);
    let tailLength = Math.floor(Util.map(this.size, this.min_size, this.max_size, 4, 16));
    this.tail = [];
    for (let i = 0; i < tailLength; i++) {
      this.tail.push({
        x: this.position.x,
        y: this.position.y      });
    }
    this.wiggle_speed = Util.map(this.size, this.min_size, this.max_size, 2 , 1.2);
    this.blink_offset = Util.random(0, 100);
    this.alpha = Util.random(0.1,1)
  }
  render() {
    this.update();
    this.draw();
  }
  update() {
    let old_position = this.position.copy();
    // Focus on target
    let t = new Vector(this.target.x, this.target.y),
      angle = this.position.angle(t);
    let d_f_target = t.dist(this.position);
      let f = new Vector().fromAngle(angle);

      f.setMag(Util.map(Util.clamp(d_f_target,0,400), 0, 400, 0, this.topSpeed * 0.1));
      this.addForce(f);

    // Update position and velocity
    this.velocity.add(this.acceleration);
    if(d_f_target < 800){
       this.velocity.limit(Util.map(Util.clamp(d_f_target,0,800), 0, 800, this.topSpeed*0.4, this.topSpeed));
       }else{
         this.velocity.limit(this.topSpeed);
       }
    this.position.add(this.velocity);
    // Reset acceleration for the next loop
    this.acceleration.mult(0);
    this.travelled_distance += old_position.dist(this.position);

      let wiggle =
        Math.sin(frame * this.wiggle_speed) *
        Util.map(this.velocity.mag(), 0, this.topSpeed, 0, this.size);
      let w_a = this.velocity.heading() + Math.PI / 2;

      let w_x = this.position.x + Math.cos(w_a) * wiggle,
        w_y = this.position.y + Math.sin(w_a) * wiggle;

      this.travelled_distance = 0;
      let from = this.tail.length - 1,
        to = 0;
          let n = new Vector().fromAngle(Util.random(0,TWO_PI));
      n.setMag(Math.random()*this.size);


      var tail = { x: w_x+ n.x, y: w_y + n.y};
      this.tail.splice(from, 1);
      this.tail.splice(to, 0, tail);

  }
  draw() {

        let energy = Util.map(this.velocity.mag(),0,this.topSpeed,0.1,1);


    let color =
      "hsl("+Math.sin((frame + this.blink_offset) * 0.1) * 360+",50%,"+

        Util.map(this.velocity.mag(),0,this.topSpeed,40,100) * this.alpha
    +"%)";
    ctx.globalAlpha = this.alpha;

    ctx.strokeStyle = color;
    for (let i = 0; i < this.tail.length - 1; i++) {
      let t = this.tail[i],
        next_t = this.tail[i + 1];
      ctx.lineWidth = Util.map(i, 0, this.tail.length - 1, this.size, 1);
      ctx.beginPath();
      ctx.moveTo(t.x, t.y);
      ctx.lineTo(next_t.x, next_t.y);
      ctx.closePath();
      ctx.stroke();
    }

    let gradient_size = 140 * energy;var grd = ctx.createRadialGradient(
  this.position.x,this.position.y , 5,
  this.position.x,this.position.y, gradient_size);grd.addColorStop(0, "rgba(255,255,255,0.01)");grd.addColorStop(0.1, "rgba(255,120,200,0.02)");grd.addColorStop(0.9, "rgba(255,255,120,0)");grd.addColorStop(1, "rgba(0,0,0,0)");// Fill with gradientctx.fillStyle = grd;ctx.fillRect(this.position.x - gradient_size / 2 ,this.position.y - gradient_size / 2 , gradient_size, gradient_size);

    ctx.globalAlpha = energy+0.2;
    ctx.fillStyle = "white";
    for(let i = 0; i < 4; i++){
      let n = new Vector().fromAngle(Util.random(0,TWO_PI));
      n.setMag(Math.random()*energy*100);
      n.add(this.position);
      ctx.beginPath();
      ctx.arc(n.x,n.y,Math.random(),0,TWO_PI)
      ctx.fill();
    }

  }
  addForce(vector) {
    this.acceleration.add(vector);
  }
  avoid(others) {
    others.forEach(other => {
      if (other !== this) {
        let dist = this.position.dist(other.position),
          max_dist = this.zone + other.size;
        if (max_dist - dist >= 0) {
          let angle = other.position.angle(this.position);
          let force = new Vector().fromAngle(angle);
          force.setMag(Util.map(dist, 0, max_dist, 2, 0));
          this.addForce(force);
        }
      }
    });
  }}let arrows = [];for (let i = 0; i < 100; i++) {
  arrows.push(new Arrow(W / 2, H / 2, mouse));}let frame = 0;ctx.strokeStyle = "white";function loop() {
  ctx.fillStyle="black";
  ctx.globalCompositeOperation = "source-over";
  ctx.globalAlpha = 0.2;
  ctx.fillRect(0, 0, W, H);
  ctx.globalAlpha = 1;
  ctx.globalCompositeOperation = "lighter";
  arrows.forEach(a => {
    a.avoid(arrows);
  });
  arrows.forEach(a => {
    a.render();
  });
  frame += 1;
requestAnimationFrame(loop);}ctx.lineCap = "round";ctx.lineJoin = "round";loop();推荐学习:Html5视频教程
以上是HTML5 canvas如何绘制酷炫能量线条效果(附代码)的详细内容。更多信息请关注PHP中文网其他相关文章!
 了解H5代码:HTML5的基本原理Apr 17, 2025 am 12:08 AM
HTML5是构建现代网页的关键技术,提供了许多新元素和功能。1.HTML5引入了语义化元素如、、等,增强了网页结构和SEO。2.支持多媒体元素和,无需插件即可嵌入媒体。3.表单增强了新输入类型和验证属性,简化了验证过程。4.提供了离线和本地存储功能,提升了网页性能和用户体验。
 H5代码:Web开发人员的最佳实践Apr 16, 2025 am 12:14 AM
H5代码的最佳实践包括:1.使用正确的DOCTYPE声明和字符编码;2.采用语义化标签;3.减少HTTP请求;4.使用异步加载;5.优化图像。这些实践能提升网页的效率、可维护性和用户体验。
 H5:网络标准和技术的发展Apr 15, 2025 am 12:12 AM
Web标准和技术从HTML4、CSS2和简单的JavaScript演变至今,经历了显着的发展。 1)HTML5引入了Canvas、WebStorage等API,增强了Web应用的复杂性和互动性。 2)CSS3增加了动画和过渡功能,使页面效果更加丰富。 3)JavaScript通过Node.js和ES6的现代化语法,如箭头函数和类,提升了开发效率和代码可读性,这些变化推动了Web应用的性能优化和最佳实践的发展。
 H5是HTML5的速记吗?探索细节Apr 14, 2025 am 12:05 AM
H5不仅仅是HTML5的简称,它代表了一个更广泛的现代网页开发技术生态:1.H5包括HTML5、CSS3、JavaScript及相关API和技术;2.它提供更丰富、互动、流畅的用户体验,能在多设备上无缝运行;3.使用H5技术栈可以创建响应式网页和复杂交互功能。
 H5和HTML5:网络开发中常用的术语Apr 13, 2025 am 12:01 AM
H5与HTML5指的是同一个东西,即HTML5。HTML5是HTML的第五个版本,带来了语义化标签、多媒体支持、画布与图形、离线存储与本地存储等新功能,提升了网页的表现力和交互性。
 H5指的是什么?探索上下文Apr 12, 2025 am 12:03 AM
H5referstoHTML5,apivotaltechnologyinwebdevelopment.1)HTML5introducesnewelementsandAPIsforrich,dynamicwebapplications.2)Itsupportsmultimediawithoutplugins,enhancinguserexperienceacrossdevices.3)SemanticelementsimprovecontentstructureandSEO.4)H5'srespo
 H5:工具,框架和最佳实践Apr 11, 2025 am 12:11 AM
H5开发需要掌握的工具和框架包括Vue.js、React和Webpack。1.Vue.js适用于构建用户界面,支持组件化开发。2.React通过虚拟DOM优化页面渲染,适合复杂应用。3.Webpack用于模块打包,优化资源加载。
 HTML5的遗产:当前了解H5Apr 10, 2025 am 09:28 AM
HTML5hassignificantlytransformedwebdevelopmentbyintroducingsemanticelements,enhancingmultimediasupport,andimprovingperformance.1)ItmadewebsitesmoreaccessibleandSEO-friendlywithsemanticelementslike,,and.2)HTML5introducednativeandtags,eliminatingthenee


热AI工具

Undresser.AI Undress
人工智能驱动的应用程序,用于创建逼真的裸体照片

AI Clothes Remover
用于从照片中去除衣服的在线人工智能工具。

Undress AI Tool
免费脱衣服图片

Clothoff.io
AI脱衣机

AI Hentai Generator
免费生成ai无尽的。

热门文章

热工具

WebStorm Mac版
好用的JavaScript开发工具

记事本++7.3.1
好用且免费的代码编辑器

EditPlus 中文破解版
体积小,语法高亮,不支持代码提示功能

SublimeText3汉化版
中文版,非常好用

VSCode Windows 64位 下载
微软推出的免费、功能强大的一款IDE编辑器


