本篇文章给大家介绍一下Bootstrap中的常用表单组件。有一定的参考价值,有需要的朋友可以参考一下,希望对大家有所帮助。

相关推荐:《bootstrap教程》
表单常见的元素主要包括:文本输入框、下拉选择框、单选框、复选框、文本域、按钮等。下面是不同的bootstrap版本:
LESS: forms.less
SASS: _forms.scss
bootstrap仅对表单内的fieldset、legend、label标签进行了定制
fieldset {
min-width: 0;
padding: 0;
margin: 0;
border: 0;
}
legend {
display: block;
width: 100%;
padding: 0;
margin-bottom: 20px;
font-size: 21px;
line-height: inherit;
color: #333;
border: 0;
border-bottom: 1px solid #e5e5e5;
}

label {
display: inline-block;
margin-bottom: 5px;
font-weight: bold;
}
除了这个几个元素之外,还有input、select、textarea等元素,在bootstrap框架中,通过定制一个类名.form-control来实现效果
1、宽度变成了100%;
2、设置了一个浅灰色(#ccc)的边框
3、具有4px的圆角
4、设置阴影效果,并且元素得到焦点时,阴影和边框效果会有所变化
5、设置了palceholder的颜色为#999
内联表单
如果要在input之前添加一个了label标签,会导致input换行显示;如果又必须添加这样一个label标签,且不想让input换行,就需要将label标签也放在容器.form-group中,例如:
<div class="form-group ">
        <label class="sr-only">邮箱地址</label>
    </div>
    <div class="form-group">
        <input type="email" class="form-control" placeholder="请输入邮箱号">
    </div>
实现联表单效果只需在form元素中添加类名.form-inline即可,实现原理:
将表单控件设置成内联块元素(display:inline-block),让表单控件在一行显示。
例子:
<form class="form-inline">
        <div class="form-group">
            <label class="sr-only">邮箱</label>
            <input class="form-control" type="email" placeholder="请输入邮箱号">
        </div>
        <div class="form-group">
            <label class="sr-only">密码</label>
            <input type="password" class="form-control" placeholder="请输入密码">
        </div>
        <div class="checkbox">
            <label>
                <input type="checkbox" > 记住密码
            </label>
        </div>
        <div class="form-group">
            <button class="btn btn-default">进入邮箱</button>
        </div>
    </form>
效果如下:

看到上图效果你有没有发现代码里明明有label标签,且没放在容器.form-group中,input也不会换行,更奇怪的是label标签的内容居然没有显示出来!其实仔细一看label标签是添加了类名.sr-only,就是它将label给隐藏起来了,来看看它的源码:
.sr-only {
position: absolute;
width: 1px;
height: 1px;
padding: 0;
margin: -1px;
overflow: hidden;
clip: rect(0, 0, 0, 0);
border: 0;
}
既然添加了label标签,又添加.sr-only类名把label给隐藏起来,是不是多此一举???但这恰恰是bootstrap框架的一个优点,如果没有为输入控件设置label,屏幕阅读器将无法正确识别,同时也为残障人员进行了一定的考虑
水平表单
在bootstrap中实现水平表单效果需满足下面两个条件:
1、在form元素上使用类名.form-horizontal
2、配合bootstrap框架的网格系统(详细:详解Bootstrap网格系统)
在form元素使用类名.form-horizontal主要有以下几个作用:
1、设置表单控件padding和margin值
2、改变.from-group的表现形式,类似于网格系统的row
css源码:
.form-horizontal .control-label,
.form-horizontal .radio,
.form-horizontal .checkbox,
.form-horizontal .radio-inline,
.form-horizontal .checkbox-inline {
padding-top: 7px;
margin-top: 0;
margin-bottom: 0;
}
.form-horizontal .radio,
.form-horizontal .checkbox {
min-height: 27px;
}
.form-horizontal .form-group {
margin-right: -15px;
margin-left: -15px;
}
.form-horizontal .form-control-static {
padding-top: 7px;
}
@media (min-width: 768px) {
.form-horizontal .control-label {
text-align: right;
  }
}
.form-horizontal .has-feedback .form-control-feedback {
top: 0;
right: 15px;
}
例子:
<form class="form-horizontal">
        <div class="form-group">
            <label class="col-sm-2 control-label">邮箱</label>
            <div class="col-sm-10">
                <input type="email" class="form-control" placeholder="请输入邮箱">
            </div>
        </div>
        <div class="form-group">
            <label class="col-sm-2 control-label">密码</label>
            <div class="col-sm-10">
                <input type="password" class="form-control" placeholder="请输入密码">
            </div>
        </div>
        <div class="form-group">
            <div class="col-sm-10 col-sm-offset-2">
                <label>
                    <input type="checkbox">记住密码
                </label>
            </div>
        </div>
        <div class="form-group">
            <div class="col-sm-10 col-sm-offset-2">
                <button class="btn btn-default">进入邮箱</button>
            </div>

        </div>
    </form>
效果如下:

单行输入框
在bootstrap中使用input时也必须添加type类型,如果没有指定type类型,将无法得到正确的样式,因为bootstrap框架都是通过input[type=”?”]的形式来定义样式的,如:text类型,对应得是input[type=”text”]
为了让控件在各种表单风格中样式不错,需要添加类名.form-control
cd3acb39d5099c5f8af3928f3dee6a3c
    1d62a832781cd1c2cbae5beb67379498
        7292965e2097cdfb59873efcaa2347a4
    16b28748ea4df4d9c2150843fecfba68
f5a47148e367a6035fd7a2faa965022e
下拉选择框select
多行选择设置multiple属性的值为multiple
<form role="form">
<div class="form-group">
  <select class="form-control">
    <option>1</option>
    <option>2</option>
    <option>3</option>
    <option>4</option>
    <option>5</option>
  </select>
  </div>
  <div class="form-group">
  <select multiple class="form-control">
    <option>1</option>
    <option>2</option>
    <option>3</option>
    <option>4</option>
    <option>5</option>
  </select>
</div>
</form>
文本域textarea
文本域和原始使用方法一样,设置rows可定义其高度,设置cols可以定义其宽度,如果textarea元素中添加了类名.form-control,则无需设置cols属性,因为bootstrap框架中.form-control样式的标的空间宽度为100%或auto
cd3acb39d5099c5f8af3928f3dee6a3c
        1d62a832781cd1c2cbae5beb67379498
            895d077dc8437ea6578ef30611e2040f40587128eee8df8f03d0b607fe983014
        16b28748ea4df4d9c2150843fecfba68
    f5a47148e367a6035fd7a2faa965022e

复选框checkbox和单选框radio
checkbox和radio与label标签配合使用会出现一些小问题(如对齐问题)
ff9c23ada1bcecdd1a0fb5d5a0f18437
        01a4bae87a05290e767d4d587a756f67
            2e1cf0710519d5598b1f0f14c36ba674
                0d8eb24ba92cc1873dd349193fd3e03f 记住密码
            8c1ecd4bb896b2264e0711597d40766c
        16b28748ea4df4d9c2150843fecfba68
        44bfa95971b4ff52d7f1290a216d962e
            2e1cf0710519d5598b1f0f14c36ba674
                ef02e8d4a54da881d08e41cd0a6baf29 喜欢
            8c1ecd4bb896b2264e0711597d40766c
        16b28748ea4df4d9c2150843fecfba68
        44bfa95971b4ff52d7f1290a216d962e
            2e1cf0710519d5598b1f0f14c36ba674
                5655c8d301501c54f5c97e33314532c3不喜欢
            8c1ecd4bb896b2264e0711597d40766c
        16b28748ea4df4d9c2150843fecfba68
    f5a47148e367a6035fd7a2faa965022e
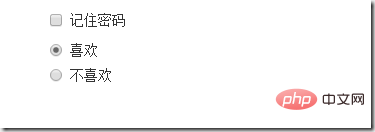
1、不管是checkbox还是radio都使用label包起来了
2、checkbox连同label标签放在一个名为.checkbox的容器内
3、radio连同label标签放在一个名为.radio的容器内,bootstrap主要借助.checkbox和.radio样式来处理复选框、单选按钮与标签的对齐方式
.radio,
.checkbox {
display: block;
min-height: 20px;
padding-left: 20px;
margin-top: 10px;
margin-bottom: 10px;
}
.radio label,
.checkbox label {
display: inline;
font-weight: normal;
cursor: pointer;
}
.radio input[type="radio"],
.radio-inline input[type="radio"],
.checkbox input[type="checkbox"],
.checkbox-inline input[type="checkbox"] {
float: left;
margin-left: -20px;
}
.radio + .radio,
.checkbox + .checkbox {
margin-top: -5px;
}
复选框和单选按钮水平排列
1、如果checkbox需要水平排列,只需要在label标签上添加类名.checkbox-inline
2、如果radio需要水平排列,只需在label标签上添加类名.radion-inline
下面是css源码:
.radio-inline,
.checkbox-inline {
display: inline-block;
padding-left: 20px;
margin-bottom: 0;
font-weight: normal;
vertical-align: middle;
cursor: pointer;
}
.radio-inline + .radio-inline,
.checkbox-inline + .checkbox-inline {
margin-top: 0;
margin-left: 10px;
}
1d62a832781cd1c2cbae5beb67379498
        d38f46b5ee69e763fbb46470fa3e40c9
            4775c82f25bd013c57bc5779eb677a32 男性
        8c1ecd4bb896b2264e0711597d40766c

        d38f46b5ee69e763fbb46470fa3e40c9
            79505eab8d853ebadc460ca44ca39bfa 女性
        8c1ecd4bb896b2264e0711597d40766c

        d38f46b5ee69e763fbb46470fa3e40c9
            c1e13ac5eed1feea2abebb3c0d5f2121中性
        8c1ecd4bb896b2264e0711597d40766c
    16b28748ea4df4d9c2150843fecfba68

表单控件状态
1、焦点状态:
焦点状态是通过伪类:focus来实现的,bootstrap表单控件中的焦点状态删除了outline的默认样式,重新添加阴影效果,下面是css源码:
.form-control:focus {
border-color: #66afe9;
outline: 0;
  -webkit-box-shadow: inset 0 1px 1pxrgba(0,0,0,.075), 0 0 8px rgba(102, 175, 233, .6);
box-shadow: inset 0 1px 1pxrgba(0,0,0,.075), 0 0 8px rgba(102, 175, 233, .6);
}
从源码中可以看出,要让控件在焦点状态下有上面的样式效果需要给控件添加类名.form-control
<form class="form-horizontal">
        <div class="form-group ">
            <div class="col-xs-6">
                <input type="text" class=" input-lg" placeholder="不是在焦点状态下的效果">
            </div>
            <div class="col-xs-6">
                <input type="text" class="form-control input-lg" placeholder="在焦点状态下的效果">
            </div>
        </div>
 </form>
file、radio、checkbox控件在焦点状态下的效果也与普通的input控件不太一样,下面是源码
input[type="file"]:focus,
input[type="radio"]:focus,
input[type="checkbox"]:focus {
outline: thin dotted;
outline: 5px auto -webkit-focus-ring-color;
outline-offset: -2px;
}
2、禁用状态:
在相应得表单控件上添加属性disabled即可,下面是css源码:
.form-control[disabled],
.form-control[readonly],
fieldset[disabled] .form-control {
cursor: not-allowed;
background-color: #eee;
opacity: 1;
}
input[type="radio"][disabled],
input[type="checkbox"][disabled],
.radio[disabled],
.radio-inline[disabled],
.checkbox[disabled],
.checkbox-inline[disabled],
fieldset[disabled] input[type="radio"],
fieldset[disabled] input[type="checkbox"],
fieldset[disabled] .radio,
fieldset[disabled] .radio-inline,
fieldset[disabled] .checkbox,
fieldset[disabled] .checkbox-inline {
cursor: not-allowed;
}例子:
dac94bebb272fc72016fc47e23ca99ec

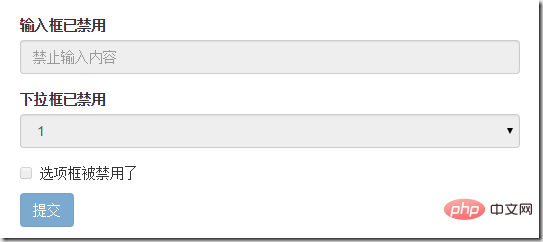
如果fieldset设置了disabled属性,整个域都会处于被禁用状态
例子:
<form role="form">
        <fieldset disabled>
            <div class="form-group">
                <label> 输入框已禁用</label>
                <input type="text" class="form-control" placeholder="禁止输入内容">
            </div>
            <div class="form-group">
                <label>下拉框已禁用</label>
                <select class="form-control">
                    <option>1</option>
                    <option>2</option>
                    <option>3</option>
                    <option>4</option>
                </select>
            </div>
            <div class="checkbox">
              <label >
                  <input type="checkbox">选项框被禁用了
              </label>
            </div>
            <button type="submit" class="btn btn-primary">提交</button>
        </fieldset>
</form>
效果如下:(鼠标移上去的时候出现禁用的图标,这里是直接截的图看不到这个效果)
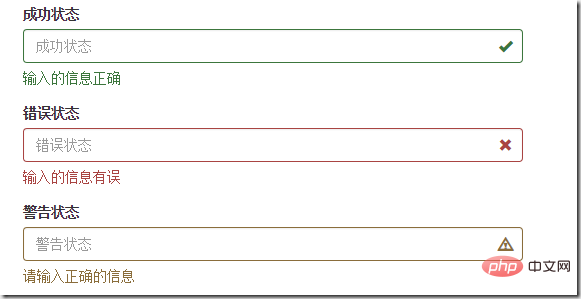
3、验证状态
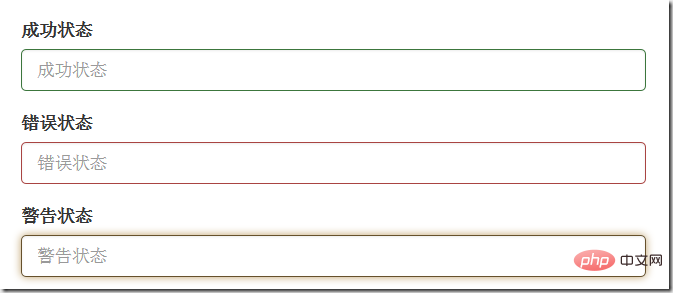
bootstrap提供下面这几种效果:
1)、.has-warning:警告状态 黄色
2)、 .has-error :错误状态 红色
3)、 .has-success:成功状态 绿色
使用的时候只需在form-group容器上对应添加状态类名,三种状态下效果都是一样的,只是颜色不一样而已
例子:
<form>
        <div class="form-group has-success">
          <label>成功状态</label>
          <input type="text" class="form-control" placeholder="成功状态">
        </div>
        <div class="form-group has-error">
            <label>错误状态</label>
            <input type="text" class="form-control" placeholder="错误状态">
        </div>
        <div class="form-group has-warning">
            <label>警告状态</label>
            <input type="text" class="form-control" placeholder="警告状态">
        </div>
    </form>
效果如下:
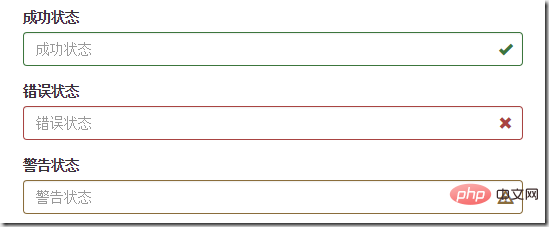
有时候,在表单验证的时不同的状态会提供不同的icon,如果要在对应的状态下显示icon出来,只需要在对应的状态下添加类名.has-feedback ,注意它要和.has-error,.has-success,.has-warning一起使用。
bootstrap的小图标都是使用@font-face来制作的。如:009bdef44fc7c129b3e76dd942760f8e54bdf357c58b8a65c66d7c19c8e4d114
例子:
<form>
        <div class="form-group has-success has-feedback">
            <label> 成功状态</label>
            <input type="text" class="form-control" placeholder="成功状态">
            <span class="glyphicon glyphicon-ok form-control-feedback"></span>
        </div>
        <div class="form-group has-error has-feedback">
            <label>错误状态</label>
            <input type="text" class="form-control" placeholder="错误状态">
            <span class="glyphicon glyphicon-remove form-control-feedback"></span>
        </div>
        <div class="form-group has-warning has-feedback">
            <label>警告状态</label>
            <input type="text" class="form-control" placeholder="警告状态">
            <span class="glyphicon glyphicon-warning-sign form-control-feedback"></span>
        </div>
</form>
效果如下:
表单提示信息
一般在制作表单验证时,需要提供不同的提示信息,在bootstrap框架中使用.help-block,将提示信息以块状显示,并且显示在控件底部
下面是css源码:
.help-block {
display: block;
margin-top: 5px;
margin-bottom: 10px;
color: #737373;
}
例子:
<form>
        <div class="form-group has-success has-feedback">
            <label>成功状态</label>
            <input type="text" class="form-control" placeholder="成功状态">
            <span class="help-block">输入的信息正确</span>
            <span class="glyphicon glyphicon-ok form-control-feedback"></span>
        </div>
        <div class="form-group has-error has-feedback">
            <label>错误状态</label>
            <input type="text" class="form-control" placeholder="错误状态">
            <span class="help-block">输入的信息有误</span>
            <span class="glyphicon glyphicon-remove form-control-feedback"></span>
        </div>
        <div class="form-group has-warning has-feedback">
            <label>警告状态</label>
            <input type="text" class="form-control" placeholder="警告状态">
            <span class="help-block">请输入正确的信息</span>
            <span class="glyphicon glyphicon-warning-sign form-control-feedback"></span>
        </div>
 </form>
效果如下:
如果不想为bootstrap.css增加自己的代码,而且设计又有这种需要,可以借助bootstrap的网格系统,例如:
<form role="form">
  <div class="form-group">
    <label class="control-label" for="inputSuccess1">成功状态</label>
    <div class="row">
      <div class="col-xs-6">
        <input type="text" class="form-control" id="inputSuccess1" placeholder="成功状态" >
      </div>
       <span class="col-xs-6 help-block">你输入的信息是正确的</span>
    </div>
  </div>
</form>更多编程相关知识,请访问:编程视频!!
以上是Bootstrap学习之详解常用表单组件的详细内容。更多信息请关注PHP中文网其他相关文章!
 Bootstrap和React:结合Web开发框架Apr 28, 2025 am 12:08 AM
结合Bootstrap和React的原因是它们的互补性:1.Bootstrap提供预定义的样式和组件,简化UI设计;2.React通过组件化开发和虚拟DOM提升效率和性能。结合使用可以享受快速UI构建和复杂交互管理。
 从零到bootstrap:快速入门Apr 27, 2025 am 12:07 AM
Bootstrap是一个基于HTML、CSS和JavaScript的开源前端框架,旨在帮助开发者快速构建响应式网站。它的设计理念是“移动优先”,提供了丰富的预定义组件和工具,如网格系统、按钮、表单、导航栏等,简化前端开发过程,提高开发效率,并确保网站的响应性和一致性。使用Bootstrap可以从一个简单的页面开始,逐步添加高级组件如卡片和模态框,优化性能的最佳实践包括自定义Bootstrap、使用CDN和避免过度使用类名。
 React和Bootstrap:增强用户界面设计Apr 26, 2025 am 12:18 AM
React和Bootstrap可以无缝集成来提升用户界面设计。1)安装依赖包:npminstallbootstrapreact-bootstrap。2)导入CSS文件:import'bootstrap/dist/css/bootstrap.min.css'。3)使用Bootstrap组件,如按钮和导航栏。通过这种结合,开发者可以利用React的灵活性和Bootstrap的样式库,创建美观且高效的用户界面。
 将引导程序集成到React:实用指南Apr 25, 2025 am 12:04 AM
将Bootstrap集成到React项目中的步骤包括:1.安装Bootstrap包,2.导入CSS文件,3.使用Bootstrap类名样式化元素,4.使用React-Bootstrap或reactstrap库来使用Bootstrap的JavaScript组件。这种集成利用React的组件化和Bootstrap的样式系统,实现高效的UI开发。
 Bootstrap是用什么?一个实用的解释Apr 24, 2025 am 12:16 AM
bootstrapisapowerfulflameworkthatsimplifiesCreatingingResponsive,移动 - firstwebsites.itoffers.itoffers:1)AgridSystemforadaptableBableLayouts,2)2)pre-styledlementslikeButtonslikeButtonSandForms和3)JavaScriptCompriptcomponcomponentsSuchcaroSelSuselforEnhanceSuch forenhanceTinteractivity。
 引导程序:从布局到组件Apr 23, 2025 am 12:06 AM
Bootstrap是一个由Twitter开发的前端框架,集成了HTML、CSS和JavaScript,帮助开发者快速构建响应式网站。其核心功能包括:栅格系统与布局:基于12列的设计,使用flexbox布局,支持不同设备尺寸的响应式页面。组件与样式:提供丰富的组件库,如按钮、模态框等,通过添加类名即可实现美观效果。工作原理:依赖CSS和JavaScript,CSS使用LESS或SASS预处理器,JavaScript依赖jQuery,实现交互和动态效果。通过这些功能,Bootstrap大大提升了开发
 什么是bootstrap?初学者的介绍Apr 22, 2025 am 12:07 AM
BootstrapisafreeCSSframeworkthatsimplifieswebdevelopmentbyprovidingpre-styledcomponentsandJavaScriptplugins.It'sidealforcreatingresponsive,mobile-firstwebsites,offeringaflexiblegridsystemforlayoutsandasupportivecommunityforlearningandcustomization.
 Bootstrap Demystified:一个简单的解释Apr 21, 2025 am 12:13 AM
Bootstrapisafree,open-sourceCSSframeworkthathelpscreateresponsive,mobile-firstwebsites.1)Itoffersagridsystemforlayoutflexibility,2)includespre-styledcomponentsforquickdesign,and3)ishighlycustomizabletoavoidgenericlooks,butrequiresunderstandingCSStoop


热AI工具

Undresser.AI Undress
人工智能驱动的应用程序,用于创建逼真的裸体照片

AI Clothes Remover
用于从照片中去除衣服的在线人工智能工具。

Undress AI Tool
免费脱衣服图片

Clothoff.io
AI脱衣机

Video Face Swap
使用我们完全免费的人工智能换脸工具轻松在任何视频中换脸!

热门文章

热工具

适用于 Eclipse 的 SAP NetWeaver 服务器适配器
将Eclipse与SAP NetWeaver应用服务器集成。

SublimeText3 英文版
推荐:为Win版本,支持代码提示!

螳螂BT
Mantis是一个易于部署的基于Web的缺陷跟踪工具,用于帮助产品缺陷跟踪。它需要PHP、MySQL和一个Web服务器。请查看我们的演示和托管服务。

DVWA
Damn Vulnerable Web App (DVWA) 是一个PHP/MySQL的Web应用程序,非常容易受到攻击。它的主要目标是成为安全专业人员在合法环境中测试自己的技能和工具的辅助工具,帮助Web开发人员更好地理解保护Web应用程序的过程,并帮助教师/学生在课堂环境中教授/学习Web应用程序安全。DVWA的目标是通过简单直接的界面练习一些最常见的Web漏洞,难度各不相同。请注意,该软件中

SecLists
SecLists是最终安全测试人员的伙伴。它是一个包含各种类型列表的集合,这些列表在安全评估过程中经常使用,都在一个地方。SecLists通过方便地提供安全测试人员可能需要的所有列表,帮助提高安全测试的效率和生产力。列表类型包括用户名、密码、URL、模糊测试有效载荷、敏感数据模式、Web shell等等。测试人员只需将此存储库拉到新的测试机上,他就可以访问到所需的每种类型的列表。


