uniapp如何实现自定义设置导航栏
- coldplay.xixi原创
- 2020-12-16 17:10:529583浏览
uniapp实现自定义设置导航栏的方法:使用一个view,代码为【43f2367825c6e73bc5325670c50d2dd7,e88e63bd5420b02859605c633e78dbddde5f4c1163741e920c998275338d29b2】。

本教程操作环境:windows7系统、uni-app2.5.1版本,该方法适用于所有品牌电脑。
推荐(免费):uni-app开发教程
uniapp实现自定义设置导航栏的方法:
在单页面关闭默认的导航栏
"navigationStyle": "custom"
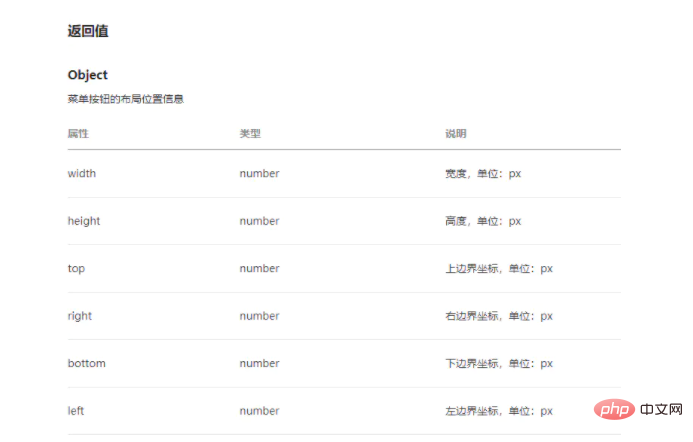
官方获取的参数是

参数详解

实现原理
用一个view,padding-top=top;height=height;padding-bottom=给一个自己喜欢的数值+rpx
实现的代码
<template>
<view>
<view :style="'height:' + demo.height + 'px;' + 'padding-top:' + demo.top + 'px;padding-bottom:10rpx'">
<view :style="'top:' + demo.top + 'px'">
<view class="iconfont icon-xiaoxi"></view>
</view>
测试辣
</view>
</view>
</template>
<script>
export default {
data () {
return {
demo: {
top: 0,
height: 0
}
}
},
created () {
const demo = uni.getMenuButtonBoundingClientRect()
this.demo.top = demo.top
this.demo.height = demo.height
}
}
</script>
<style>
.demo{
position: relative;
display: flex;
align-items: center;
justify-content: center;
background: #fff;
font-size: 26rpx;
.left{
float: left;
position: absolute;
width: max-content;
height: max-content;
top: 0;
bottom: 0;
left: 20rpx;
margin: auto;
.iconfont{
color: #3C3C3C;
}
}
}
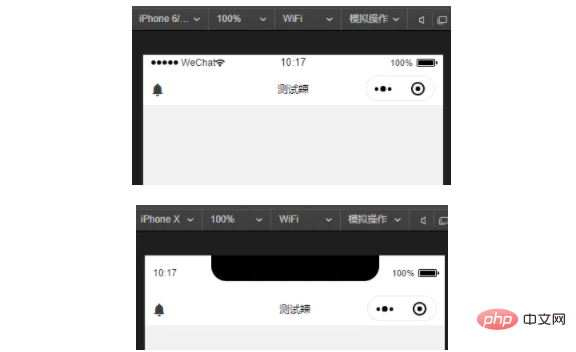
</style>效果

相关免费学习推荐:php编程(视频)
以上是uniapp如何实现自定义设置导航栏的详细内容。更多信息请关注PHP中文网其他相关文章!
声明:
本文内容由网友自发贡献,版权归原作者所有,本站不承担相应法律责任。如您发现有涉嫌抄袭侵权的内容,请联系admin@php.cn
上一篇:uniapp跳转无效怎么办下一篇:uniapp怎么去掉标题栏

