官方文档:http://vuejs.github.io/vue-validator/zh-cn/index.html
github项目地址:https://github.com/vuejs/vue-validator
单独使用vue-validator的方法见官方文档,本文结合vue-router使用。
安装验证器
不添加自定义验证器或者无需全局使用的公用验证器,在main.js中安装验证器,使用 CommonJS 模块规范, 需要显式的使用 Vue.use() 安装验证器组件。
import Validator from 'vue-validator'
Vue.use(Validator)
与 vue-router 同时使用,必须在调用 router#map, router#start 等实例方法前安装验证。
若要自定义验证器,建一个js文件,在该文件中安装验证器组件。例如:validation.js
import Vue from 'vue'
import Validator from 'vue-validator'
Vue.use(Validator)
//自定义验证器
自定义验证器
官方提供的api如下
input[type="text"]
input[type="radio"]
input[type="checkbox"]
input[type="number"]
input[type="password"]
input[type="email"]
input[type="tel"]
input[type="url"]
select
textarea
但是以上的不一定满足我们的需求,这时就需要用到另一个全局api,用于注册和获取全局验证器。
Vue.validator( id, [definition] )
示例 定义validation.js 内容如下
import Vue from 'vue'
import Validator from 'vue-validator'
Vue.use(Validator)
//自定义验证器
//添加一个简单的手机号验证
//匹配0-9之间的数字,并且长度是11位
Vue.validator('tel', function (val) {
  return /^[0-9]{11}$/.test(val)
});
//添加一个密码验证
//匹配6-20位的任何字类字符,包括下划线。与“[A-Za-z0-9_]”等效。
Vue.validator('passw', function (val) {
  return /^(\w){6,20}$/.test(val)
});
使用验证器
验证器语法
<validator name="validation">
<input type="text" v-model='comment' id='comment'
v-validate:comment="{ minlength: 3, maxlength: 15 }">
<div>
<span v-show="$validation.comment.minlength">不得少于3个字符</span>
<span v-show="$validation.comment.maxlength">不得大于15个字符</span>
</div>
</validator>默认情况下,vue-validator 会根据 validator 和 v-validate 指令自动进行验证。然而有时候我们需要关闭自动验证,在有需要时手动触发验证。如果你不需要自动验证,可以通过 initial 属性或 v-validate 验证规则来关闭自动验证。
如下:
<validator name="validation">
<input type="text" v-model='comment' id='comment'
v-validate:comment="{ minlength: 3, maxlength: 15 }"
detect-change="off" initial='off'>
<div>
<span v-show="$validation.comment.minlength">不得少于3个字符</span>
<span v-show="$validation.comment.maxlength">不得大于15个字符</span>
</div>
</validator>Terminal 指令问题
<validator name="test_validator">
<!-- @invalid:valid的逆 ,表示验证不通过 -->
<input @invalid="passwInvalid" @valid="passwok"
type="password" v-model='passw' id='passw' v-validate:passw="['passw']"
detect-change="off" initial='off' placeholder='请输入密码'>
<input @invalid="passwInvalid" @valid="passwok"
type="password" v-model='passw2' id='passw2' v-validate:passw2="['passw']"
detect-change="off" initial='off' placeholder='请输入密码'>
</validator>
<script>
//若是在main.js中导入 无需再次导入
//此处导入的是上面代码的validation.js
import validator from '../validator/validation'
export default{
data(){
return{
comment:'',
passw:'',
passw2:''
}
},
methods:{
passwInvalid(){
alert('只能输入6-20个字母、数字、下划线');
},
passwok(){
//alert('验证码符合规范')
}
}
}
</script>示例:用户注册验证
用了一个组件来显示提示信息
toast.vue
<template>
<div v-show="toastshow" transition="toast"
class="toast font-normal">
{{toasttext}}
</div>
</template>
<script>
export default{
props:{
//是否显示提示
toastshow:{
type:Boolean,
required: false,
default:function(){
return false;
}
},
//提示的内容
toasttext:{
type:String,
required: false,
default:function(){
return 'no message';
}
},
//显示的时间
duration: {
type: Number,
default:3000,//默认3秒
required:false
}
},
ready() {
},
watch:{
toastshow(val){
if (this._timeout) clearTimeout(this._timeout)
if (val && !!this.duration) {
this._timeout = setTimeout(()=>
this.toastshow = false, this.duration)
}
}
}
}
</script>
<style>
.toast{
position:absolute;
left:50%;
margin-left:-25%;
bottom:30px;
display:block;
width:200px;
height:auto;
text-align:center;
color:white;
background-color:rgba(0,0,0,0.5);
border-radius:10px;
z-index:10;
transform:scale(1);
padding:5px;
}
.toast-transition{
transition: all .3s ease;
}
.toast-enter{
opacity:0;
transform:scale(0.1);
}
.toast-leave{
opacity:0;
transform:scale(0.1);
}
</style>注册用户:假如我们需要填写手机号和输入两次密码
<template>
<div class='register-box'>
<!-- 组件:用于显示提示信息 -->
<Toast :toastshow.sync="toastshow" :toasttext="toasttext"></Toast>
<validator name="validation_register1">
<div class='register1'>
<div class='pd05'>
<input @invalid="telonInvalid" initial="off"
detect-change="off" v-model="telphone" id="telphone" type="tel"
class='phone-number' v-validate:telphone="['tel']"
placeholder='请输入手机号码'>
</div>
<div class='pd05'>
<input @invalid="passwInvalid" v-model="passw1" initial="off"
detect-change="off" id="passw1" type="password"
v-validate:passw1="['passw']"class='password-number'placeholder='请输入密码'>
</div>
<div class='pd05'>
<input @invalid="passwInvalid" v-model="passw2"
initial="off" detect-change="off" id="passw2" type="password"
v-validate:passw2="['passw']" class='password-number'
placeholder='请输入密码'>
</div>
<a class='greenBtn' v-on:click='register_user()'>下一步</a>
</div>
</validator>
</div>
</template>
<script>
//导入validation.js 此处的validation.js就是上文中validation.js的内容
import validator from '../validator/validation';
//导入显示提示信息的组件
import Toast from '../components/toast.vue';
export default{
components: {
//注册组件
Toast
},
data(){
return{
telphone:'',//电话号码
toastshow:false,//默认不现实提示信息
toasttext:'',//提示信息内容
passw1:'',//首次输入密码
passw2:''//再次输入密码
}
},
methods:{
//手机号验证失败时执行的方法
telonInvalid(){
//设置提示信息内容
this.$set('toasttext','手机不正确');
//显示提示信息组件
this.$set('toastshow',true);
},
//密码验证失败时执行的方法
passwInvalid(){
this.$set('toasttext','只能输入6-20个字母、数字、下划线');
this.$set('toastshow',true);
},
register_user(){
var that = this;
var telephones = that.$get('telphone');
var pw1 = that.$get('passw1');
var pw2 = that.$get('passw2')
that.$validate(true, function () {
if (that.$validation_register1.invalid) {
//验证无效
that.$set('toasttext','请完善表单');
that.$set('toastshow',true);
}else{
that.$set('toasttext','验证通过');
that.$set('toastshow',true);
//验证通过做注册请求
/*that.$http.post('http://192.168.30.235:9999/rest/user/register',
'account':telephones,'pwd':pw1,'pwd2':pw2}).then(function(data){
if(data.data.code == '0'){
that.$set('toasttext','注册成功');
that.$set('toastshow',true);
}else{
that.$set('toasttext','注册失败');
that.$set('toastshow',true);
}
},function(error){
//显示返回的错误信息
that.$set('toasttext',String(error.status));
that.$set('toastshow',true);
})*/
}
})
}
}
}
</script>
<style>
.register-box{
padding: 10px;
}
.pd05{
margin-top: 5px;
}
.greenBtn{
width: 173px;
height: 30px;
text-align: center;
line-height: 30px;
background: red;
color: #fff;
margin-top: 5px;
}
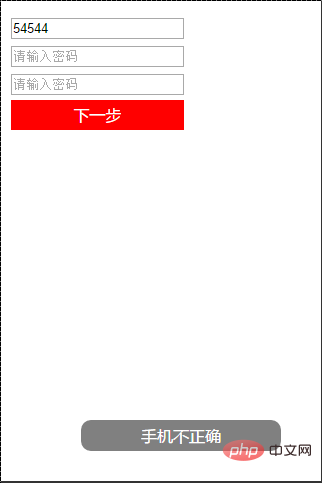
</style>若点击下一步,会提示“请完善表单”,因为验证不通过;若是文本框获得焦点后失去焦点则会提示相应的错误信息;若内容填写正确,则会提示验证通过并发送相应的请求。
效果如图

相关推荐:
更多编程相关知识,请访问:编程入门!!
以上是详解vue验证器(vue-validator)的使用的详细内容。更多信息请关注PHP中文网其他相关文章!
 前端中的vue.js:现实世界的应用程序和示例Apr 11, 2025 am 12:12 AM
Vue.js是一种渐进式JavaScript框架,适用于构建复杂的用户界面。1)其核心概念包括响应式数据、组件化和虚拟DOM。2)实际应用中,可以通过构建Todo应用和集成VueRouter来展示其功能。3)调试时,建议使用VueDevtools和console.log。4)性能优化可通过v-if/v-show、列表渲染优化和异步加载组件等实现。
 vue.js和React:了解关键差异Apr 10, 2025 am 09:26 AM
Vue.js适合小型到中型项目,而React更适用于大型、复杂应用。1.Vue.js的响应式系统通过依赖追踪自动更新DOM,易于管理数据变化。2.React采用单向数据流,数据从父组件流向子组件,提供明确的数据流向和易于调试的结构。
 vue.js vs.反应:特定于项目的考虑因素Apr 09, 2025 am 12:01 AM
Vue.js适合中小型项目和快速迭代,React适用于大型复杂应用。1)Vue.js易于上手,适用于团队经验不足或项目规模较小的情况。2)React的生态系统更丰富,适合有高性能需求和复杂功能需求的项目。
 vue怎么a标签跳转Apr 08, 2025 am 09:24 AM
实现 Vue 中 a 标签跳转的方法包括:HTML 模板中使用 a 标签指定 href 属性。使用 Vue 路由的 router-link 组件。使用 JavaScript 的 this.$router.push() 方法。可通过 query 参数传递参数,并在 router 选项中配置路由以进行动态跳转。
 vue怎么实现组件跳转Apr 08, 2025 am 09:21 AM
Vue 中实现组件跳转有以下方法:使用 router-link 和 <router-view> 组件进行超链接跳转,指定 :to 属性为目标路径。直接使用 <router-view> 组件显示当前路由渲染的组件。使用 router.push() 和 router.replace() 方法进行程序化导航,前者保存历史记录,后者替换当前路由不留记录。
 vue的div怎么跳转Apr 08, 2025 am 09:18 AM
Vue 中 div 元素跳转的方法有两种:使用 Vue Router,添加 router-link 组件。添加 @click 事件监听器,调用 this.$router.push() 方法跳转。
 vue引入方式怎么跳转Apr 08, 2025 am 09:12 AM
Vue.js提供了三种跳转方式:原生 JavaScript API:使用 window.location.href 进行跳转。Vue Router:使用 <router-link> 标签或 this.$router.push() 方法进行跳转。VueX:通过 dispatch action 或 commit mutation 来触发路由跳转。


热AI工具

Undresser.AI Undress
人工智能驱动的应用程序,用于创建逼真的裸体照片

AI Clothes Remover
用于从照片中去除衣服的在线人工智能工具。

Undress AI Tool
免费脱衣服图片

Clothoff.io
AI脱衣机

AI Hentai Generator
免费生成ai无尽的。

热门文章

热工具

MinGW - 适用于 Windows 的极简 GNU
这个项目正在迁移到osdn.net/projects/mingw的过程中,你可以继续在那里关注我们。MinGW:GNU编译器集合(GCC)的本地Windows移植版本,可自由分发的导入库和用于构建本地Windows应用程序的头文件;包括对MSVC运行时的扩展,以支持C99功能。MinGW的所有软件都可以在64位Windows平台上运行。

PhpStorm Mac 版本
最新(2018.2.1 )专业的PHP集成开发工具

SublimeText3汉化版
中文版,非常好用

SublimeText3 英文版
推荐:为Win版本,支持代码提示!

禅工作室 13.0.1
功能强大的PHP集成开发环境


